


Creating our first optimized DCGAN
Last Updated on February 15, 2023 by Editorial Team
Author(s): Pere Martra
Originally published on Towards AI.
The following article is the first in a series that will discuss generative adversarial networks. Let’s get started creating GANs and using ChatGPT to compare our models to their creations.
Image generated by the author using Dall-E
In this first article, we will use one of the simplest Datasets, made up of 28 x 28 images of handwritten numbers in grayscale. I suppose you all know that it is the very famous MNIST Dataset.
While we are looking at the theory, we will see the code needed to make and train the GAN.
Even though this is our first GAN, we will use several of the recommendations launched by Soumith Chintala, known as GAN Hacks. Thus, we will create a GAN correctly optimized for the Dataset used.
We will create a complete GAN model after seeing the theory and the separate code of each step. We will explain the reasons for the decisions made and use part of the recommendations that we have seen, which have already been established as a standard.
I would like to emphasize that although GANs are usually used to generate images, they can also be used in other fields. For example, text or sound could be generated. We will see GANs creating this type of content in more advanced articles.
The code is available at Kaggle:
GAN Tutorial. First DCGAN using TensorFlow.
And also at Google Colab.
How does a GAN work?
A GAN is used to train a generative model, that is, to produce content. It consists of two models that work together. Once trained, the generative model can be detached from the GAN and used on its own.
The types of models we can find in a GAN are:
Generator Model: It is responsible for producing the images, or the content, that we want to be generated by the GAN.
Discriminator model. Decide when an image is true or false.
GAN model. The sum of the two models.
Currently, we have a model that generates images and another that decides whether they are real or not.
These models must be used together until the generator model can make images that deceive the discriminator, and it can’t tell the real ones from the ones that were made up.
How does the GAN Generator model work?
Like any model, it transforms an input into an output. In this case, the output will be a 28×28 grayscale image since we are going to use the well-known MNIST dataset for our first GAN.
As input, the generator will receive random data, which we could call noise. These data take the form of a vector following a Gaussian distribution. In simple terms, a vector of randomly generated numbers. It isn’t an image, and it doesn’t need to be.
test_noise = tf.random.normal([16, noise_input])
With this line, we will be creating a vector with 16 x noise_input of random values that follow a Gaussian distribution.
For an input of size noise_input, the model should produce an output of 28 x 28 x 1. The 1 is because being a grayscale image, it does not have the color depth. The transformation will require two main actions: make sense of the numbers and scale them because we need more values than we have.
Let’s see the simple way to create the first layers of the builder:
tf.keras.Layers.Dense(128 * 7 * 7, input_dim=noise_input),
tf.keras.layers.Reshape([7, 7, 128])
In the first, the nodes of the dense layer are fed with the input noise. The second layer changes the data shape in order to make it easier to transform so that it reaches the output of the last layer with the shape of the image.
As the output of the model, we want to obtain a 28×28 image. For now, after these layers, we have a 7×7 shape with 128 features. We will have to upsample to go from 77 to 14×14.
The easiest way to do upsampling would be to use an Upsampling2D layer followed by a Convolutional layer. However, although it would be sufficient for our model, it is much more powerful and optimal to use a Conv2DTranspose layer. In our model, we are going to use a Conv2dTranspose layer directly.
So, our model would continue with the layer:
tf.keras.layers.Conv2DTranspose(64, kernel_size=4, strides=2, padding="SAME",
                                 activation=keras.layers.LeakyReLU(alpha=0.2))
As you can see, Conv2DTranspose is a powerful and flexible layer that receives a multitude of parameters. Most of the parameters are shared with a Convolutional layer and behave in the same way. In this case, what matters most to us is the number of strides.
Putting a 2 on the strides, which could also be written as (2, 2), doubles the size of the output, giving us 14×14 instead of 7×7. The size of the kernel is recommended to keep it as a factor of the strides, so I have set it to 4.
To highlight the use of LeakyRelu activation. This activation, unlike a standard Relu, allows negative values. Instead of adjusting any negative value to 0, it will do so by multiplying the alpha * value. That is, a negative value of -2 in our case would be -2 * 0.2 = -0. 4
With which the passage of information through the network is smoother since negative values are not cut off so heavily. The recommended value to use as alpha is 0.2.
This recommendation, along with many others that we will see, are known as GAN HACK’s, and were presented by Soumith Chintala in 2016: https://github.com/soumith/ganhacks
To achieve an output size of 28×28, another Conv2DTranspose layer is needed to perform another upsampling. This layer will be the last in the model, so we have to make sure that its output is 28 × 28 × 1. That is, exactly the format of the MNIST dataset images.
keras.layers.Conv2DTranspose(1, kernel_size=4, strides=2,
  padding="SAME", activation='tanh'),
Another recommendation is to use the tanh activator on the last layer of the model. It restricts the output of the layer to a range of values between 0 and 1. Its gradients are also more stable than a sigmoid activator (another recommendation), and can help improve speed and stability.
Regardless, we have to believe these explanations since they have been empirically verified, and the documentation is never entirely conclusive. But in this case, the result obtained with tanh is excellent, much better than with sigmoid. I encourage you to try it!
Now it would be time to put all the parts together to make the whole generator. Let’s see how it looks:
generator = keras.models.Sequential([
    keras.layers.Dense(7 * 7 * 128, input_shape=[noise_input],
                       activation=keras.layers.LeakyReLU(alpha=0.2)),
    keras.layers.Reshape([7, 7, 128]),
    keras.layers.BatchNormalization(),

    #First UpSample doubling the size to 14x14
    keras.layers.Conv2DTranspose(64, kernel_size=4, strides=2, padding="SAME",
                                 activation=keras.layers.LeakyReLU(alpha=0.2)),
    keras.layers.BatchNormalization(),

    #Second UpSample doubling the size to 28x28
    keras.layers.Conv2DTranspose(1, kernel_size=4, strides=2, padding="SAME",
                                 activation='tanh'),
])
As you can see, I’ve embedded two BatchNormalization layers between the Conv2DTranspose layers. Trying to smooth out the result of the different layers, also helps to improve stability and training speed. They wouldn’t be completely necessary, but I’ve gotten better results using BatchNormalization layers.
I’m aware that this is not the only possible model. Even I have serious doubts about whether or not to use some of the different variations that I have been experimenting.
One possible improvement would be to remove the activation of the Conv2DTranspose to put it in an external layer and have the BatchNormalization layer between the two.
This is what it looks like:
keras.layers.Conv2DTranspose(128, kernel_size=4, strides=2, padding="SAME"),
keras.layers.BatchNormalization()
keras.layers.LeakyRelu(0.2)
But I have not tried this combination. I’ll leave it to you. 🙂
There are hundreds of possible generators that can solve the problem. All of them should have in common a random noise input and an upsampling process until the size of the image we want to generate is achieved.
We can see the final shape of our model in the following plot:
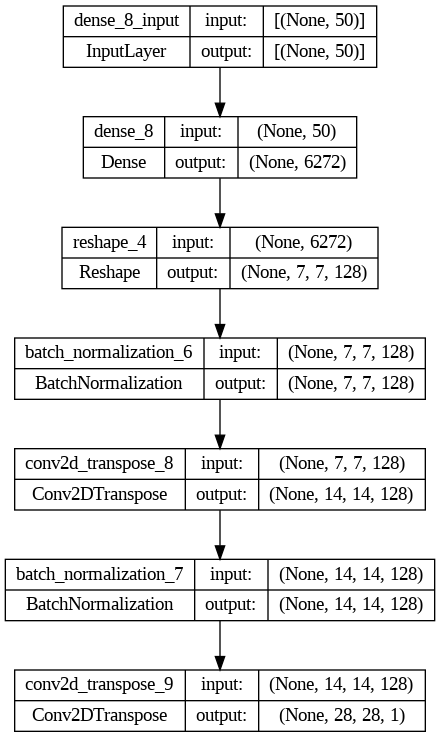 Generator Model
Notice how in each of the two layers of Conv2DTranspose the output, double the input, and the model ends with a 28×28×1 image.
How do we create the Discriminator model of our GAN?
This model is responsible for deciding if an image is true or false. Therefore, it is clear that as input, it will receive a 28×28×1 image, and as output, it will have a binary value.
discriminator = keras.models.Sequential([
    #downsizing from 28x28 to 14x14
    keras.layers.Conv2D(64, kernel_size=5, strides=2, padding="SAME",
                        activation=keras.layers.LeakyReLU(0.2),
                        input_shape=[28, 28, 1]),
    keras.layers.Dropout(0.4),

    #downsizing from 14x14 to 7x7
    keras.layers.Conv2D(64, kernel_size=3, strides=2, padding="SAME",
                        activation=keras.layers.LeakyReLU(0.2)),
    keras.layers.Dropout(0.4),
    keras.layers.Flatten(),
    keras.layers.Dense(1, activation="sigmoid")
])
The discriminator model is simpler than the generator. We reduce the input data dimensions using the convolutional layers and a stride of 2, so the input data dimensions are halved.
In the discriminator, we use several of the recommendations launched by Soumith Chintala, such as the use of LeakyRelu activators or the use of Dropout layers.
Before sending the data to the last dense layer, we flatten it with the Flatten layer. The final Dense layer uses a sigmoid activator because we are only interested in the values 0 and 1. That is, it indicates that the image is false or authentic.
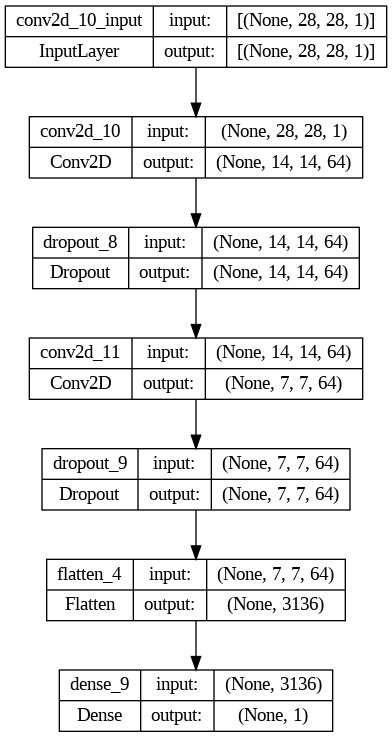 Discriminator Model
It can be seen how the Conv2D layers reduce the dimensionality of the data, contrary to what happens with the Conv2DTranspose layers.
As a model optimizer, we will use Adam, and as loss function, we will use binary_crossentropy. Both decisions are based on GAN HACKS.
optimizer = keras.optimizers.Adam(learning_rate=0.0002, beta_1=0.5)
discriminator.compile(loss='binary_crossentropy', optimizer=optimizer,
  metrics=['accuracy'])
Training the GAN.
We have created two separate models. One generates images from noise, and the other can identify when an image is real or not. The Generator is incapable of producing anything that even resembles what we want, nor is the discriminator capable of knowing when an image is real or not. The two models must be trained, and we are going to do it together.
The first thing we have to do is put them together in a single model.
gan = keras.models.Sequential([generator, discriminator])
optimizer = keras.optimizers.Adam(learning_rate=0.0002, beta_1=0.5)
gan.compile(loss="binary_crossentropy", optimizer=optimizer)
For the general model, we will use the optimizer and the loss function that we have used in the Discriminator. Following the same recommendations.
We will train the two models together in a function. The steps would be:
- We create a loop to execute the necessary epochs. Within each epoch, the steps for each batch of images is executed. In each step, the discriminator and the generator are trained.
- We train the discriminator with a set of images made up of real images from the Dataset and fake images created by the generator. The two types of images will go with their corresponding label, 0 for fake images and 1 for real ones.
- We train the generator. Passing a set of false images, with true image labels, to the full model of the GAN. So that the discriminator does not update its weights with this false information, it is indicated that its layers are not trainable.
Let’s see the code to train the discriminator.
            # Training the discriminator
            # create noise
            noise = tf.random.normal(shape=[batch_size, random_normal_dimensions])

            # send the noise to the generator to create fake images.
            fake_images = generator(noise)

            # creating labels: 0 for fake images, 1 for reals.
            mixed_images = tf.concat([fake_images, real_images], axis=0)
            discriminator_labels = tf.constant([[0.]] * batch_size + [[1.]] * batch_size)

            # Rhe disciminator layers must be trainables
            discriminator.trainable = True

            # call train_on_batch of the discriminator model.
            discriminator.train_on_batch(mixed_images, discriminator_labels)
Since we want to train the Discriminator, it is essential that we make sure that its layers can be trained, so we put the value True in its trainable attribute before the call to train_on_batch. In the code, we can see all the steps to make a call to the discriminator.
Let’s look at the code used within the epoch to train the generator:
            # Training the generator
            # Create the noise to feed the Generator.
            noise = tf.random.normal(shape=[batch_size, random_normal_dimensions])

            # All the images must have a label of true image.
            generator_labels = tf.constant([[1.]] * batch_size)

            # Freeze the discrmininator Layers. .
            discriminator.trainable = False

            # Train the GAP using the noise.
            gan.train_on_batch(noise, generator_labels)
We pass the generated noise and the labels to the GAN so that by executing the generator and the discriminator, it adjusts the weights of the generator to produce better-quality images at each step.
The generator produces a fake image that is labeled as a real image. The discriminator returns a value of 0 if it thinks the image is fake or a value of 1 if it thinks the image is real. In the early epochs, the discriminator will be able to identify all false images. As a result, the generator will adjust the weights as much as possible.
Let’s see the complete code of the GAN training function:
def train_gan(gan, dataset, random_normal_dimensions, n_epochs=30):

    #WWe obtained the generator and discriminator from the layers of the GAN model.
    generator, discriminator = gan.layers

    for epoch in range(n_epochs):
        print("Epoch {}/{}".format(epoch + 1, n_epochs))

        #The data is organized into batches when we load it.
        for real_images in dataset:
            # infer batch size from the training batch
            batch_size = real_images.shape[0]

            # Train the discriminator
            # create the random gaussian noise
            noise = tf.random.normal(shape=[batch_size, random_normal_dimensions])

            # Generate fake images from the noise
            fake_images = generator(noise)

            # create a list by concatenating the fake images with the real ones
            mixed_images = tf.concat([fake_images, real_images], axis=0)

            # Create the labels for the discriminator
            # 0 for the fake images
            # 1 for the real images
            discriminator_labels = tf.constant([[0.]] * batch_size + [[1.]] * batch_size)

            # mark the discriminator as trainable
            discriminator.trainable = True

            # use train_on_batch to train the discriminator.
            discriminator.train_on_batch(mixed_images, discriminator_labels)

            # Train the generator
            # create a new batch of random noise
            noise = tf.random.normal(shape=[batch_size, random_normal_dimensions])

            # label all generated FAKE images as "real ones"
            generator_labels = tf.constant([[1.]] * batch_size)

            # Mark the discriminator as non trainable.
            discriminator.trainable = False

            # train the GAN on the noise with the labels all set to be true
            gan.train_on_batch(noise, generator_labels)
With this, we would have almost all the necessary code. Missing the loading of the Dataset, the auxiliary functions, and the loading of libraries.
You can find all the code in this notebook in Google Colab and in Kaggle.
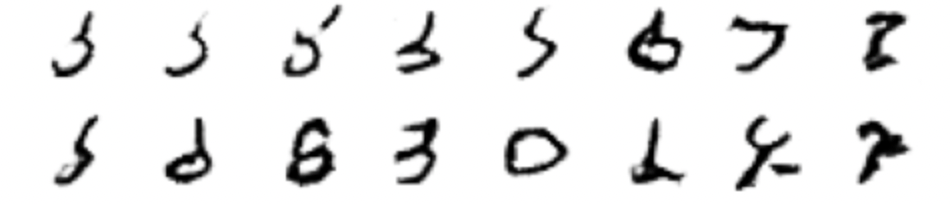
For now, let’s see the result:
 After training for 30 epochs.
It’s not bad at all, 30 times are not too many, and the result obtained is very worthwhile.
Creating a GAN with ChatGPT.
I have decided to try ChatGPT and create a model with the famous generative tool.
I have asked ChatGPT to act as a Machine Learning expert who wants to create a GAN as an example for people who are learning. Using the MNIST dataset with TensorFlow, Python, and Keras.
And it has generated the Discriminator and the Generator for me.
generator = keras.models.Sequential([
    keras.layers.Dense(7 * 7 * 64, activation=keras.layers.LeakyReLU(0.2), input_shape=(noise_input,)),
    keras.layers.Reshape((7, 7, 64)),
    keras.layers.Conv2DTranspose(64, (3, 3), strides=(2, 2), padding='same', activation=keras.layers.LeakyReLU(0.2)),
    keras.layers.Conv2DTranspose(32, (3, 3), strides=(2, 2), padding='same', activation=keras.layers.LeakyReLU(0.2)),
    keras.layers.Conv2D(1, (3, 3), padding='same', activation='tanh')
])

discriminator = keras.models.Sequential([
    keras.layers.Conv2D(32, (3, 3), strides=(2, 2), padding='same', input_shape=(28, 28, 1)),
    keras.layers.LeakyReLU(0.2),
    keras.layers.Conv2D(64, (3, 3), strides=(2, 2), padding='same'),
    keras.layers.LeakyReLU(0.2),
    keras.layers.Flatten(),
    keras.layers.Dense(1, activation='sigmoid')
])
This is the final code that works as I had to tweak the Generator a bit, but it has created a correct model. Functional, but without frills.
The Generator uses two layers of Conv2DTranspose to perform the upsampling, but unlike what we have done, it incorporates a final Conv2D layer to convert the data to the 28 × 28 × 1 image format. Our model uses the final layer of Conv2DTranspose to perform upsampling and conversion in the same step.
The other big difference is the absence of the BatchNormalization layers. But the two Generators look very similar.
As for the Discriminator, the most significant difference is that it uses a LeakyRelu layer after the Conv2D layer instead of using it as an activator on the same layer. In this way, the negative activation occurs after the Convolution. The biggest advantage of this method is that you can put other layers before activation, but he is not using it in this case. The data is not particularly complex either. I just did not find a clear advantage in separating the LeakyRelu layer from the activation.
If we compare the results of the two networks, I think the clear winner is our model.
 ChatGPT results after training for 30 epochs.
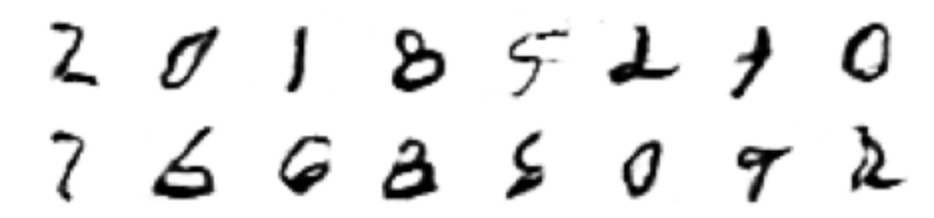 Our GAN results after 30 training epochs.
In any case, ChatGPT has proven to be a very useful tool that can help us in our day to day. I encourage you to use it and ask him about the differences between our models. I am convinced that you will be surprised by the way in which he justifies his decisions.
What have we learned?
We have seen a simple GAN, and we have followed some of the most famous recommendations.
We already know how a generator and a discriminator are used to generate content while training each other.
Not only that, but we have also seen how to upsample the input of the generator until reaching the format of the image that we want to generate using Conv2DTranspose layers.
I would like to emphasize the GAN hacks that we have used:
- When loading the images, we normalized their values between -1 and 1.
- We have used the tanh activator as the activator for the last layer of the generator.
- LeakyRelu has been used as the activation layer in the Conv2D layers of the discriminator and the Conv2DTranspose layers of the generator.
- We have used the Adam optimizer.
What’s next?
My main recommendation is that you clone the notebook and modify it. Try another Dataset, a good substitute could be FashionMNIST, also made up of 28 × 28 × 1 images.
You can also implement some of the recommendations we haven’t seen yet, you can find them at this link: https://github.com/ soumith/ganhacks. If I had to choose, I would possibly implement the smoothing of the labels. I think it is easy to implement and, at the same time, it will give us some fun.
In the next article, we will use a more complex Dataset. The first thing will be to introduce color, which will cause our GAN to be much heavier to train. So, we will incorporate even more recommendations from the GAN Hacks and possibly use TPU’s instead of GPU’s.
I write about TensorFlow and machine learning regularly. Consider following me on Medium to get updates about new articles. And, of course, You are welcome to connect with me on LinkedIn.
If you like TensorFlow and want to know some interesting techniques, check my series: TensorFlow Beyond The Basics.
Creating our first optimized DCGAN was originally published in Towards AI on Medium, where people are continuing the conversation by highlighting and responding to this story.
Join thousands of data leaders on the AI newsletter. Join over 80,000 subscribers and keep up to date with the latest developments in AI. From research to projects and ideas. If you are building an AI startup, an AI-related product, or a service, we invite you to consider becoming a sponsor.
Published via Towards AI
Towards AI Academy
We Build Enterprise-Grade AI. We'll Teach You to Master It Too.
15 engineers. 100,000+ students. Towards AI Academy teaches what actually survives production.
Start free — no commitment:
→ 6-Day Agentic AI Engineering Email Guide — one practical lesson per day
→ Agents Architecture Cheatsheet — 3 years of architecture decisions in 6 pages
Our courses:
→ AI Engineering Certification — 90+ lessons from project selection to deployed product. The most comprehensive practical LLM course out there.
→ Agent Engineering Course — Hands on with production agent architectures, memory, routing, and eval frameworks — built from real enterprise engagements.
→ AI for Work — Understand, evaluate, and apply AI for complex work tasks.
Note: Article content contains the views of the contributing authors and not Towards AI.
Related posts
Recent Posts


")