


Identifying Nigerian Traditional Textiles using Artificial Intelligence on Android Devices ( Part 1…
Last Updated on January 31, 2023 by Editorial Team
Last Updated on January 31, 2023 by Editorial Team
Author(s): Oluwatimilehin Ogidan
Originally published on Towards AI.
Identifying Traditional Nigerian Textiles using Artificial Intelligence on Android Devices ( Part 1 )
Nigeria is a country blessed by God with 3 major ethnic groups( Yoruba, Hausa, and Ibo) and these different ethnic groups have their different cultural differences in terms of dressing, marriage, food, etc.
When it comes to clothing, these three ethnic groups have a wide range of beautiful textiles used for their outfits and styles.
Recognizing the different textiles by name is a problem for even some Nigerian adults because of the volume. Now you could imagine how it is going to be for the younger generation, tourists, and foreigners(It must be a very cumbersome one 😢)
Then I thought to myself, why don’t I build a machine-learning model and embedded it in an app so that people can easily use it to identify them and also get suggestions on the different attires they can sew with them.
I then decide to build a machine learning algorithm that is capable of naming some Yoruba traditional textiles which are Ankara, Aso oke, Atiku, and lace textiles using their images. I embedded the model into an android app such that tourists, foreigners, and Nigerians can use the app to take pictures of traditional textiles, get the name of the textiles, and also get suggestions on different attires that can be made with them.
Sounds cool, right?
Sure, it does.
Here is a quick demo of how it works
Let's now dive deep into how I went about the project.
Approach
Below are the steps I followed to build the model:
- Data collection
- Data cleaning and preparation
- Model architecture
- Model building
- Making predictions
In the following tutorial, I’ll be showing you how to easily deploy the model on a Flutter Android app. So, let’s move on.
Data collection
When I decided to start this project, I couldn’t find any online datasets that contained various Nigerian textiles and their labels. That meant only one thing,
I had to collect the dataset myself
I have never done something like that before. At this point, I had two options.
- To drop the project and pick a simpler one that had an available dataset
- To collect the dataset myself
I decided to go on with the project since I loved the idea and wanted to see it work. I manually gathered Google images of the four classes, which are Akara, Aso oke, Atiku, and Lace. I downloaded 50 samples from each, but something unfortunate happened — all the images I collected got deleted! It happened as a result of a mistake in my script. You can imagine how I must have felt, but that didn’t deter me. I adjusted the error, and I summoned up the courage to collect them again.
I also had to make sure that I downloaded only good photos of the different textiles I was interested in. In total, I downloaded about 200 images. It’s a minimal dataset, but it’s a good way to start. I then uploaded the images to Google Drive because I wanted to use Google Collab to train the model.
Data preparation
The first thing I did was import the necessary libraries.
I need to mount the data since the dataset is on my Google Drive.
What I did at this stage was to put my data into subdirectories of training and validation so that an image data generator would auto-label them for me.
I made use of a separate Python script to perform this task. It becomes extremely useful when you need to split thousands of images with many classes into a training and validation directory. The script can be accessed here
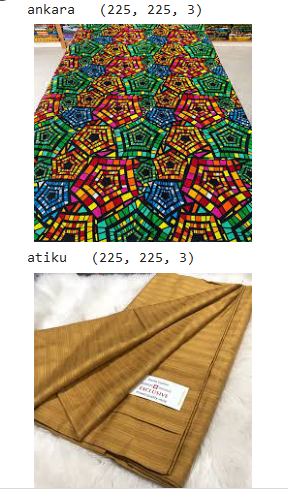
Now, let's see some of the images in the folders. To achieve this, I defined two functions, “check_image” and "view_image." The check image let me view the number of files in the subdirectories and their names, while the view directory helped me visualize the ideas using Matplotlib.
Here are some examples of the images:
The "ImageDataGenerator" class is available in Tensorflow under “Keras.preprocessing.image” of the TensorFlow library.
To use an image generator, you will create an instance of one. You then call “flow_from_directory” to get a generator object. For the training dataset, you will then point to the training directory and specify the target size.
Because there are four classes we want to classify for, the “class_mode ” parameter will be set to “categorical”
I made use of data augmentation techniques to present several sides of the same image during training because we only have a small quantity of data. By displaying alternate sides of the same image during training, you also stop the model from becoming very adept at learning a single feature.
Here are a few of the ones I made use of:
- Rotation range: a range from 0 to 180 degrees with which you can randomly rotate the images
- Width_shift_range and height_shift_range: they specify as a proportion of the image size how much we should move the image in its frame
- Shear_range: it shears the image by a random amount of specified proportion in the image
- Zoom_range: it specifies a relative portion of the image you will zoom on
Thankfully, the image data generator class comes with a lot of image augmentation options. Here is how I used it:
I called the function and used the “train_generator” output of the model to get the labels. This will be very useful when we make predictions.
Model architecture
I used the transfer learning method to build the model.
Transfer learning is a machine learning method where we use a pretrained model as starting point for a model on a new task.
We use the method when we have a limited volume of data available. We can also call the pre-trained model the “base model”. I made use of “MobileNetV2” as my base model because it allows you to build and run neural networks that can run in “low-compute” environments. It has been well-optimized to run on edge devices like phones, microcontrollers, microprocessors, etc., which suits my use case well.
The mobile net model makes use of a depth-wise separable convolution which makes it suitable for low-compute environments.

To learn more about the mobilenetv2 architecture, you can read the research paper here
I used a combination of the base model and “fully connected” TensorFlow layers.
Model building
To build the model, the first thing I did was download the pre-trained model and its weight using the Keras API.
I then got the top layer's name because they are responsible for classification. When we begin training from these earlier layers, the model can be easily adapted to our use case.
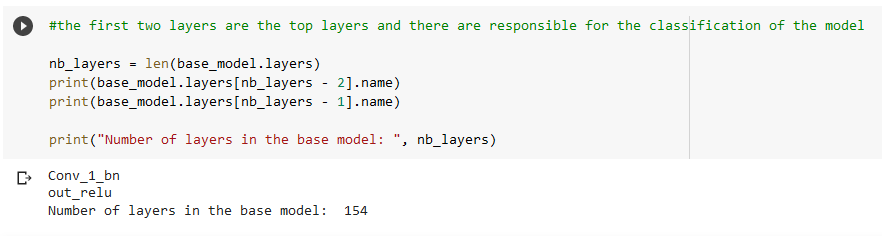
We discovered that the total number of layers of the mobile network is 152. I then decided to start my fine-tuning from the 120th layer.
To achieve this, I had to make all the layers of the neural network trainable by the neural network by setting “layer. trainable” to true. I then freeze all layers before the 120th layer by looping through them and setting the “layer. trainable” to false.
In building this model, I made use of the Keras functional API.
The Keras functional API is a way to create models that are more flexible than the tf.keras.Sequential API. The functional API can handle models with non-linear topology, shared layers, and even multiple inputs or outputs.
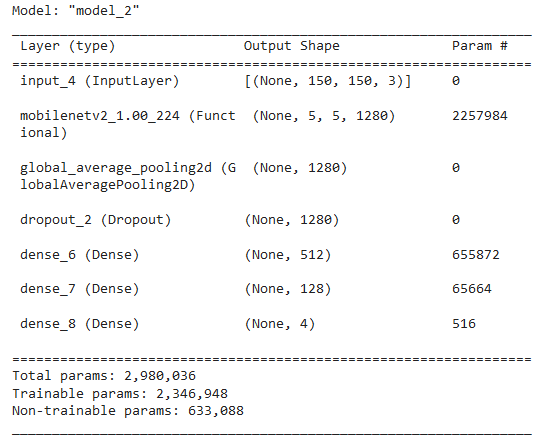
The network contains a base model, Maxpool, Dropout, and Dense layers.
The dropout layer does not allow the activation functions from the previous layers to rely on any feature, so it will have to spread out its weight, thereby helping in preventing overfitting.
I then went on to instantiate my model, compile it and show the model’s summary.
To compile your model, you need to specify your loss function, your optimizing function, and your metrics.
The loss function helps the neural network to calculate how far its predictions are from the target value on each training instance. We made use of the “categorical cross-entropy ” loss from the Keras API because we are dealing with a multi-classification problem.
If it were to be a binary classification problem, we are going to make use of the “binary cross-entropy”. There are varieties of other loss functions you can use. To learn more about them, check this blog post which it is well explained.
For our choice of the optimizer, we made use of the “Adams” optimizer. The function of the optimizing function is to optimize the weights in the direction that reduces the loss of the neural network using gradient descent.
The “Adams” optimizer has momentum built into it to help dampen out the oscillations from normal gradient descent algorithms by enabling it to move slower in the vertical direction and slower in the horizontal direction.
I then compiled my model and printed out the summary, as shown below.
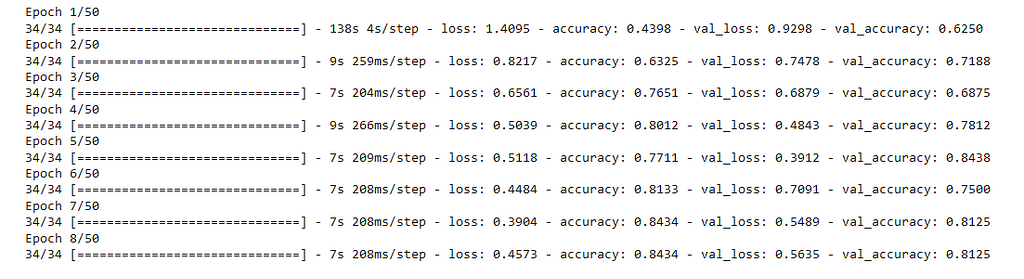
I then went to define my “early stopping” call back to prevent overfitting and I fit the model and started training
I passed in the train and validation generators from earlier. I specified my number of epochs to be 50.
Side Note: Epochs is simply one full pass through the training set
This is what the training looks like:
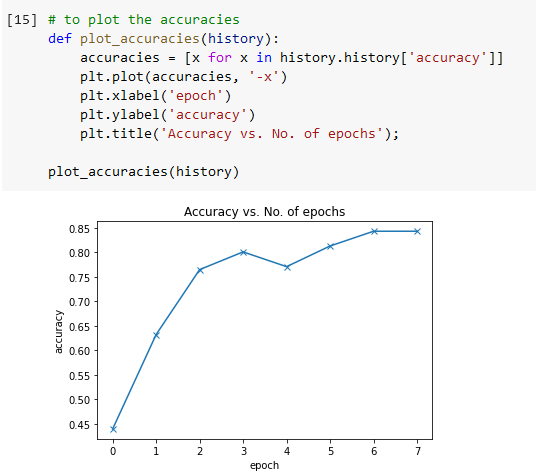
Let’s see how accurately our model performed by plotting it from history using Matplotlib.
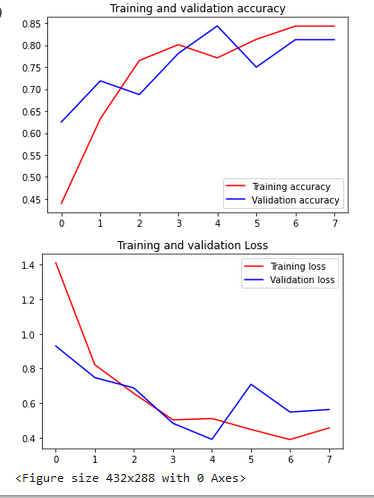
Let us also plot the training and validation loss and accuracies.
Making Predictions
It’s time to make some predictions! To do this, we need to:
- Extract the image.
- Get predictions from the model.
- Get the class with the highest prediction.
- Visualize the output and see if it gets the image correctly.
Here’s the function to predict the image:
Let’s test the model with all the food classes and see how well it performs.
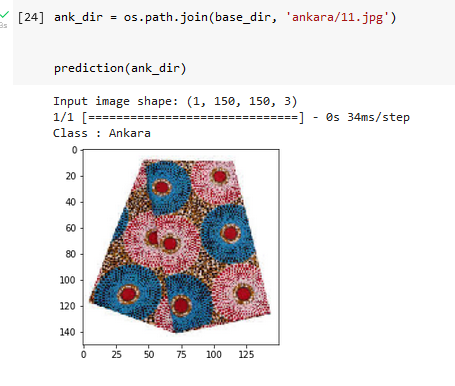
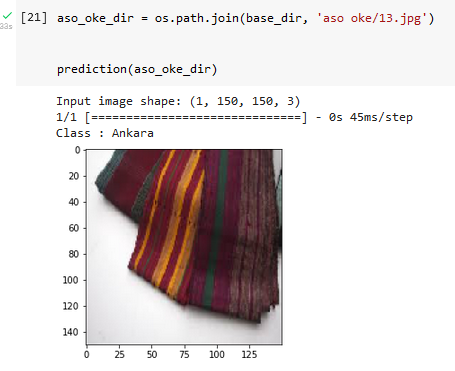
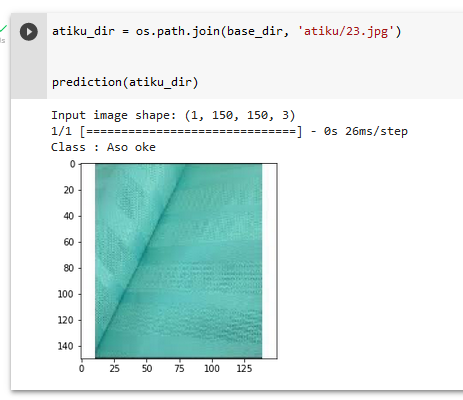
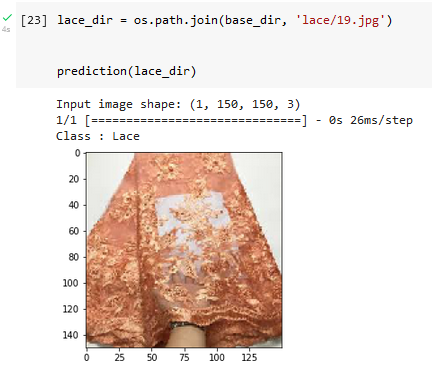
We can see that the model got only one wrong out of four. The model couldn’t really differentiate between Aso oke and Atiku textiles probably because they have a similar line pattern. The model can still be improved by adding more classes of different images.
We have to save the model and convert it to TensorFlow lite format so that we can be able to embed it in our flutter app.
I then downloaded the saved model and the label.txt file to my local system.
Thanks for staying with me this far! In part two, I’ll be discussing how I deployed the model on Android.
Please feel free to ask questions or reach out to me.
Identifying Nigerian Traditional Textiles using Artificial Intelligence on Android Devices ( Part 1… was originally published in Towards AI on Medium, where people are continuing the conversation by highlighting and responding to this story.
Join thousands of data leaders on the AI newsletter. Join over 80,000 subscribers and keep up to date with the latest developments in AI. From research to projects and ideas. If you are building an AI startup, an AI-related product, or a service, we invite you to consider becoming a sponsor.
Published via Towards AI
Towards AI Academy
We Build Enterprise-Grade AI. We'll Teach You to Master It Too.
15 engineers. 100,000+ students. Towards AI Academy teaches what actually survives production.
Start free — no commitment:
→ 6-Day Agentic AI Engineering Email Guide — one practical lesson per day
→ Agents Architecture Cheatsheet — 3 years of architecture decisions in 6 pages
Our courses:
→ AI Engineering Certification — 90+ lessons from project selection to deployed product. The most comprehensive practical LLM course out there.
→ Agent Engineering Course — Hands on with production agent architectures, memory, routing, and eval frameworks — built from real enterprise engagements.
→ AI for Work — Understand, evaluate, and apply AI for complex work tasks.
Note: Article content contains the views of the contributing authors and not Towards AI.
Related posts
Recent Posts


")

