


Beyond the Jupyter Notebooks
Last Updated on July 26, 2023 by Editorial Team
Author(s): Oluwatimilehin Ogidan
Originally published on Towards AI.
Deploy your models in a swift with Flask
As a data scientist, if you have often found yourselves seeking answers to the popular question of “what’s next after Jupiter notebooks?”, you are definitely in the right place because that’s the question this article is about to answer.
I will assume that anyone reading this article has at one time, or the other performed some fundamental analysis on data and built machine learning models. One thing we must never forget is that:
The role of data science is to gain insight from our data and also make future predictions based on the data in order to add business value.
For this objective to be actualized, the models built in our Jupyter notebooks must be made available to relevant stakeholders for decision-making. Your models are not meant just to end their life cycle in your PC.
Right now, you might be asking, “How do we make it available to them?”, that is where model deployment comes in.
Model deployment is the process of releasing finalized machine learning model into a live environment where it may be fully exploited for its intended purpose
Machine learning models can be deployed through a variety of environments and made accessible in the form of an Application Programming Interface (API) that can be consumed by applications such as the web, android, etc.
Side note: An API is a bunch of code that enables two software components to talk to each other
In this article, I will be showing you how you can deploy a simple machine learning model as an API using the Flask framework. By the end of this article, you will have sufficient information for you to start deploying your own models to the cloud.
Grab a cup of coffee, and you going to enjoy this article!
What is Flask
Flask is a lightweight framework written in python that allows you to develop web applications and API. It is very intuitive to use and easy for beginners to get started with.
Project Strategy
These are the steps I followed to deploy my machine learning model through a flask application:
- Saving of machine learning model
- Creation of a virtual environment
- Developing the flask routes and their associated functions
- Finishing and testing the routes
Model Saving
To get started, the first thing is to save your model. We will do that using the “pickle” python library. For demonstration purposes, I will use a model I built to predict customers' responses to the marketing campaign of an e-commerce company. The full code and implementation of this project can be found here.

Use these lines of code to save your model. The first parameter of the pickle. dump takes in the model name depending on the name you give to your model.
Virtual Environment Creation
A virtual environment is a directory that contains the software on which your application depends
It helps to contain our application and its packages in one directory and most importantly, it prevents our packages version from conflicting with other packages on our system. We can create a virtual environment using the virtualenv package. You can read more about this package here
Install virtualenv on your system using pip
pip install virtualenv
create a virtual environment in your project directory
virtualenv env
This command will create a virtual environment with the name “env”. You could use any name of your choice but “env” is popularly used
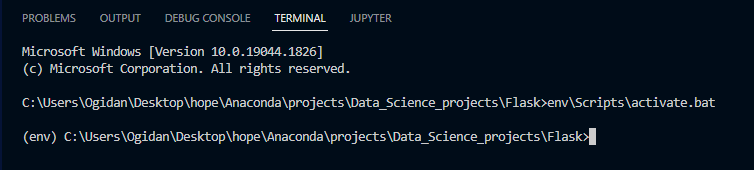
The next step is to activate the virtual environment you have created using this command
env\Scripts\activate.bat
Note: This command works for only windows machines, if you are on a mac, use this command
source env/bin/activate
The next step is to install the python flask library and other libraries we might need in this new virtual environment. We will be using pip to install it by entering this command in our terminal

The pip command will install flask and other packages into the virtual environment, and you can then use them in your project.
Flask Body
Haven installed flask, opened a blank python file, and let's set it to work.
This is what a basic flask app will look like. The first thing to do is to instantiate the flask object and assign it to any variable of your choice but we mostly use “app” as the variable name. The “__name__” represents the name of the application package, and it’s used by Flask to identify resources like templates, static assets, and the instance folder.
The next step we take is to define our routes. To define routes in a flask, we make use of the “app.route” decorator like this :
@app.route
Routes in flask is used to map specific functions intended to execute a task to a url that can be accessed from a webpage.
Simply put, routes are used to connect some actions you desire to URLs such that whenever the user visits that route through the URL, the output is the result of the function.
For example:
What happens here is that the test function gets mapped to the “/test” route such that whenever the user visits the “/test” endpoint, “Ping Model A application!!” is displayed on the screen. The “methods” parameter accepts a list of the kind of HTTP request that is allowed.
Our next course of action will be to develop “prediction” the function that we assigned to the “/predict” route. To avoid confusion and ensure code readability, I will create a new folder named “model_files” in my directory.
This folder will contain:
- The saved model
- The “ml_model.py” file
- The “__init__.py” file
The “ml_model.py” file will contain the preprocessing function and prediction function. Later, I will import these files to be used in my main flask app.
This is what my file looks like:
The idea behind this is to turn this file into a package that can be imported into our main flask app. To make this folder a package, create a new file name “__init.py__” and leave it empty.
Finishing
At this stage, we have two routes set up already, which are the “test” and “predict”. The allowed HTTP request method for the “test” route is the get request, while that of the “predict” route is the post request.
The last step now is for us to develop the prediction function we defined above in the “predict” route to accept data, process it, and return predictions using the “model_file” package.
This is what the main file looks like. I made use of the functions we created by importing the package and calling them. The next thing to do is to start up the flask server and test it locally.

Lets us now try to use to model to make predictions

We are making a post request at the predicted route and passing in our data.

The model returns an output of one, meaning that this customer will respond to the company's marketing campaign.
Conclusion
Phew! You have successfully deployed your machine learning model using Flask. At this stage, it is still local and can only be accessed on your computer. In my next article, I will be showing you how to deploy the flask app to the Heroku cloud platform so that it can be accessed over the internet.
The files for this project can be accessed from my GitHub repo here
Thanks to all who inspired me to do this. Connect with me on LinkedIn and Twitter and see how well we can bond.
Join thousands of data leaders on the AI newsletter. Join over 80,000 subscribers and keep up to date with the latest developments in AI. From research to projects and ideas. If you are building an AI startup, an AI-related product, or a service, we invite you to consider becoming a sponsor.
Published via Towards AI
Related posts


Popular posts

 for 2021")


Updates

Recent Posts


