


Beginners Guide to Convolutional Neural Network from Scratch — Kuzushiji-MNIST
Last Updated on January 6, 2023 by Editorial Team
Last Updated on June 12, 2020 by Editorial Team
Author(s): Satsawat Natakarnkitkul
Machine Learning
Beginner Guide to Convolutional Neural Network from Scratch — Kuzushiji-MNIST
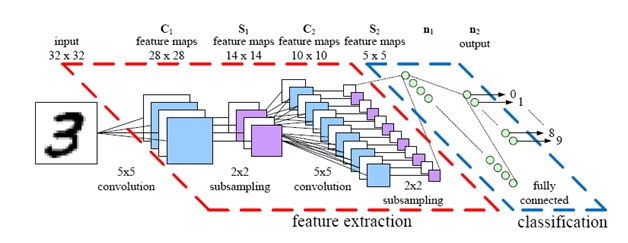
In the previous post, which you can check it out here, I have demonstrated various dimensional reduction techniques on Kuzushiji-MNIST (KMNIST) data set. In this post, I will build the convolutional neural network from scratch using keras to predict the class of KMNIST.
What is CNN?
Artificial Intelligence is growing a lot faster in the past few years, it is sub-field within computer science that aims to create intelligent machines.
There is a lot of research domains within AI, for example, speech recognition, natural language processing (NLP), and computer vision. I will focus on computer vision in this post.
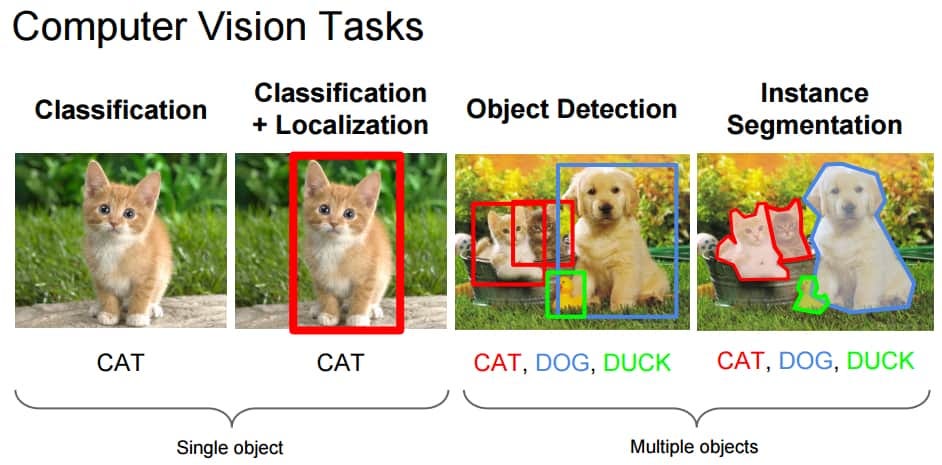
The aim of computer vision is to enable machines, computers, or programs to view the world as humans do, and apply the knowledge to specific tasks such as image and video recognition, image classification. This has been enabled with the advancement of deep learning algorithms, to be more specific, a Convolutional Neural Network (CNN / ConvNet).
The architecture of the Convolutional networks are the connectivity pattern of neurons in the animal brain, and are inspired by biological processes, the connectivity pattern between neurons resembles the organization of the animal visual cortex.
Convolutional neural networks have the ability to capture the spatial and temporal dependencies in the input image through the application of relevant filters. It performs better for the image data set due to the reduction in the number of parameters involved and the reusability of weights.
How does it work?
Convolutional neural networks (or ConvNets) do not view the images like we, humans, do. We view the image as flat canvases with color, we may not care much about the width and height of the images but we can perceive those parameters.
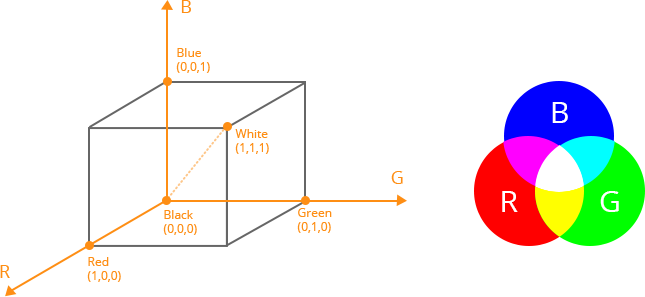
However, ConvNets views images into different dimensional objects such as three-dimensional objects with the third-dimension as a color encoding (or color channel), mainly red-green-blue (RGB) which combines and produces the color we see (of course, there are more than RGB, examples are grayscale, HSV, and CMYK).
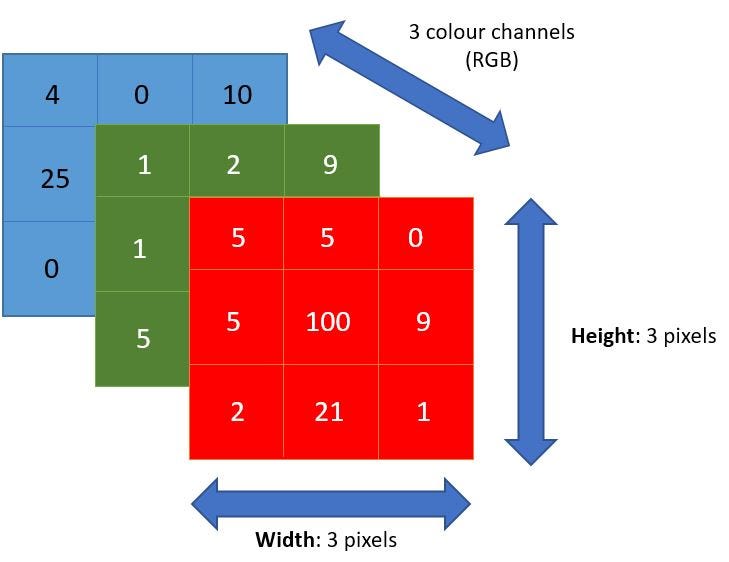
The first key point in implementing ConvNets is the precise measurement of each dimension of the image as it will become the foundation of the linear algebra operation used to process the images.
Figure 4 demonstrates how ConvNets works on the RGB image, each layer represents the color (R-G-B) with the number represented the intensity (range between 0 and 255).
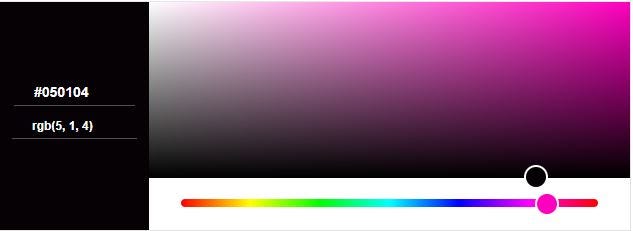
Continue from figure 4, if we take the upper-left pixel, RGB (5, 1, 4). Our eyes will see a purple-ish color.
Imagine now the digital pictures, a seven-megapixel camera may produce 3072 x 2304 pixels (I’m no expert in camera though!!), so how much computationally intensive this will be?
Convolutional neural networks (ConvNets) is to find which of those numbers are significant signals (by reducing the images into a form which is easier to process, and without losing features) that actually help it classify images more accurately. This is another important concept to keep in mind when designing the ConvNet architecture which is not only good at learning features but it is more scalable to massive images data set.
Convolutional Neural Network Layers
There are several main layers implemented in ConvNets.
Conv2D layer
It is a 2-Dimension convolutional layer, mainly it is used as the layer to extract features from the raw input image. The first layer is responsible for capturing low-level features such as edges, color, gradient orientation. With added layers, the architecture will attempt to capture high-level features.
Conv2D filters extend through the three channels in the image (red-green-blue). The filters may be different for each channel too.
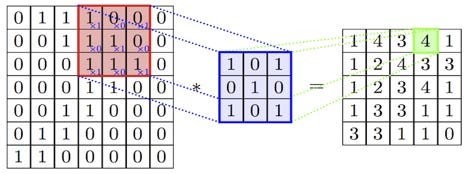
The red area displays the region of the current filter is computed and is called the receptive field. The number in the filter is called weights or parameters. The filter is sliding (or convolving) around the image, it will compute the element-wise multiplications and fill the output to the output, which is called activation map (or feature map).
We can have multiple convolution layers to identify and capture high-level features, but this comes with more computational power.
Pooling layer
The next layer following the convolution layer is the pooling layer (or down-sampling or sub-sampling). The activation maps are fed into a downsampling layer, this layer will apply one patch at a time (like convolution layer).
The pooling layer progressively reduces the spatial size of the representation. Thus, it reduces the number of parameters and the amount of computational in the network. The pooling layer is also aimed at controlling over-fitting.
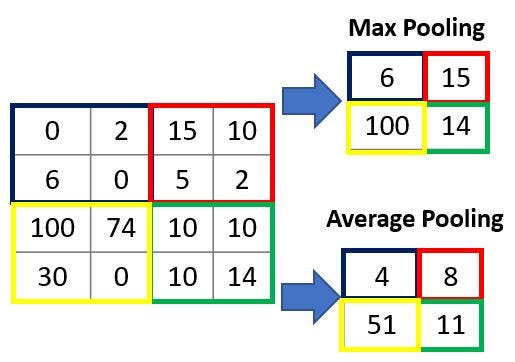
There are two main types of pooling layers: max pooling returns the maximum value from the specific pool size (2×2) and average pooling returns the average of all values from the specific pool size, which can be seen from figure 8.
Max pooling performs as a Noise Suppressant, whereas average pooling performs dimensional reduction as noise suppressing mechanism. Hence, max-pooling performs a lot better than the average pooling and is the most common pooling layer to implement.
After going through the above max-pooling layer, we have enabled the ConvNet model to understand the image features. Next part, we will feed it to the fully connected neural network for a classification task.
However, before feeding the output of the pooling layer to the fully connected layer, we need a middle layer to transform the dimension of the data for classification tasks in the FC layer, this middle layer is called the Flatten layer.
Flatten Layer
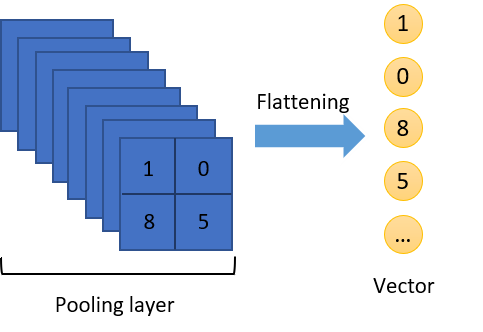
As mention earlier and the name suggested, this layer will flatten/convert the multi-dimensional arrays into a single long continuous linear vector. In more technical term, it breaks the spatial structure of the data and transforms the multi-dimensional tensor into mono-dimensional tensor, hence a vector.
Dense / Fully connected Layer
Each neuron receives input from all neurons in the previous layer, thus densely connected. The layer has a weight matrix 𝑊, a bias vector 𝛽, and the activation of the previous layer 𝑎. An example can be seen from figure 10a.
Dense implements the operation of:output = activation(dot(input, kernel) + bias) .
Dropout
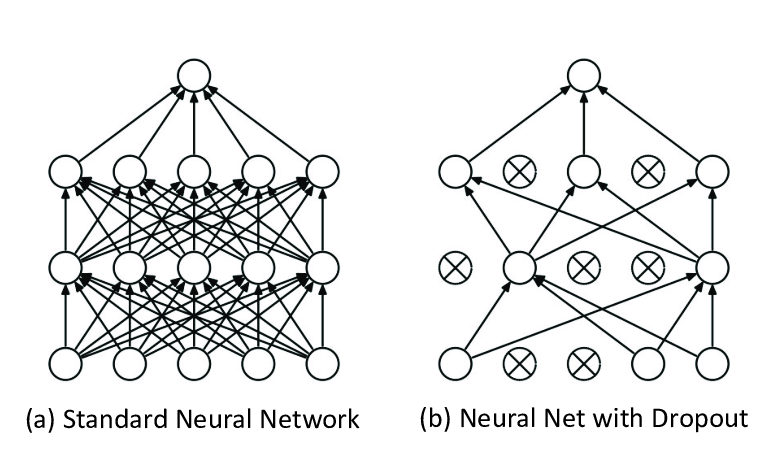
Actually dropout is a regularization method, during training, some of the numbers of layer outputs are randomly ignored (dropped out, switched out). This implementation will have the effect of making layers be treated-like different layers with a different number of nodes and connectivity to the prior layer.
In a convolutional network, dropout is usually implemented in the fully-connected layers and not the convolution layers.
Python Implementation on Kuzushiji-MNIST
In the previous section, the concepts, definitions of all relevant layers are provided. I will combine those concepts and implement the ConvNet from scratch using keras to classify the Kuzushiji-MNIST¹ in Python language. I will demonstrate how we can write our own callbacks object to use in the model as well.
KMNIST is a drop-in replacement for the MNIST data set, it also represents ten classes of Hiragana characters. The given data set has 60,000 training images and 10,000 testing images. All pixels have 28×28 pixels. Each class is distributed evenly (ten class with 6,000 images each).
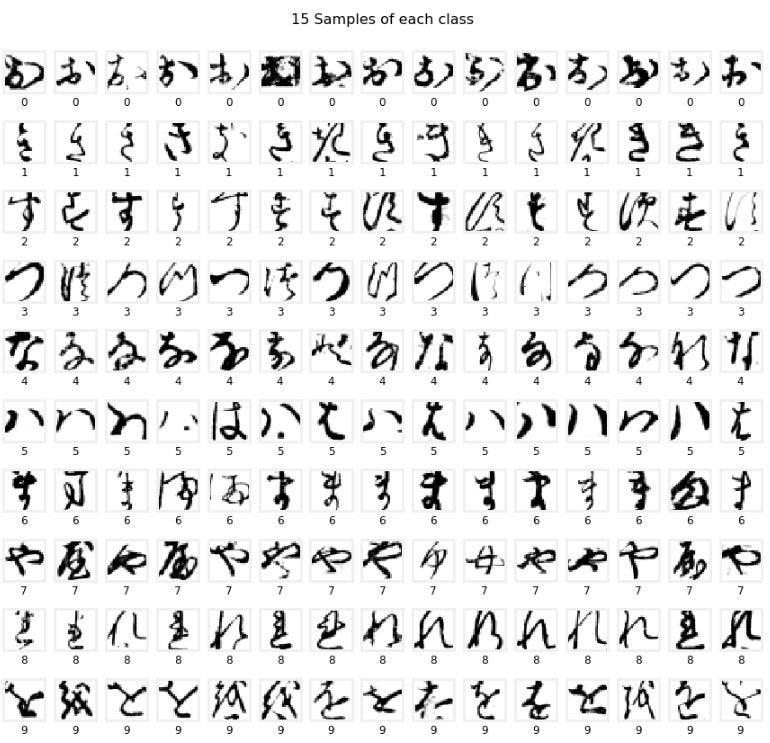
The label is provided as a numeric number from 0 to 9, with each number represents different Hiragana characters (i.e. 0: お, 1: き). The images are also provided in NumPy array format with the shape of (60000, 28, 28) .
We need to do several input transformation of both the images (scaled to 0 and 1) and labels (categorical encoding) data set. The most effective way is to implement a function to handle as we can apply it to both training and testing data. I will also subset the training data further to create a validation data set.
The training, validation, and testing data set consist of 48,000, 12,000, and 10,000 images respectively with the new shape of (28, 28, 1).
As shown in the below code snippet,
- we will define the Sequential() model in Keras and add layers to build up the ConvNets. The last layer of the fully-connected is the output layer with 10 output neurons (the same number as the class of images). The softmax activation will give you the probabilities of each class label.
model.add(Dense(NUM_CLASS, activation='softmax'))
2. Choosing loss, optimizer, and metrics to be used in the model
3. Define callbacks function
4. Train and evaluate model performance
What is Callbacks function?
A callback is a set of functions to be applied at given stages of the training procedure. You can use callbacks to get a view on internal states and statistics of the model during training.
Ultimately, it can help you fix bugs, build better models, and keep track on the model’s training. It can use to visualize how the training is going, help prevent over-fitting by using early stopping and save the best model’s weight automatically.
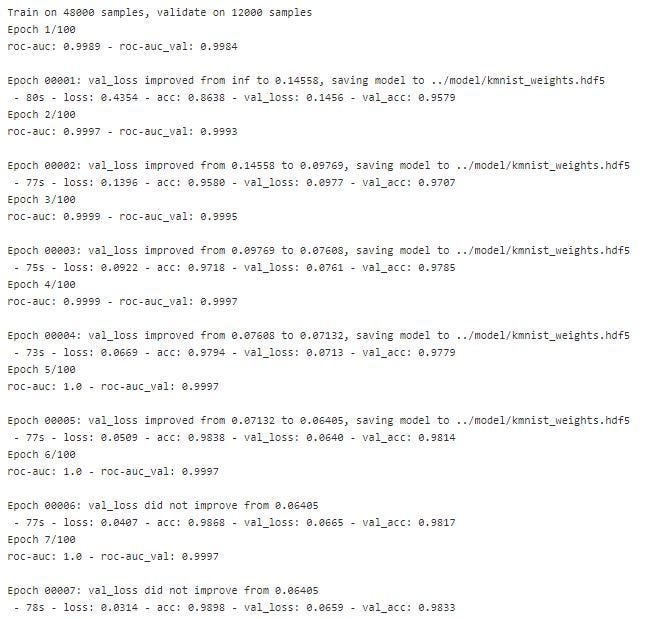
In this demonstration, I manually create callbacks class to keep auc the score for each epoch and use ModelCheckPoint and EarlyStopping to save the best weights of the model (based on loss score on validation data set) and stop train the model (if loss score on validation data set stops improving).
Figure 12 shows the callbacks in action, it prints AUC score during each epoch and saves the best weight to file.
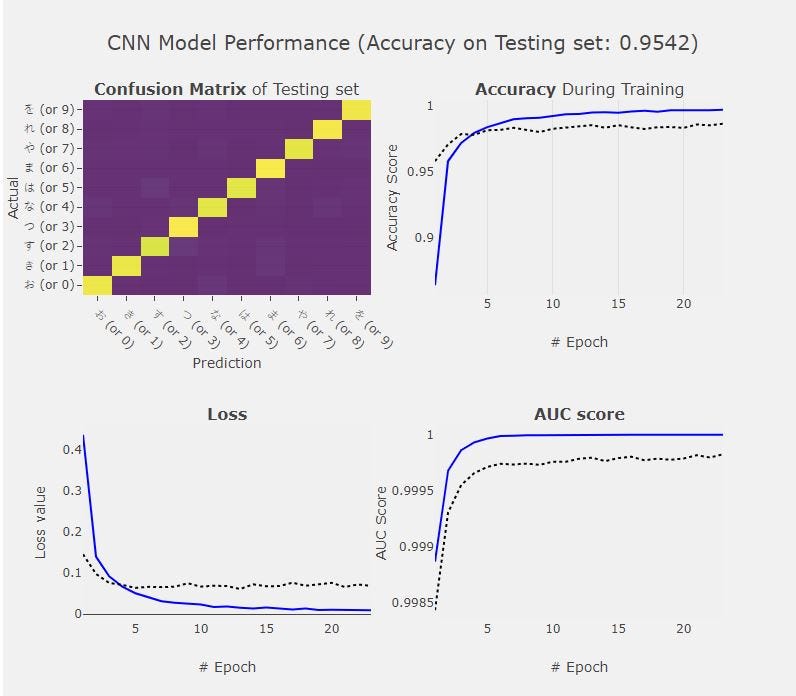
We then compute the model performance against the test images. The history (or callback) from previous steps can be feed to visualize how the model learns in each epoch.
Thanks for reading up to this point. In this article, I started from walkthrough what is ConvNet, and how it works. The layers for the ConvNet architecture are also explained. I close out this article by implementing the ConvNet from scratch using Keras and write our own callback functions, which further help the model development process.
If you have any questions, please feel free to comment or reach me via LinkedIn here.
GitHub Notebook — Recognizing Kuzushiji Character using KMNIST Data set with Keras
netsatsawat/Kuzushiji-Classification
[1]: “KMNIST Dataset” (created by CODH), adapted from “Kuzushiji Dataset” (created by NIJL and others), doi:10.20676/00000341
Beginner Guide to Convolutional Neural Network from Scratch — Kuzushiji-MNIST was originally published in Towards AI — Multidisciplinary Science Journal on Medium, where people are continuing the conversation by highlighting and responding to this story.
Published via Towards AI
Towards AI Academy
We Build Enterprise-Grade AI. We'll Teach You to Master It Too.
15 engineers. 100,000+ students. Towards AI Academy teaches what actually survives production.
Start free — no commitment:
→ 6-Day Agentic AI Engineering Email Guide — one practical lesson per day
→ Agents Architecture Cheatsheet — 3 years of architecture decisions in 6 pages
Our courses:
→ AI Engineering Certification — 90+ lessons from project selection to deployed product. The most comprehensive practical LLM course out there.
→ Agent Engineering Course — Hands on with production agent architectures, memory, routing, and eval frameworks — built from real enterprise engagements.
→ AI for Work — Understand, evaluate, and apply AI for complex work tasks.
Note: Article content contains the views of the contributing authors and not Towards AI.
Related posts
Recent Posts


")

