


Working on a Computer Vision project? These code chunks will help you !!!
Last Updated on November 27, 2022 by Editorial Team
Author(s): Chinmay Bhalerao
Originally published on Towards AI the World’s Leading AI and Technology News and Media Company. If you are building an AI-related product or service, we invite you to consider becoming an AI sponsor. At Towards AI, we help scale AI and technology startups. Let us help you unleash your technology to the masses.
Working on a Computer Vision Project? These Code Chunks Will Help You !!!
An introduction to a few “used to” methods in a computer vision project
“VR and AR will eventually converge, and smart glasses will take over our digital interactions.”― Carlos López (Founder @ Oarsis)
The amazing thing about working in Computer vision and machine learning is that after every few years, somebody invents something crazy that makes you totally reconsider what's possible!!!
The World got a new eye & new way of thinking and tracking objects since the emergence of Computer vision algorithms. Starting from Region-Based Convolutional Neural Networks [RCNN] to YOLO V7, detectron-2, segformer, and classification architectures, computer vision changed drastically for higher efficiency of detection and higher latency with less requirement of time and computational expensiveness.
A computer vision project is a combination of many things, from data collection to successful deployment. Understanding data and the right processing and training is the key to success. Below are a few code chunks with descriptions of their work that will ease your working on the project.
1. Know your dataset’s instances
for the object detection or segmentation project, we annotate our dataset with the help of external annotation tools like makesense.ai, VGG annotator, LableIMG, etc.
We know the exact number of images, but it's hard to know how many instances of each class we have. Knowing instances of the class will tell you if your dataset is imbalanced or not. It will have a deep impact on the learning model if your instances are not balanced. So after downloading annotated dataset and its annotation file, you can use the following chunk of code to see the class balance status.
import os
#Give path of folder in which you stored images and annotations
path = r"Your dataset *folder* location"
# Change the directory to path
os.chdir(path)
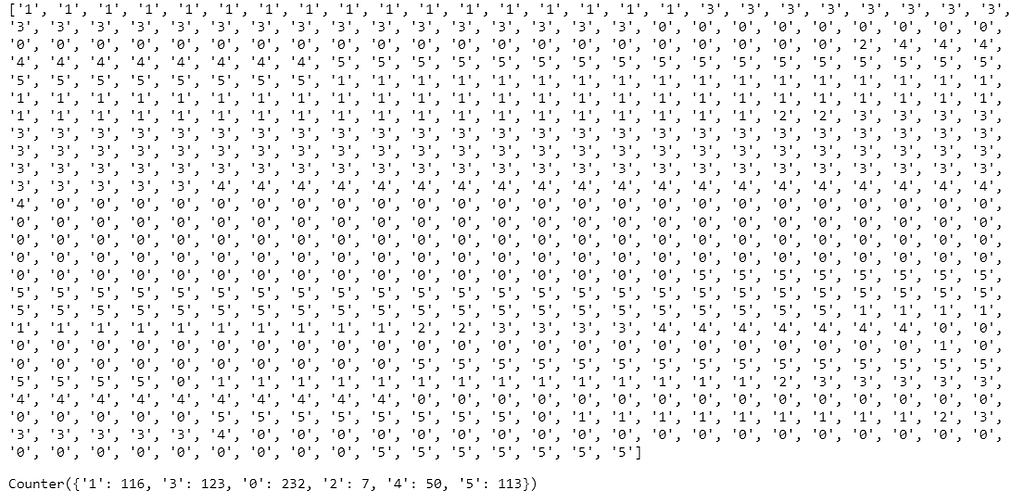
x=[]
# Spinning through all files
for file in os.listdir():
# Checking for text annotation file
if file.endswith(".txt"):
file_path = f"{path}\{file}"
with open(file_path, 'r') as f:
for line in f:
a=line[0]
x.append(a)
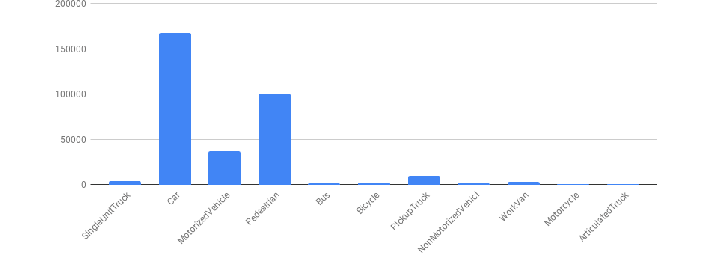
print(x)
#to count instances
from collections import Counter
Counter(x)
You can see, at last, the counter gives instance values for each class, and then on your model criteria, you can decide if the dataset needs further balancing or not.
2. Preprocessing of images
In our image dataset, other than class instances, we have many other objects/things. If we take it for the learning purpose of the model, then these other items can be classified as noises. There are many use cases that claim that removing these noises and then sending them to the model for training improves the performance of the model. So how do preprocess images? See the below code.
#Writing a function to create mouse masking
#We are using mouse click events here
import numpy as np
import cv2 as cv
drawing = False # true if mouse is pressed
mode = True # if True, draw rectangle. Press 'm' to toggle to curve
ix,iy = -1,-1
# mouse callback function
def draw_circle(event,x,y,flags,param):
    global ix,iy,drawing,mode
    if event == cv.EVENT_LBUTTONDOWN:
        drawing = True
        ix,iy = x,y
    elif event == cv.EVENT_MOUSEMOVE:
        if drawing == True:
            if mode == True:
                cv.rectangle(img,(ix,iy),(x,y),(255,255,255),-1)
                #(255,255,255) represents white color but you can give any.
                # -1 represents filled box and 1 represents hollow box
            else:
                cv.circle(img,(x,y),5,(0,0,255),-1)
    elif event == cv.EVENT_LBUTTONUP:
        drawing = False
        if mode == True:
            cv.rectangle(img,(ix,iy),(x,y),(255,255,255),-1)
        else:
            cv.circle(img,(x,y),5,(0,0,255),-1)

#storing final output

    cv2.imwrite("new_img.jpg",img)
#Calling function and using it on input image
import cv2
img = cv2.imread(r"Your image path",1)
#resizing to fit on screen
img = cv2.resize(img,(1200,800))
cv.namedWindow('image')
cv.setMouseCallback('image',draw_circle)
while(1):
    cv.imshow('image',img)
    k = cv.waitKey(1) & 0xFF
    if k == ord('m'):
        mode = not mode
    elif k == 27:
        break
cv.destroyAllWindows()
If you run the above code, then you will have your training image in front of you, and your mouse will act as a mask maker. After clicking and hovering the mouse on an unnecessary object will direct create a mask on that object. I took white color for use case purposes, but you can take any according to your problem. You can train a separate object detection model for noise, and below that, you can attach this code. At first, the model will detect noise, and then this code will mask that bounding box with your desired color.
There are many things you can do for image preprocessing, like cropping, making blur/contrast, etc. you can read my blog for more image preprocessing techniques.
Do you know these basic image processing operations?
3. Data Augmentation
In every computer vision project, you want to augment the dataset to make it bigger to make the model’s work easier. There is much open-source software that does Augmentations for you, like Roboflow. But many times, there can be a problem with data security and confidentiality. So you can do your own dataset augmentation on your python editor. There is a library by TensorFlow known as “ImageDataGenerator” which helps you to do this. See the below code.
# FOR COMPLETE FOLDER ANNOTATION
#imports
import tensorflow
import keras
import numpy as np
import os
from PIL import Image
from skimage import io
SIZE = 128
dataset = []
image_directory = 'Image folder address/'
from keras.preprocessing.image import ImageDataGenerator, array_to_img, img_to_array, load_img
# Gving required augmentations to image
#ImageDataGenerator has many Augmentations, choose those who are good for your condition
datagen = ImageDataGenerator(
        rotation_range=40,
        width_shift_range=0.2,
        height_shift_range=0.2,
        shear_range=0.2,
        zoom_range=0.2,
        horizontal_flip=True,
        fill_mode='nearest')

my_images = os.listdir(image_directory)
for i, image_name in enumerate(my_images):
    if (image_name.split('.')[1] == 'jpg'):
        image = io.imread(image_directory + image_name)
        image = Image.fromarray(image,'RGB')
        image = image.resize((SIZE,SIZE))
        dataset.append(np.array(image))
x = np.array(dataset)
i = 0
for batch in datagen.flow(x, batch_size=20,
                          save_to_dir='preview', save_prefix='Hard_Hat', save_format='jpeg'):
    i += 1
    if i > 200:
        break
#FOR SINGLE IMAGE ANNOTATION

import tensorflow
import keras
from keras.preprocessing.image import ImageDataGenerator, array_to_img, img_to_array, load_img
#Adress of image
img = load_img('Image address [should end with .jpg or .png]')
#Required augmentations
datagen = ImageDataGenerator(
        rotation_range=40,
        width_shift_range=0.2,
        height_shift_range=0.2,
        shear_range=0.2,
        zoom_range=0.2,
        horizontal_flip=True,
        fill_mode='nearest')

x = img_to_array(img)
x = x.reshape((1,) + x.shape)

i = 0
for batch in datagen.flow(x, batch_size=1,
                          save_to_dir='preview/green_Aug', save_prefix='Hard_Hat_orange_Aug', save_format='jpeg'):
    i += 1
    if i > 20:     #20 is the output images that we will get. you can set any limit according to project
        break
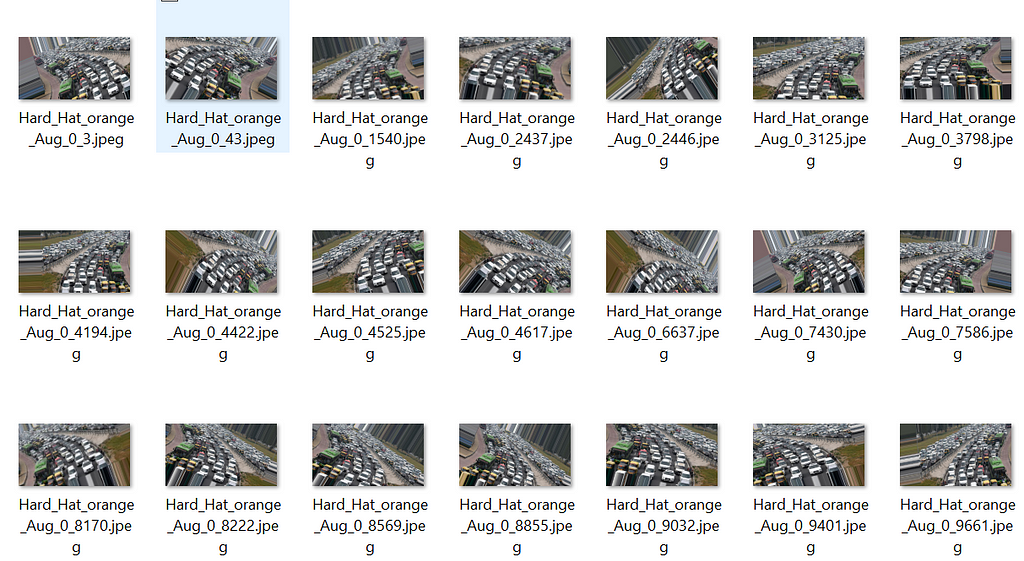
The first chunk of code is for the folder of images. you can do mass augmentation from that. The second chunk is for single images. You can use any of the above according to your use case. The last “i” is the number of synthetic images you want to create. Choose an appropriate number and Augment it.
4. Dataset creation
Many times, you require images from a webcam. but it's hard to click it and save it in the labeled folder for classification or object detection. It also involves a lot of manual tasks. below code is to click images for particular labels, and it directly will store them at the proper location.
Mention your labels and mention how many images you want for each class. Then specify your path for storage. After every time.sleep(5), it will click images until the creation of data.
# Importing modules
import cv2
import uuid
import os
import time

#Classes that you want to use
labels = ['happyface', 'sadface', 'angryface', 'excitedface']
# How many images you want for each class
number_imgs = 5
#Image path
IMAGES_PATH = os.path.join('Tensorflow', 'workspace', 'images', 'collectedimages')
if not os.path.exists(IMAGES_PATH):
    if os.name == 'posix':
        !mkdir -p {IMAGES_PATH}
    if os.name == 'nt':
         !mkdir {IMAGES_PATH}
for label in labels:
    path = os.path.join(IMAGES_PATH, label)
    if not os.path.exists(path):
        !mkdir {path}
# This will open your Webcam and start clicking images and save it in .jpg format
for label in labels:
    cap = cv2.VideoCapture(0)
    print('Collecting images for {}'.format(label))
    time.sleep(5)
    for imgnum in range(number_imgs):
        print('Collecting image {}'.format(imgnum))
        ret, frame = cap.read()
        imgname = os.path.join(IMAGES_PATH,label,label+'.'+'{}.jpg'.format(str(uuid.uuid1())))
        cv2.imwrite(imgname, frame)
        cv2.imshow('frame', frame)
        time.sleep(2)
        if cv2.waitKey(1) & 0xFF == ord('q'):
            break
cap.release()
cv2.destroyAllWindows()
You will get the below result after running the code chunk. and images will get stored at the specified location.

5. Extracting areas from the image
This is the most useful thing not just to detect or segment objects but to extract their areas. We use many techniques like pixel measurement and others. But the thing is, you have to do calibration before extracting areas to match the original dimensions and their representations in the image and their ratios. So for calibration, people use inbuilt ratios and reference object schemes, but I tried a new way of calculating the calibration factor. You have to draw just a line to do the calibration. I mentioned how to do that in the below blog.
Calibration in Image Processing
These are a few chunks that will help you to build and contribute to your project. There were many things I wanted to cover, but still, this is enough for this blog section.
If you have found this article insightful
If you found this article insightful, follow me on Linkedin and medium. you can also subscribe to get notified when I publish articles. Let’s create a community! Thanks for your support!
If you want to support me :
As Your following and clapping is the most important thing, but you can also support me by buying coffee. COFFEE.
You can read my other blogs related to :
- Feature selection techniques for data
- Simultaneous Localization And Mapping [SLAM] systems
- Genetic Algorithm Optimization
- Ant Colony Optimization: An overview
Signing off,
Chinmay Bhalerao
Working on a Computer Vision project? These code chunks will help you !!! was originally published in Towards AI on Medium, where people are continuing the conversation by highlighting and responding to this story.
Join thousands of data leaders on the AI newsletter. It’s free, we don’t spam, and we never share your email address. Keep up to date with the latest work in AI. From research to projects and ideas. If you are building an AI startup, an AI-related product, or a service, we invite you to consider becoming a sponsor.
Published via Towards AI
Towards AI Academy
We Build Enterprise-Grade AI. We'll Teach You to Master It Too.
15 engineers. 100,000+ students. Towards AI Academy teaches what actually survives production.
Start free — no commitment:
→ 6-Day Agentic AI Engineering Email Guide — one practical lesson per day
→ Agents Architecture Cheatsheet — 3 years of architecture decisions in 6 pages
Our courses:
→ AI Engineering Certification — 90+ lessons from project selection to deployed product. The most comprehensive practical LLM course out there.
→ Agent Engineering Course — Hands on with production agent architectures, memory, routing, and eval frameworks — built from real enterprise engagements.
→ AI for Work — Understand, evaluate, and apply AI for complex work tasks.
Note: Article content contains the views of the contributing authors and not Towards AI.
Related posts
Recent Posts


")

