


![Transformers for Multi-Regression — [PART2]](https://cdn-images-1.medium.com/max/1024/1*tGODcZqHO9H7KjtKldraVw.jpeg "Transformers for Multi-Regression — [PART2]")
Transformers for Multi-Regression — [PART2]
Last Updated on December 9, 2022 by Editorial Team
Author(s): Zeineb Ghrib
Originally published on Towards AI the World’s Leading AI and Technology News and Media Company. If you are building an AI-related product or service, we invite you to consider becoming an AI sponsor. At Towards AI, we help scale AI and technology startups. Let us help you unleash your technology to the masses.
🤖 Fine Tuning 🤖
In the context of the FB3 competition, we aim to model six analysis metrics using pre-scored argumentative essays written by 8th-12th grade English Language Learners. The skills we have to model are the following: cohesion, syntax, vocabulary, phraseology, grammar, and conventions. The scores range from 1.0 to 5.0 in increments of 0.5.
In my last post, I showed you how to use a pre-trained transformer to extract context-capturing embeddings and use them for training a multi-regressor.
This time I will show you how to train end-to-end the whole transformer, which also means updating the parameters of the pre-trained model.
Also, I will show you how to use the weights and biases platform: from the login with the wandb API, to creating and using model artifacts and passing through the model track.
All the code sources can be retrieved from my Kaggle notebook
Credit: In this Part, I borrowed @debarshichanda model’s architecture.
🎛Imports and Config
First of all, we will define the CONFIG dictionary and the transformer-related imports that we will be using all over the project:
import torch
import torch.nn as nn
import transformers
from transformers import (
    AutoModel, AutoConfig,
    AutoTokenizer, logging,
    AdamW, get_linear_schedule_with_warmup,
    DataCollatorWithPadding,
    Trainer, TrainingArguments
)
from transformers.modeling_outputs import SequenceClassifierOutput

logging.set_verbosity_error()
logging.set_verbosity_warning()

CONFIG = {
    "model_name": "microsoft/deberta-v3-base",# "distilbert-base-uncased",
    "device": 'cuda' if torch.cuda.is_available() else 'cpu',
    "dropout": random.uniform(0.01, 0.60),
    "max_length": 512,
    "train_batch_size": 8,
    "valid_batch_size": 16,
    "epochs": 10,
    "folds" : 3,
    "max_grad_norm": 1000,
    "weight_decay": 1e-6,
    "learning_rate": 1e-5,
     "loss_type": "rmse",
    "n_accumulate" : 1,
    "label_cols" : ['cohesion', 'syntax', 'vocabulary', 'phraseology', 'grammar', 'conventions'],

}
🧮Custom Dataset Iterator:
As explained in the previous post, we will define a subclass of torch.utils.data.Dataset and override __init__ , __len__ and __getitem__ special methods as follows:
import pandas as pd

train = pd.read_csv(PATH_TO_TRAIN)
test = pd.read_csv(PATH_TO_TEST)

# lets define the batch genetator
class CustomIterator(torch.utils.data.Dataset):
    def __init__(self, df, tokenizer, labels=CONFIG['label_cols'], is_train=True):
        self.df = df
        self.tokenizer = tokenizer
        self.max_seq_length = CONFIG["max_length"]# tokenizer.model_max_length
        self.labels = labels
        self.is_train = is_train

    def __getitem__(self,idx):
        tokens = self.tokenizer(
                    self.df.loc[idx, 'full_text'],#.to_list(),
                    add_special_tokens=True,
                    padding='max_length',
                    max_length=self.max_seq_length,
                    truncation=True,
                    return_tensors='pt',
                    return_attention_mask=True
                )
        res = {
            'input_ids': tokens['input_ids'].to(CONFIG.get('device')).squeeze(),
            'attention_mask': tokens['attention_mask'].to(CONFIG.get('device')).squeeze()
        }

        if self.is_train:
            res["labels"] = torch.tensor(
                self.df.loc[idx, self.labels].to_list(),
            ).to(CONFIG.get('device'))

        return res

    def __len__(self):
        return len(self.df)
🤖 Fine Tune Transformer
With this approach, the hidden states are not fixed but trainable: for this reason, it requires the classification head to be differentiable. Usually, we use a neural network for the classifier.
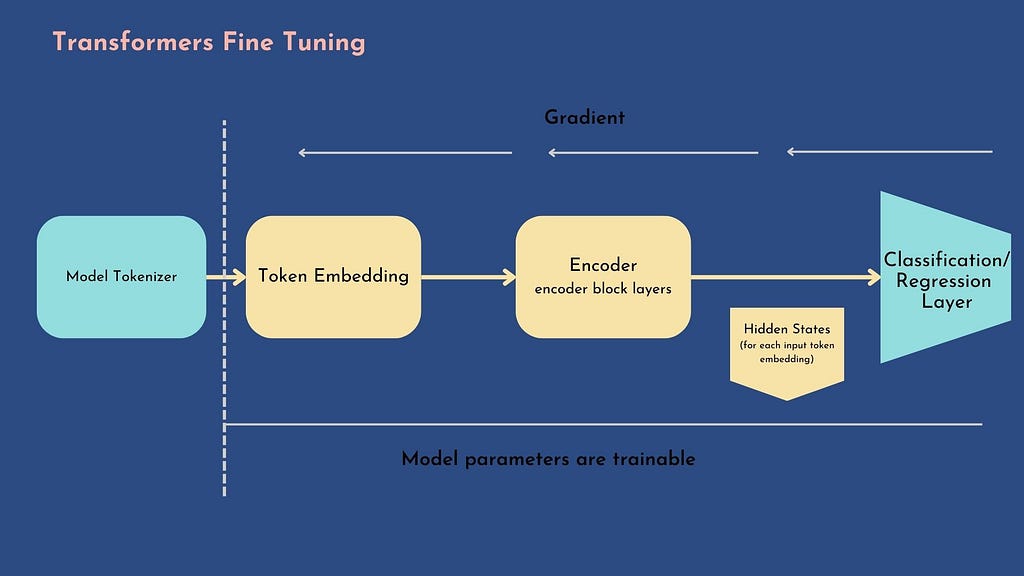
In this section, we will see how to fine-tune an encoder transformer based on microsoft/deberta-v3-base pretrained model, using a simple and feature-complete training and evaluation API provided by HuggingFace : the Trainer.
We will define a custom model that extends microsoft/deberta-v3-base with a trainable neural network head.
The custom model will be composed of:
- Pre-trained Baseline model : load the pre-trained microsoft/deberta-v3-base with the AutoModel.from_pretrained function
- Mean pooling Layer: we need to add some changes to the previous Mean Pooling function (see part one post): inherit from torch.nn.Module the pooling class and define the mean pooling function within a forward method (see code below)
- Dropout layer: add a dropout layer for regularization
- Linear layer: input size = hidden_state_dim, output size = number of target features (6)
The logits output of the linear layer is returned through a SequenceClassifierOutput – a subclass of ModelOutput class- on the forward method (All models must have outputs that are instances of subclasses of ModelOutput: reference here )
class MeanPooling(nn.Module):
    def __init__(self):
        super(MeanPooling, self).__init__()
    def forward(self, last_hidden_state, attention_mask):
        input_mask_expanded = attention_mask.unsqueeze(-1).expand(last_hidden_state.size()).float()
        sum_embeddings = torch.sum(last_hidden_state * input_mask_expanded, 1)
        sum_mask = input_mask_expanded.sum(1)
        sum_mask = torch.clamp(sum_mask, min=1e-9)
        mean_embeddings = sum_embeddings / sum_mask
        return mean_embeddings

class FeedBackModel(nn.Module):
    def __init__(self, model_name):
        super(FeedBackModel, self).__init__()
        self.config = AutoConfig.from_pretrained(model_name)
        self.config.hidden_dropout_prob = 0
        self.config.attention_probs_dropout_prob = 0
        self.model = AutoModel.from_pretrained(model_name, config=self.config)
        self.drop = nn.Dropout(p=0.2)
        self.pooler = MeanPooling()
        self.fc = nn.Linear(self.config.hidden_size, len(CONFIG['label_cols']))

    def forward(self, input_ids, attention_mask):
        out = self.model(input_ids=input_ids,
                         attention_mask=attention_mask,
                         output_hidden_states=False)
        out = self.pooler(out.last_hidden_state, attention_mask)
        out = self.drop(out)
        outputs = self.fc(out)
        return SequenceClassifierOutput(logits=outputs)
Loss & Metric
As we will be using a Trainer, we need to define a new loss function corresponding to the target evaluation Metric (in our cases MCRMSE) this loss function will be used to train the transformer. The way to implement this is to define a subclassing Trainer and override the compute_loss() method.
In the same way, we want to get the local evaluation for each target class during the evaluation step, so we will provide the Trainer a custom compute_metrics() function that allows calculating the RMSE of each of the six targets (Otherwise, the evaluation would just have returned just the loss evaluation – the MCRMSE).
class RMSELoss(nn.Module):
    """
    Code taken from Y Nakama's notebook (https://www.kaggle.com/code/yasufuminakama/fb3-deberta-v3-base-baseline-train)
    """
    def __init__(self, reduction='mean', eps=1e-9):
        super().__init__()
        self.mse = nn.MSELoss(reduction='none')
        self.reduction = reduction
        self.eps = eps

    def forward(self, predictions, targets):
        loss = torch.sqrt(self.mse(predictions, targets) + self.eps)
        if self.reduction == 'none':
            loss = loss
        elif self.reduction == 'sum':
            loss = loss.sum()
        elif self.reduction == 'mean':
            loss = loss.mean()
        return loss

class CustomTrainer(Trainer):
    def compute_loss(self, model, inputs, return_outputs=False):
        outputs = model(inputs['input_ids'], inputs['attention_mask'])
        loss_func = RMSELoss(reduction='mean')
        loss = loss_func(outputs.logits.float(), inputs['labels'].float())
        return (loss, outputs) if return_outputs else loss

def compute_metrics(eval_pred):
    predictions, labels = eval_pred
    colwise_rmse = np.sqrt(np.mean((labels - predictions) ** 2, axis=0))
    res = {
        f"{analytic.upper()}_RMSE" : colwise_rmse[i]
        for i, analytic in enumerate(CONFIG["label_cols"])
    }
    res["MCRMSE"] = np.mean(colwise_rmse)
    return res
🧚Weights & Biases🧚
Even though HuggingFace Transformers provide a wide range of training checkpointing facilities. W&B provides powerful experiment tracking and model versioning tools with friendly and interactive dashboards. Each experiment project is partitioned on its own.
Check out this excellent notebook that describes in detail how to use W&B in kaggle:
The W&B provides two main utilities:
🤙 Dashboard (experiment tracking): Log and visualize experiments in real time = Keep data and results in one convenient place. Consider this as a repository of experiments.
🤙 Artifacts (dataset + model versioning): Store and version datasets, models, and results = Know exactly what data a model is being trained on.
To connect to Weights & Biases, we need the Access your API key from https://wandb.ai/authorize.
There are two ways you can log in using a Kaggle kernel:
- Run the wandb.login(key=your-api-key) cmd: It will ask for the API key: you can copy/paste it from https://wandb.ai/authorize.
Feel free to skip this part if you are not using Kaggle
- Use Kaggle secrets to store your API key: and use the code snippet below to log in.
- Click on the Add-ons menus in the Notebook Editor then Secrets:

2. Store the api-key as key-value pair that will be attached to the current Notebook:
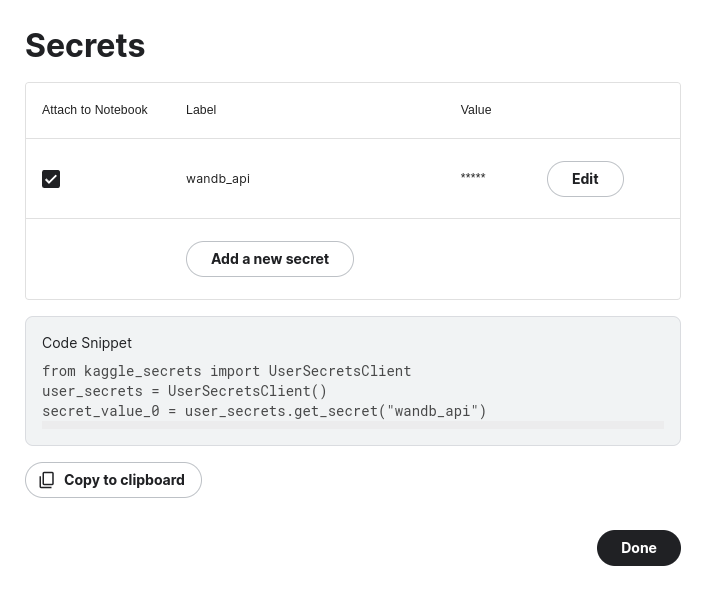
3. Copy and paste the code snippet to access to the api-key then use wandb.login() to connect to W&B:
from kaggle_secrets import UserSecretsClient
import wandb

user_secrets = UserSecretsClient()
api_key = user_secrets.get_secret("wandb_api")
wandb.login(key=api_key)
🛠Wandb Arguments
For each CV iteration ‘i’ we will create a new run called FB3-fold-i with ‘i’ = iteration’s number, within a single project that we’ll call Feedback3-deberta.
Some other parameters:
- group: the group parameter is especially used to organize individual runs into a larger experiment, here are some use cases examples
- tags: we will add the model name and the metric tags. as explained in W&B doc Tags are useful for organizing runs together or applying temporary labels like “baseline” or “production”. It’s easy to add and remove tags in the UI or filter down to just runs with a specific tag.
- job_type: usually it’s either “train” or “eval”. Later, it would allow filtering and grouping of similar runs. We will set the job_type to “train”
- anonymous: this parameter allows controlling anonymous logging. we will set it to “must” which would send the run to an anonymous account instead of to a signed-up user account. For the other options, you can check the documentation
For each CV iteration we can instantiate a wandb run as follows:
run = wandb.init(project="FB3-deberta-v3",
                   config=CONFIG,
                   job_type='train',
                   group="FB3-BASELINE-MODEL",
                   tags=[CONFIG['model_name'], CONFIG['loss_type'], "10-epochs"],
                   name=f'FB3-fold-{fold}',
                   anonymous='must')
Now let’s define the training arguments that will be used by the Huggingface Trainer
🛠Training Arguments
Before instantiating our custom Trainer, we will create a TrainingArguments to define the training config.
We will set the following parameters:
- output_dir : The output directory where the model predictions and checkpoints will be written: each CV iteration would have its own directory with a name equal to the number of iterations prefixed with "output-"
- evaluation_strategy : set to "epoch" which means the Evaluation is done at the end of each epoch.
- per_device_train_batch_size: The batch size for training. We will set it to 8
- per_device_eval_batch_size: The batch size for evaluation. We will set it to 16 (to speed up the time execution)
- num_train_epochs: number of training epochs. As a reminder, during one epoch each sample of the training dataset has been seen by the model
- group_by_length: as long as we will be using dynamic padding, we will set this parameter to True to group together samples of roughly the same length in the training dataset (to minimize padding applied and be more efficient)
- max_grad_norm: Maximum gradient norm (for gradient clipping).
- learning_rate: The initial learning rate for AdamW optimizer. As a reminder, the AdamW optimizer
- weight_decay: The weight decay to apply to AdamW optimizer: in our case, we will apply the weight decay to all layers except biases and normalization layers
Note :
Weight decay is a regularization technique that adds a small penalty to the loss function (usually the L2 norm of the weights).
loss = loss + weight_decay_parameter * L2_norm_of_the_weights
Some implementations apply weight decay only to the weights and not the bias. On the other hand, PyTorch applies weight decay to both weights and bias.
Why weight decay?
1. To prevent overfitting.
2. To avoid exploding gradient: Because of the additional L2 norm, each iteration of your network will try to optimize the model weights in addition to the loss. This will help keep the weights as small as possible, preventing the weights to grow out of control, and thus avoiding exploding gradient
- gradient_accumulation_steps: Number of steps the gradients should be accumulated across before performing a backward pass: When using gradient accumulation, gradient calculation is done in smaller steps rather than all at once for a batch; 1 (means no gradient accumulation))
Note:
In this Stackoverflow discussion, it has been explained how to use the set gradient_accumulation_steps parameter to avoid OOM errors: set the gradient_accumulation_steps argument to a number that would fit into memory, and modify the per_device_train_batch_size to original_batch_size/gradient_accumulation_steps: so that the gradients would be accumulated across gradient_accumulation_steps, and a backward pass would be performed through gradient_accumulation_steps*original_batch_size/gradient_accumulation_steps=original_batch_size samples. The total number of training steps would be :

- load_best_model_at_end: we will set it to True to load the best model found during training at the end of the training: in this case, the save_strategy must be the same as evaluation_strategy: epoch in our case
- metric_for_best_model: we will set to the competition metric MCRMSE or eval_MCRMSE (with eval_ prefix)
- greater_is_better: set it to False, because we want to get the model with lower MCRMSE
- save_total_limit: we will set it to 1 to always keep one checkpoint a time (older checkpoints in output_dir will be deleted).
- report_to: as we are connected to W&B we will set the report_to logs to "wandb"
- label_name: set The list of label_name parameters to ["labels"], which corresponds to the previously defined field yielded by our custom Dataloader corresponding to the target classes
training_args = TrainingArguments(
        output_dir=f"outputs-{fold}/",
        evaluation_strategy="epoch",
        per_device_train_batch_size=CONFIG['train_batch_size'],
        per_device_eval_batch_size=CONFIG['valid_batch_size'],
        num_train_epochs=CONFIG['epochs'],
        learning_rate=CONFIG['learning_rate'],
        weight_decay=CONFIG['weight_decay'],
        gradient_accumulation_steps=CONFIG['n_accumulate'],
        seed=SEED,
        group_by_length=True,
        max_grad_norm=CONFIG['max_grad_norm'],
        metric_for_best_model='eval_MCRMSE',
        load_best_model_at_end=True,
        greater_is_better=False,
        save_strategy="epoch",
        save_total_limit=1,
        report_to="wandb",
        label_names=["labels"]
    )
Furthermore, we will define some other parameters for the Trainer:
- data collator: we need to define how to create a single batch from the list of data inputs returned by the Dataloader
We will use DataCollatorWithPadding which will dynamically pad the received inputs. - optimizer: we will use AdamW with decay in all layers except bias and normalization layers
- scheduler: we will use the get_linear_schedule_with_warmup to create a schedule with a warmup period during which the learning rate increases linearly from 0 to the initial lr (set in the optimizer) and then decreases linearly from the initial lr set in the optimizer to 0.
The Scheduler allows us to keep control of the learning rate if, for example, we want to make sure that every update of the learning rate doesn’t exceed a lambda value (check this Stackoverflow discussion about the utility of optimizer scheduler)
To launch the cross-validation training, first, we have to create the CV fold columns as explained in the PART1 post:
# set seed to produce similar folds
cv = MultilabelStratifiedKFold(n_splits=CONFIG.get("folds", 3), shuffle=True, random_state=SEED)

train = train.reset_index(drop=True)
for fold, ( _, val_idx) in enumerate(cv.split(X=train, y=train[CONFIG['label_cols']])):
    train.loc[val_idx , "fold"] = int(fold)

train["fold"] = train["fold"].astype(int)
The CV training workflow can be implemented as follows:
# Data Collator for Dynamic Padding
collate_fn = DataCollatorWithPadding(tokenizer=tokenizer)
# init predictions by fold
predictions = {}
for fold in range(0, CONFIG['folds']):
    print(f" ---- Fold: {fold} ----")
    run = wandb.init(project="FB3-deberta-v3",
                     config=CONFIG,
                     job_type='train',
                     group="FB3-BASELINE-MODEL",
                     tags=[CONFIG['model_name'], CONFIG['loss_type'], "10-epochs"],
                     name=f'FB3-fold-{fold}',
                     anonymous='must')
    # the reset index is VERY IMPORTANT for the Dataset iterator
    df_train = train[train.fold != fold].reset_index(drop=True)
    df_valid = train[train.fold == fold].reset_index(drop=True)
    # create iterators
    train_dataset = CustomIterator(df_train, tokenizer)
    valid_dataset = CustomIterator(df_valid, tokenizer)
    # init model
    model = FeedBackModel(CONFIG['model_name'])
    model.to(CONFIG['device'])

    # SET THE OPITMIZER AND THE SCHEDULER
    # no decay for bias and normalization layers
    param_optimizer = list(model.named_parameters())
    no_decay = ["bias", "LayerNorm.weight"]
    optimizer_parameters = [
        {
            "params": [p for n, p in param_optimizer if not any(nd in n for nd in no_decay)],
            "weight_decay": CONFIG['weight_decay'],
        },
        {
            "params": [p for n, p in param_optimizer if any(nd in n for nd in no_decay)],
            "weight_decay": 0.0,
        },
    ]
    optimizer = AdamW(optimizer_parameters, lr=CONFIG['learning_rate'])
    num_training_steps = (len(train_dataset) * CONFIG['epochs']) // (CONFIG['train_batch_size'] * CONFIG['n_accumulate'])
    scheduler = get_linear_schedule_with_warmup(
        optimizer,
        num_warmup_steps=0.1*num_training_steps,
        num_training_steps=num_training_steps
    )
    # CREATE THE TRAINER
    trainer = CustomTrainer(
        model=model,
        args=training_args,
        train_dataset=train_dataset,
        eval_dataset=valid_dataset,
        data_collator=collate_fn,
        optimizers=(optimizer, scheduler),
        compute_metrics=compute_metrics
    )
    # LAUNCH THE TRAINER
    trainer.train()
You can access my public W&B dashboard that I created for this project: https://wandb.ai/athena75/FB3-deberta-v3?workspace=user-athena75
🗿Create W&B artifacts
For Later use, W&B is very convenient to create model artifacts once the model is fine-tuned. We can use them later and create new versions of our models.
To create a model artifact, all you have to do is :
- Create a wandb.Artifact object with a clear and consistent name, and you have to specify the type parameter it can be a dataset or model, in our case model
- Add the local directory to the artifact: in fact, once you instantiate the model and start to fine-tune it, it creates a local checkpoint containing the model bin as well as the model state and configuration. You have to add it to the artifact.
- Once the artifact has all the desired files, you can call wandb.log_artifact() to log it.
Here is a snip-code example of creating an artifact for each CV model:
for fold in range(0, CONFIG['folds']):
    run = wandb.init(project="FB3-deberta-v3",
                         config=CONFIG,
                         job_type='train',
                         group="FB3-BASELINE-MODEL",
                         tags=[CONFIG['model_name'], CONFIG['loss_type'], "10-epochs"],
                         name=f'FB3-fold-{fold}',
                         anonymous='must')

    trainer = CustomTrainer(
              .....
    )
    ##### TRAIN / FINE-TUNE ####
    # create model artifact
    model_artifact = wandb.Artifact(f'FB3-fold-{fold}', type="model",
                                   description=f"MultilabelStratified - fold--{fold}")
    # save locally the model - it would create a local dir
    trainer.save_model(f'fold-{fold}')
    # add the local dir to the artifact
    model_artifact.add_dir(f'fold-{fold}')
    # log artifact
    # it would save the artifact version and declare the artifact as an output of the run
    run.log_artifact(model_artifact)

    run.finish()
✨Use W&B artifacts for inference✨:
Once the training is accomplished, we can use the stored artifacts on the Weights & Biases server, in our case, to generate model predictions and generate an aggregated output prediction.
PS: you can extract the usage code directly from the W&B interface https://wandb.ai/athena75/Feedback3-deberta/artifacts/model/FB3-fold-0/93c08783e5b7c696451a/usage
- login to your wandb account and Instantiate a default run with wandb.init()
- Indicate to the use_artifact() method the path to your artifact as well as the type (the model in our case) to retrieve the artifact
- Download the artifact directory locally using the download() method
- Load the local model and use it to make predictions
Example of implementation :
predictions = torch.zeros((len(test), len(CONFIG['label_cols']))

for fold in range(CONFIG["folds"]):
    print(f"---- FOLD {fold} -------")
    # instantiate deafault run
    run = wandb.init()
    # Indicate the artifact we want to use with the use_artifact method.
    artifact = run.use_artifact(f'athena75/FB3-deberta-10/FB3-fold-{fold}:v0', type='model')
    # download locally the model
    artifact_dir = artifact.download()
    # load the loacal model
    # it is a pytorch moeal: loaded as follows
    # https://pytorch.org/tutorials/beginner/saving_loading_models.html
    model = FeedBackModel(CONFIG['model_name'])
    model.load_state_dict(torch.load(f'artifacts/FB3-fold-{fold}:v0/pytorch_model.bin'))
    # generate test embediings
    test_dataset = CustomIterator(test, tokenizer, is_train=False)
    test_dataloader = torch.utils.data.DataLoader(
            test_dataset,
            batch_size=CONFIG["train_batch_size"],
            shuffle=False
        )
    input_ids, attention_mask = tuple(next(iter(test_dataloader)).values())
    input_ids = input_ids.to('cpu')
    attention_mask = attention_mask.to('cpu')
    # genreate predictions
    fold_preds = model(input_ids, attention_mask)
    predictions = fold_preds.logits.add(predictions)
    # remove local dir to save space
    shutil.rmtree('artifacts')
🙏Credits:
This Work is a singular genesis of these excellent resources, do not hesitate to upvote the Kaggle resources:
- @rhtsingh notebook: the different ways to explore transformer representations
- @debarshichanda work: from which I borrowed the trainer hyper-parameters and the model architecture
- @Y.NAKAMA notebook: the loss function and the multi-label — Stratified cross-validation
- @shreydan notebook: the notebook’s global style
Conclusion:
Thanks a lot for reading my posts! 🥰, I share with you all my work: this Kaggle notebook, as well as my public W&B dashboard.
I hope it was clear, and feel free to ask me questions.
📬My address mail is: schopenhacker75@gmail.com📬
For a later post, I intend to address the subject of how to deploy a Transformer in production. Or how to build an MLOps Pipeline for NLP Transformers, I haven’t decided yet…
Transformers for Multi-Regression — [PART2] was originally published in Towards AI on Medium, where people are continuing the conversation by highlighting and responding to this story.
Join thousands of data leaders on the AI newsletter. It’s free, we don’t spam, and we never share your email address. Keep up to date with the latest work in AI. From research to projects and ideas. If you are building an AI startup, an AI-related product, or a service, we invite you to consider becoming a sponsor.
Published via Towards AI
Towards AI Academy
We Build Enterprise-Grade AI. We'll Teach You to Master It Too.
15 engineers. 100,000+ students. Towards AI Academy teaches what actually survives production.
Start free — no commitment:
→ 6-Day Agentic AI Engineering Email Guide — one practical lesson per day
→ Agents Architecture Cheatsheet — 3 years of architecture decisions in 6 pages
Our courses:
→ AI Engineering Certification — 90+ lessons from project selection to deployed product. The most comprehensive practical LLM course out there.
→ Agent Engineering Course — Hands on with production agent architectures, memory, routing, and eval frameworks — built from real enterprise engagements.
→ AI for Work — Understand, evaluate, and apply AI for complex work tasks.
Note: Article content contains the views of the contributing authors and not Towards AI.
Related posts
Recent Posts


")

