
Template Matching
Last Updated on July 25, 2023 by Editorial Team
Author(s): Erika Lacson
Originally published on Towards AI.
Introduction to Image Processing with Python
Episode 9: Template Matching

Hello, fellow explorers! U+1F680 Here we are, at the grand finale of our image processing series. In this closing episode, we’ll be exploring a method that’s integral to object detection and tracking — Template Matching. It’s all about finding patterns in a larger canvas, and it’s as exciting as it sounds. So, without further ado, let’s jump right in! U+1F64C
Template Matching is like finding Waldo in a crowded scene — we have a reference image (Waldo), and we want to find it in a larger image (the crowd).
The algorithm for template matching is straightforward: it compares the template to each part of the source image, sliding pixel by pixel. The result is a correlation map where each pixel value reflects how similar the template is to that location in the source image.
In practice, actual implementations of template matching differ based on the measure of similarity and methods for efficient multiple comparisons. But no worries, I’ll break it down for you. U+1F9D0
As always, let’s import the necessary libraries:
# Import libraries
import numpy as np
import matplotlib.pyplot as plt
from skimage.io import imread, imshow
from skimage.color import rgb2gray
from skimage.feature import match_template
from skimage.feature import peak_local_max
Let’s illustrate this with an example featuring emojis (because who doesn’t love emojis, right?). U+1F929
original_image = imread('emojis.png')
plt.figure(figsize=(20,20))
plt.imshow(original_image)
plt.title('Original Image', fontsize=20, weight='bold')
plt.axis('off')
plt.show()
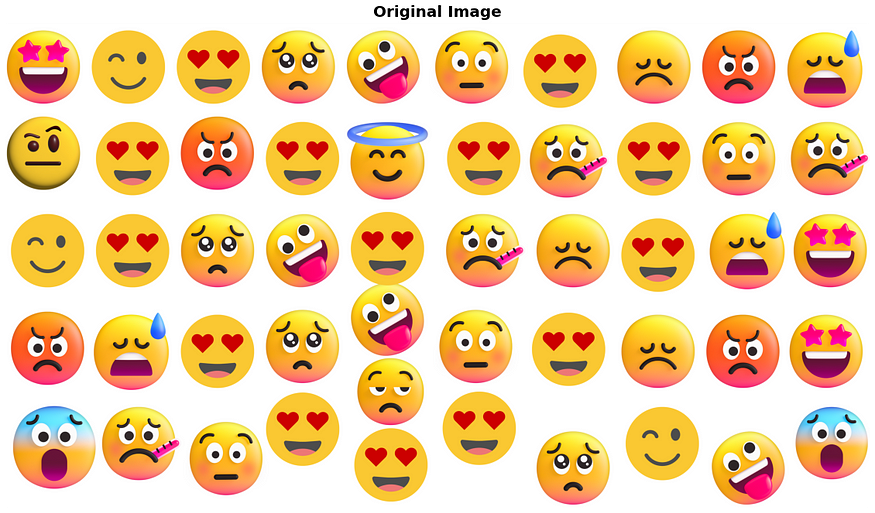
While template matching works with color images, let’s simplify things and convert our image to grayscale.
# Convert the image to grayscale
gray_image = rgb2gray(original_image[:,:,:3])
plt.figure(figsize=(20,20))
plt.imshow(gray_image, cmap='gray')
plt.title('Grayscale Image', fontsize=20, weight='bold')
plt.axis('off')
plt.show()

Now, let’s choose a single emoji as our template:
template = gray_image[1330:1850,625:1140]
plt.figure(figsize=(10,10))
plt.imshow(template, cmap='gray')
plt.title('Template Image', fontsize=20, weight='bold')
plt.axis('off')
plt.show();
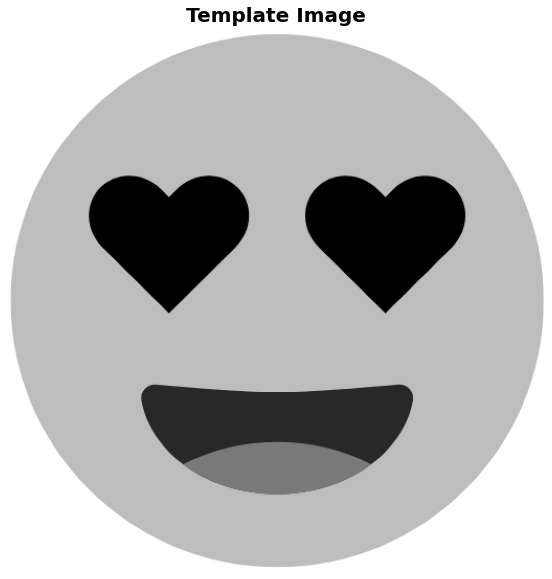
By using match_template, we perform the template matching.
result = match_template(gray_image, template)
plt.figure(figsize=(10,10))
imshow(result, cmap='viridis')
plt.show();
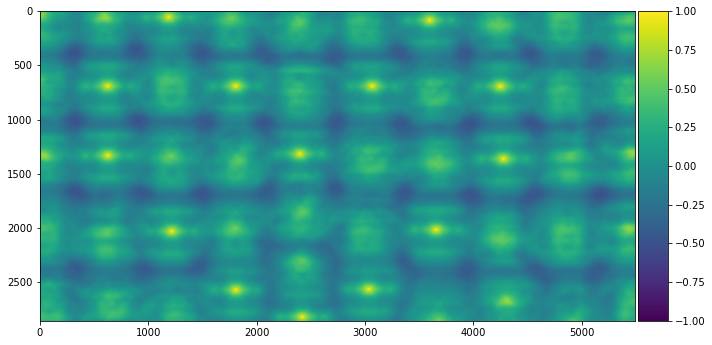
The result? Brightly colored areas show where our template might be found.U+1F440 Did you notice the shape formed by the bright-colored areas?
If we assume that the template is found only once in the source image then we can find where it is by looking for the pixel with the highest value (~1.00).
Now let’s pinpoint the exact location.
x, y = np.unravel_index(np.argmax(result), result.shape)
print((x, y))
Output:
(1330, 625)
imshow(gray_image)
template_width, template_height = template.shape
rect = plt.Rectangle((y, x), template_height, template_width, color='y',
 fc='none')
plt.gca().add_patch(rect);
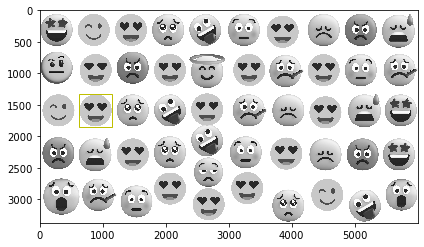
To locate multiple matches of a template, we search for peaks that have a certain value for correlation.
imshow(gray_image)
template_width, template_height = template.shape
for x, y in peak_local_max(result, threshold_abs=0.99):
 rect = plt.Rectangle((y, x), template_height, template_width, color='red',
 fc='none')
 plt.gca().add_patch(rect);
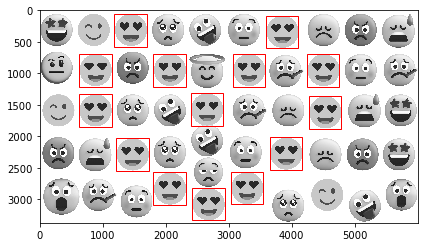
Voila! We’ve found our heart eyes emoji in the crowd! U+1F389
Finally, let’s stack it on our colored image:
plt.figure(figsize=(20, 20))
plt.imshow(original_image)
plt.title('We found our heart eyes emojis!', fontsize=20, weight='bold', color='red')
template_width, template_height = template.shape
for x, y in peak_local_max(result, threshold_abs=0.99):
 rect = plt.Rectangle((y, x), template_height, template_width, color='red',
 fc='none')
 plt.gca().add_patch(rect);

Exploring Further U+1F50D
- What happens if we change the threshold? Lowering the threshold will give us more matches (but also more false positives), while raising it will make the matches fewer but potentially more accurate.
- How about enlarging the template? The larger the template, the fewer matches we’ll get. That’s because the match must be nearly identical in size to the template.
- Flipping the template? This would likely result in no matches, as template matching is sensitive to orientation.
- Changing the image contrast? As long as the template and the source image change similarly, the matches should remain valid. However, drastic changes may alter the results.
You can test it out to confirm. 🙂
Conclusion U+1F3C1
And with that, we’ve reached the end of our image-processing journey. We’ve traversed through fascinating landscapes of pixels and matrices, unlocked the secrets of colors, shapes, and transformations, and have seen firsthand how these simple concepts can bring images to life.
I hope this series has sparked your curiosity to explore the vast universe of image processing further. Remember, every ending is just the beginning of a new adventure. So, keep learning, stay curious, and continue to push the boundaries of your imagination.
Thank you for joining me on this journey! U+1F64C Until our next adventure, keep coding, keep exploring! U+1F4BBU+1F680U+1F389
References:
- Borja, B. (2023). Lecture 9 — Special Topics in Image Processing Part 2 [Jupyter Notebook]. Introduction to Image Processing 2023, Asian Institute of Management.
Join thousands of data leaders on the AI newsletter. Join over 80,000 subscribers and keep up to date with the latest developments in AI. From research to projects and ideas. If you are building an AI startup, an AI-related product, or a service, we invite you to consider becoming a sponsor.
Published via Towards AI
Take our 90+ lesson From Beginner to Advanced LLM Developer Certification: From choosing a project to deploying a working product this is the most comprehensive and practical LLM course out there!
Towards AI has published Building LLMs for Production—our 470+ page guide to mastering LLMs with practical projects and expert insights!

Discover Your Dream AI Career at Towards AI Jobs
Towards AI has built a jobs board tailored specifically to Machine Learning and Data Science Jobs and Skills. Our software searches for live AI jobs each hour, labels and categorises them and makes them easily searchable. Explore over 40,000 live jobs today with Towards AI Jobs!
Note: Content contains the views of the contributing authors and not Towards AI.


