Classifying Emotions with an AI Model using brain data!
Last Updated on March 4, 2024 by Editorial Team
Author(s): Yakshith Kommineni
Originally published on Towards AI.

Have you ever felt that your Spotify playlist is insanely unorganized? I mean how one song could be very slow and melodic while the next one has a lot of loud instrumentals and is upbeat. I can definitely relate to this. Sometimes, I think about making a playlist for each emotion but this is just too much work. This is where emotion classifiers come in. By reading the electrical signals produced by your neurons (EEG) with a brain-computer interface or BCIs, AI models can detect what you’re feeling and can be used for whatever. In the scenario above, you would use it for Spotify. For more information on BCIs, make sure to read my other articles!
Learning about the Specific Model
BCIs typically use AI models in their software as they can be very useful. Throughout this article, you will see how a specific AI model called TSception works and is coded. Make sure to watch the demo video below for a better understanding and live run-through of this article
A TSception model is an AI model that was specifically for emotion classification. It’s a multi-scale convolutional neural network (CNN). If you are quite new to AI, a neural network is essentially an AI model’s structure that is greatly inspired by the structure of the brain. A CNN is a neural network with filters, convolution, pooling, and fully-connected layers. Filters look for specific features in the data that could correspond to something, like emotions. Convolution is the process of zooming in on the data for the filters to find more of those features. Pooling is summarizing the data and understanding what was found. Finally, the fully connected layers bring everything together and generate an output based on what was found.

That was a CNN but you’re probably wondering what a multi-scale CNN is. The multi-scale aspect is viewing the data in perspectives and levels. In the TSception model, there are two of these perspectives. The temporal level and the asymmetric spatial level. The temporal level is looking for specific changes in the EEG data. Patterns and rhythms of the electrical signals.
The Asymmetric Spatial Layer utilizes two types of spatial convolutional kernels (filters): Global Kernel captures overall spatial information, and Hemisphere Kernel extracts relations between the left and right brain hemispheres.
Coding the Model

Here comes the second component. Actually coding and training the model to detect emotions. Keep in mind that you don’t need much knowledge as we’re using basic Python and machine learning methods. We will be using PyTorch which is a very popular AI framework for Python and it’s sub-library, TorchEEG which was built for BCI application like this one.
Prerequisites:
- Basic Python Knowledge
– Latest version of Python on your computer
– The following libraries: TorchEEG and Torch
– The DREAMER Dataset (Request Access)
Step 1: Begin Coding by Importing the Necessary Modules

These are all the modules we will be using throughout this model. The first one is importing the DREAMERDataset functions, KFoldGroupbyTrial which is a type of validation, a data loader to load the data, the actual model, a trainer, preprocessing transformations and a wrapper to simplify the training process.
Step 2: Load your Dataset

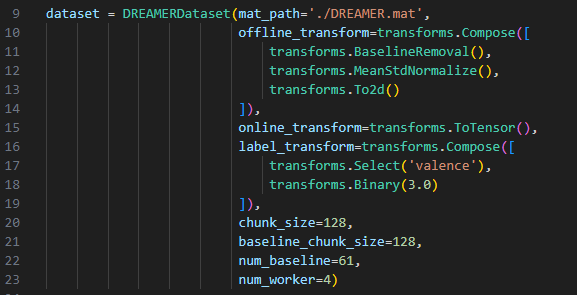
We load the dataset with the module we imported, set the paths, and perform transforms to make labels such as the valence one which corresponds to the emotional level, making it into a tensor and defining the training parameters like the chunk size.
Step 3: Configure your validation

Validation is a way of testing the model and how it performed. We will be using KFoldGroupbyTrial, where trials (or subjects) are kept together in the same fold to prevent data leakage. This is particularly important in scenarios where data from the same trial or subject may be correlated.
Step 4: Training your model

Definitely the most important step, is actually training your model so it can classify emotions. In this for loop, we define the model with things like electrodes, classes, and sampling rate. We initiate the training loop for the epochs, use a progress bar, save the last model checkpoint, and print a summary of the model architecture. Then we assign the score of the model to the variable “score” and print it.
Note: In line 45, you should change ‘cpu’ to ‘gpu’ if your machine has one as it’s much faster.
You’re all done!
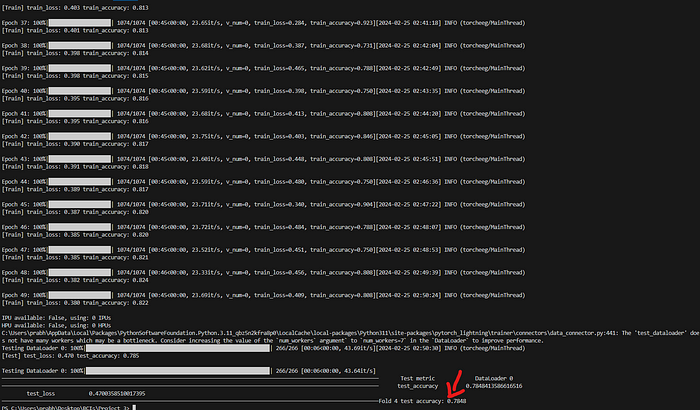
That’s pretty much everything for the code except for a few minor changes. Now you just wait for the model to train. Keep in mind if you’re using your CPU, it can take quite some time (around 5 hours) because you need to train 5 times for the K fold validation.


As you can see the test accuracy is 78% which isn’t too bad but there is a lot of room for improvement. A few things you can do to improve the accuracy are adjust the amount of epochs it’s training for. Since I don’t have a gpu, it’s hard to determine the exact amount as I have to test multiple values which would take hours. Keep in mind the above model took 5 hours of keeping the laptop idle.
Real World Applications
Emotion detection models like this one have many applications to solve real-world problems. They could truly revolutionize treatments and procedures for patients with movement-restricting diseases such as ALS and LIS. They could provide key insights into how patients react to certain types of treatments. They would also provide a great platform for therapy. Your feelings would be much clearer which makes the therapist’s job significantly easier. And of course, the music player that reacts to your emotional application too. These are just the tip of the iceberg, emotion detection BCIs can be integrated with movement detection, speech detection, and many other things to provide an unreal experience for those who can’t express these things.
Conclusion
Throughout the article, you’ve learned many things, like what multi-scale CNNs are, and various AI concepts, and hopefully, you’ve read my other articles to learn more about BCIs too. Having said this, there are still many more possibilities that can be done with EEG data. In my previous project, I used a Muse headband which is a BCI that can send EEG data directly to your computer to play Chrome Dino with just my brain. Make sure to follow and stay tuned as there are even bigger projects to come filling the gap between computers and our brain.
Hello! I’m Yakshith and I’m a high school student, an Innovator at TKS (The Knowledge Society), and a brain-computer interface (BCI) enthusiast. Thank you for reading and don’t hesitate to check out my X, Substack, LinkedIn, YouTube!
Join thousands of data leaders on the AI newsletter. Join over 80,000 subscribers and keep up to date with the latest developments in AI. From research to projects and ideas. If you are building an AI startup, an AI-related product, or a service, we invite you to consider becoming a sponsor.
Published via Towards AI
Take our 90+ lesson From Beginner to Advanced LLM Developer Certification: From choosing a project to deploying a working product this is the most comprehensive and practical LLM course out there!
Towards AI has published Building LLMs for Production—our 470+ page guide to mastering LLMs with practical projects and expert insights!

Discover Your Dream AI Career at Towards AI Jobs
Towards AI has built a jobs board tailored specifically to Machine Learning and Data Science Jobs and Skills. Our software searches for live AI jobs each hour, labels and categorises them and makes them easily searchable. Explore over 40,000 live jobs today with Towards AI Jobs!
Note: Content contains the views of the contributing authors and not Towards AI.


