


A Gentle Introduction to Audio Classification With Tensorflow
Last Updated on May 3, 2021 by Editorial Team
Author(s): Dimitre Oliveira
Deep Learning
Applying deep learning to classify audio with Tensorflow
We have seen a lot of recent advances in deep learning related to vision and language fields, it is intuitive to understand why CNN performs very well on images, with pixel’s local correlation, and how sequential models like RNNs or transformers also perform very well on language, with its sequential nature, but what about audio? what are the types of models and processes used when we are dealing with audio data?
In this article you will learn how to approach a simple audio classification problem, you will learn some of the common and efficient methods used, and the Tensorflow code to do it.
Disclaimer: The code presented here is based on my work developed for the “Rainforest Connection Species Audio Detection” Kaggle competition, but for demonstration purposes, I will use the “Speech Commands” dataset.
Waveforms
We usually have audio files in the “.wav” format, they are commonly referred to as waveforms, a waveform is a time series with the signal amplitude at each specific time, if we visualize one of those waveform samples we will get something like this:
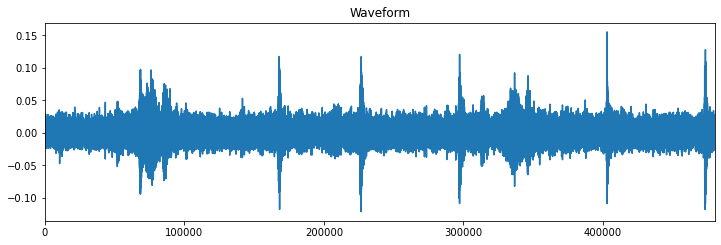
Intuitively one might consider modeling this data like a regular time series (e.g. stock price forecasting) using some kind of RNN model, in fact, this could be done, but since we are using audio signals, a more appropriate choice is to transform the waveform samples into spectrograms.
Spectrograms
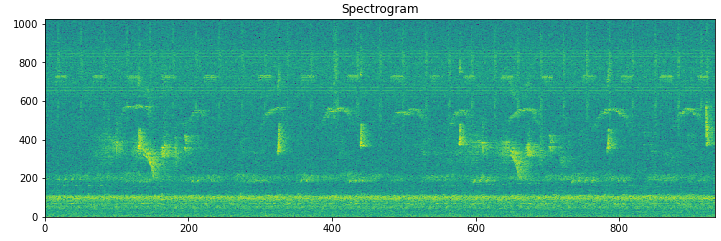
A spectrogram is an image representation of the waveform signal, it shows its frequency intensity range over time, it can be very useful when we want to evaluate the signal's frequency distribution over time. Below is the spectrogram representation of the waveform image we saw above.
Speech Commands use case
To make this tutorial simpler we will be using the “Speech Commands” dataset, this dataset has one-second audio clips with spoken words like: “down”, “go”, “left”, “no”, “right”, “stop”, “up” and “yes”.
Audio processing with Tensorflow
Now that we have an idea of how we process audio data to use with deep learning models, we can proceed to look at the code implementation to do it, our pipeline will follow a simple workflow described by the diagram below:
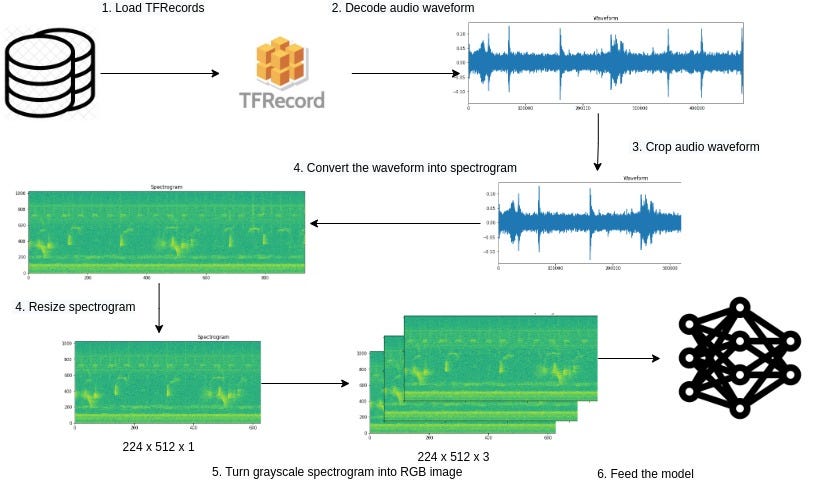
Note that in our use case at the 1st step, the data is loaded directly from “.wav” files, and the 3rd step is optional since the audio files have only one second each, in some cases cropping the audio may be a good idea for longer files and also for keeping a fixed-length across all samples.
Loading the data
def load_dataset(filenames):
  dataset = tf.data.Dataset.from_tensor_slices(filenames)
  return dataset
The load_dataset function will be responsible for loading the .wav files and converting them into a Tensorflow dataset.
Extracting waveform and label
commands = np.array(tf.io.gfile.listdir(str(data_dir)))
commands = commands[commands != 'README.md']
def decode_audio(audio_binary):
  audio, _ = tf.audio.decode_wav(audio_binary)
  return tf.squeeze(audio, axis=-1)
def get_label(filename):
  label = tf.strings.split(filename, os.path.sep)[-2]
  label = tf.argmax(label == commands)
  return label
def get_waveform_and_label(filename):
  label = get_label(filename)
  audio_binary = tf.io.read_file(filename)
  waveform = decode_audio(audio_binary)
  return waveform, label
After loading the .wav files we need to decode them, this can be done using the tf.audio.decode_wav function, it will turn the .wav files into float tensors. Next, we need to extract the labels from the files, in this specific use case we can get the labels from each sample’s file path, after that we just need to one-hot encode them.
Here is an example:
First, we get a file path like this one:
"data/mini_speech_commands/up/50f55535_nohash_0.wav"
Then we extract the text after the second “/”, in this case, the label is UP, finally, we use the commands list to one-hot encode the labels.
Commands: ['up' 'down' 'go' 'stop' 'left' 'no' 'yes' 'right']
Label = 'up'
After one-hot encoding:
Label = [1, 0, 0, 0, 0, 0, 0, 0]
Transforming waveforms into spectrograms
The next step is to convert the waveforms files into spectrograms, luckily Tensorflow has a function that can do that, tf.signal.stft applies a short-time Fourier transform (STFT) to convert the audio into the time-frequency domain, then we apply the tf.abs operator to remove the signal phase, and only keep the magnitude. Note that the tf.signal.stft function has some parameters like frame_length and frame_step, they will affect the generated spectrogram, I will not go into details about how to tune them but you can refer to this video to learn more.
def get_spectrogram(waveform, padding=False, min_padding=48000):
  waveform = tf.cast(waveform, tf.float32)
  spectrogram = tf.signal.stft(waveform, frame_length=2048, frame_step=512, fft_length=2048)
  spectrogram = tf.abs(spectrogram)
  return spectrogram
def get_spectrogram_tf(waveform, label):
  spectrogram = get_spectrogram(waveform)
  spectrogram = tf.expand_dims(spectrogram, axis=-1)
  return spectrogram, label
Transform spectrograms into RGB images
The final step is to transform the spectrograms into RGB images, this step is optional, but here we will be using a model pre-trained on the ImageNet dataset, and this model requires input images with 3 channels, otherwise, you could keep the spectrograms with only one channel.
def prepare_sample(spectrogram, label):
  spectrogram = tf.image.resize(spectrogram, [HEIGHT, WIDTH])
  spectrogram = tf.image.grayscale_to_rgb(spectrogram)
  return spectrogram, label
Combining all together
HEIGHT, WIDTH = 128, 128
AUTO = tf.data.AUTOTUNE
def get_dataset(filenames, batch_size=32):
  dataset = load_dataset(filenames)

  dataset = files_ds.map(get_waveform_and_label, num_parallel_calls=AUTO)
  dataset = dataset.map(get_spectrogram_tf, num_parallel_calls=AUTO)
  dataset = dataset.map(prepare_sample, num_parallel_calls=AUTO)
  dataset = dataset.shuffle(256)
  dataset = dataset.repeat()
  dataset = dataset.batch(batch_size)
  dataset = dataset.prefetch(AUTO)
  return dataset
Bringing all together we have the get_dataset function that takes the filenames as inputs and after going through all the steps described above, returns a Tensorflow dataset with RGB spectrograms images and its labels.
The model
def model_fn(input_shape, N_CLASSES):
  inputs = L.Input(shape=input_shape, name='input_audio')
  base_model = efn.EfficientNetB0(input_tensor=inputs,
                                  include_top=False,
                                  weights='imagenet')

  x = L.GlobalAveragePooling2D()(base_model.output)
  x = L.Dropout(.5)(x)
  output = L.Dense(N_CLASSES, activation='softmax',name='output')(x)

  model = Model(inputs=inputs, outputs=output)

  return model
Our model will have an EfficientNetB0 backbone, and at its top, we have added a GlobalAveragePooling2D followed by a Dropout, with a final Dense layer that will do the actual multi-class classification.
With a small dataset EfficientNetB0 may be a good baseline, it has decent accuracy even being a fast and light model.
Training
model = model_fn((None, None, CHANNELS), N_CLASSES)
model.compile(optimizer=tf.optimizers.Adam(),
              loss=losses.CategoricalCrossentropy(),
              metrics=[metrics.CategoricalAccuracy()])

model.fit(x=get_dataset(FILENAMES),
          steps_per_epoch=100,
          epochs=10)
The training code is very standard for a Keras model, so you probably won’t find anything new here.
Conclusion
Now you should have a clearer understanding of the workflow to apply deep learning to audio files, while this is not the only way you can do it, it is one best options regarding the easiness/performance trade-off. If you are going to model audio you may want to also consider other promising approaches like transformers.
As additional preprocessing steps you can truncate or pad the waveforms, this might be a good idea in cases where your samples have different lengths or if the samples are too long and you just need a smaller part from it, you can find the code on how to do it in the references section below.
References
– Simple audio recognition: Recognizing keywords
– Rainforest-Audio classification Tensorflow starter
– Rainforest-Audio classification TF Improved
A Gentle Introduction to Audio Classification With Tensorflow was originally published in Towards AI on Medium, where people are continuing the conversation by highlighting and responding to this story.
Published via Towards AI
Towards AI Academy
We Build Enterprise-Grade AI. We'll Teach You to Master It Too.
15 engineers. 100,000+ students. Towards AI Academy teaches what actually survives production.
Start free — no commitment:
→ 6-Day Agentic AI Engineering Email Guide — one practical lesson per day
→ Agents Architecture Cheatsheet — 3 years of architecture decisions in 6 pages
Our courses:
→ AI Engineering Certification — 90+ lessons from project selection to deployed product. The most comprehensive practical LLM course out there.
→ Agent Engineering Course — Hands on with production agent architectures, memory, routing, and eval frameworks — built from real enterprise engagements.
→ AI for Work — Understand, evaluate, and apply AI for complex work tasks.
Note: Article content contains the views of the contributing authors and not Towards AI.
Related posts
Recent Posts


")


Comments are closed.