Name: Towards AI Legal Name: Towards AI, Inc. Description: Towards AI is the world's leading artificial intelligence (AI) and technology publication. Read by thought-leaders and decision-makers around the world. Phone Number: +1-650-246-9381 Email: pub@towardsai.net
228 Park Avenue South New York, NY 10003 United States
Website: Publisher: https://towardsai.net/#publisher Diversity Policy: https://towardsai.net/about Ethics Policy: https://towardsai.net/about Masthead: https://towardsai.net/about
Name: Towards AI Legal Name: Towards AI, Inc. Description: Towards AI is the world's leading artificial intelligence (AI) and technology publication. Founders: Roberto Iriondo, , Job Title: Co-founder and Advisor Works for: Towards AI, Inc. Follow Roberto: X, LinkedIn, GitHub, Google Scholar, Towards AI Profile, Medium, ML@CMU, FreeCodeCamp, Crunchbase, Bloomberg, Roberto Iriondo, Generative AI Lab, Generative AI Lab Denis Piffaretti, Job Title: Co-founder Works for: Towards AI, Inc. Louie Peters, Job Title: Co-founder Works for: Towards AI, Inc. Louis-François Bouchard, Job Title: Co-founder Works for: Towards AI, Inc. Cover:
Towards AI Cover
Logo:
Towards AI Logo
Areas Served: Worldwide Alternate Name: Towards AI, Inc. Alternate Name: Towards AI Co. Alternate Name: towards ai Alternate Name: towardsai Alternate Name: towards.ai Alternate Name: tai Alternate Name: toward ai Alternate Name: toward.ai Alternate Name: Towards AI, Inc. Alternate Name: towardsai.net Alternate Name: pub.towardsai.net
5 stars – based on 497 reviews

Frequently Used, Contextual References

TODO: Remember to copy unique IDs whenever it needs used. i.e., URL: 304b2e42315e

Resources

Take our 85+ lesson From Beginner to Advanced LLM Developer Certification: From choosing a project to deploying a working product this is the most comprehensive and practical LLM course out there!

Publication

Building Neural Networks with Python Code and Math in Detail — II
Editorial   Machine Learning   Tutorials

Building Neural Networks with Python Code and Math in Detail — II

Last Updated on October 14, 2020 by Editorial Team

Author(s): Pratik Shukla, Roberto Iriondo
Image designed in photoshop representing a neural network and brain. The open source image can be found for free on Pixabay
Source: Pixabay

The second part of our tutorial on neural networks from scratch. From the math behind them to step-by-step implementation case studies in Python. Launch the samples on Google Colab.

In the first part of our tutorial on neural networks, we explained the basic concepts about neural networks, from the math behind them to implementing neural networks in Python without any hidden layers. We showed how to make satisfactory predictions even in case scenarios where we did not use any hidden layers. However, there are several limitations to single-layer neural networks.

In this tutorial, we will dive in-depth on the limitations and advantages of using neural networks in machine learning. We will show how to implement neural nets with hidden layers and how these lead to a higher accuracy rate on our predictions, along with implementation samples in Python on Google Colab.

Index:

  1. Limitations and advantages of neural networks
  2. How to select several neurons in a hidden layer.
  3. The general structure of an artificial neural network (ANN).
  4. Implementation of a multilayer neural network in Python.
  5. Comparison with a single-layer neural network.
  6. Non-linearly separable data with a neural network.
  7. Conclusion.

1. Limitations and Advantages of Neural Networks

Limitations of single-layer neural networks:

  • It can only represent a limited set of functions. If we have been training a model that uses complicated functions (which is the general case), then using a single layer neural network can lead to low accuracy in our prediction rate.
  • It can only predict linearly separable data. If we have non-linear data, then training our single-layer neural network will lead to low accuracy in our prediction rate.
  • Decision boundaries for single-layer neural networks must be hyperplane, which means that if our data distributes in 3 dimensions, then the decision boundary must be in 2 dimensions.
Figure 0: An example of non-linearly separable data
Figure 0: An example of non-linearly separable data.

To overcome such limitations, we use hidden layers in our neural networks.

Advantages of single-layer neural networks:

  • Single-layer neural networks are easy to set up.
  • Single-layer neural networks take less time to train compared to a multi-layer neural network.
  • Single-layer neural networks have explicit links to statistical models.
  • The outputs in single layer neural networks are weighted sums of inputs. It means that we can interpret the output of a single layer neural network feasibly.

Advantages of multilayer neural networks:

  • They construct more extensive networks by considering layers of processing units.
  • They can be used to classify non-linearly separable data.
  • Multilayer neural networks are more reliable compared to single-layer neural networks.

2. How to select several neurons in a hidden layer?

There are many methods for determining the correct number of neurons to use in the hidden layer. We will see a few of them here.

  • The number of hidden nodes should be less than twice the size of the nodes in the input layer.

For example: If we have 2 input nodes, then our hidden nodes should be less than 4.

a. 2 inputs, 4 hidden nodes:

Figure 1: A neural net with 2 inputs, and 4 hidden nodes
Figure 1: A neural net with 2 inputs, and 4 hidden nodes.

b. 2 inputs, 3 hidden nodes:

Figure 2: A neural net with 2 inputs, and 3 hidden nodes.
Figure 2: A neural net with 2 inputs, and 3 hidden nodes.

c. 2 inputs, 2 hidden nodes:

Figure 3: A neural network with 2 inputs, and 2 hidden nodes.
Figure 3: A neural network with 2 inputs, and 2 hidden nodes.

d. 2 inputs, 1 hidden node:

Figure 4: A neural net with 2 inputs, and 1 hidden node.
Figure 4: A neural net with 2 inputs, and 1 hidden node.
  • The number of hidden nodes should be 2/3 the size of input nodes, plus the size of the output node.

For example: If we have 2 input nodes and 1 output node then the hidden nodes should be = floor(2*2/3 + 1) = 2

a. 2 inputs, 2 hidden nodes:

Figure 5: A neural net with 2 inputs, and 2 hidden nodes.
Figure 5: A neural net with 2 inputs, and 2 hidden nodes.
  • The number of hidden nodes should be between the size of input nodes and output nodes.

For example: If we have 3 input nodes and 2 output nodes, then the hidden nodes should be between 2 and 3.

a. 3 inputs, 2 hidden nodes, 2 outputs:

Figure 6: A neural net with 3 inputs, 2 hidden nodes and 2 outputs.
Figure 6: A neural net with 3 inputs, 2 hidden nodes, and 2 outputs.

b. 3 inputs, 3 hidden nodes, 2 outputs:

Figure 7: A neural net with 3 inputs, 3 hidden nodes, and 2 outputs.
Figure 7: A neural net with 3 inputs, 3 hidden nodes, and 2 outputs.

How many weight values do we need?

  1. For a hidden layer: Number of inputs * No. of hidden layer nodes
  2. For an output layer: Number of hidden layer nodes * No. of outputs

3. The General Structure of an Artificial Neural Network (ANN):

Figure 8: General structure for an artificial neural network with three layers, an input layer, a hidden layer, and an output
Figure 8: General structure for an artificial neural network with three layers, an input layer, a hidden layer, and an output layer.

Summarization of an artificial neural network:

  1. Take inputs.
  2. Add bias (if required).
  3. Assign random weights in the hidden layer and the output layer.
  4. Run the code for training.
  5. Find the error in prediction.
  6. Update the weight values of the hidden layer and output layer by gradient descent algorithm.
  7. Repeat the training phase with updated weights.
  8. Make predictions.

Execution of multilayer neural networks:

After reading the first article, we saw that we had only 1 phase of execution there. In that phase, we find the updated weight values and rerun the code to achieve minimum error. However, things are a little spicy here. The execution in a multilayer neural network takes place in two-phase. In phase-1, we update the values of weight_output (weight values for output layer), and in phase-2, we update the value of weight_hidden ( weight values for the hidden layer ). Phase-1 is similar to that of a neural network without any hidden layers.

Execution in phase-1:

To find the derivative, we are going to use in gradient descent algorithm to update the weight values. Here we are not going to derive the derivatives for those functions we already did in part -1 of neural network.
In this phase, our goal is to find the weight values for the output layer. Here we are going to calculate the change in error concerning the change in output weight.

We first define some terms we are going to use in these derivatives:

Figure 9: Defining our derivatives
Figure 9: Defining our derivatives.

a. Finding the first derivative:

Figure 10: Finding the first derivative
Figure 10: Finding the first derivative.

b. Finding the second derivative:

Figure 11: Finding the second derivative.

c. Finding the third derivative:

Figure 12: Finding the third derivative.

Notice that we already derived these derivatives in the first part of our tutorial.

Execution in phase-2:

In phase-1, we find the updated weight for the output layer. In the second phase, we need to find the updated weights for the hidden layer. Hence, find how the change in hidden weight affects the change in error value.

Represented as:

Figure 13: Finding the updated weights for the hidden layer
Figure 13: Finding the updated weights for the hidden layer.

a. Finding the first derivative:

Here we are going to use the chain rule to find the derivative.
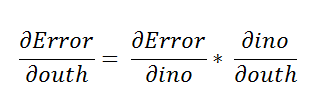
Figure 14: Finding the first derivative
Figure 14: Finding the first derivative.

Using the chain rule again.

Figure 15: Applying a change rule once again.
Figure 15: Applying a change rule once again.

The step below is similar to what we did in the first part of our tutorial on neural networks.

Figure 16: Expanding our result for the first derivative, resulting in the output weight.

b. Finding the second derivative:

Figure 17: Finding the second derivative.

c. Finding the third derivative:

Figure 18: Finding the third derivative.

4. Implementation of a multilayer neural network in Python

📚 Multilayer neural network: A neural network with a hidden layer 📚 For more definitions, check out our article in terminology in machine learning.

Below we are going to implement the “OR” gate without the bias value. In conclusion, adding hidden layers in a neural network helps us achieve higher accuracy in our models.

Representation:

Figure 19: The OR Gate
Figure 19: The OR Gate.

Truth-Table:

Figure 20: Input features.

Neural Network:

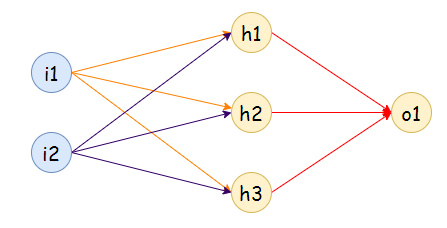
Notice that here we have 2 input features and 1 output feature. In this neural network, we are going to use 1 hidden layer with 3 nodes.
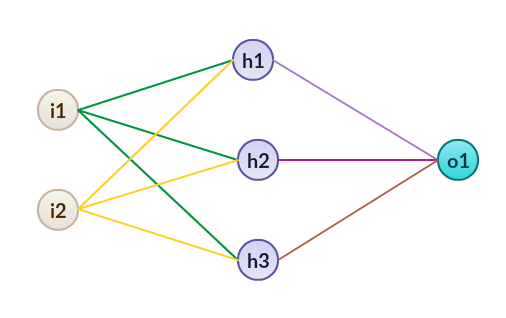
Figure 21: Neural network.
Figure 21: Neural network.

Graphical representation:

Figure 22: Inputs on the graph, notice that the same color dots have the same output.
Figure 22: Inputs on the graph, notice that the same color dots have the same output.

Implementation in Python:

Below, we are going to implement our neural net with hidden layers step by step in Python, let’s code:

a. Import required libraries:

Figure 23: Importing NumPy
Figure 23: Importing NumPy.

b. Define input features:

Next, we take input values for which we want to train our neural network. We can see that we have taken two input features. On tangible data sets, the value of input features is mostly high.

Figure 24: Assigning input values to train our neural net.
Figure 24: Assigning input values to train our neural net.

c. Define target output values:

For the input features, we want to have a specific output for specific input features. It is called the target output. We are going to train the model that gives us the target output for our input features.

Figure 25: Defining our target output, and reshaping our target output into a vector
Figure 25: Defining our target output, and reshaping our target output into a vector

d. Assign random weights:

Next, we are going to assign random weights to the input features. Note that our model is going to modify these weight values to be optimal. At this point, we are taking these values randomly. Here we have two layers, so we have to assign weights for them separately.

The other variable is the learning rate. We are going to use the learning rate (LR) in a gradient descent algorithm to update the weight values. Generally, we keep LR as low as possible so that we can achieve a minimal error rate.

Figure 26: Defining the weights for our neural net, along with our learning rate (LR)
Figure 26: Defining the weights for our neural net, along with our learning rate (LR)

e. Sigmoid function:

Once we have our weight values and input features, we are going to send it to the main function that predicts the output. Notice that our input features and weight values can be anything, but here we want to classify data, so we need the output between 0 and 1. For such output, we are going to use a sigmoid function.

Figure 27: Applying our sigmoid function.
Figure 27: Applying our sigmoid function. 

f. Sigmoid function derivative:

In a gradient descent algorithm, we need the derivative of the sigmoid function.

Figure 28: Applying a derivation to our sigmoid function.

g. The main logic for predicting output and updating the weight values:

We are going to understand the following code step-by-step.

Figure 29: Phase 1 of training on our neural network.
Figure 29: Phase 1 of training on our neural network.
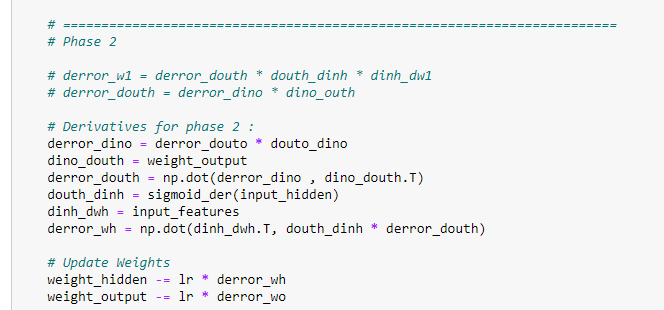
Figure 30: Phase 2 of training on our neural network.
Figure 30: Phase 2 of training on our neural network.

How does it work?

a. First of all, we run the above code 2,00,000 times. Keep in mind that if we only run this code a few times, then it is probable that we will have a higher error rate. Therefore, we update the weight values 10,000 times to reach the optimal value possible.

b. Next, we find the input for the hidden layer. Defined by the following formula:

Figure 31: Finding the input for our neural network’s hidden layer.
Figure 31: Finding the input for our neural network’s hidden layer.

We can also represent it as matrices to understand in a better way.

The first matrix here is input features with size (4*2), and the second matrix is weight values for a hidden layer with size (2*3). So the resultant matrix will be of size (4*3).

The intuition behind the final matrix size:

The row size of the final matrix is the same as the row size of the first matrix, and the column size of the final matrix is the same as the column size of the second matrix in multiplication (dot product).

In the representation below, each of those boxes represents a value.

Figure 32: Matrix value representation.

c. Afterward, we have an input for the hidden layer, and it is going to calculate the output by applying a sigmoid function. Below is the output of the hidden layer:

Figure 33: Output of our hidden layer.
Figure 33: Output of our hidden layer.

d. Next, we multiply the output of the hidden layer with the weight of the output layer:

Figure 34: Formula representing the output of our hidden layer, with the weight of the output layer.
Figure 34: Formula representing the output of our hidden layer, with the weight of the output layer.

The first matrix shows the output of the hidden layer, which has a size of (4*3). The second matrix represents the weight values of the output layer,

Figure 35: Representation of the hidden layer, and our output layer.
Figure 35: Representation of the hidden layer, and our output layer.

e. Afterward, we calculate the output of the output layer by applying a sigmoid function. It can also be represented in matrix form as follows.

Figure 36: Output of our layer, after a sigmoid function.

f. Now that we have our predicted output, we find the mean squared between target output and predicted output.

Figure 37: Finding the mean between our target output and our predicted output.

g. Next, we begin the first phase of training. In this step, we update the weight values for the output layer. We need to find out how much the output weights affect the error value. To update the weights, we use a gradient descent algorithm. Notice that we have already found the derivatives we will use during the training phase.
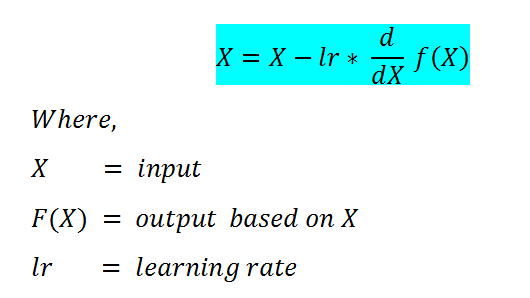
Figure 38: Updating the weight values for our output layer.
Figure 38: Updating the weight values for our output layer.

g.a. Matrix representation of the first derivative. Matrix size (4*1).

derror_douto = output_op -target_output

Figure 39: First derivative matrix representation.

g.b. Matrix representation of the second derivative. Matrix size (4*1).

dout_dino = sigmoid_der(input_op)

Figure 40: Second derivative matrix representation.

g.c. Matrix representation of the third derivative. Matrix size (4*3).

dino_dwo = output_hidden

Figure 41: Third derivative matrix representation.

g.d. Matrix representation of transpose of dino_dwo. Matrix size (3*4).

Figure 42: Matrix representation of our variable dino_dwo, see implementation for details.
Figure 42: Matrix representation of our variable dino_dwo, see the implementation for details.

g.e. Now, we are going to find the final matrix of output weight. For a detailed explanation of this step, please check out our previous tutorial. The matrix size will be (3*1), which is the same as the output_weight matrix.

Figure 43: Final matrix of the output weight.
Figure 43: Final matrix of the output weight.

Hence, we have successfully find the derivative values. Next, we update the weight values accordingly with the help of a gradient descent algorithm.

Nonetheless, we also have to find the derivative for phase-2. Let’s first find that, and then we will update the weights for both layers in the end.

h. Phase -2. Updating the weights in the hidden layer.

Since we have already discussed how we derived the derivative values, we are just going to see matrix representation for each of them to understand it better. Our goal here is to find the weight matrix for the hidden layer, which is of size (2*3).

h.a. Matrix representation for the first derivative.

derror_dino = derror_douto * douto_dino

Figure 44: Matrix representation of the first derivative.

h.b. Matrix representation for the second derivative.

dino_douth = weight_output

Figure 45: Matrix representation of the second derivative.

h.c. Matrix representation for the third derivative.

derror_douth = np.dot(derror_dino , dino_douth.T)

Figure 46: Matrix representation of the third derivative.

h.d. Matrix representation for the fourth derivative.

douth_dinh = sigmoid_der(input_hidden)

Figure 47: Matrix representation of the fourth derivative.

h.e. Matrix representation for the fifth derivative.

dinh_dwh = input_features

Figure 48: Matrix representation of the fifth derivative.

h.f. Matrix representation for the sixth derivative.

derror_dwh = np.dot(dinh_dwh.T, douth_dinh * derror_douth)

Figure 49: Matrix representation of the sixth derivative.

Notice that our goal was to find a hidden weight matrix with the size of (2*3). Furthermore, we have successfully managed to find it.

h.g. Updating the weight values :

We will use the gradient descent algorithm to update the values. It takes three parameters.

  1. The original weight: we already have it.
  2. The learning rate (LR): we assigned it the value of 0.05.
  3. The derivative: Found on the previous step.

Gradient descent algorithm:

Figure 50: Formula for a gradient descent algorithm

Since we have all of our parameter values, this will be a straightforward operation. First, we are updating the weight values for the output layer, and then we are updating the weight values for the hidden layer.

i. Final weight values:

Below, we show the updated weight values for both layers — our prediction bases on these values.

Figure 51: Displaying the final hidden layer weight values.
Figure 51: Displaying the final hidden layer weight values.
Figure 52: Displaying the final output layer weight values.
Figure 52: Displaying the final output layer weight values.

j. Making predictions:

j.a. Prediction for (1,1).

Target output = 1

Explanation:

First of all, we are going to take the input values for which we want to predict the output. The “result1” variable stores the value of the dot product of input variables and hidden layer weight. We obtain the output by applying a sigmoid function, the result stores in the result2 variable. Such is the input feature for the output layer. We calculate the input for the output layer by multiplying input features with output layer weight. To find the final output value, we take the sigmoid value of that.

Figure 53: Printing our results for target output = 1.
Figure 53: Printing our results for target output = 1.

Notice that the predicted output is very close to 1. So we have managed to make accurate predictions.

j.b. Prediction for (0,0).

Target output = 0

Figure 54: Printing our results for target output = 0.
Figure 54: Printing our results for target output = 0.

Note that the predicted output is very close to 0, which indicates the success rate of our model.

k. Final error value :

After 200,000 iterations, we have our final error value — the lower the error, the higher the accuracy of the model.

Figure 55: Displaying final error value after 200,000 iterations.
Figure 55: Displaying the final error value after 200,000 iterations.

As shown above, we can see that the error value is 0.0000000189. This value is the final error value in prediction after 200,000 iterations.

Putting it all together:

# Import required libraries :
import numpy as np# Define input features :
input_features = np.array([[0,0],[0,1],[1,0],[1,1]])
print (input_features.shape)
print (input_features)# Define target output :
target_output = np.array([[0,1,1,1]])# Reshaping our target output into vector :
target_output = target_output.reshape(4,1)
print(target_output.shape)
print (target_output)# Define weights :
# 6 for hidden layer
# 3 for output layer
# 9 totalweight_hidden = np.array([[0.1,0.2,0.3],
 [0.4,0.5,0.6]])
weight_output = np.array([[0.7],[0.8],[0.9]])# Learning Rate :
lr = 0.05# Sigmoid function :
def sigmoid(x):
 return 1/(1+np.exp(-x))# Derivative of sigmoid function :
def sigmoid_der(x):
 return sigmoid(x)*(1-sigmoid(x))for epoch in range(200000):
 # Input for hidden layer :
 input_hidden = np.dot(input_features, weight_hidden)
 
 # Output from hidden layer :
 output_hidden = sigmoid(input_hidden)
 
 # Input for output layer :
 input_op = np.dot(output_hidden, weight_output)
 
 # Output from output layer :
 output_op = sigmoid(input_op)#==========================================================
 # Phase1
 
 # Calculating Mean Squared Error :
 error_out = ((1 / 2) * (np.power((output_op — target_output), 2)))
 print(error_out.sum())
 
 # Derivatives for phase 1 :
 derror_douto = output_op — target_output
 douto_dino = sigmoid_der(input_op) 
 dino_dwo = output_hiddenderror_dwo = np.dot(dino_dwo.T, derror_douto * douto_dino)#===========================================================
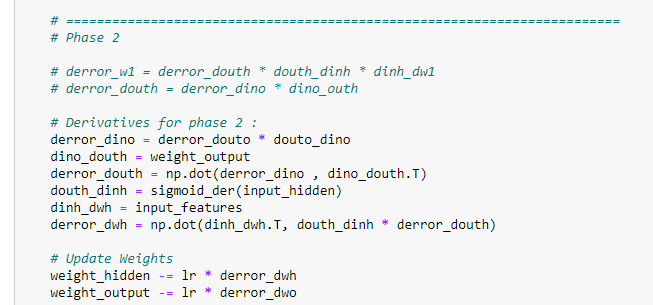
 # Phase 2 
 # derror_w1 = derror_douth * douth_dinh * dinh_dw1
 # derror_douth = derror_dino * dino_outh
 
 # Derivatives for phase 2 :
 derror_dino = derror_douto * douto_dino
 dino_douth = weight_output
 derror_douth = np.dot(derror_dino , dino_douth.T)
 douth_dinh = sigmoid_der(input_hidden) 
 dinh_dwh = input_features
 derror_wh = np.dot(dinh_dwh.T, douth_dinh * derror_douth)# Update Weights
 weight_hidden -= lr * derror_wh
 weight_output -= lr * derror_dwo
 
# Final hidden layer weight values :
print (weight_hidden)# Final output layer weight values :
print (weight_output)# Predictions :#Taking inputs :
single_point = np.array([1,1])
#1st step :
result1 = np.dot(single_point, weight_hidden) 
#2nd step :
result2 = sigmoid(result1)
#3rd step :
result3 = np.dot(result2,weight_output)
#4th step :
result4 = sigmoid(result3)
print(result4)#=================================================
#Taking inputs :
single_point = np.array([0,0])
#1st step :
result1 = np.dot(single_point, weight_hidden) 
#2nd step :
result2 = sigmoid(result1)
#3rd step :
result3 = np.dot(result2,weight_output)
#4th step :
result4 = sigmoid(result3)
print(result4)#=====================================================
#Taking inputs :
single_point = np.array([1,0])
#1st step :
result1 = np.dot(single_point, weight_hidden) 
#2nd step :
result2 = sigmoid(result1)
#3rd step :
result3 = np.dot(result2,weight_output)
#4th step :
result4 = sigmoid(result3)
print(result4)

Below, notice that the data we used in this example was linearly separable, which means that by a single line, we can classify outputs with 1 value and outputs with 0 values.
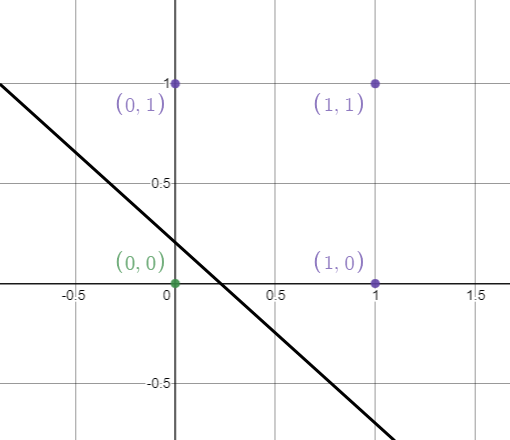
Figure 56: Graph showing data being linearly separable, allowing to classify outputs with 1 value or 0 values
Figure 56: Graph showing data being linearly separable, allowing to classify outputs with 1 value or 0 values.

Launch it on Google Colab:


5. Comparison with a single-layer neural network

Notice that we did not use bias value here. Now let’s have a quick look at the neural network without hidden layers for the same input features and target values. What we are going to do is find the final error rate and compare it. Since we have already implemented the code in our previous tutorial, for this purpose, we are going to analyze it quickly. [2]

The final error value for the following code is:

Figure 57: Displaying final error value.
Figure 57: Displaying the final error value.

As we can see, the error value is way too high compared to the error we found in our neural network implementation with hidden layers, making it one of the main reasons to use hidden layers in a neural network.

# Import required libraries :
import numpy as np# Define input features :
input_features = np.array([[0,0],[0,1],[1,0],[1,1]])
print (input_features.shape)
print (input_features)# Define target output :
target_output = np.array([[0,1,1,1]])# Reshaping our target output into vector :
target_output = target_output.reshape(4,1)
print(target_output.shape)
print (target_output)# Define weights :
weights = np.array([[0.1],[0.2]])
print(weights.shape)
print (weights)# Define learning rate :
lr = 0.05# Sigmoid function :
def sigmoid(x):
    return 1/(1+np.exp(-x))# Derivative of sigmoid function :
def sigmoid_der(x):
    return sigmoid(x)*(1-sigmoid(x))# Main logic for neural network :
# Running our code 10000 times :for epoch in range(10000):
    inputs = input_features#Feedforward input :
    pred_in = np.dot(inputs, weights)#Feedforward output :
    pred_out = sigmoid(pred_in)#Backpropogation 
    #Calculating error
    error = pred_out - target_output
    x = error.sum()
    
    #Going with the formula :
    print(x)
    
    #Calculating derivative :
    dcost_dpred = error
    dpred_dz = sigmoid_der(pred_out)
    
    #Multiplying individual derivatives :
    z_delta = dcost_dpred * dpred_dz#Multiplying with the 3rd individual derivative :
    inputs = input_features.T
    weights -= lr * np.dot(inputs, z_delta)#Predictions :#Taking inputs :
single_point = np.array([1,0])
#1st step :
result1 = np.dot(single_point, weights) 
#2nd step :
result2 = sigmoid(result1)
#Print final result
print(result2)#====================================
#Taking inputs :
single_point = np.array([0,0])
#1st step :
result1 = np.dot(single_point, weights) 
#2nd step :
result2 = sigmoid(result1)
#Print final result
print(result2)#===================================
#Taking inputs :
single_point = np.array([1,1])
#1st step :
result1 = np.dot(single_point, weights) 
#2nd step :
result2 = sigmoid(result1)
#Print final result
print(result2)

Launch it on Google Colab:


6. Non-linearly separable data with a neural network

In this example, we are going to take a dataset that cannot be separated by a single straight line. If we try to separate it by a single line, then one or many outputs may be misclassified, and we will have a very high error. Therefore we use a hidden layer to resolve this issue.

Input Table:

Figure 58: Input features
Figure 58: Input features.

Graphical Representation Of Data Points :

As shown below, we represent the data on the coordinate plane. Here notice that we have 2 colored dots (black and red). If we try to draw a single line, then the output is going to be misclassified.

Figure 59: Coordinate plane with input points
Figure 59: Coordinate plane with input points.

As figure 59 shows, we have 2 inputs and 1 output. In this example, we are going to use 4 hidden perceptrons. The red dots have an output value of 0, and the black dots have an output value of 1. Therefore, we cannot simply classify them using a single straight line.

Neural Network:

Figure 60: An artificial neural network
Figure 60: An artificial neural network.

Implementation in Python:

a. Import required libraries:

Figure 61: Importing NumPy with Python.
Figure 61: Importing NumPy with Python.

b. Define input features:

Figure 62: Defining our input features.

c. Define the target output:

Figure 63: Defining our target output.
Figure 63: Defining our target output.

d. Assign random weight values:

On figure 64, notice that we are using NumPy’s library random function to generate random values.

numpy.random.rand(x,y): Here x is the number of rows, and y is the number of columns. It generates output values over [0,1). It means 0 is included, but 1 is not included in the value generation.

Figure 64: Generating random values with NumPy’s library np.random.rand

e. Sigmoid function:

Figure 65: Defining our sigmoid function
Figure 65: Defining our sigmoid function

f. Finding the derivative with a sigmoid function:

Figure 66: Finding the derivative of our sigmoid function
Figure 66: Finding the derivative of our sigmoid function

g. Training our neural network:

Figure 67: Phase 1 of training on our neural net
Figure 67: Phase 1 of training on our neural net
Figure 68: Phase two of training on our neural network
Figure 68: Phase two of training on our neural network

h. Weight values of hidden layer:

Figure 69: Displaying the final values of our weights in the hidden layer.
Figure 69: Displaying the final values of our weights in the hidden layer.

i. Weight values of output layer:

Figure 70: Displaying the final weight values for our output layers.
Figure 70: Displaying the final weight values for our output layers.

j. Final error value :

After training our model for 200,000 iterations, we finally achieved a low error value.

Figure 71: Low error value of the model trained during 200,000 iterations

k. Making predictions from the trained model :

k.a. Predicting output for (0.5, 2).

Figure 72: Predicting our results for (0.5, 2).
Figure 72: Predicting our results for (0.5, 2). 

The predicted output is closer to 1.

k.b. Predicting output for (0, -1)

Figure 73: Predicting our results for (0, -1)
Figure 73: Predicting our results for (0, -1)

The predicted output is very near to 0.

k.c. Predicting output for (0, 5)
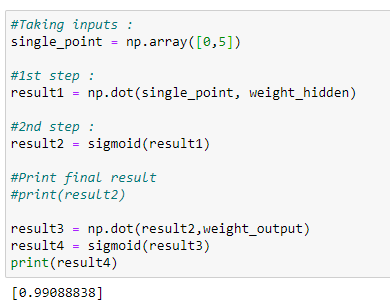
Figure 74: Predicting our results for (0, 5).
Figure 74: Predicting our results for (0, 5).

The predicted output is close to 1.

k.d. Predicting output for (1, 1.2)

Figure 75: Predicting our results for (1, 1.2).
Figure 75: Predicting our results for (1, 1.2).

The predicted output is close to 0.

Based on the output values, our model has done a high-grade job of predicting values.

We can separate our data in the following way as shown in Figure 76. Note that this is not the only possible way to separate these values.

Figure 76: Possible ways of separating our values.
Figure 76: Possible ways of separating our values.

Therefore to conclude, using a hidden layer on our neural networks helps us reducing the error rate when we have non-linearly separable data. Even though the training time extends, we have to remember that our goal is to make high accuracy predictions, and such will be satisfied.

Putting it all together:

# Import required libraries :
import numpy as np# Define input features :
input_features = np.array([[0,0],[0,1],[1,0],[1,1]])
print (input_features.shape)
print (input_features)# Define target output :
target_output = np.array([[0,1,1,0]])# Reshaping our target output into vector :
target_output = target_output.reshape(4,1)
print(target_output.shape)
print (target_output)# Define weights :
# 8 for hidden layer
# 4 for output layer
# 12 total 
weight_hidden = np.random.rand(2,4)
weight_output = np.random.rand(4,1)# Learning Rate :
lr = 0.05# Sigmoid function :
def sigmoid(x):
 return 1/(1+np.exp(-x))# Derivative of sigmoid function :
def sigmoid_der(x):
 return sigmoid(x)*(1-sigmoid(x))# Main logic :
for epoch in range(200000):
 # Input for hidden layer :
 input_hidden = np.dot(input_features, weight_hidden)
 
 # Output from hidden layer :
 output_hidden = sigmoid(input_hidden)
 
 # Input for output layer :
 input_op = np.dot(output_hidden, weight_output)
 
 # Output from output layer :
 output_op = sigmoid(input_op)#========================================================================
 # Phase1
 
 # Calculating Mean Squared Error :
 error_out = ((1 / 2) * (np.power((output_op — target_output), 2)))
 print(error_out.sum())
 
 
 # Derivatives for phase 1 :
 derror_douto = output_op — target_output
 douto_dino = sigmoid_der(input_op) 
 dino_dwo = output_hiddenderror_dwo = np.dot(dino_dwo.T, derror_douto * douto_dino)# ========================================================================
 # Phase 2# derror_w1 = derror_douth * douth_dinh * dinh_dw1
 # derror_douth = derror_dino * dino_outh
 
 # Derivatives for phase 2 :
 derror_dino = derror_douto * douto_dino
 dino_douth = weight_output
 derror_douth = np.dot(derror_dino , dino_douth.T)
 douth_dinh = sigmoid_der(input_hidden) 
 dinh_dwh = input_features
 derror_dwh = np.dot(dinh_dwh.T, douth_dinh * derror_douth)# Update Weights
 weight_hidden -= lr * derror_dwh
 weight_output -= lr * derror_dwo
 
 
# Final values of weight in hidden layer :
print (weight_hidden)# Final values of weight in output layer :
print (weight_output)#Taking inputs :
single_point = np.array([0,-1])
#1st step :
result1 = np.dot(single_point, weight_hidden) 
#2nd step :
result2 = sigmoid(result1)
#3rd step :
result3 = np.dot(result2,weight_output)
#4th step :
result4 = sigmoid(result3)
print(result4)#Taking inputs :
single_point = np.array([0,5])
#1st step :
result1 = np.dot(single_point, weight_hidden) 
#2nd step :
result2 = sigmoid(result1)
#3rd step :
result3 = np.dot(result2,weight_output)
#4th step :
result4 = sigmoid(result3)
print(result4)#Taking inputs :
single_point = np.array([1,1.2])
#1st step :
result1 = np.dot(single_point, weight_hidden) 
#2nd step :
result2 = sigmoid(result1)
#3rd step :
result3 = np.dot(result2,weight_output)
#4th step :
result4 = sigmoid(result3)
print(result4)

Launch it on Google Colab:


7. Conclusion

  • Neural networks can learn from their mistakes, and they can produce output that is not limited to the inputs provided to them.
  • Inputs store in its networks instead of a database.
  • These networks can learn from examples, and we can predict the output for similar events.
  • In case of failure of one neuron, the network can detect the fault and still produce output.
  • Neural networks can perform multiple tasks in parallel processes.

DISCLAIMER: The views expressed in this article are those of the author(s) and do not represent the views of Carnegie Mellon University, nor other companies (directly or indirectly) associated with the author(s). These writings do not intend to be final products, yet rather a reflection of current thinking, along with being a catalyst for discussion and improvement.

Published via Towards AI

Citation

For attribution in academic contexts, please cite this work as:

Shukla, et al., “Building Neural Networks with Python Code and Math in Detail — II”, Towards AI, 2020

BibTex citation:

@article{pratik_iriondo_2020, 
 title={Building Neural Networks with Python Code and Math in Detail — II}, 
 url={https://towardsai.net/building-neural-nets-with-python}, 
 journal={Towards AI}, 
 publisher={Towards AI Co.}, 
 author={Pratik, Shukla and Iriondo, 
 Roberto},  
 year={2020}, 
 month={Jun}
}

📚 Are you new to machine learning? Check out an overview of machine learning algorithms for beginners with code examples in Python 📚

References:

[1] Stats Stack Exchange, https://stats.stackexchange.com

[2] Neural Networks from Scratch with Python Code and Math in Detail — I, Pratik Shukla, Roberto Iriondo, https://towardsai.net/neural-networks-with-python

Feedback ↓

Sign Up for the Course
`; } else { console.error('Element with id="subscribe" not found within the page with class "home".'); } } }); // Remove duplicate text from articles /* Backup: 09/11/24 function removeDuplicateText() { const elements = document.querySelectorAll('h1, h2, h3, h4, h5, strong'); // Select the desired elements const seenTexts = new Set(); // A set to keep track of seen texts const tagCounters = {}; // Object to track instances of each tag elements.forEach(el => { const tagName = el.tagName.toLowerCase(); // Get the tag name (e.g., 'h1', 'h2', etc.) // Initialize a counter for each tag if not already done if (!tagCounters[tagName]) { tagCounters[tagName] = 0; } // Only process the first 10 elements of each tag type if (tagCounters[tagName] >= 2) { return; // Skip if the number of elements exceeds 10 } const text = el.textContent.trim(); // Get the text content const words = text.split(/\s+/); // Split the text into words if (words.length >= 4) { // Ensure at least 4 words const significantPart = words.slice(0, 5).join(' '); // Get first 5 words for matching // Check if the text (not the tag) has been seen before if (seenTexts.has(significantPart)) { // console.log('Duplicate found, removing:', el); // Log duplicate el.remove(); // Remove duplicate element } else { seenTexts.add(significantPart); // Add the text to the set } } tagCounters[tagName]++; // Increment the counter for this tag }); } removeDuplicateText(); */ // Remove duplicate text from articles function removeDuplicateText() { const elements = document.querySelectorAll('h1, h2, h3, h4, h5, strong'); // Select the desired elements const seenTexts = new Set(); // A set to keep track of seen texts const tagCounters = {}; // Object to track instances of each tag // List of classes to be excluded const excludedClasses = ['medium-author', 'post-widget-title']; elements.forEach(el => { // Skip elements with any of the excluded classes if (excludedClasses.some(cls => el.classList.contains(cls))) { return; // Skip this element if it has any of the excluded classes } const tagName = el.tagName.toLowerCase(); // Get the tag name (e.g., 'h1', 'h2', etc.) // Initialize a counter for each tag if not already done if (!tagCounters[tagName]) { tagCounters[tagName] = 0; } // Only process the first 10 elements of each tag type if (tagCounters[tagName] >= 10) { return; // Skip if the number of elements exceeds 10 } const text = el.textContent.trim(); // Get the text content const words = text.split(/\s+/); // Split the text into words if (words.length >= 4) { // Ensure at least 4 words const significantPart = words.slice(0, 5).join(' '); // Get first 5 words for matching // Check if the text (not the tag) has been seen before if (seenTexts.has(significantPart)) { // console.log('Duplicate found, removing:', el); // Log duplicate el.remove(); // Remove duplicate element } else { seenTexts.add(significantPart); // Add the text to the set } } tagCounters[tagName]++; // Increment the counter for this tag }); } removeDuplicateText(); //Remove unnecessary text in blog excerpts document.querySelectorAll('.blog p').forEach(function(paragraph) { // Replace the unwanted text pattern for each paragraph paragraph.innerHTML = paragraph.innerHTML .replace(/Author\(s\): [\w\s]+ Originally published on Towards AI\.?/g, '') // Removes 'Author(s): XYZ Originally published on Towards AI' .replace(/This member-only story is on us\. Upgrade to access all of Medium\./g, ''); // Removes 'This member-only story...' }); //Load ionic icons and cache them if ('localStorage' in window && window['localStorage'] !== null) { const cssLink = 'https://code.ionicframework.com/ionicons/2.0.1/css/ionicons.min.css'; const storedCss = localStorage.getItem('ionicons'); if (storedCss) { loadCSS(storedCss); } else { fetch(cssLink).then(response => response.text()).then(css => { localStorage.setItem('ionicons', css); loadCSS(css); }); } } function loadCSS(css) { const style = document.createElement('style'); style.innerHTML = css; document.head.appendChild(style); } //Remove elements from imported content automatically function removeStrongFromHeadings() { const elements = document.querySelectorAll('h1, h2, h3, h4, h5, h6, span'); elements.forEach(el => { const strongTags = el.querySelectorAll('strong'); strongTags.forEach(strongTag => { while (strongTag.firstChild) { strongTag.parentNode.insertBefore(strongTag.firstChild, strongTag); } strongTag.remove(); }); }); } removeStrongFromHeadings(); "use strict"; window.onload = () => { /* //This is an object for each category of subjects and in that there are kewords and link to the keywods let keywordsAndLinks = { //you can add more categories and define their keywords and add a link ds: { keywords: [ //you can add more keywords here they are detected and replaced with achor tag automatically 'data science', 'Data science', 'Data Science', 'data Science', 'DATA SCIENCE', ], //we will replace the linktext with the keyword later on in the code //you can easily change links for each category here //(include class="ml-link" and linktext) link: 'linktext', }, ml: { keywords: [ //Add more keywords 'machine learning', 'Machine learning', 'Machine Learning', 'machine Learning', 'MACHINE LEARNING', ], //Change your article link (include class="ml-link" and linktext) link: 'linktext', }, ai: { keywords: [ 'artificial intelligence', 'Artificial intelligence', 'Artificial Intelligence', 'artificial Intelligence', 'ARTIFICIAL INTELLIGENCE', ], //Change your article link (include class="ml-link" and linktext) link: 'linktext', }, nl: { keywords: [ 'NLP', 'nlp', 'natural language processing', 'Natural Language Processing', 'NATURAL LANGUAGE PROCESSING', ], //Change your article link (include class="ml-link" and linktext) link: 'linktext', }, des: { keywords: [ 'data engineering services', 'Data Engineering Services', 'DATA ENGINEERING SERVICES', ], //Change your article link (include class="ml-link" and linktext) link: 'linktext', }, td: { keywords: [ 'training data', 'Training Data', 'training Data', 'TRAINING DATA', ], //Change your article link (include class="ml-link" and linktext) link: 'linktext', }, ias: { keywords: [ 'image annotation services', 'Image annotation services', 'image Annotation services', 'image annotation Services', 'Image Annotation Services', 'IMAGE ANNOTATION SERVICES', ], //Change your article link (include class="ml-link" and linktext) link: 'linktext', }, l: { keywords: [ 'labeling', 'labelling', ], //Change your article link (include class="ml-link" and linktext) link: 'linktext', }, pbp: { keywords: [ 'previous blog posts', 'previous blog post', 'latest', ], //Change your article link (include class="ml-link" and linktext) link: 'linktext', }, mlc: { keywords: [ 'machine learning course', 'machine learning class', ], //Change your article link (include class="ml-link" and linktext) link: 'linktext', }, }; //Articles to skip let articleIdsToSkip = ['post-2651', 'post-3414', 'post-3540']; //keyword with its related achortag is recieved here along with article id function searchAndReplace(keyword, anchorTag, articleId) { //selects the h3 h4 and p tags that are inside of the article let content = document.querySelector(`#${articleId} .entry-content`); //replaces the "linktext" in achor tag with the keyword that will be searched and replaced let newLink = anchorTag.replace('linktext', keyword); //regular expression to search keyword var re = new RegExp('(' + keyword + ')', 'g'); //this replaces the keywords in h3 h4 and p tags content with achor tag content.innerHTML = content.innerHTML.replace(re, newLink); } function articleFilter(keyword, anchorTag) { //gets all the articles var articles = document.querySelectorAll('article'); //if its zero or less then there are no articles if (articles.length > 0) { for (let x = 0; x < articles.length; x++) { //articles to skip is an array in which there are ids of articles which should not get effected //if the current article's id is also in that array then do not call search and replace with its data if (!articleIdsToSkip.includes(articles[x].id)) { //search and replace is called on articles which should get effected searchAndReplace(keyword, anchorTag, articles[x].id, key); } else { console.log( `Cannot replace the keywords in article with id ${articles[x].id}` ); } } } else { console.log('No articles found.'); } } let key; //not part of script, added for (key in keywordsAndLinks) { //key is the object in keywords and links object i.e ds, ml, ai for (let i = 0; i < keywordsAndLinks[key].keywords.length; i++) { //keywordsAndLinks[key].keywords is the array of keywords for key (ds, ml, ai) //keywordsAndLinks[key].keywords[i] is the keyword and keywordsAndLinks[key].link is the link //keyword and link is sent to searchreplace where it is then replaced using regular expression and replace function articleFilter( keywordsAndLinks[key].keywords[i], keywordsAndLinks[key].link ); } } function cleanLinks() { // (making smal functions is for DRY) this function gets the links and only keeps the first 2 and from the rest removes the anchor tag and replaces it with its text function removeLinks(links) { if (links.length > 1) { for (let i = 2; i < links.length; i++) { links[i].outerHTML = links[i].textContent; } } } //arrays which will contain all the achor tags found with the class (ds-link, ml-link, ailink) in each article inserted using search and replace let dslinks; let mllinks; let ailinks; let nllinks; let deslinks; let tdlinks; let iaslinks; let llinks; let pbplinks; let mlclinks; const content = document.querySelectorAll('article'); //all articles content.forEach((c) => { //to skip the articles with specific ids if (!articleIdsToSkip.includes(c.id)) { //getting all the anchor tags in each article one by one dslinks = document.querySelectorAll(`#${c.id} .entry-content a.ds-link`); mllinks = document.querySelectorAll(`#${c.id} .entry-content a.ml-link`); ailinks = document.querySelectorAll(`#${c.id} .entry-content a.ai-link`); nllinks = document.querySelectorAll(`#${c.id} .entry-content a.ntrl-link`); deslinks = document.querySelectorAll(`#${c.id} .entry-content a.des-link`); tdlinks = document.querySelectorAll(`#${c.id} .entry-content a.td-link`); iaslinks = document.querySelectorAll(`#${c.id} .entry-content a.ias-link`); mlclinks = document.querySelectorAll(`#${c.id} .entry-content a.mlc-link`); llinks = document.querySelectorAll(`#${c.id} .entry-content a.l-link`); pbplinks = document.querySelectorAll(`#${c.id} .entry-content a.pbp-link`); //sending the anchor tags list of each article one by one to remove extra anchor tags removeLinks(dslinks); removeLinks(mllinks); removeLinks(ailinks); removeLinks(nllinks); removeLinks(deslinks); removeLinks(tdlinks); removeLinks(iaslinks); removeLinks(mlclinks); removeLinks(llinks); removeLinks(pbplinks); } }); } //To remove extra achor tags of each category (ds, ml, ai) and only have 2 of each category per article cleanLinks(); */ //Recommended Articles var ctaLinks = [ /* ' ' + '

Subscribe to our AI newsletter!

' + */ '

Take our 85+ lesson From Beginner to Advanced LLM Developer Certification: From choosing a project to deploying a working product this is the most comprehensive and practical LLM course out there!

'+ '

Towards AI has published Building LLMs for Production—our 470+ page guide to mastering LLMs with practical projects and expert insights!

' + '
' + '' + '' + '

Note: Content contains the views of the contributing authors and not Towards AI.
Disclosure: This website may contain sponsored content and affiliate links.

' + 'Discover Your Dream AI Career at Towards AI Jobs' + '

Towards AI has built a jobs board tailored specifically to Machine Learning and Data Science Jobs and Skills. Our software searches for live AI jobs each hour, labels and categorises them and makes them easily searchable. Explore over 10,000 live jobs today with Towards AI Jobs!

' + '
' + '

🔥 Recommended Articles 🔥

' + 'Why Become an LLM Developer? Launching Towards AI’s New One-Stop Conversion Course'+ 'Testing Launchpad.sh: A Container-based GPU Cloud for Inference and Fine-tuning'+ 'The Top 13 AI-Powered CRM Platforms
' + 'Top 11 AI Call Center Software for 2024
' + 'Learn Prompting 101—Prompt Engineering Course
' + 'Explore Leading Cloud Providers for GPU-Powered LLM Training
' + 'Best AI Communities for Artificial Intelligence Enthusiasts
' + 'Best Workstations for Deep Learning
' + 'Best Laptops for Deep Learning
' + 'Best Machine Learning Books
' + 'Machine Learning Algorithms
' + 'Neural Networks Tutorial
' + 'Best Public Datasets for Machine Learning
' + 'Neural Network Types
' + 'NLP Tutorial
' + 'Best Data Science Books
' + 'Monte Carlo Simulation Tutorial
' + 'Recommender System Tutorial
' + 'Linear Algebra for Deep Learning Tutorial
' + 'Google Colab Introduction
' + 'Decision Trees in Machine Learning
' + 'Principal Component Analysis (PCA) Tutorial
' + 'Linear Regression from Zero to Hero
'+ '

', /* + '

Join thousands of data leaders on the AI newsletter. It’s free, we don’t spam, and we never share your email address. Keep up to date with the latest work in AI. From research to projects and ideas. If you are building an AI startup, an AI-related product, or a service, we invite you to consider becoming a sponsor.

',*/ ]; var replaceText = { '': '', '': '', '
': '
' + ctaLinks + '
', }; Object.keys(replaceText).forEach((txtorig) => { //txtorig is the key in replacetext object const txtnew = replaceText[txtorig]; //txtnew is the value of the key in replacetext object let entryFooter = document.querySelector('article .entry-footer'); if (document.querySelectorAll('.single-post').length > 0) { //console.log('Article found.'); const text = entryFooter.innerHTML; entryFooter.innerHTML = text.replace(txtorig, txtnew); } else { // console.log('Article not found.'); //removing comment 09/04/24 } }); var css = document.createElement('style'); css.type = 'text/css'; css.innerHTML = '.post-tags { display:none !important } .article-cta a { font-size: 18px; }'; document.body.appendChild(css); //Extra //This function adds some accessibility needs to the site. function addAlly() { // In this function JQuery is replaced with vanilla javascript functions const imgCont = document.querySelector('.uw-imgcont'); imgCont.setAttribute('aria-label', 'AI news, latest developments'); imgCont.title = 'AI news, latest developments'; imgCont.rel = 'noopener'; document.querySelector('.page-mobile-menu-logo a').title = 'Towards AI Home'; document.querySelector('a.social-link').rel = 'noopener'; document.querySelector('a.uw-text').rel = 'noopener'; document.querySelector('a.uw-w-branding').rel = 'noopener'; document.querySelector('.blog h2.heading').innerHTML = 'Publication'; const popupSearch = document.querySelector$('a.btn-open-popup-search'); popupSearch.setAttribute('role', 'button'); popupSearch.title = 'Search'; const searchClose = document.querySelector('a.popup-search-close'); searchClose.setAttribute('role', 'button'); searchClose.title = 'Close search page'; // document // .querySelector('a.btn-open-popup-search') // .setAttribute( // 'href', // 'https://medium.com/towards-artificial-intelligence/search' // ); } // Add external attributes to 302 sticky and editorial links function extLink() { // Sticky 302 links, this fuction opens the link we send to Medium on a new tab and adds a "noopener" rel to them var stickyLinks = document.querySelectorAll('.grid-item.sticky a'); for (var i = 0; i < stickyLinks.length; i++) { /* stickyLinks[i].setAttribute('target', '_blank'); stickyLinks[i].setAttribute('rel', 'noopener'); */ } // Editorial 302 links, same here var editLinks = document.querySelectorAll( '.grid-item.category-editorial a' ); for (var i = 0; i < editLinks.length; i++) { editLinks[i].setAttribute('target', '_blank'); editLinks[i].setAttribute('rel', 'noopener'); } } // Add current year to copyright notices document.getElementById( 'js-current-year' ).textContent = new Date().getFullYear(); // Call functions after page load extLink(); //addAlly(); setTimeout(function() { //addAlly(); //ideally we should only need to run it once ↑ }, 5000); }; function closeCookieDialog (){ document.getElementById("cookie-consent").style.display = "none"; return false; } setTimeout ( function () { closeCookieDialog(); }, 15000); console.log(`%c 🚀🚀🚀 ███ █████ ███████ █████████ ███████████ █████████████ ███████████████ ███████ ███████ ███████ ┌───────────────────────────────────────────────────────────────────┐ │ │ │ Towards AI is looking for contributors! │ │ Join us in creating awesome AI content. │ │ Let's build the future of AI together → │ │ https://towardsai.net/contribute │ │ │ └───────────────────────────────────────────────────────────────────┘ `, `background: ; color: #00adff; font-size: large`); //Remove latest category across site document.querySelectorAll('a[rel="category tag"]').forEach(function(el) { if (el.textContent.trim() === 'Latest') { // Remove the two consecutive spaces (  ) if (el.nextSibling && el.nextSibling.nodeValue.includes('\u00A0\u00A0')) { el.nextSibling.nodeValue = ''; // Remove the spaces } el.style.display = 'none'; // Hide the element } }); // Add cross-domain measurement, anonymize IPs 'use strict'; //var ga = gtag; ga('config', 'G-9D3HKKFV1Q', 'auto', { /*'allowLinker': true,*/ 'anonymize_ip': true/*, 'linker': { 'domains': [ 'medium.com/towards-artificial-intelligence', 'datasets.towardsai.net', 'rss.towardsai.net', 'feed.towardsai.net', 'contribute.towardsai.net', 'members.towardsai.net', 'pub.towardsai.net', 'news.towardsai.net' ] } */ }); ga('send', 'pageview'); -->