


How to Dockerize Your Data Science Project — A Quick Guide
Last Updated on February 21, 2021 by Editorial Team
Author(s): Yash Prakash
Data Science
How to Dockerize Your Data Science Project — A Quick Guide
How I do the deploying every time in these simple, easy steps!
In the previous article, I described in detail all the steps involved in making a complete interactive web app from our image classification model with fastai. In here, we will be looking into making the app platform-independent and convenient to share.
First, a brief introduction…
Docker is a software development tool made to make our lives easier by managing the code of our app and all required libraries and their dependencies in a neat package called a container.
What this means:
You just take your project and with the help of one Dockerfile, convert it into a docker image with one line of code, which can then be simply run on any machine to execute the app with another single line of code without the headache of manually running ANY other command or installing anything else whatsoever. Docker does it all automatically.
The steps to install Docker on your machine should not take you more than five minutes at most and is available in easy-to-follow steps here.
For most use cases, Docker Desktop proves to be sufficient, so go ahead and install that.
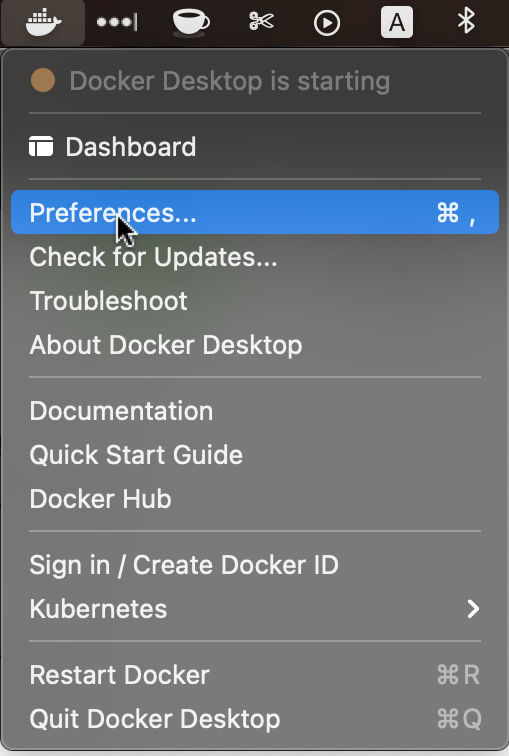
One important note: After you start Docker Desktop for the first time, make sure to click on preferences and select memory at the minimum of 3GB for Docker to run, otherwise sometimes, it might give some problem with a machine learning or deep learning library you install in the future that ends up needing more memory. It happened with me and I’m including this little tip here to make sure you don’t face it too. 🙂
Now, let’s move on to how to build the Dockerfile for our app
The complete code base for the app rests in this GitHub repository. If you want to take a complete look at the code as you follow along with this tutorial, you’re welcome to.
I promised simple, easy-to-follow steps, so here I am. Let’s go:
Construct your requirements file
I religiously use pipenv for managing all my python projects and environments. I would admit that it’s a convenient tool and has a minimal learning curve too. Setting up your data science environment should be as easy and effortless as possible and I talk in detail about it in one of my articles as well.
We’ll use the pip freeze command to build the file for our image classification app. In the terminal, type and enter:
pipenv run pip freeze > requirements.txt
In your root project directory, you’ll see that the new file has been made. This is an important steps as it defines every library and dependency that will be included when we build the docker image.
The next step entails actually constructing the Dockerfile.
Write your Dockerfile
Before I show you the code to build it, let me first re-iterate on the importance of project structure and how mine looked throughout this project.
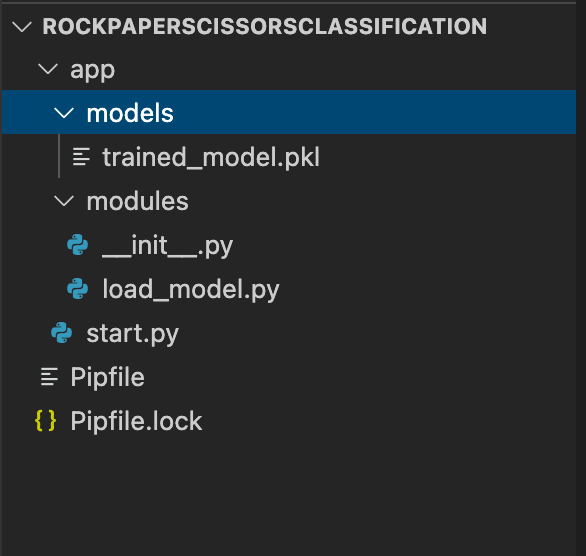
Make sure to make your dockerfile while outside the app directory shown above.
touch Dockerfile
Open up the file in your favourite text editor and paste the following code snippet into it and save the file:
FROM python:3.9.1
EXPOSE 8501
COPY ./requirements.txt /requirements.txt
WORKDIR /
RUN pip3 install -r requirements.txt
COPY . /
ENTRYPOINT ["streamlit", "run"]
CMD ["start.py"]
WORKDIR /app
Now let us go over these instructions line by line.
- FROM is what every Dockerfile begins with. It states the environment in which our image will be built and run, which in our case is the Python environment. This can also be, in other cases, an already existing docker image like that of an operating system such as Ubuntu, a server like nginx, and so on.
- EXPOSE indicates the port on which our app will be run. In the previous article, we saw that our streamlit app always runs on port 8501, hence we expose it in our Dockerfile.
- COPY command is used two times in the file. Its basic function is to copy over all the essential code and other files into the docker image. The . (dot) indicates that we want to copy over the entire app directory into the docker image.
- WORKDIR is, as you might have already guessed, to state which is the working directory our app will be running from. We change it first to outside the app directory in order to run the next line → pip3 install -r requirements.txt. In the last line, we change it back to the app directory because the start.py file through which our app will execute is located there.
- Finally, CMD and ENTRYPOINT are two keywords used to describe a command to run on the terminal to start the app from within the container. The line to run our app is: streamlit run start.py. This can also be written as simply: CMD [“streamlit”, “run”, “start.py”]. There are many situations in which combining CMD and ENTRYPOINT would be the best solution for your Docker container. In such cases, the executable is defined with ENTRYPOINT, while CMD specifies the default parameter, just like we did in the above code snippet.
We are almost through! The last step is to build and run this Dockerfile.
Building and running the docker image
I promised two lines of code for this step so here we go!
First, we build the image with this command:
docker build --tag rps:1.0 .
— tag is just used to make sure we have name and a version attached to our docker image. This is just a human-readable form for our image. Here, I’m taking ‘rps’ symbolising RockPaperScissors as the tag for this image.
While running the command, you must have noticed that a number of ‘layers’ get downloaded. This is because we are building the python 3.9.1 environment and installing all the dependencies specified with the RUN command in our Dockerfile. So our base Python image will either be downloaded from the docker hub or taken from our local machine if available. On top of that, our libraries will be installed from the requirements file.
The . at the end of the docker build command indicates that Docker should look for the Dockerfile in our current directory.
The final step is to run our built container image
docker run --publish 8501:8501 -it rps:1.0
— it is used for making sure that other iterative processes like the terminal commands can be run from within the docker container. Also, —- publish helps us run our streamlit web app in the browser at port 8501.
Navigate to: localhost:8501 to see the app in action!
We did it!

Concluding…
Building data science projects take a lot of effort, and making our work available to an outsider is some additional work on top of everything else. In this series of articles, we saw a minimal process of packaging our image classification engine into a web application and then making sure that it can also be run on a different machine and by someone else extremely effortlessly.
In my humble opinion, the versatility of Docker absolutely amazing and stay tuned if you want to explore more of it in my upcoming projects and as I document more about them.
Some resources for you to extend your knowledge with:
- Comparison between the ENTRYPOINT and CMD commands in Dockerfile with this Stack Overflow post.
- Docker builds and run process overview here on their official page.
Thank you for reading! 😁
If you’re interested in this series of articles to follow along from the beginning, it all starts here:
A Fast Introduction to FastAI — My Experience
The github codebase for this entire project:
yashprakash13/RockPaperScissorsFastAI
I’m writing a free course on How to Build a Cool Data Science Portfolio Project. Subscribe here.
Connect with me on Twitter.
How to Dockerize Your Data Science Project — A Quick Guide was originally published in Towards AI on Medium, where people are continuing the conversation by highlighting and responding to this story.
Published via Towards AI
Towards AI Academy
We Build Enterprise-Grade AI. We'll Teach You to Master It Too.
15 engineers. 100,000+ students. Towards AI Academy teaches what actually survives production.
Start free — no commitment:
→ 6-Day Agentic AI Engineering Email Guide — one practical lesson per day
→ Agents Architecture Cheatsheet — 3 years of architecture decisions in 6 pages
Our courses:
→ AI Engineering Certification — 90+ lessons from project selection to deployed product. The most comprehensive practical LLM course out there.
→ Agent Engineering Course — Hands on with production agent architectures, memory, routing, and eval frameworks — built from real enterprise engagements.
→ AI for Work — Understand, evaluate, and apply AI for complex work tasks.
Note: Article content contains the views of the contributing authors and not Towards AI.
Related posts
")

Recent Posts


")


