Scraping Medium Stories with Selenium
Last Updated on January 6, 2023 by Editorial Team
Author(s): Eugenia Anello
How to extract data from Medium Search results

Disclaimer: This article is only for educational purposes. We do not encourage anyone to scrape websites, especially those web properties that may have terms and conditions against such actions.
Web scraping is the process to extract data from websites. There are many use cases. We can apply it to scrape posts from social networks, products from Amazon, apartments from Airbnb or Medium posts as I will show.
Medium is a platform, where people can bring new ideas to the surface, spread them and learn new things every day. When I search one topic, there are a lot of articles as results and I would like to use web scraping to get the details of each of the Medium stories. Moreover, I would like to change the order of the articles, to see the most recent stories, instead of having an order based on claps.
I decided to build a crawler using Selenium, that is an open-source project used for browser automation. Selenium supports bindings for all major programming languages, including the language we’ll use in the tutorial: Python. The Selenium API uses the WebDriver protocol to control a web browser, like Chrome, Firefox, Microsoft Edge. Here we will use Chrome as browser.
Content:
- Prerequisites
- Introduction to Selenium
- Getting started with Selenium
- Interact with elements within the page
- Create DataFrame and export it into CSV file
1. Prerequisites
Before we begin this tutorial, set up Python environment in your machine. Install Anaconda in their official page here if you didn’t do it yet. In this story, I will use Jupiter as environment in Windows 10, but feel free to decide your IDE of choice.
Let’s install selenium:
We also need to install Chrome webdriver, it’s important to use the selenium library:
Downloads – ChromeDriver – WebDriver for Chrome
Choose the version that matches the version of your browser. Once downloaded, you need to add the chromedriver.exe’s directory to your path. Don’t skip this last step, otherwise the program will give errors.
There are other supported browsers, that have their own drivers available:
2.Introduction of Selenium
The proper documentation about selenium can be found here.
The following methods help to find multiple elements in a web page and return a list:
- find_elements_by_name
- find_elements_by_xpath
- find_elements_by_link_text
- find_elements_by_partial_link_text
- find_elements_by_tag_name
- find_elements_by_class_name
- find_elements_by_css_selector
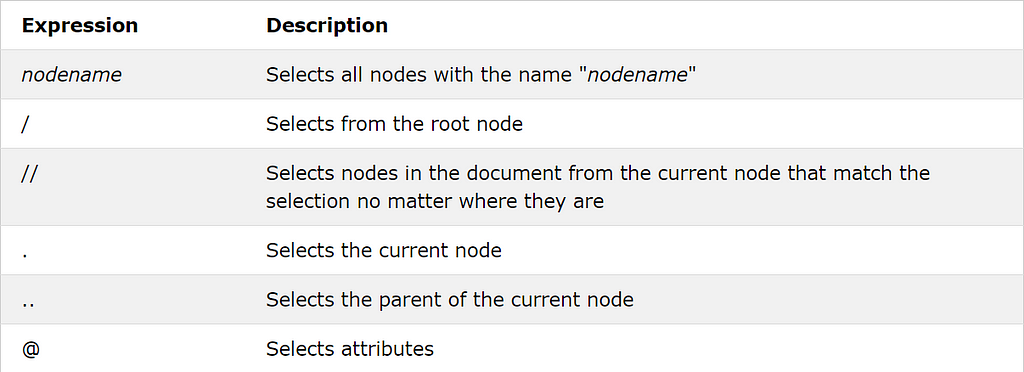
In this tutorial, I will only use find_elements_by_xpath function, that extract the elements in a webpage specifying the path using XPath. Xpath is a language that is used for locating nodes in an XML document. The most useful path expressions are listed below:

3. Getting Started with Selenium

Let’s import the libraries:
Now we can create an instance of Chrome WebDriver, using the direct path of the location of your downloaded webdriver.
After we can create a function, that takes as input a string, that represents the topic you write in the search bar.
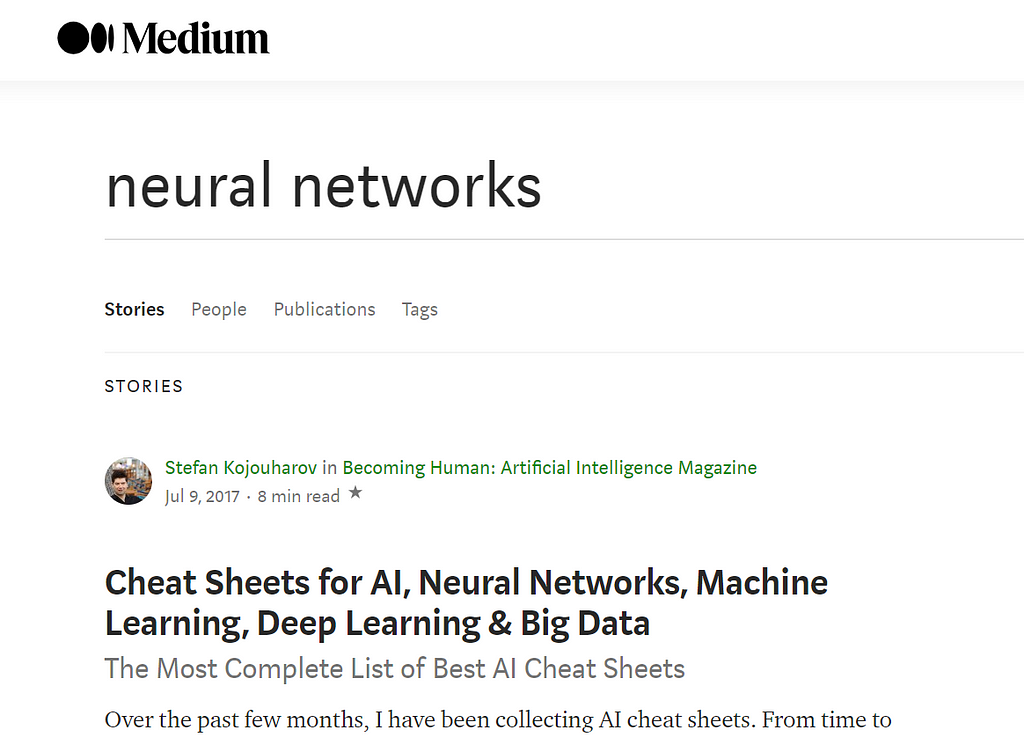
In this tutorial, I focused on searching articles about neural networks. The first thing to do with the WebDriver is navigate to the link created through the function defined before. The normal way to do this is by calling get method:
WebDriver will wait until the page has fully loaded before returning control to our test or script. The loaded search will show only the first ten results. So, we need to scroll to the bottom of the page:
4. Interact with elements within the page
Now, need to interact with the HTML elements within a page. In the medium search page, we’ll scrape:
- story’s title
- story’s link
- date
- number of claps
- number of responses
- author’s link
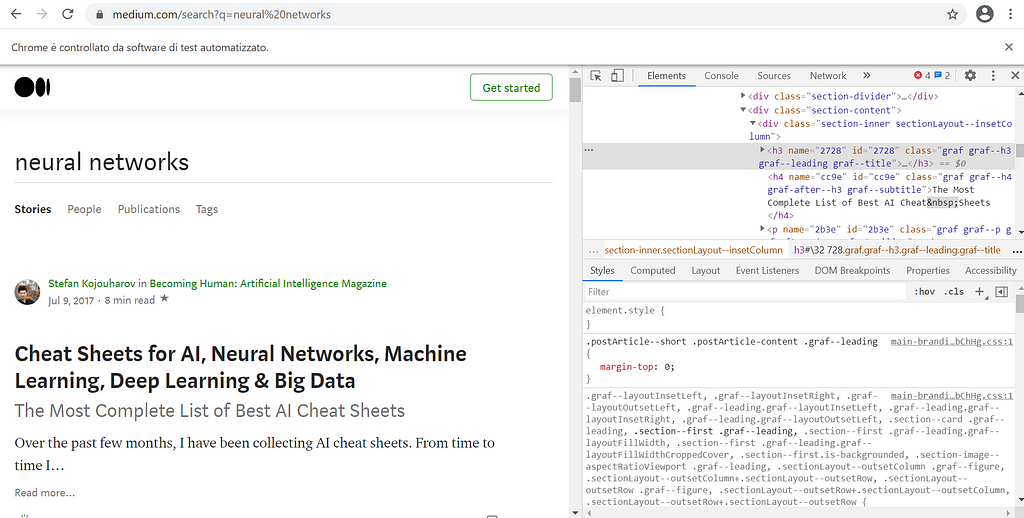
For example, we can make a right-click in the title of the first story and click inspect element. At right we see the HTML of the web page. In particular, the highlighted part represents the code of the title.

We select the title of each article using the function find_elements_by_xpath shown before. // is used to select the nodes in the web page from the tag <div> that belongs to the class “section-content”. We write the entire Xpath to extract the titles, which are specified by the tag elements <h3>, used to define headings.

Now we extract the links from each story.

The specified path begins from the tag <div> that belong to the class “postArticle-content” and ends with the tag <a>, that is used to define hyperlinks. In order to extract the URL, we need to get the property of the tag <a>, href, that contains the link of the specific article.

We’ll do the same procedure for other pieces of information:
These variables contain the list of the corresponding elements: dates, number of claps, number of responses and author’s URL.
5. Create DataFrame and export it into CSV file
Now the scraping is finished and we want to fill the values of the dictionary “each_story”. Once the dictionary is complete, we transform the dictionary into a DataFrame.

We want the more recent results at the top. So, we sort the DataFrame by date in descending order.

Let’s export the DataFrame into a CSV file:
Congratulations! You extracted Medium Search results using Python!
Final thoughts:
Until now we interacted with many languages, Python, HTML, XPath and many other more. If you had some difficulties with some languages, such as HTML and XPath, I suggest you to relook the basics in w3school and do many “inspect” in the webpages to make practice. I hope you found useful this tutorial to extract the various types of information from websites on your own. The code is in github.
Scraping Medium Stories with Selenium was originally published in Towards AI on Medium, where people are continuing the conversation by highlighting and responding to this story.
Published via Towards AI
Take our 90+ lesson From Beginner to Advanced LLM Developer Certification: From choosing a project to deploying a working product this is the most comprehensive and practical LLM course out there!
Towards AI has published Building LLMs for Production—our 470+ page guide to mastering LLMs with practical projects and expert insights!

Discover Your Dream AI Career at Towards AI Jobs
Towards AI has built a jobs board tailored specifically to Machine Learning and Data Science Jobs and Skills. Our software searches for live AI jobs each hour, labels and categorises them and makes them easily searchable. Explore over 40,000 live jobs today with Towards AI Jobs!
Note: Content contains the views of the contributing authors and not Towards AI.


