


")
PySpark Snowflake Data Warehouse Read Write operations — Part1 (Read Only)
Last Updated on February 8, 2021 by Editorial Team
Author(s): Vivek Chaudhary
Programming
PySpark Snowflake Data Warehouse Read Write operations — Part1 (Read-Only)
The Objective of this story is to build an understanding of the Read and Write operations on the Snowflake Data warehouse table using Apache Spark API, Pyspark.
Snowflake is a cloud-based Data Warehousing solution, designed for scalability and performance. In my upcoming blogs I will definitely share a detailed insight on Snowflake and its components, but for the moment take it as a cloud-based Database system with massively parallel processing and enormous computation power, so as of now I will restrict myself here only to Snowflake and Spark related stuff.
- Load Data from Amazon S3 Bucket to Snowflake DB table
Snowflake provides a 30 day free trial. Create your free tier account and enjoy the benefits of learning.
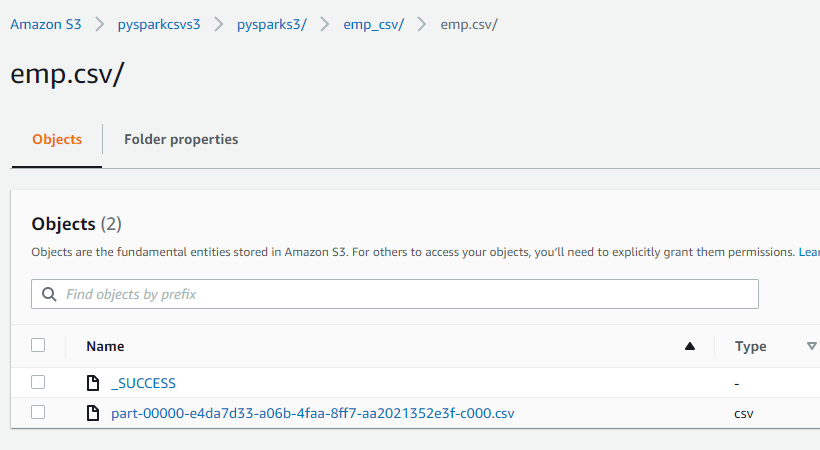
Data present in AWS S3 bucket:
Setup before loading data into Snowflake Table:
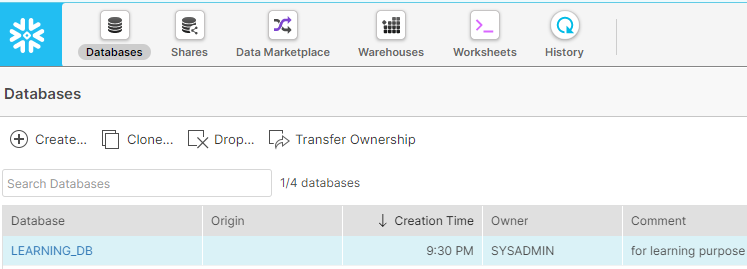
- Create Snowflake Free Tier Account and Create a Database as below:
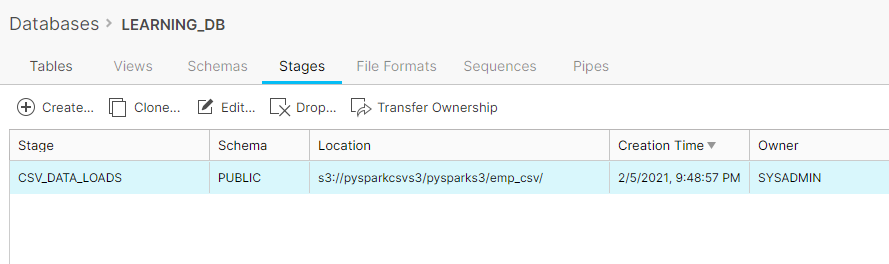
2. Create a Stage that will point to the AWS S3 bucket:
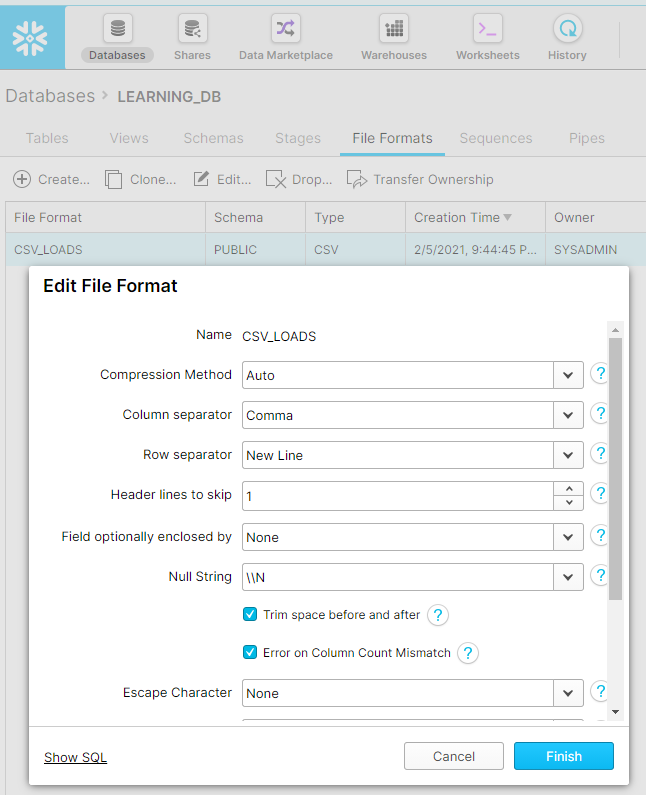
3. Under the File Formats tab create a CSV file format to be used while loading data from AWS S3 to Snowflake Table.
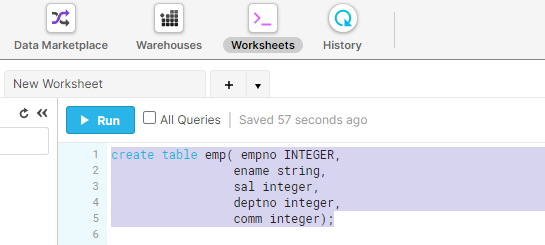
4. The next step is to create Snowflake Table “EMP”, go to the Worksheets tab and execute the SnowSQL DDL command to create a table.
create table emp( empno INTEGER,
 ename string,
 sal integer,
 deptno integer,
 comm integer);
5. Next, copy the data from AWS S3 to the Snowflake table.
copy into learning_db.emp
from @csv_data_loads/emp.csv file_format=csv_loads
on_error=’skip_file’;
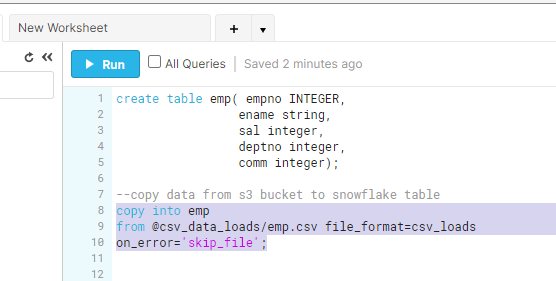
csv_data_loads represents Stage location where we pointed to S3 bucket csv_loads is the file format we created for csv dataset.
Verify the dataset using SnowSQL:
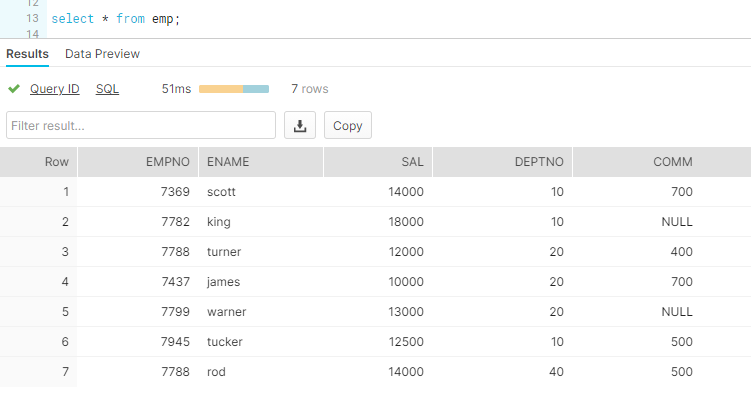
Data successfully loaded to Snowflake.
2. Read Snowflake Table using PySpark.
Import prerequisites and set spark configurations:
import findspark
findspark.init(‘D:\spark-2.3.3-bin-hadoop2.7’)
import pyspark
from pyspark.sql import SparkSession
from pyspark import SparkContext, SparkConf
import os
os.environ[‘PYSPARK_SUBMIT_ARGS’] = ‘ — packages net.snowflake:snowflake-jdbc:3.11.1,net.snowflake:spark-snowflake_2.11:2.5.7-spark_2.4 pyspark-shell’
spark = SparkSession.builder.appName(‘Pyspark_snowflake’).getOrCreate()
spark._jvm.net.snowflake.spark.snowflake.SnowflakeConnectorUtils.enablePushdownSession(spark._jvm.org.apache.spark.sql.SparkSession.builder().getOrCreate())
Set Snowflake connection properties:
sfOptions = {
 “sfURL” : “wa29709.ap-south-1.aws.snowflakecomputing.com”,
 “sfAccount” : “xxxxxxx”,
 “sfUser” : “xxxxxxxx”,
 “sfPassword” : “xxxxxxx”,
 “sfDatabase” : “learning_db”,
 “sfSchema” : “public”,
 “sfWarehouse” : “compute_wh”,
 “sfRole” : “sysadmin”,
}

SNOWFLAKE_SOURCE_NAME = “net.snowflake.spark.snowflake”
df=spark.read.format(SNOWFLAKE_SOURCE_NAME).options(**sfOptions).option(“query”,”select * from emp”).load()
df.show()
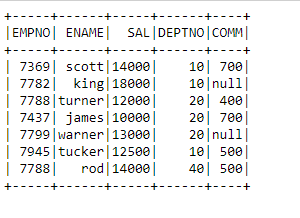
Data Validation successful, we are able to connect to spark and read the data from Snowflake table into Spark.
Summary:
· Load AWS S3 data into Snowflake DB table
· Snowflake Stage and File Format creation.
· SnowSQL commands such as DDL and copying data.
· Use Pyspark to read Snowflake table data
Thanks to all for reading my blog. Do share your views and feedback.
PySpark Snowflake Data Warehouse Read Write operations — Part1 (Read Only) was originally published in Towards AI on Medium, where people are continuing the conversation by highlighting and responding to this story.
Published via Towards AI
Towards AI Academy
We Build Enterprise-Grade AI. We'll Teach You to Master It Too.
15 engineers. 100,000+ students. Towards AI Academy teaches what actually survives production.
Start free — no commitment:
→ 6-Day Agentic AI Engineering Email Guide — one practical lesson per day
→ Agents Architecture Cheatsheet — 3 years of architecture decisions in 6 pages
Our courses:
→ AI Engineering Certification — 90+ lessons from project selection to deployed product. The most comprehensive practical LLM course out there.
→ Agent Engineering Course — Hands on with production agent architectures, memory, routing, and eval frameworks — built from real enterprise engagements.
→ AI for Work — Understand, evaluate, and apply AI for complex work tasks.
Note: Article content contains the views of the contributing authors and not Towards AI.


Recent Posts


")

