


Developing Your First REST API with Python using the Flask Framework
Last Updated on December 16, 2020 by Editorial Team
Author(s): Sanket Kangle
Programming
What is an API?
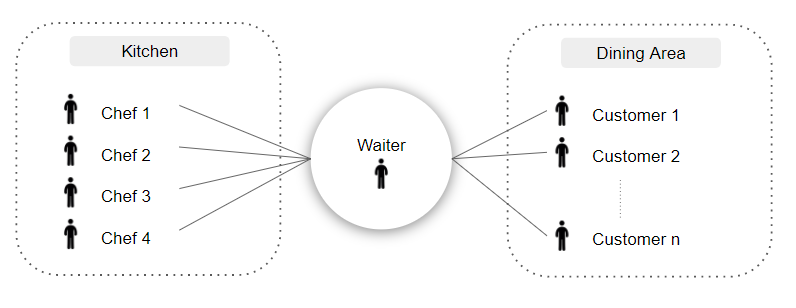
API stands for application programming interface; it is an intermediate interface for the website or mobile application to communicate with the backend logic. In simple terms Its like a messenger between requester and provider. A commonly used metaphor is a “waiter.” Think about it. The waiter is a messenger between the customers and the chefs in the kitchen. A waiter can understand the different requirements of customers, pass them to the chefs, and provide the dishes made by chefs back to the customers. Waiters are the essential middleman. The key benefits of waiters are that they can cater to all kinds of customers, and as customers are isolated from the kitchen, the business secrets are preserved(customers can’t steal your recipe). In this example, the waiter acts like an API. The following image illustrates the same.
Similarly, in computer science, one of the key benefits of having API is encapsulation. . We encapsulate the logic so that people outside won’t be able to see it.
Understanding RESTful API
REST stands for Representational State Transfer. It was first defined in Dr. Roy Fielding’s dissertation (Architectural Styles and the Design of Network-Based Software Architectures) back in 2000. REST is not a standard or protocol; it is more like a software architectural style. Many engineers follow this architectural style to build their applications, and some examples are eBay, Facebook, Google Maps, and many more as we can understand from these examples that REST really is a scalable architecture style.
RESTful API is an API that conforms to the REST constraints/principles.
REST Constraints/Principles
- Client-server: The client and server communicate through this interface and are independent of each other. Either side can be replaced as long as the interface stays the same. Requests always come from the client-side.
- Stateless: Every request is considered to be independent and complete, i.e., There is no dependence on the previous request nor dependence on a session to maintain the connection status.
- Cacheable: Things are cacheable on the server or client-side to improve performance.
- Layered system: There can be multiple layers in the system, and the goal here is to hide the actual logic/resources. These layers can perform different functions, such as caching and encryption.
- Uniform interface: The interface stays the same. This helps to decouple the client and server logic.
Understanding HTTP Protocol
HTTP is short for HyperText Transfer Protocol. It is an implementation of the REST architecture style. It is the standard protocol used on the worldwide web. In the HTTP protocol, different types of service request methods are available. We need to choose an appropriate method according to our needs.
- GET: For reading data
- POST: For creating data
- PUT: For completely updating data
- PATCH: For partially updating data
- DELETE: For deleting data
In simple words, different HTTP methods are like “actions” instructions for the REST API. They are used to perform different actions on the same data.
We can design and test a REST API very easily with Python & Flask. Let us see how.
Building API — Hands-on
This is going to be a hands-on tutorial. For this exercise, the software requirements are as below:
- Python 3 (link)
- Any Python IDE according to your preference. PyCharm is used in this tutorial(Public edition will also do) (link)
Other frameworks and libraries we will install on the go.
In this exercise, we will create an API for a student record system. When doing it on an enterprise-level, the data is generally stored in a database, but here, the focus is on building API, so we will store the data locally in program memory only.
By the end of this tutorial, you will have created a Student management system API with the following functionalities using Flask and python.
- get_records: Retrieves and displays all the records of student available
- get_record: Retries and displays a single record based on the provided id. If the record is not available, then returns an empty record.
- create_record: Create and add a new record to the student’s records.
- update_record: Updates a record for specifically provided id with given data
While implementing this, we will cover GET, POST, and PUT method, their correct HTTP Status response, and expected output in JSON format.
So, without further ado, Let’s get started.
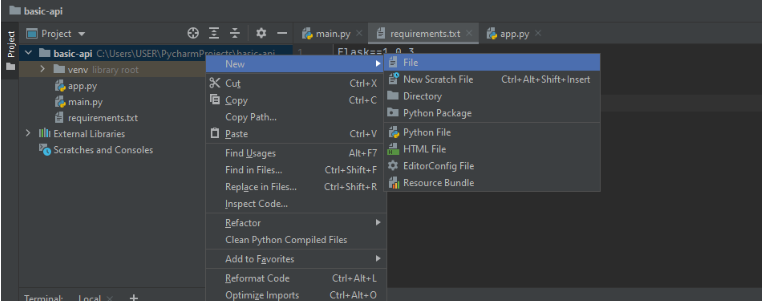
Create a new project in python with the name basic-api (any suitable name will do). Create a new file in that project by right-clicking on it, as shown in the exhibit below.
Give it a name as requirements.txt. It is standard practice that we create a file like this and include all the dependencies with respect to the project in it. We can also install all of them in one go.
We need Flask and httpie(pronounced as each-tee-tee-pie), write them with the versions as shown in the following exhibit.

run the following command in the terminal of pycharm, and the dependencies will be installed for the current virtual environment.
pip install -r requirements.txt
Once that is done, create a new python file as shown in the following exhibit.
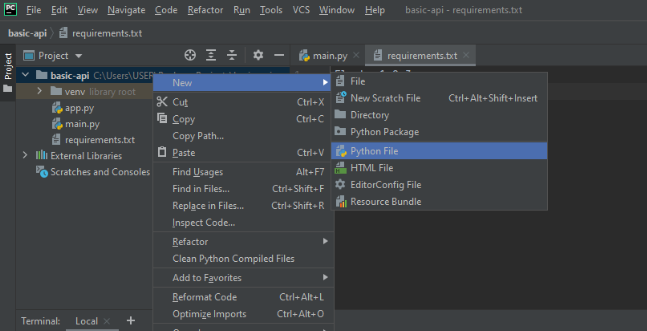
Name it “app” (any other name will also do, this is just a convention).

Before we start writing actual code for actual API, let’s first see if all installation is working well or not with a dummy starter web service.
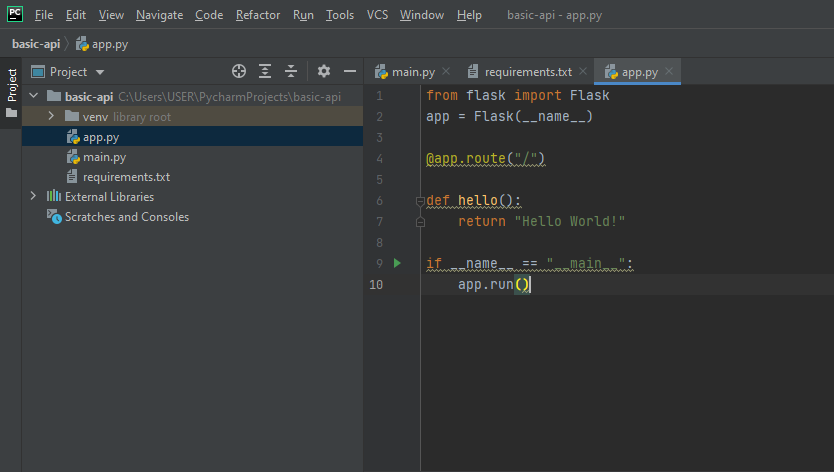
Write following code in app.py
from flask import Flask
app = Flask(__name__)
@app.route("/")
def hello():
    return "Hello World!"
if __name__ == "__main__":
    app.run()
your editor in pycharm should look like the following exhibit.
Now, right-click on it and run it by clicking on Run ‘app’. You will get the following output.
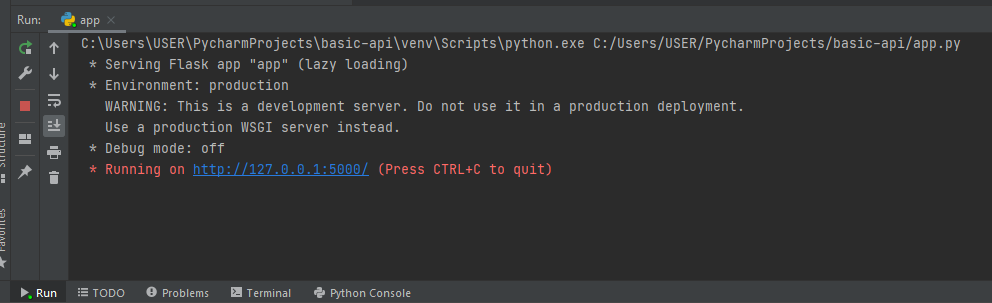
Click on this blue URL https://bit.ly/3ixh7qt or go to your web browser and in the new tab go to the URL http://localhost:5000 . You should open a locally hosted web service page with only Hello World written on it as shown in the following exhibit.
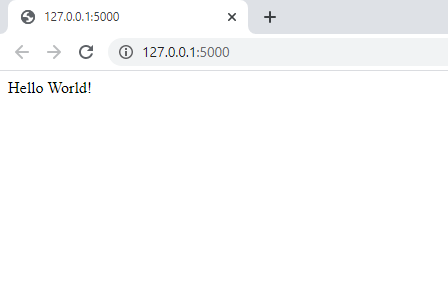
If you reached till here without any error. then congrats, you are on the right track. (If not, don’t worry, just see where you went wrong, debug your code — isn’t that the sweet nectar for a developer?)
What we have done till here is, first it imports flask package in app.py. It instantiates the Flask object and assigns it to the app variable. The main function is the entry point and it brings up the Flask web server. In our only API function, we have defined hello function which returns “Hello World!” as a response. Using the Flask decorator, we can route the GET request URL to this function when we are able to see it on the web page.
This is a very good start! Though this web service merely returns the plain text string, we can build a lot of stuff on top of that. Hope you can see how simple it is to build a web service using Flask; it is literally just a few lines of code.
As everything is working fine, let us start writing our original student record system API.
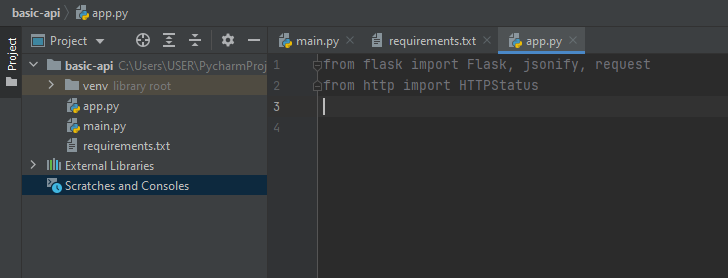
First, clean up app.py and start over again. Import the packages necessary.
from flask import Flask, jsonify, request
from http import HTTPStatus
jsonify package converts Python objects to JSON format. It also changes the Content-Type of the HTTP response to application/json. HTTPStatus enum includes different HTTP statuses. The exhibit is below.
Then create an instance of class Flask and assign it to the app variable.
app = Flask(__name__)
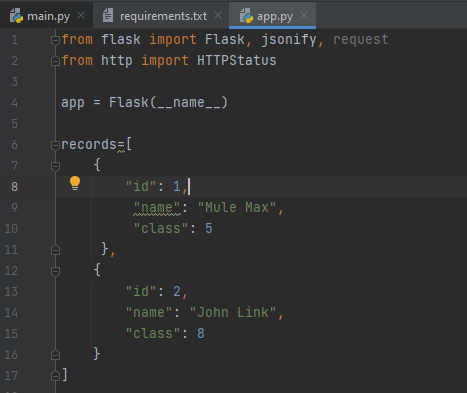
Now, define the records list at starting
records=[
    {
        "id": 1,
         "name": "Mule Max",
         "class": 5
     },
    {
        "id": 2,
        "name": "John Link",
        "class": 8
    }
]
your editor should look like the following exhibit.
get_records: Retrieves and displays all the records of student available
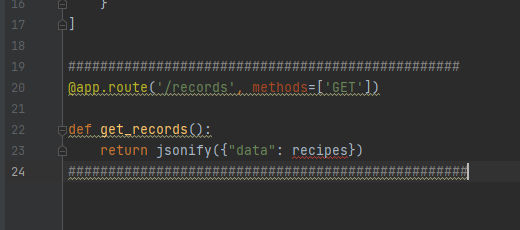
Use the route decorator to tell Flask that the /records route will route to the get_records function, and the methods = [‘GET’] argument to specify that the route decorator will only respond to GET requests. After that, we use the jsonify function to convert the list of records to JSON format and respond to the client.
@app.route('/records', methods=['GET'])

def get_records():
    return jsonify({"data": recipes})
Note that even if we do not specify a method to be GET, It will be GET by default. pycharm editor exhibit is as follows.
get_record: Retries and displays a single record based on the provided id
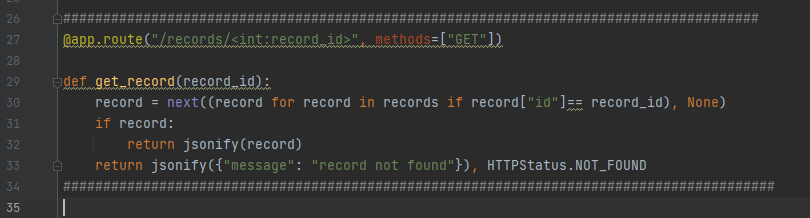
For retrieving one specific record, use the /records/<int:record_id> route to trigger the get_record(record_id) function.
@app.route('/records/<int:record_id>', methods=['GET'])
def get_record(record_id):
    record = next((record for record in records if record["id"]== record_id), None)
    if record:
        return jsonify(record)
    return jsonify({"message": "record not found"}), HTTPStatus.NOT_FOUND
The syntax <int:record_id> means the value in the route will be assigned to the integer variable record_id and can be used in the function. Our function get_record(record_id) will then loop through the whole “records” list and locate the record that has the id that we are looking for. If that record exists, then we will return it else it will return the message stating record not found. The pycharm editor exhibit of the function is given below.
create_record: Create and add a new record to the student’s records
For creating a record in memory, we will build a create_record function. Use the /records route to the create_record function and the methods=[“ POST”] argument to specify it will only respond to POST requests.
@app.route("/records", methods=["POST"])

def create_record():
    data = request.get_json()
    name = data.get("name")
    class_ = data.get("class")
    record = {
        "id": len(records)+1
        "name": name
        "class": class_
    }
    records.append(record)
    return jsonify(record), HTTPStatus.CREATED
We used the request.get_json() method to get data from a POST request. These two values together with a self-incremented id that we generate will be stored in the record (dictionary object) and then appended to our records list. At this point in time, the record is created and stored. the pycharm editor exhibit is below.

update_record: Updates a record for specifically provided id with given data
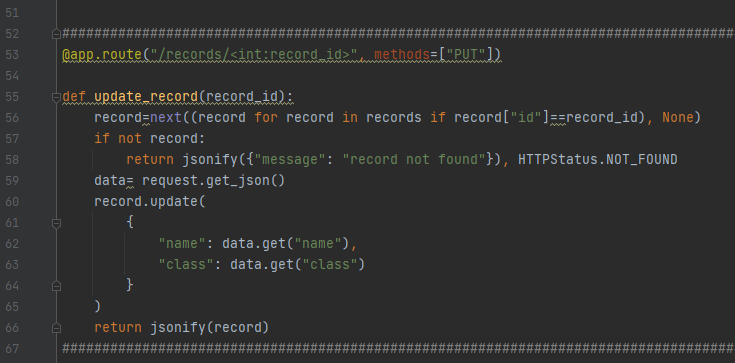
For updating a record that already exists in the record, use the /records/<int:record_id> route with methods=[“ PUT”] argument to specify it will only respond to PUT requests.
@app.route("/records/<int:record_id>", methods=["PUT"])

def update_record(record_id):
    record=next((record for record in records if record["id"]==record_id), None)
    if not record:
        return jsonify({"message": "record not found"}), HTTPStatus.NOT_FOUND
    data= request.get_json()
    record.update(
        {
            "name": data.get("name"),
            "class": data.get("class")
        }
    )
    return jsonify(record)
We use the same line of code to get a record with the provided id as we used before in get_record function. If the record is not there then return the message that “record is not found”. If the record is found, then perform record.update function and update the name and class you got from the client request. The pycharm exhibit is as follows.
Now the last thing is to write a driver code.
if __name__=="__main__":
    app.run()
Run this app.py and you should get the following response.
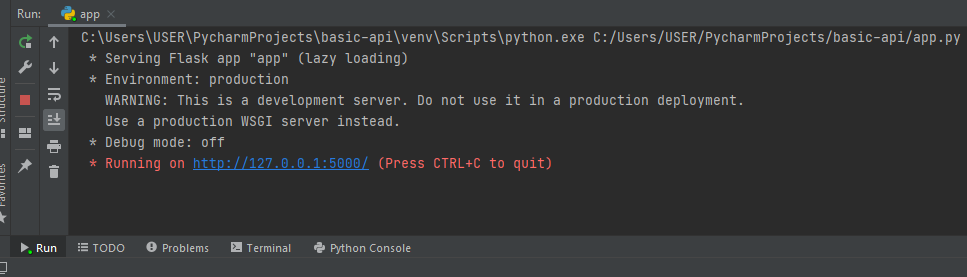
If you got this response then congrats, you have successfully deployed your first REST API locally on your machine.
you can test all the endpoints of this API using httpie, curl, Postman, or Advance rest client. Stay tuned to learn how to test your API.
The complete code of app.py is as follows
from flask import Flask, jsonify, request
from http import HTTPStatus

app = Flask(__name__)

records=[
    {
        "id": 1,
         "name": "Mule Max",
         "class": 5
     },
    {
        "id": 2,
        "name": "John Link",
        "class": 8
    }
]

#################################################
@app.route('/records', methods=['GET'])

def get_records():
    return jsonify({"data": recipes})
##################################################

##################################################
@app.route("/records/<int:record_id>", methods=["GET"])

def get_record(record_id):
    record = next((record for record in records if record["id"]== record_id), None)
    if record:
        return jsonify(record)
    return jsonify({"message": "record not found"}), HTTPStatus.NOT_FOUND
###################################################

###################################################
@app.route("/records", methods=["POST"])

def create_record():
    data = request.get_json()
    name = data.get("name")
    class_ = data.get("class")
    record = {
        "id": len(records)+1,
        "name": name,
        "class": class_
    }
    records.append(record)
    return jsonify(record), HTTPStatus.CREATED
#####################################################

#####################################################
@app.route("/records/<int:record_id>", methods=["PUT"])

def update_record(record_id):
    record=next((record for record in records if record["id"]==record_id), None)
    if not record:
        return jsonify({"message": "record not found"}), HTTPStatus.NOT_FOUND
    data= request.get_json()
    record.update(
        {
            "name": data.get("name"),
            "class": data.get("class")
        }
    )
    return jsonify(record)
#########################################################

if __name__=="__main__":
    app.run()
Give claps if you found this article useful. Stay tuned for upcoming articles.
All the images/exhibits are from the author unless given credit
Thanks for reading the article! Wanna connect with me?
Here is a link to my Linkedin Profile
Sanket Kangle – Software Engineer – Apisero Inc. | LinkedIn
Developing Your First REST API with Python using the Flask Framework was originally published in Towards AI on Medium, where people are continuing the conversation by highlighting and responding to this story.
Published via Towards AI
Take our 90+ lesson From Beginner to Advanced LLM Developer Certification: From choosing a project to deploying a working product this is the most comprehensive and practical LLM course out there!
Towards AI has published Building LLMs for Production—our 470+ page guide to mastering LLMs with practical projects and expert insights!

Discover Your Dream AI Career at Towards AI Jobs
Towards AI has built a jobs board tailored specifically to Machine Learning and Data Science Jobs and Skills. Our software searches for live AI jobs each hour, labels and categorises them and makes them easily searchable. Explore over 40,000 live jobs today with Towards AI Jobs!
Note: Content contains the views of the contributing authors and not Towards AI.


Popular posts

 for 2021")


Updates

Recent Posts


