Number Plate Detection — DETECTRON v2
Last Updated on July 20, 2023 by Editorial Team
Author(s): Luka Chkhetiani
Originally published on Towards AI.

Most (well, at least some) of the ‘Smart Cameras’ don’t use number plate detection & recognition systems, but they pay attention to specific hidden codes on the number plates, and by sticking some transparent material on them, tricking the intelligent systems are not just possible, but pretty easy.
Well, it’s not legal, but …
Robust, real-time detection of number plates is not an unresolved challenge for the specific countries, that have dataset published.
While looking around the web, I couldn’t find any collection, or at least a ready-to-be-scrapped place, where I could get a dataset of Georgian number plates.
I’m pretty interested in challenging myself to do some work only by myself, even if it includes some menial work to do. For instance: labeling dataset (not a fan, right?). Or, worse — annotating the dataset for the detector model in COCO format.
After a couple of minutes of thinking, I came up with an approach, that would take the minimum time possible to get some results.
The plan looks like the following:
- Get 2–3 videos from youtube that contain keywords “driving, tbilisi”, “driving georgia”.
- Cut them to 1 FPS using ffmpeg.
- Annotate the images using Labelme open-source annotator.
- Train the detector model with Detectron 2 framework. RetinaNet with ResNet50 backbone to be specific.
5. And — publish the dataset, trained model, and inference after finishing the work.
Detectron2 is a new write-up by FAIR (Facebook AI Research), that comes with a number of detector and backbone (classifier) pre-trained models for:
object detection, instance segmentation, panoptic segmentation, keypoint detection.
See the repository: https://github.com/facebookresearch/detectron2
I’ll write Colab Notebook as a follow-up later on, but firstly, let me introduce how easy and quick it is building Detectron2 framework on Google Colab.
Installing torch, torchvision and cython.
Building FVCore, COCO API for Python.
!pip install -U torch torchvision cython!pip install -U 'git+https://github.com/facebookresearch/fvcore.git' 'git+https://github.com/cocodataset/cocoapi.git#subdirectory=PythonAPI'
Cloning into Detectron2 Repository and building it
!git clone https://github.com/facebookresearch/detectron2 detectron2_repo!pip install -e detectron2_repo
And, restarting Runtime after the building is mandatory.
Dataset
You can access the dataset with the link.
It’s uploaded on Google Drive. You can either use the “Add to my drive” function or use my beloved Google Drive Downloader script — gdown.
Unzip the dataset. The instances will be as followed:
-plates_coco
U+007C--annotations.json
U+007C--JPEGImages
U+007C--U+007C---*.jpg
Gdown.pl
Using gdown script is pretty easy. Just clone the repository, give the script admin privileges [sudo chmod 777 gdown.pl], and use it as follows:
./gdown.pl filelink name
In our case
./gdown.pl https://drive.google.com/file/d/1u1VNPrDPP6AePoiYESldTBepFaamrMbY/view?usp=sharing plates_coco.zip
Labelme
“ The dataset I’ve provided you with is already converted to COCO format.
One of the coolest totally open-source project. Labelme is image polygonal annotator in python. Absolutely free, easy to use.
Check out the repository.
Works with pip3 install labelme, and you can execute it afterward by entering the desired dataset directory with terminal and executing command labelme.
Then click the ‘Open Directory’ button, and open the directory you’re in.
Click ‘Create Polygons’, and start annotating. You can add as many classes as you want.
A little UX would be: after finishing annotating each image, you can press the ‘d’ button on keyboard and ‘Enter’ twice to save the *.json file, and it’ll proceed to the next image straightforward.
After finishing the annotation, you’re required to convert it to the COCO format.
It’s easy as followed:
Get the script from the gist: Labelme2COCO.py
Name it ‘labelme2coco.py’.
Create ‘labels.txt’ file with the following structure:
__ignore__
class1
class2
class3
In our case, it is:
__ignore__
plates
Execute the command:
!python3 labelm2coco.py input_dir output_dir --labels labels.txt
The input_dir is the directory your dataset and JSON files are. In case you’re in the same directory, you can use ‘.’ instead of ‘input_dir’. Output_dir is the directory we want our COCO-format converted dataset to be named as. And, the labels.txt is the name of.. well, you understand.
Training
After installing required libraries, and building the detectron2 framework, training is easy to do.
You can use the following script:
It’ll take a couple of minutes (around 45) to finish the training procedure. And you’ll be able to see the process in detail.

Basically cfg.SOLVER.IMS_PER_BATCH = 2 (or, batch_size = 2) takes 6414M, almost half of the GPU, so we can increase it for sure.
Detectron uses an iteration-based training system. In other words, we don’t have epochs, we have iterations. To be clearer, IMS_PER_BATCH = 2 means that in 1 iteration the model sees 2 images. The total size of the iterations should be (N / B) * E, where N stands for Number of Images, B stands for Batch Size, and E means epochs, or how many times we want our model to see each image.
In my training procedure, I’ve used a total of 10000 steps, which means the model has seen each image (Batch Size *10000)/Num Images times, which roughly is 48 (epochs).
Model Outputs
The training procedure creates the ‘outputs’ directory with checkpoints and the log files for tensorboard. In our trainer we’ve used 500 as a period for each checkpoint, in other words — it’ll generate a model in every 500 steps. This means every time the model sees the dataset twice, we’re generating the checkpoint.
You can access my pretrained model with the link
Inference
For the inference, use the following gist.
Colab Notebook
Access the Notebook with the following link.
Google Colaboratory
Edit description
colab.research.google.com
Results
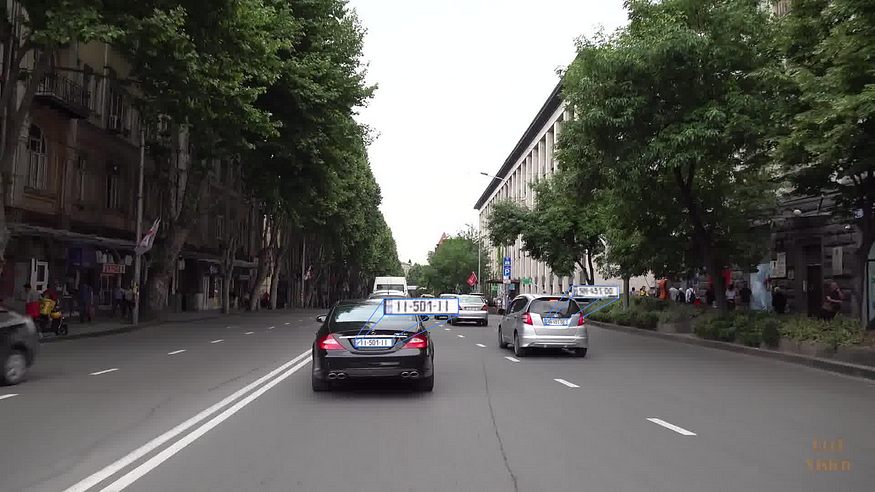
The model works fine. To be fair, with a total of 414 images annotated, and by making it struggle by downsampling the input images 2–3 times, its outputs turns out to be pretty good.
See some of the results here:


In case of any questions, feel free to comment & reach out.
And, thanks for reading!
Join thousands of data leaders on the AI newsletter. Join over 80,000 subscribers and keep up to date with the latest developments in AI. From research to projects and ideas. If you are building an AI startup, an AI-related product, or a service, we invite you to consider becoming a sponsor.
Published via Towards AI


