


How To Develop A Game Using Computer Vision
Last Updated on July 24, 2023 by Editorial Team
Author(s): Ritheesh Baradwaj Yellenki
Originally published on Towards AI.
Computer Vision
Playing A Racing Game using Hand Tracking, Artificial Intelligence
If you are an excited geek and love Computer Vision, AI here is an interesting application for you. Developing a game using CV in AI. I developed a simple game using a deep learning library and python game development tool known as — Pygame. Let’s get to understand how you can control the movements on your computer screen using hand-tracking or any user-defined object.
Below is a short video of how I controlled the game using my hands.

VideoGame1.mp4
Game — Integrated with gesture controls
Implementation using Python
Let’s start implementing the algorithm step-by-step using OpenCV and Numpy. First, we build a model, and in that, define the color range of the object we want to control. The code below is for identifying a red-colored object, you can change it to identify any desired color just by changing the intensity values. To detect red, you can use an HSV color threshold script below.


We can obtain better results by applying the masks multiple times with various ranges and using different models sampled from the object we want to find. Also one can implement a multi-back projection version (histogram back projection). If you want to write code from scratch you can use CNN library Deepgaze.
Detect Multiple Contours
We all know that videos are nothing but a series of images (frames) being displayed at a rapid rate. This game uses the same frame (road in the background) repeatedly. We try to find the contour of the desired object (man here) on each frame and once identified performance action (if necessary), we move on to the next frame. If not found, the man most likely is already dead.
The below code will return us the number of contours. Since we run the frame one after another(sliding windows) we don't want to process the frame to the next step if there is no contour in it.
Detecting the Contour with maximum Area
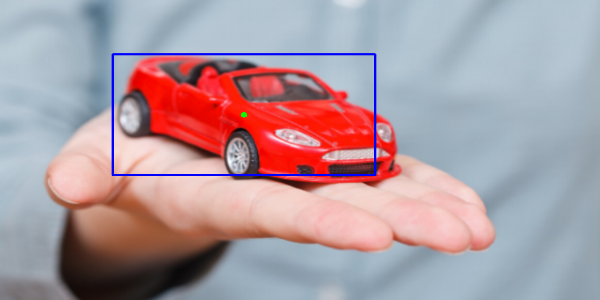
After identifying the object in each frame, contour which occupies a maximum portion in the image array will be selected, to avoid contours with less area, probably noise (you can see that in the car image above, unwanted portions are also seen as a white portion, but we don’t want our model to misunderstand it and negatively impact the results).
Once we’ve got a contour with the maximum area, we assign a point of reference to it — let’s call it a node point. This node point helps in tracking this contour so that whenever the object moves, this nodal point will move along with it. I’ve considered the center of the rectangle as a nodal point. You can choose any number of nodal points depending on your application.
Our main aim now is to get the pixel values (x,y) values of our nodal point. Any method can be preferred to approach this step. For example, you can use a classifier which detects human faces and controls the actions when the model detects a face in the frame. In that case node point will lies in the center region of the face detected.
The Game
Now that we have our nodal point, we need to write an algorithm to move the PLAYER in the game. In my case, I want the PLAYER to move left and right when my skin color/red color object is detected. To control the keyboard actions we have a tool in python known as — Pynput.

The area between two red lines L1 (left), L2 (right) represents the critical area.
- When the nodal point lies in the region left to line L1, keyboard action LEFT is triggered notifying the application that the user wants to move the PLAYER to the left side.
- Similarly, when the nodal point lies in region right to line L2, the player will move to the right.
- If the nodal point lies between L1 and L2 i.e., in offset region (offset = L2-L1) no action will be performed.
Armor!
Again these constraints for my game, you can perform any actions of your own.
That’s all we had to do! THE GAME is ready, we have performed every step required to set up a Gesture Control Application which is responsible to handle the PLAYER in-game. We can integrate this model to any other application like to control our Laptop screens, Game Development, etc. I have used Deepgaze, a CNN library for human-computer interaction.
The full code can be found on GitHub, from here. Download the code and run the below commands. I have included clear instructions to set up the game and about how to play it.
pip install -r requirements.txt
python "Race Game.py"
You can check out short clip of the game here.
VideoGame.mp4
Pygame
VideoGame1.mp4
Game — Integrated with gesture controls
To download the executable file for Gesture Control Application, click here.
Conclusion
We learned how a motion-tracking application can be built and how it can be integrated with a game using Pygame. I hope you enjoyed the procedure and now understand how you can start developing simple yet interesting games. Please feel free to suggest changes wherever you find a scope of improvement. I will catch up with you again soon. Till then, Stay Home and Stay Safe!
If you would like to get in touch, connect with me on LinkedIn.
Join thousands of data leaders on the AI newsletter. Join over 80,000 subscribers and keep up to date with the latest developments in AI. From research to projects and ideas. If you are building an AI startup, an AI-related product, or a service, we invite you to consider becoming a sponsor.
Published via Towards AI
Related posts


Popular posts

 for 2021")


Updates

Recent Posts


