


How Do Face Filters Work?
Last Updated on June 3, 2024 by Editorial Team
Author(s): Vincent Vandenbussche
Originally published on Towards AI.
Everyone knows Snapchat filters. Face filters are everywhere now in our apps: Instagram, TikTok, Snapchat… But how does that even work? Let’s have in this post a short introduction with a fully working python code, allowing you to create your own filter.
A face filter is simply a filter applied to a face in a picture. Many face filters are available on Instagram or Snapchat, as shown in the picture below.

While it’s fairly easy to create your own Snapchat Lenses with Snap AR or an Instagram filter with Meta Spark AR, as soon as you want to make your own filter working in a dedicated app, it gets more complicated.
In this article, I will explain one way to apply such a filter on a given face image, and I will provide working python code so that you can do your own face filter on a webcam feed.
The overall steps of applying such a filter are shown in the following image:

Those steps will be explained further in the article. Such a solution can be divided in two main parts: offline preparation and online computation.
The offline preparation will be done only once for a given filter, and does not need to be repeated for each new frame. The steps are the following:
- Defining and annotating the face filter
- Defining the Delaunay triangles
Then we will start working with the input image (a webcam feed or an input image containing a face), and do the following:
- Compute the face landmarks and the Delaunay triangles
- Compute and apply affine transformation from the filter plane to the image plane
- And finally, display the results!
First things first, let’s now do the offline preparation.
Offline Preparation
As mentioned, there are mostly two steps in the offline preparation:
- Choosing and annotating the face filter
- Computing the Delaunay triangles
I know that choosing and annotating the face filter can be painful and tedious, so I provided in the GitHub repository a filter with its associated labels. But let’s have a look at how it works, so that you can do any filter you want in the future.
Choosing and Annotating the Filter
The first step is of course to choose a face filter. For convenience, and in order to mimic the original Mediapipe’s demo code, I decided to use this geometric colorful mask:

A word about Mediapipe’s FaceMesh: as detailed in the model card, the model was evaluated on more than 1700 images from 17 evenly distributed subregions of the world to ensure fairness low bias results. Check the model card for more about the fairness of the model based on world subregions, skin tone or gender.
Once the filter chosen, we have to annotate it. I have chosen to use 75 landmarks to apply the face filter; so I need to annotate those 75 landmarks on my mask. The 75 selected landmarks cover all the face, with slightly more landmarks on the eyes, the mouth and the eyebrows, since they are usually parts of the face that are more expressive.

Of course, you could use more or less than the 75 selected landmarks. Keep in mind, though, that there’s a tradeoff here:
- More landmarks may give a more accurate face filter, but may make the computationally expensive
- More landmarks may also increase the risk of having really small triangles in the next step, thus making the affine transformation complicated or even inaccurate
Since we are going to reuse Mediapipe’s Face landmarks and a subsample of its 468 landmarks, I simply replaced the 75 selected landmarks from the reference UV mapping to my filter.

As we can see from the above picture, once the 75 landmarks were selected, it was easy to transpose them to the face filter, since it’s the same shape and landmarks locations.
However, with another face filter, you may need to use labeling tools such as LabelStudio and manually annotate your 75 landmark locations. In the GitHub repository, I also provided an Anonymous mask face filter, annotated by hand, so that you can get an idea of how it would work.
Now that we have selected and annotated a face filter, let’s compute the Delaunay triangles.
Computing the Delaunay Triangles
You may have never heard of the Delaunay triangulation, but it’s nothing complicated to understand. Basically, from a set of points on a plane, the algorithm behind Delaunay triangulation is going to find a set of non-overlapping triangles while trying to maximize the small angles of those triangles. Put it simply, from a given set of points, you can a set of triangles while trying to avoid sliver triangles.

This is quite fortunate for our need: from our landmarks, we need a set of triangles so that we can apply affine transformation from one plane (the face filter) to another (the input image). Delaunay triangulation will provide exactly what we need.
To compute those Delaunay triangles from a set of points, we can use OpenCV, which provides all the necessary functions, as proposed in the following function:
This function takes as input the positions of the points (here, we would use the position of the 75 selected landmarks in the image) as well as the bounding rectangle (here, the image size basically). This returns the list of the indexes of all the computed triangles. On a given image, it looks like the following:
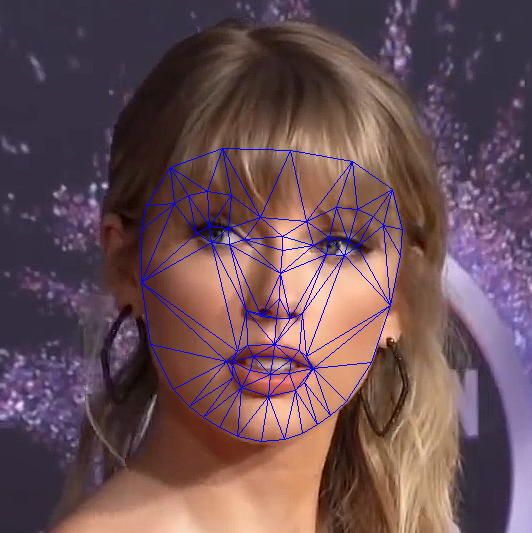
As we can see on the above image, even with only 75 selected landmarks, we have about 120 triangles.
Once the Delaunay triangles are computed once, it’s not mandatory to recompute them for every frame: while it could sometimes improve a bit the rendering by optimizing the triangles depending on the face perspective, it would be less computationally effective. It’s one more tradeoff to choose at this point
Online Computation
Now that we have the face filter and its landmark labels, as well as the Delaunay triangles, we can actually start working on a given input face image. There are two main steps:
- Computing the face landmarks using Mediapipe
- Computing and applying the affine transformation for each Delaunay triangle
And finally, we will be able to display the results. Let’s start with the landmarks computation.
Computing the Face Landmarks
In order to compute the face landmarks, we are going to use Mediapipe’s Face landmarks solution. That is a quite robust, ligthweight and free to use solution. The documentation about how to use it is quite straightforward, but let’s give a working code here, allowing to keep only the selected landmarks.
This functions takes as arguments the input image and the indexes of the selected landmarks. It will then instantiate a face landmarker model, run it on the image and keep only the relevant landmarks for each detected face. Of course, this is just an example code, but in practice it would be much more efficient to instantiate the face landmarker model only once, and not for every new frame.
Computing and Applying the Affine Transformation
Once the face landmarks are computed using Mediapipe, we can now compute and apply the affine transformation for each of the Delaunay triangles. The affine transformation will simply find the homography matrix to apply to a given input image, project it in the destination image plane. This is as simple as in the following image:

As we can see, for a given triangle in one image (the face filter), we will compute the affine transformation, allowing this triangle to be in the target shape (the input face image on which to apply the filter).
To do so, we will just loop over all the Delaunay triangles computed earlier, and for each of those, we will do the following:
- Compute the bounding rectangles containing the triangle in each plane (the plane of the input image and the plane of the face filter)
- Compute the affine transformation from the face filter to the input image
- Apply the affine transformation to the face filter
This can be done with the following code:
Once this is done, all we need to do is to blend the input image with the warped face filter, and it’s done!
Displaying the Results
In order to blend correctly the input image with the face filter, we not only applied the affine transformation to the face filter, but also to a mask, so that we know what pixels to keep from each frame. Put simply, for each pixel we know what frame to keep: either the input image, either the transformed face filter.

As a result, the face filter is applied to the relevant part of the image, as shown in the above image. The whole code is available in this GitHub repository (as well as codes of other medium posts I wrote). Feel free to reach out to me if you have any questions, either here or on LinkedIn.
Going further
This post, while realistic and working, is quite simplistic and does not cover all the use cases. Indeed, there are much more in face filters than what I propose here, such as:
- Rigid filters such as glasses, hat, etc…
- Conditional filters, such as displaying tongue or responding to a gesture
- Face modification filters such as bigger eyes, makeup, beauty filters, etc…
- Dynamic filters such as Apple’s Memoji
- And even more…
Most of those filters can be applied using the same ideas: face detection and face landmarks (in case of Apple’s Memoji though, the Mediapipe’s Blendshape model would be more suited) with sometimes some heuristics or well chosen image processing.
References
Here are a few references used for writing this article (most of it is already mentioned throughout the article):
- The GitHub repository containing this code
- Mediapipe’s face landmarks documentation, they even have an impressive in-browser avatar renderer
- A nice blog post that inspired me in the first place
- The somewhat cryptic OpenCV documentation about the Delaunay triangulation
- The OpenCV documentation about affine transformation
- Spark AR, Snap AR studio and the TikTok Effect House for making filters in those apps
- Original images and credits: Taylor Swift, Dwayne Johnson, Kendall Jenner, Pedro Pascal
Join thousands of data leaders on the AI newsletter. Join over 80,000 subscribers and keep up to date with the latest developments in AI. From research to projects and ideas. If you are building an AI startup, an AI-related product, or a service, we invite you to consider becoming a sponsor.
Published via Towards AI
Related posts


Popular posts

 for 2021")


Updates

Recent Posts


