


Creating Movie Trailers With AI
Last Updated on February 5, 2024 by Editorial Team
Author(s): Dimitre Oliveira
Originally published on Towards AI.
AI has been used in the movie industry in many different use cases, from visual effects to the recent usage of generative AI to create scripts or actual movies; some use cases are less obvious, like movie recommendations or creating content to promote the movie, this project targets this last use case, with it, a user will be able to automatically generate a number of trailer candidates for a given movie, the user only needs to provide the movie file and a couple of text parameters, and everything else is taken care of.
Here are some examples of trailers generated by the project.
How does it work?
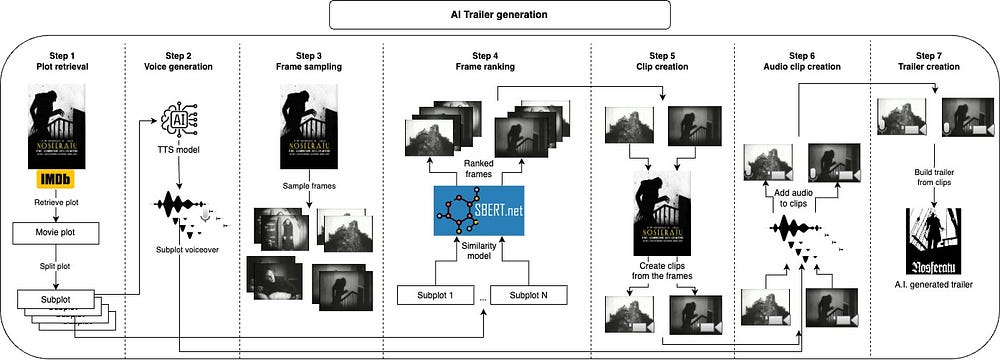
First, we take the movie’s plot and split it into subplots, which will roughly describe the main parts of the movie. Next, we generate a voice for each subplot. Following that, we take short clips for each subplot and apply the voice over them; we chose the clips by sampling many frames from the movie and taking some of the most similar frames to each subplot; with this, we have the images that best represent each subplot, the next step would be to take a clip of a few seconds starting from each frame. After combining each audio with the corresponding clip, we just need to join all clips together into the final trailer. Let's look at each part in more detail.
Note: the code samples below were simplified for demonstration purposes, to check the actual working code, visit the project's page.
1. Plot retrieval
The first task of the workflow is to get the movie's plot, we will take that from IMDB for its huge movie diversity and many tools that interact with it, here I chose the Cinemagoer library; we just need to provide the movie's IMDB ID, and we can get its ID as well as many other informations, here you can learn how to get a movie's IMDB ID.
ia = Cinemagoer()
movie = ia.get_movie("0063350") # ID for Night of the Living Dead
plot = movie["plot outline"]
After retrieving the movie's plot we split them into subplots, simply by splitting the text by ".", each subplot is like a scene or important point of the movie.
2. Voice generation
Now that we have broken down the plot, we can create voiceovers for them. This is done using a text-to-speech model (TTS), which receives text and outputs audio, nowadays we have many good options for those, but in this specific case, we want the audio with a consistent voice across them and mainly with a voice that fits a trailer, this is why we are using a TTS model that can clone voices. I am using XTTS v2 from Coqui AI, the usage is quite simple:
tts.tts_to_file(
 text, # Subplot goes here
 speaker_wav="{path_to_the_reference_voice}",
 language="en",
 file_path="{voice_output_file}.wav",
)
We create a voiceover for each subplot, if you listen to them it should already feel like someone narrating the movie's plot, on a radio, since there is no image (yet).
3. Frame sampling
With the audio part done, we can start to work on the image part. The first step is to sample multiple frames from the movie, 1000 is a good starting number, but there is a tradeoff here if you sample too few frames, you won’t have good options to match the subplots, but if you sample too many, you will probably end up with many frames that are too similar to each other, lacking diversity. The OpenCV library will help us with this.
cam = cv2.VideoCapture(movie_path)
# Total number of frames in the movie
total_frames = int(cam.get(cv2.CAP_PROP_FRAME_COUNT))
# Loop over all frames and save a few of them
currentframe = 0
while True:
 ret, frame = cam.read()
 if ret:
 img_name = f"frame_{currentframe}.jpg"
 if currentframe % (total_frames // n_frames) == 0:
 cv2.imwrite(f"{frame_dir}/{img_name}", frame)
 currentframe += 1
 else:
 break
cam.release()
cv2.destroyAllWindows()
4. Frame ranking
Now that we have a database with frames from the movie, we need to rank them. The idea is quite simple, we take each subplot and rank the top K frames most similar to it, for this task, we use a multi-modal model that accepts both text and image, here I used clip-ViT-B-32 with the SentenceTransformers library.
model = SentenceTransformer("clip-ViT-B-32")
# Embed all images
img_emb = model.encode([Image.open(img) for img in imgs])

for plot in sub_plots:
 plot_emb = model.encode([plot])
 hits = util.semantic_search(plot_emb, img_emb, top_k=top_k)[0]

 for hit in hits:
 # Copy top images
 img_source_path = img_filepaths[hit["corpus_id"]]
 shutil.copyfile(img_source_path, img_output_path)
After this we have each subplot paired with the frames that better represent it, we just need to turn those frames into video clips.
5. Clip Creation
Once you have chosen the frames creating the clips is quite trivial, you just need to take a video of a few seconds starting from that frame, the trick here is to take a clip with a length that matches the audio created at the second step, this way we can join them together. The Moviepy library makes this process quite easy.
# Load the original movie
movie = VideoFileClip(movie_path, audio=True)

# Iterate over the frames and take a clip from the movie based on the frame
for frame in frames:
 clip_start = frame // movie.fps
 clip_end = clip_start + audio_duration

 clip = movie.subclip(clip_start, clip_end)
 clip.write_videofile("{clip_output_path}.mp4")
 clip.close()
6. Audio clip creation
Now for each subplot, we have a video clip as the visual representation of it, and a voiceover that will be its narration. We will use the Moviepy library again to mix those two.
for audio_path in audios:
 audio = AudioFileClip(audio_path)
 for clip_path in clips:
 clip = VideoFileClip(clip_path)

 # Mix clip and audio
 mixed_audio = CompositeAudioClip(
 [
 clip.audio.volumex(0.5), # 50% volume from the original clip file
 audio.volumex(1.0), # 100% volume from the audio file
 ]
 )
 # Add the mixed audio to the clip
 clip.set_audio(mixed_audio).write_videofile("{audio_clip_output_path}.mp4")
7. Trailer Creation
The final step is quite simple, we just need to join all audio clips following the plot order, with this, Moviepy will help us as well.
clips = [VideoFileClip(audio_clip_path) for audio_clip_path in audio_clip_paths]
trailer = concatenate_videoclips(clips)
trailer.write_videofile("{trailer_output_path}.mp4")
And that is all, following this workflow you can go from movie to trailer quite fast, the slower part is the voice generation if you are running on a CPU, I found that it works quite well for most use cases, in theory, it could generate a trailer for any kind of video. For optimal results, you can check the intermediate results after each step and do some manual pruning on the generated artifacts, for instance, removing the frames that don't represent the subplot very well, or just deleting audio files that don't sound too good.
I hope you enjoyed this project, feel free to share the cool trailers that you generated.
Join thousands of data leaders on the AI newsletter. Join over 80,000 subscribers and keep up to date with the latest developments in AI. From research to projects and ideas. If you are building an AI startup, an AI-related product, or a service, we invite you to consider becoming a sponsor.
Published via Towards AI
Towards AI Academy
We Build Enterprise-Grade AI. We'll Teach You to Master It Too.
15 engineers. 100,000+ students. Towards AI Academy teaches what actually survives production.
Start free — no commitment:
→ 6-Day Agentic AI Engineering Email Guide — one practical lesson per day
→ Agents Architecture Cheatsheet — 3 years of architecture decisions in 6 pages
Our courses:
→ AI Engineering Certification — 90+ lessons from project selection to deployed product. The most comprehensive practical LLM course out there.
→ Agent Engineering Course — Hands on with production agent architectures, memory, routing, and eval frameworks — built from real enterprise engagements.
→ AI for Work — Understand, evaluate, and apply AI for complex work tasks.
Note: Article content contains the views of the contributing authors and not Towards AI.
Related posts
Recent Posts
")


")


