


Client-Side Form Validation using JavaScript
Last Updated on August 28, 2023 by Editorial Team
Author(s): Vivek Chaudhary
Originally published on Towards AI.
The objective of this article is to learn how to perform form validations in JavaScript. For our learning purpose, I have designed an Employee Records Keeping website form using HTML, CSS, and JavaScript. All Form Validation logic is developed using JavaScript.
Below is the project Demo:

Project Development is divided into three steps:
- Writing the HTML
- Adding the CSS
- Writing the JavaScript
Write HTML to design the Form
<!--file name validations.html-->

<html>
 <head>
 </head>
<body>
 <br>
 <h2>Employee Record Keeping System</h2>
 <div class=”container”>
 <form id=”form” onsubmit=”validation()”>
 <div class=”title”><b>Please Enter Values</b></div>

 <! — First Name input →
 <div>
 <label for=”fname”>First Name</label>
 <input
 type=”text”
 name=”fname”
 id=”fname”
 placeholder=”Vivek”/>
 <p id=”err1"></p>
 </div>

 <! — Last Name input →
 <div>
 <label for=”lname”>Last Name</label>
 <input
 type=”text”
 name=”lname”
 id=”lname”
 placeholder=”Chaudhary”/>
<p id=”err2"></p>
 </div>

 <! — EmployeeId input →
 <div>
 <label for=”eid”>EmployeeId</label>
 <input
 type=”text”
 name=”eid”
 id=”eid”
 placeholder=”1234"/>
 <p id=”err3"></p>
 </div>

 <! — Email input →
 <div>
 <label for=”email”>Email</label>
 <input
 type=”email”
 name=”email”
 id=”email”
 placeholder=”[email protected]”/>
 <p id=”err4"></p>
 </div>

 <! — Department input →
 <div>
 <label for=”did”>DeptNo</label>
 <input
 type=”text”
 name=”did”
 id=”did”
 placeholder=”10"/>
 <p id=”err5"></p>
 </div>

 <br><br>
 <button id=”btn” type=”submit”>Submit</button>

 </form>
 </div>
</body>
</html>
This is what form looks like at this point:

Done with the HTML.
Add CSS to style the form
CSS helps us to add some styling and effects to our form to help it look more attractive.
<style>
 * {
 margin: .5;
 padding: .5;
 box-sizing: border-box;
}

body {
 font-family: sans-serif;
}

form {
 display: flex;
 flex-direction: column;
 justify-content: center;
 max-width: 400px;
 box-shadow: 2px 2px 4px rgba(0, 0, 0, 0.1);
 padding: 50px;
}

input[type=”text”],input[type=”email”]{
 width: 100%;
 border: 1px solid #333;
 box-sizing: border-box
}

label {
 display: block;
 margin-bottom: 5px;
}

input:invalid{
 box-shadow:0 0 5px 1px red;
}

input:focus {
 border: 2px solid #f2796e;
}

form div input {
 width: 100%;
 height: 40px;
 border-radius: 8px;
 outline: none;
 border: 2px solid #c4c4c4;
 padding: 0 30px;
 box-shadow: 2px 2px 4px rgba(0, 0, 0, 0.1);
}

form div {
 position: relative;
 margin-bottom: 15px;
}

input:focus {
 border: 2px solid #f2796e;
}

button {
 margin-top: 15px;
 width: 100%;
 height: 45px;
 background-color: #6e98f2;
 border: 2px solid #6e98f2;
 border-radius: 8px;
 color: #fff;
 font-size: 20px;
 cursor: pointer;
 box-shadow: 2px 2px 4px rgba(0, 0, 0, 0.1);
 transition: all 0.1s ease;
}

.success-icon,
.failure-icon {
 right: 0.5;
 opacity: 0.5;
}

button:hover {
 opacity: 0.7;
}
</style>
After adding CSS components to our HTML objects, this is how our form looks like.

Done with the styling.
Add JavaScript for Validations.
JavaScript helps us to access and modify DOM (Data Object Model) elements. I have broken the Javascript into several parts for better understanding.
Access HTML DOM elements via their IDs:
let fname=document.getElementById(“fname”);
let lname=document.getElementById(“lname”);
let eid=document.getElementById(“eid”);
let email=document.getElementById(“email”);
let did=document.getElementById(“did”);
let form=document.getElementById(“form”)
let err1=document.getElementById(“err1”)
let err2=document.getElementById(“err2”)
let err3=document.getElementById(“err3”)
let err4=document.getElementById(“err4”)
let err5=document.getElementById(“err5”)
let successIcon = document.getElementsByClassName(“success-icon”)
let failureIcon = document.getElementsByClassName(“failure-icon”)
let deptno=[10,20,30,40,50]
let btn=document.getElementById("btn").type
getElementById() method is one of the most common methods in the HTML DOM. It is used access or modify an HTML element.
getElementByClassName() method returns a collection of elements with a specified class name(s).
we are using both methods to access the form components to modify their behaviour.
Define Regex for form components validation
// Javascript reGex for Name validation
var rName = /^[A-Za-z]+$/;
// Javascript reGex for EmpID validation.
var rEmpID=/\d{4}$/;
//Javascript reGex for Email Validation.
var rEmail=/^\w+([\.-]?\w+)*@\w+([\.-]?\w+)*(\.\w{2,3})+$/g;
//JS for deptno validation
var rDeptno = /^\d{2}$/;
Define a function for validation
//file name is validation.js

function validation() {
 //first name validation
 if (fname.value==”” U+007CU+007C !fname.value.match(rName)){
 err1.innerHTML=”*Firstname cannot be blank and should be characters”;
 fname.style.border = “2px solid red”;
 }
 else {
 err1.innerHTML=””;
 fname.style.border = “2px solid green”;
 }

 //last name validation
 if (lname.value==”” U+007CU+007C !lname.value.match(rName)){
 err2.innerHTML=”*Lastname cannot be blank and should be in characters”;
 lname.style.border = “2px solid red”;
 }
 else {
 err2.innerHTML=””;
 lname.style.border = “2px solid green”;
 }

 //email validation
 console.log(“email id is “,email.value)
 if (email.value==”” && !rEmail.test(email.value)){
 console.log(“inside email if”)
 err4.innerHTML=”*EmailID should be non-empty and valid. Please follow rules”;
 email.style.border = “2px solid red”;
 }
 else {
 err4.innerHTML=””;
 email.style.border = “2px solid green”;
 }

 //employee ID validation
 if (eid.value==”” U+007CU+007C !rEmpID.test(eid.value)){
 err3.innerHTML=”*Please enter a valid Employee ID starting with 2 characters and 6 digits”;
 eid.style.border = “2px solid red”;
 }
 else {
 err3.innerHTML=””;
 eid.style.border = “2px solid green”;
 }

 //department no validation
 dept=Number(did.value)
 console.log(‘value of dept ‘,dept +” “+typeof(dept))
 if (dept==”” U+007CU+007C !rDeptno.test(dept)){
 console.log(‘inside if’)
 err5.innerHTML=”*DeptNo cannot be Empty or non-numeric. Please check again”;
 did.style.border = “2px solid red”;
 }
 else if(!dept==”” && !deptno.includes(dept)) {
 console.log(“value of dept entered “, did.value + “ “+typeof(did.value))
 err5.innerHTML=”*DeptNo should be from list of values[10,20,30,40].
 Please check again”;
 did.style.border = “2px solid red”;
 }
 else if(!dept==”” && deptno.includes(dept)){
 console.log(‘inside 2nd elif’)
 err5.innerHTML=””;
 did.style.border = “2px solid green”;
 }
}

form.addEventListener(btn,(event)=>{
 event.preventDefault()
});
Validations
- FirstName
let fname=document.getElementById(“fname”);
let err1=document.getElementById("err1");

// Javascript reGex for Name validation
var rName = /^[A-Za-z]+$/;

//first name validation
 if (fname.value=="" U+007CU+007C !fname.value.match(rName)){
 err1.innerHTML="*Firstname cannot be blank and should be in characters";
 fname.style.border = "2px solid red";
 }
 else {
 err1.innerHTML="";
 fname.style.border = "2px solid green";
 }
- access the form input item of text type for firstname using document.getElementById(“fname”) also accesses the error tag using document.getElementById(“err1”)
- define a regex expression for firstname using rName = /^[A-Za-z]+$/
- next part is the if-else block, where the comparison is made to take action on form. if firstname entered by the user is null or doesn't satisfy the regex criteria, the text field will be marked red with an error message.

- when first name entered by user satisfy the policy then result is as below, text field is marked as green.

LastName validation logic is the same as FirstName.
2. Email
let email=document.getElementById(“email”);
let err4=document.getElementById("err4");

//Javascript reGex for Email Validation.
var rEmail=/^\w+([\.-]?\w+)*@\w+([\.-]?\w+)*(\.\w{2,3})+$/g;

//email validation
 if (email.value=="" && !rEmail.test(email.value)){

 err4.innerHTML="*EmailID should be non-empty and valid. Please follow rules";
 email.style.border = "2px solid red";
 }
 else {
 err4.innerHTML="";
 email.style.border = "2px solid green";
 }
- access the form input item of text type for email using document.getElementById(“email”) also access the error tag using document.getElementById(“err4”).
- if emailID entered by the user is Null or does not satisfy regex criteria, the text field will be marked red with an error message.
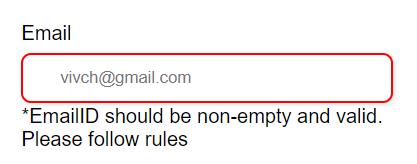
- as we have defined the text input field as email type it expects “@” symbol or else it will throw an error as below:

- when the email entered by the user satisfies the policy, then the result is as below: text field is marked as green.

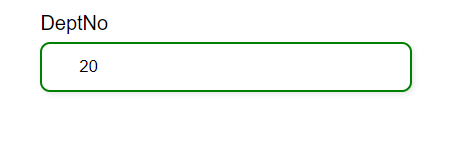
3. DeptNo
let did=document.getElementById(“did”);
let err5=document.getElementById("err5")

//list of values for departments
let deptno=[10,20,30,40,50]

//department no validation
 dept=Number(did.value)
 if (dept=="" U+007CU+007C !rDeptno.test(dept)){
 console.log('inside if')
 err5.innerHTML="*DeptNo cannot be Empty or non-numeric. Please check again";
 did.style.border = "2px solid red";
 }
 else if(!dept=="" && !deptno.includes(dept)) {
 err5.innerHTML="*DeptNo should be from list of values[10,20,30,40].
 Please check again";
 did.style.border = "2px solid red";
 }
 else if(!dept=="" && deptno.includes(dept)){
 err5.innerHTML="";
 did.style.border = "2px solid green";
 }
}
- access the form input item of text type for email using document.getElementById(“did”) Also access the error tag using document.getElementById(“err5”).
- if values entered by the user doesn’t satisfy the if condition, then an error is thrown, and the text field is marked as red.

- if values entered by the user don’t satisfy the else if condition, then an error is thrown, and the text field is marked as red.

- if values entered by the user satisfy the else if condition, then the text field is marked as green.
That’s all with the Form Validation logic written in JavaScript.
Results If all inputs given by the user are incorrect:

Results If all inputs given by the user are correct:

The scope of this article is related to client-side validations only.
Summary:
- write HTML to define the project form.
- add CSS to style the HTML form elements.
- JavaScript to handle the form validation on the client side.
Join thousands of data leaders on the AI newsletter. Join over 80,000 subscribers and keep up to date with the latest developments in AI. From research to projects and ideas. If you are building an AI startup, an AI-related product, or a service, we invite you to consider becoming a sponsor.
Published via Towards AI
Related posts


Popular posts

 for 2021")


Updates

Recent Posts


