


Stop using grid search! The complete practical tutorial on Keras Tuner.
Last Updated on January 6, 2023 by Editorial Team
Last Updated on September 17, 2022 by Editorial Team
Author(s): Poulinakis Kon
Originally published on Towards AI the World’s Leading AI and Technology News and Media Company. If you are building an AI-related product or service, we invite you to consider becoming an AI sponsor. At Towards AI, we help scale AI and technology startups. Let us help you unleash your technology to the masses.
Stop Using Grid Search! The Complete Practical Tutorial on Keras Tuner.
Keras Tuner practical tutorial for automatic hyperparameter tuning of deep neural networks. An autoML tutorial.
Contents:
- Intro
- Load data
- Basics of Keras-Tuner
- Putting it all together (code explanation)
- Execute the hyperparameter search
- Extract and train the best model
- Bonus: Some Tips & Tricks
- Final thoughts
Intro
In this article, you will not only learn how to use KerasTuner but also some tricks that are not included in other tutorials, such as tuning parameters in each layer separately or tuning the learning rate in conjunction with the optimizer, which is not straightforward due to some limitations, and more. All while working with a 37 classes Sign Language computer vision dataset.
Even experts are often trapped in rabbit holes of trial and error procedures until they find a good hyperparameter combination for their Neural Networks. Keras-Tuner is a tool that will help you optimize your neural network and find a close to optimal hyperparameter set. Behind the scenes, it makes use of advanced search and optimization methods such as HyperBand Search and Bayesian Optimization. You only need to define the search space, and Keras-Tuner will take care of the laborious tuning process!
An in-depth practical example
We will quickly jump to practice!
Load data
Let’s assume that we want to train a CNN on an image classification dataset. We will showcase how to make use of KerasTuner to optimize our neural network easily.
First, install the Keras-Tuner library with pip and import the necessary libraries. If you don’t want output from pip, use the -q flag for a quiet installation.
!pip install keras-tuner --upgrade
import keras_tuner
from tensorflow import keras
from keras import backend as K
from tensorflow.keras import layers, losses
import numpy as np
import matplotlib.pyplot as plt
import os
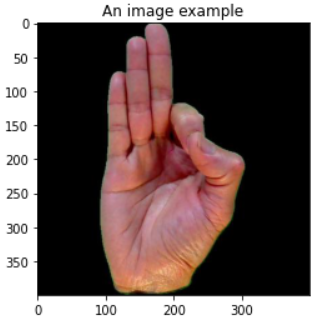
Next, we need to load some data to work with. I‘ve chosen to use the American Sign Language (ASL) dataset that is available on Kaggle under the CCO license. It contains 400×400 RGB images of sign gestures representing the American sign language. It has a whole 37 classes with 70 images for each class. We will train a CNN model to classify these gestures.
Since the dataset is already structured in folders based on classes, the easiest way to load the dataset is by using keras.utils.image_dataset_from_directory utility. Specify the parent directory path with the directory parameter and use labels=’inferred’ to load the labels based on the folder’s name automatically. With label_mode='categorical'labels are loaded as one-hot vectors. If you want the shuffling to be reproducible, you can set a seed, otherwise, don’t use the seed option at all.
BATCH_SIZE = 64
train_data = keras.utils.image_dataset_from_directory(
                  directory="../input/asl-dataset/asl_dataset",
                  labels= 'inferred',
                  label_mode='categorical',
                  color_mode='rgb',
                  batch_size=BATCH_SIZE,
                  seed=777,
                  shuffle=True,
                  image_size=(400, 400) )
Now use the function below to split the tf.data.dataset item into train-val-test subsets. I am using a 0.7–0.15–0.15 splitting rule for this dataset.
Dataset loading has finished. Let’s move to the exciting part!
Basics of Keras Tuner
Before we move into the more complicated code, we need to understand the workflow of Keras-Tuner.
- We define a build() function that takes an argument hp (keras_tuner.Hyperparameter object). Inside, we define our model architecture and the hyperparameter search space.
- In order to define a search space, hp object offers 4 methods. hp.Choice(), hp.Int(), hp.Float() and hp.Boolean(). The hp.Choice() method is the most general and accepts a list of str, int, float or boolean values, but all must have the same type. The other methods are self-explainable. Here are some intuitive examples
# defining the number of neurons in a fully connected layer
units = hp.Choice(name="neurons", values=[150, 200])
# defining the number of neurons dynamically with the hp.Int method
units = hp.Int(name="neurons", min=100, max=200, step=10)
# defining the dropout rate
dropout = hp.Int(name="dropout", min=0.0, max=0.3, step=0.05)
# Automatically assign True/False values.
shuffle = hp.Boolean("shuffle", default=False)
3. Initialize a tuner that is responsible for searching the hyperparameter space. Keras-Tuner offers 3 different search strategies, RandomSearch, Bayesian Optimization, and HyperBand. For all tuners, we need to specify a HyperModel, a metric to optimize, a computational budget, and optionally a directory to save results. For more details regarding the arguments each tuner accepts, feel free to check the relevant documentation. Below is an example of a HyperBand tuner.
tuner = keras_tuner.Hyperband(
                       hypermodel=MyHyperModel(),
                       objective = "val_accuracy", #optimize val acc
                       max_epochs=50, #for each candidate model
                       overwrite=True,  #overwrite previous results
                       directory='hyperband_search_dir', #Saving dir
                       project_name='sign_language_cnn')
4. Performing the Search. This command will initiate the search. You need to provide the training and validation data used to train and assess the models under search.
tuner.search(x=train_data,
             max_trials=50,  # Max num of candidates to try
             validation_data=val_data,
             batch_size=BATCH_SIZE)
Putting it all together
There are many ways to combine all the above. The method presented below is one that offers a lot of flexibility.
First, we define a HyperModel class that inherits from keras_tuner.HyperModel and define the build and fit methods.
With the build method, we develop our architecture and use the hp argument to set up the hyperparameter search space. We also compile our model and return it.
The fit method accepts the hp argument, the model to be trained, the training data x and also pass *args and **kwargs that will be passed into keras model.fit() method. The **kwargs should always be passed to model.fit() because it contains the callbacks for model saving and the optional tensorboard plugins.
Defining a fit()method in our HyperModel class gives you the flexibility to search parameters even during the training process, not just during building.
The above network and parameters are just for exhibition purposes. Feel free to customize the network and search space as you wish and as is more suitable for your application.
Let’s elaborate :
In lines 3–5, we start building the Keras model and add a resizing layer. In lines 7–8, we use hp.Boolean to evaluate whether it’s best to add a Normalization layer or not, while in line 10, we define different possible values for the dropout rate.
Lines 12–17 are a bit more complicated. We are dynamically specifying how many convolutional layers our model should have while simultaneously defining a different hyperparameter space for each layer. Essentially, we set the number of conv layers from 7–8, and for each layer, we independently search what the optimal number of filters, kernel size, and activation function. We do this by using a different name argument for each iteration in the loop through the use of index i in the strings name=f”kernel_{i}” . This gives us a lot of flexibility and allows us to expand the search space immensely. Beware, however, as the possible combinations might become extremely large, and a lot of computational power will be needed.
Specifying the tunable variable’s name with name=f”kernel_{i}” inside a loop allows you to define a different search space for each parameter on every layer.
During lines 18–22, we are adding (or not) dropout and batch normalization layers inside the conv block. We do the same during 28–31 but for the fully-connected layers.
In lines 24–27, we add a flattening layer followed by a searchable number of fully-connected layers with different parameters to optimize in each one, similar to lines 12–17.
During lines 36–39, we compile our model, but the choice of the optimizer and loss to use is again a searchable hyperparameter. One limitation of the Keras tuner is that it doesn’t accept variables other than int, float, str, or boolean. Hence, we cannot pass keras.optimizer objects in the choice method. This limits our hyperparameter search to optimizers and loss functions that Keras has given a string alias to, e.g. keras.optimizers.Adam() -> 'adam' .
Due to the above restriction, it’s not straightforward how you can tune the learning rate. In lines 41–43, we do exactly that in a “hacky” way.
The code below allows you to change the optimizer’s hyperparameters, like learning rate, even when you tune different optimizers, something not offered in a straightforward way by keras tuner.
from keras import backend as K
learning rate = hp.Choice('lr', [0.03, 0.01, 0.003])
K.set_value(model.optimizer.learning_rate, learning_rate)
In lines 48–53, we define the fit(self, hp, model,x, *args, **kwargs) method of our hypermodel class. As you may observe, we define hp as an argument. This allows us to tune hyperparameter values during the training process as well. As an example, I used the shuffling of the training data before each epoch. Make sure to add**kwargs as an argument because it contains the callbacks for model saving during the search (and the optional tensorboard plugins).
Make sure everything works correctly by running the lines below as a test
classes = 37
hp = keras_tuner.HyperParameters()
hypermodel = MyHyperModel()
model = hypermodel.build(hp, classes)
hypermodel.fit(hp, model, np.random.rand(BATCH_SIZE, 400, 400,3), np.random.rand(BATCH_SIZE, classes))
Executing the hyperparameter search
Assuming everything works correctly, it’s time to initialize the search. In the code below, I use the Bayesian Optimization strategy. It’s one of the best search methods used in AutoML.
Pass a hypermodel object, set the objective to the metric you wish to optimize (e.g. “val_accuracy”, “train_loss”), and define a computational budget with the max_trials argument and a path to save the models.
tuner = keras_tuner.BayesianOptimization(
                        hypermodel=MyHyperModel(),
                        objective = "val_accuracy",
                        max_trials =10, #max candidates to test
                        overwrite=True,
                        directory='BO_search_dir',
                        project_name='sign_language_cnn')
To initiate the search, execute the command below, and you are good to go. Keras-Tuner will take care of the rest while you take a coffee break.
# epochs defines how many epochs each candidate model
# will be trained for. The more the better, but slower.
tuner.search(x=train_data, epochs=10,
             validation_data=val_data)
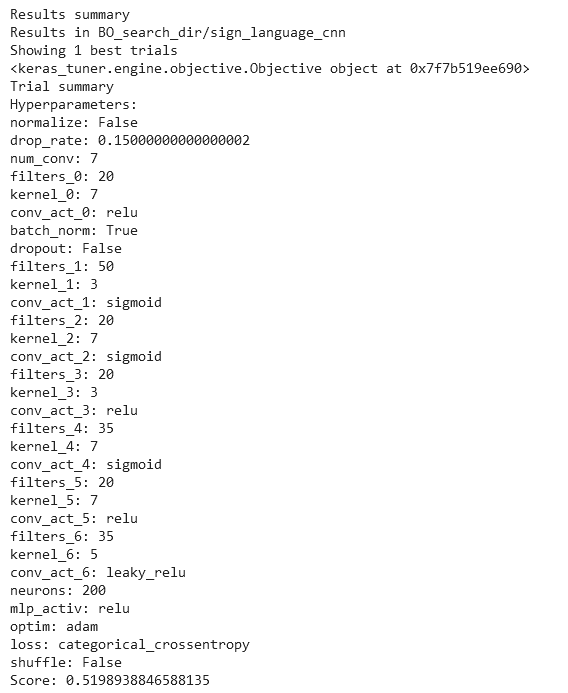
Once you finish your coffee, or once the search is done, you can access the search results with tuner.results_summary(1). You can see which value was chosen for each hyperparameter and also the validation score the best model achieved during its training.
To extract and build the best candidate model automatically, run the lines below. If you want to extract multiple top-performing models instead of just the first, change the number in tuner.get_best_hyperparameters(5).
# Get the top 2 hyperparameters.
best_hps = tuner.get_best_hyperparameters(1)
# Build the model with the best hp.
h_model = MyHyperModel()
model = h_model.build(best_hps[0])
Moving on, we have to train this model on the full dataset and for multiple epochs. You may also pass callback functions such as early stopping, save best model, and learning rate schedulers.
Once your model is trained, plot the learning graphs for inspection and evaluate the test dataset. If you are satisfied, save the model to use later for deployment
model.load_weights(‘Net_weights.h5’)
model.evaluate(test_data)
model.save(‘Best_model’)
Bonus: Some tips and tricks
- If your dataset is very big and the search takes way too long, you can use only a small subset for training, say 30%, during the searching. This will usually provide similar results in a fraction of the time. Then you can retrain the best model on the full set.
- To speed up the process during the search, you can reduce the number of epochs each candidate is trained for. However, this might reduce the precision of the search optimization since candidates who tend to perform better early on will progress further even if their performance saturates later. Try to find the sweet spot between time and precision of results.
- A possible problem that might arise during searching is that you will run out of disk space. During searching, the tuner automatically saves all models in the project directory, but discarded models are not dynamically deleted. This will quickly load the disk memory and might result in a crash, especially if you are running the code on Kaggle or Google Colab. This is a reported issue [1][2], and developers have marked it as an enhancement in Keras Tuners repository. If you get an “out of disk space” error, consider either limiting the search space or splitting your search into multiple smaller searches. Lastly, make sure to discard “bad” models after every search if you work in a local environment.
Final thoughts
In this tutorial, we explored the use of the Keras Tuner tool. This tool allows us to optimize our network architectures (number of layers, number of neurons, etc..) but also their hyperparameters (e.g., activation functions, optimizer, loss, etc..).
The search strategies implemented in the KerasTuner allow for extremely faster and easier fine-tuning compared to manual or grid search methods. Leveraging search methods such as Bayesian Optimization or HyperBand search will not only save you time but more often than not, you will end up with a much better model than you could discover without them.
References
[1] Keras Tuner Documentation, https://keras-team.github.io/keras-tuner/
[2] Jasper Snoek, Hugo Larochelle, Ryan P. Adams,
Practical Bayesian Optimization of Machine Learning Algorithms, (2012), https://arxiv.org/abs/1206.2944
[3] L. Li, K. Jamieson, G. DeSalvo, A. Rostamizadeh, A. Talwalkar, Hyperband: A Novel Bandit-Based Approach to Hyperparameter Optimization (2018), https://arxiv.org/abs/1603.06560
I hope you enjoyed this article and learnt something useful. If this is the case, consider sharing this article. If you want to read more of my articles and tutorials then follow me to get updated.
Thanks for reading, feel free to reach out!
My Links: Medium | LinkedIn | GitHub
Stop using grid search! The complete practical tutorial on Keras Tuner. was originally published in Towards AI on Medium, where people are continuing the conversation by highlighting and responding to this story.
Join thousands of data leaders on the AI newsletter. It’s free, we don’t spam, and we never share your email address. Keep up to date with the latest work in AI. From research to projects and ideas. If you are building an AI startup, an AI-related product, or a service, we invite you to consider becoming a sponsor.
Published via Towards AI
Towards AI Academy
We Build Enterprise-Grade AI. We'll Teach You to Master It Too.
15 engineers. 100,000+ students. Towards AI Academy teaches what actually survives production.
Start free — no commitment:
→ 6-Day Agentic AI Engineering Email Guide — one practical lesson per day
→ Agents Architecture Cheatsheet — 3 years of architecture decisions in 6 pages
Our courses:
→ AI Engineering Certification — 90+ lessons from project selection to deployed product. The most comprehensive practical LLM course out there.
→ Agent Engineering Course — Hands on with production agent architectures, memory, routing, and eval frameworks — built from real enterprise engagements.
→ AI for Work — Understand, evaluate, and apply AI for complex work tasks.
Note: Article content contains the views of the contributing authors and not Towards AI.
Related posts
Recent Posts


")

