


Spatial Filters: Introduction and Application
Last Updated on July 17, 2023 by Editorial Team
Author(s): Erika Lacson
Originally published on Towards AI.
Introduction to Image Processing with Python
Episode 3: Spatial Filters and Morphological Operations
Hello again, fellow image-processing enthusiasts! U+1F31F In the previous episodes, we tackled the basics and discovered the magic of image enhancements. This time around, we’re diving deeper into spatial filters and morphological operations. Grab your digital snorkeling gear because we’re about to explore these powerful tools that can truly transform the way we interact with images. U+1F4AAU+1F5BC️
So, are you pumped? Let’s jump right in! U+1F680
When it comes to image manipulation, spatial filters are the tools we need. U+1F4AB These filters have the remarkable ability to modify pixel values based on the values of neighboring pixels, enabling us to perform various image processing tasks such as noise reduction, edge detection, and smoothing.
To kick things off, let’s import the necessary libraries and set the stage for our spatial filtering activity:
import numpy as np
import matplotlib.pyplot as plt
from fractions import Fraction
from skimage.io import imread, imshow

# For Spatial Filters
from scipy.signal import convolve2d
from skimage.color import rgb2gray, gray2rgb

# For Morphological Operations
from skimage.morphology import erosion, dilation, opening, closing
from skimage.morphology import disk
Next, we’ll apply various simple spatial filters to an image. These filters alter each pixel value with the average value of the pixels around it, making way for mesmerizing effects and enhancements.
Check out the main filters we’ll be playing with today: U+1F3A8U+2728
def display_filters(image_path):
 """Defines and displays various image filters/kernels.
 These include Horizontal Sobel Filter, Vertical Sobel Filter,
 Edge Detection, Sharpen, and Box Blur.
 """
 # Define Filters
 # Horizontal Sobel Filter
 kernel_hsf = np.array([[1, 2, 1],
 [0, 0, 0],
 [-1, -2, -1]])

 # Vertical Sobel Filter
 kernel_vsf = np.array([[1, 0, -1],
 [2, 0, -2],
 [1, 0, -1]])

 # Edge Detection
 kernel_edge = np.array([[-1, -1, -1],
 [-1, 8, -1],
 [-1, -1, -1]])


 # Sharpen
 kernel_sharpen = np.array([[0, -1, 0],
 [-1, 5, -1],
 [0, -1, 0]])

 # Box Blur
 kernel_bblur = (1 / 9.0) * np.array([[1., 1., 1.],
 [1., 1., 1.],
 [1., 1., 1.]])

 # Define the kernels
 kernels = {
 'Box Blur': kernel_bblur,
 'Sharpen': kernel_sharpen,
 'Horizontal Sobel Filter': kernel_hsf,
 'Vertical Sobel Filter': kernel_vsf,
 'Edge Detection': kernel_edge,
 }

 # Read the image
 image = imread(image_path)[:,:,:3]

 # Create a figure with subplots for each kernel
 fig, ax = plt.subplots(2, 3, figsize=(20, 15))

 ax[0, 0].imshow(rgb2gray(image[:,:,:3]), cmap='gray')
 ax[0, 0].set_title('Original Image', fontsize=20)
 ax[0, 0].set_xticks([])
 ax[0, 0].set_yticks([])

 # Loop over the keys and values in the kernels dictionary
 for i, (name, kernel) in enumerate(kernels.items(), 1):
 # Determine the subplot index
 row = i // 3
 col = i % 3

 # Plot the kernel on the appropriate subplot
 ax[row, col].imshow(kernel, cmap='gray')
 ax[row, col].set_title(name, fontsize=30)

 # Loop over the cells in the kernel
 for (j, k), val in np.ndenumerate(kernel):
 # Add a text annotation at (j, k) with the value of the cell
 # If the value is less than 1, represent it as a fraction
 if val < 1:
 ax[row, col].text(k,
 j,
 str(Fraction(val).limit_denominator()),
 ha='center',
 va='center',
 color='red',
 fontsize=30)
 else:
 ax[row, col].text(k,
 j,
 str(val),
 ha='center',
 va='center',
 color='red',
 fontsize=30)

 # Show the plot
 plt.tight_layout()
 plt.show()

# Display filters
display_filters('dorm_lobby.png')
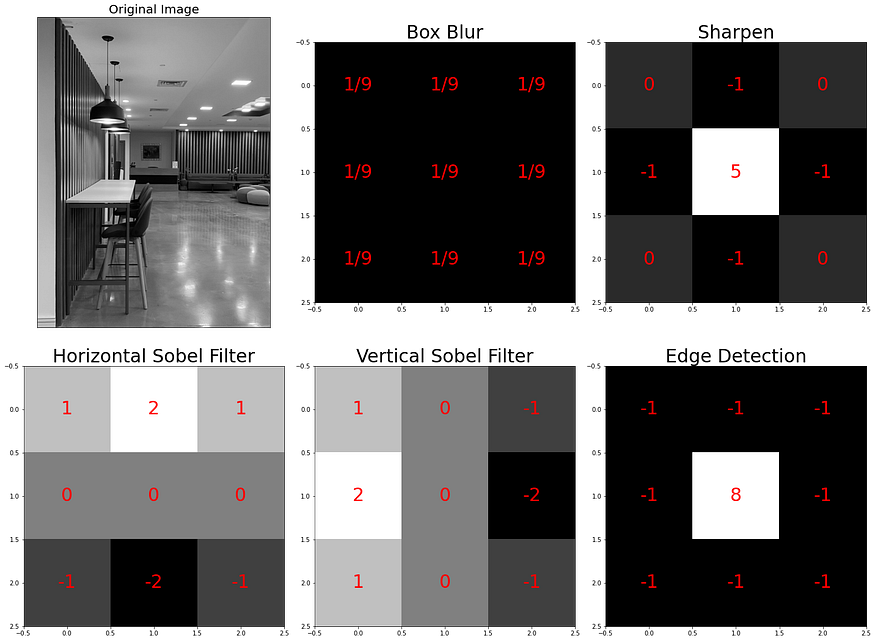
By using the display_filters() function, we can get a visual representation of the different image filters or kernels. Each filter symbolizes a unique pattern or effect that can be applied to an image.Horizontal Sobel Filter, Vertical Sobel Filter, Edge Detection, Sharpen, and Box Blur, to name a few. And guess what? These are just the tip of the iceberg. There are even more amazing filters waiting for you at this Wikipedia link: https://en.wikipedia.org/wiki/Kernel_(image_processing) U+1F50DU+1F52E
But we’re not stopping there! Let’s take things a notch higher and apply these filters to real images. Witness the magic unfold as we use the apply_selected_kernels() function to give an image a total makeover: U+1F5BC️U+2728
def apply_selected_kernels(image_path, selected_kernels, plot_cols=3):
 """Applies selected kernels or filters to an image.
 The image is read from the provided image_path, and the specified kernels
 are applied to it. The results are then displayed in a subplot alongside
 the original image.

 Args:
 image_path (str): The path to the image to which the filters
 should be applied.
 selected_kernels (list): A list of kernels to apply to the image.
 plot_cols (int, optional): The number of columns in the subplot.
 Default is 3.

 Raises:
 ValueError: If a selected kernel is not defined.
 """
 # Define the filters
 kernel_hsf = np.array([[1, 2, 1],
 [0, 0, 0],
 [-1, -2, -1]]) # Horizontal Sobel Filter

 kernel_vsf = np.array([[1, 0, -1],
 [2, 0, -2],
 [1, 0, -1]]) # Vertical Sobel Filter

 kernel_edge = np.array([[-1, -1, -1],
 [-1, 8, -1],
 [-1, -1, -1]]) # Edge Detection

 kernel_sharpen = np.array([[0, -1, 0],
 [-1, 5, -1],
 [0, -1, 0]]) # Sharpen

 kernel_bblur = (1 / 9.0) * np.array([[1., 1., 1.],
 [1., 1., 1.],
 [1., 1., 1.]]) # Box Blur

 # Define the kernels
 all_kernels = {
 'Box Blur': kernel_bblur,
 'Sharpen': kernel_sharpen,
 'Horizontal Sobel Filter': kernel_hsf,
 'Vertical Sobel Filter': kernel_vsf,
 'Edge Detection': kernel_edge,
 }

 # Check if the selected kernels are defined, if not raise an exception
 for k in selected_kernels:
 if k not in all_kernels:
 raise ValueError(f"Kernel '{k}' not defined.")

 # Read the image
 image = imread(image_path)[:,:,:3]

 # Apply selected kernels to each color channel of the image and
 # save the resulting converted RGB images
 conv_rgb_images = {}
 for kernel_name in selected_kernels:
 kernel = all_kernels[kernel_name]
 transformed_channels = []
 for i in range(3):
 conv_image = convolve2d(image[:, :, i], kernel, 'valid')
 transformed_channels.append(abs(conv_image))

 conv_rgb_image = np.dstack(transformed_channels)
 conv_rgb_image = np.clip(conv_rgb_image, 0, 255).astype(np.uint8)
 conv_rgb_images[kernel_name] = conv_rgb_image

 # Display the original image along with the combined results of all
 # the kernels in a subplot
 fig, ax = plt.subplots(2, plot_cols, figsize=(20, 20))

 ax[0, 0].imshow(image)
 ax[0, 0].set_title('Original Image', fontsize=20)
 ax[0, 0].set_xticks([])
 ax[0, 0].set_yticks([])

 for i, (kernel_name, conv_rgb_image) in enumerate(conv_rgb_images.items(), 1):
 row, col = divmod(i, plot_cols)
 ax[row, col].imshow(conv_rgb_image)
 ax[row, col].set_title(kernel_name, fontsize=20)
 ax[row, col].set_xticks([])
 ax[row, col].set_yticks([])
 plt.tight_layout()
 plt.show()
Thanks to this function, we can apply chosen filters to an image, leading to intriguing visual results. Let’s take an image of a dorm lobby with distinct horizontal and vertical lines to visualize the effects of Edge Detection, Horizontal Sobel Filter, and Vertical Sobel Filter:
# Visualize Edge Detection and Sobel Filters
apply_selected_kernels('dorm_lobby.png',
 ['Edge Detection',
 'Horizontal Sobel Filter',
 'Vertical Sobel Filter'],
 plot_cols=2)

And for the effects of Edge Detection, Sharpen and Box Blur, let's borrow a photo of my good girl, Chloe:
# Visualize Edge Detection, Sharpen, and Box Blur
apply_selected_kernels('dog.png',
 ['Edge Detection',
 'Sharpen',
 'Box Blur'],
 plot_cols=2)

Brace yourselves because things are heating up! Let’s dive deeper into the filters we’ve just applied: U+1F929U+1F4AC
1. Edge Detection (kernel_edge): This is a general edge detection filter, sometimes called a Laplacian filter or a Laplacian of Gaussian filter. This term commonly refers to a range of methods for identifying points in a digital image where the image brightness changes sharply or has discontinuities. It responds to edges of all orientations equally. The difference between this and the Sobel filters is that it doesn't differentiate between edge orientations.- The
Sobel filteris used for edge detection, specifically for detecting edges of a particular orientation. The Sobel operator uses two 3×3 kernels which are convolved with the original image to calculate approximations of the derivatives – one for horizontal changes (edges running vertically), and one for vertical changes (edges running horizontally): 2. Horizontal Sobel Filter (kernel_hsf): This is designed to respond maximally to edges running vertically and minimally to edges running horizontally. This is why you may notice that the resulting image highlighted horizontal lines.3. Vertical Sobel Filter (kernel_vsf): This is the other orientation of the Sobel filter. It's designed to respond maximally to edges running horizontally and minimally to edges running vertically. This is why you may notice that the resulting image highlighted vertical lines.4. Sharpen (kernel_sharpen): This filter is used to enhance the "sharpness" of an image. It works by enhancing the contrast of pixels next to each other, which makes the edges appear more distinct and crisp.5. Box Blur (kernel_bblur): This filter is used to blur an image. It works by averaging the pixel values in the neighborhood around each pixel, which has the effect of reducing the sharpness of edges and blending the colors of nearby pixels.
On another note, edge detection filter and the horizontal and vertical Sobel filters can sometimes produce similar-looking results. This is because they are all designed to respond to changes in intensity, which is what an edge is. However, the Sobel filters are sensitive to the orientation of the edge, whereas the edge detection filter is not. So, for example, as evident in the sample image above, if you have an image with a lot of vertical lines, the vertical Sobel filter might produce a strong response, the horizontal Sobel filter might produce a weak response, and the edge detection filter will produce a moderate response.
And voila! These filters offer us immense power to shape and transform images, bringing out their hidden details and enhancing their visual impact. By understanding the characteristics and applications of each filter, we can unleash our creativity and explore endless possibilities in image processing. Isn’t that cool? U+1F60E
Morphological Operations: Erosion, Dilation, Opening, and Closing
Now, let’s delve into morphological operations. These non-linear image processing techniques allow us to manipulate the shape and structure of objects within an image. In this section, we’ll walk through four fundamental morphological operations: erosion, dilation, opening, and closing.
Erosion
Erosion is a morphological operation that delicately shrinks the objects within an image by removing pixels from their boundaries. It achieves this by considering the neighborhood of each pixel and setting its value to the minimum value among all the pixels in that neighborhood. In a binary image, if any of the neighboring pixels have a value of 0, the output pixel is set to 0 as well.
Time to get our hands dirty and use our apply_erosion function:
def apply_erosion(image, selem):
 # Perform erosion on the given image using the structuring element, selem
 eroded_image = erosion(image, selem)

 # Display the original and eroded images
 fig, axes = plt.subplots(1, 3, figsize=(15, 10))
 ax = axes.ravel()

 ax[0].imshow(selem, cmap='gray',
 extent=[0, selem.shape[1], 0, selem.shape[0]])
 ax[0].set_title('Structuring Element', fontsize=20)

 ax[1].imshow(image, cmap='gray',
 extent=[0, image.shape[1], 0, image.shape[0]])
 ax[1].set_title('Original Image', fontsize=20)

 ax[2].imshow(eroded_image, cmap='gray',
 extent=[0, image.shape[1], 0, image.shape[0]])
 ax[2].set_title('Eroded Image', fontsize=20)

 plt.tight_layout()
 plt.show()
Let’s use the following original image:
# Define the image
original_image = np.array([[0, 0, 0, 0, 0, 0, 0, 0],
 [0, 0, 0, 1, 1, 1, 0, 0],
 [0, 0, 1, 1, 1, 1, 0, 0],
 [0, 1, 1, 1, 1, 0, 0, 0],
 [0, 1, 1, 1, 0, 0, 0, 0],
 [0, 1, 1, 1, 0, 0, 0, 0],
 [0, 0, 0, 0, 0, 0, 0, 0],
 [0, 0, 0, 0, 0, 0, 0, 0]])

plt.figure(figsize=(10,10))
plt.imshow(original_image, cmap='gray', extent=[0, 8, 0, 8])
plt.title('Original Image', fontsize=20);

Next is to define the structuring element (selem). For this example, let’s use the cross as our selem:
# Define the structuring element
selem_cross = np.array([[0,1,0],
 [1,1,1],
 [0,1,0]])
plt.figure(figsize=(9,9))
plt.imshow(selem_cross, cmap='gray')
plt.title('Structuring Element: Cross', fontsize=20);

Then use the apply_erosion function to the original image:
# Apply erosion on the original image with cross structuring element
apply_erosion(original_image, selem_cross)

Notice the transformation in the original image, it shrank, right?
To further understand how it worked under the hood, take a look at the following gif:
The primary objective of erosion is to remove floating pixels and thin lines, leading to the preservation of only substantial objects. After we apply erosion, the remaining lines appear thinner, and the shapes within the image look smaller. Erosion is usually the hero for tasks like object segmentation and boundary extraction, where it eliminates noise and fine details from an image.
Do note that the choice of the neighborhood size or the structuring element used in erosion can significantly impact the results. The choice of different structuring elements, such as squares, disks, or custom shapes, can be employed to achieve specific erosion effects based on the desired outcome. For instance, if I use a square as my structuring element, the eroded image will look something like this:
# Define the structuring element
selem_square = np.array([[0,0,0,0],
 [0,1,1,0],
 [0,1,1,0],
 [0,0,0,0]])

# Apply erosion on the original image with square structuring element
apply_erosion(original_image, selem_square)

Dilation
On the flip side, dilation is the opposite of erosion. It’s another vital morphological operation used in image processing that broadens the objects within an image by adding pixels to their boundaries. Dilation operates by considering the neighborhood of each pixel but assigns its value to the maximum value among all the pixels in that neighborhood. In a binary image, if any of the neighboring pixels have a value of 1, the output pixel is set to 1 as well.
This operation fills small gaps and holes within objects, making them more robust and complete. Time to apply dilation and see the difference:
def apply_dilation(image, selem):
 # Perform dilation on the given image using the structuring element, selem
 dilated_image = dilation(image, selem)

 # Display the original and dilated images
 fig, axes = plt.subplots(1, 3, figsize=(15, 10))
 ax = axes.ravel()

 ax[0].imshow(selem, cmap='gray',
 extent=[0, selem.shape[1], 0, selem.shape[0]])
 ax[0].set_title('Structuring Element', fontsize=20)

 ax[1].imshow(image, cmap='gray',
 extent=[0, image.shape[1], 0, image.shape[0]])
 ax[1].set_title('Original Image', fontsize=20)

 ax[2].imshow(dilated_image, cmap='gray',
 extent=[0, image.shape[1], 0, image.shape[0]])
 ax[2].set_title('Dilated Image', fontsize=20)

 plt.tight_layout()
 plt.show()
# Apply dilation on the original image with cross structuring element
apply_dilation(original_image, selem_cross)

Notice how the image became thicker.
To further visualize how dilation works, take a look at the gif below:
The primary purpose of dilation is to make objects more visible and fill in small holes within objects. When dilation is applied, lines appear thicker, and filled shapes appear larger. It helps in enhancing the structural features of an image and makes objects stand out. It is usually used to expand objects, connect broken segments, and fill in gaps or holes within the objects.
Just like erosion, it’s important to remember that the size and shape of the neighborhood or the structuring element used in dilation can significantly impact the results. Choosing an appropriate structuring element allows us to control the extent of dilation and tailor it to the specific characteristics of the objects within the image. Let’s use the square selem again on the image:
# Apply dilation on the original image with square structuring element
apply_dilation(original_image, selem_square)

Opening
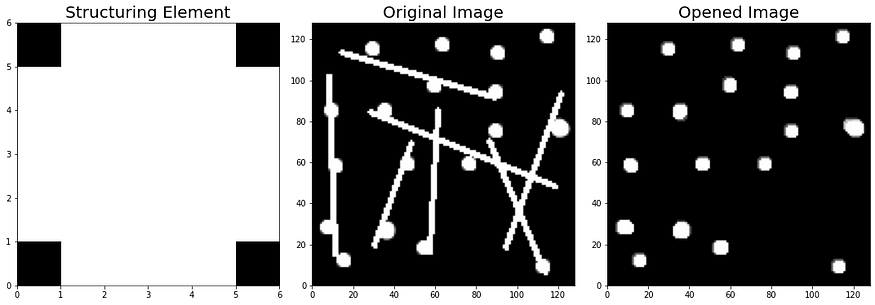
Opening, the dynamic duo of erosion followed by dilation, involves applying erosion to an image and then dilating the eroded image using the same structuring element for both operations. It is particularly useful for removing small objects and thin lines from an image (such as image denoising and extracting features) while preserving the shape and size of larger objects. By performing erosion first, small-scale noise, fine details, and thin structures are effectively eliminated. Subsequently, dilation helps in regaining the shape and size of larger objects, ensuring they remain intact.
To illustrate the opening, let’s use the art1.png and try to retain only the circles:
# Display the original image
original_image = rgb2gray(imread('art1.PNG'))
imshow(original_image)
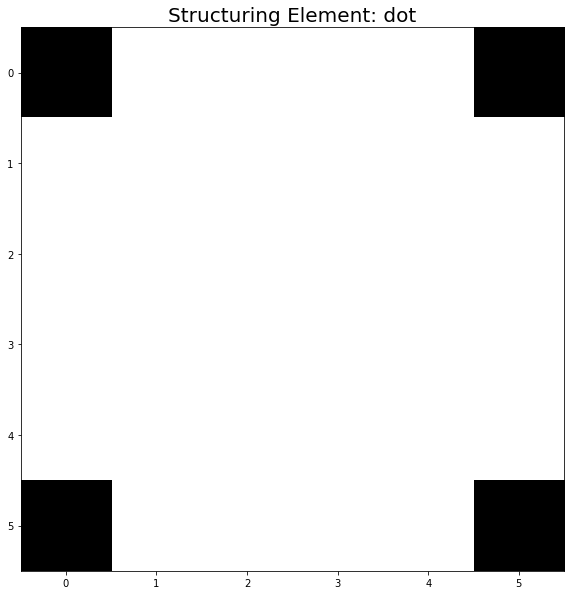
To remove the lines and retain only the circles, let’s create a big dot as our structuring element:
# Define the structuring element
selem_dot = np.array([[0, 1, 1, 1, 1, 0],
 [1, 1, 1, 1, 1, 1],
 [1, 1, 1, 1, 1, 1],
 [1, 1, 1, 1, 1, 1],
 [1, 1, 1, 1, 1, 1],
 [0, 1, 1, 1, 1, 0]])

plt.figure(figsize=(10,10))
plt.imshow(selem_dot, cmap='gray')
plt.title('Structuring Element: dot', fontsize=20)
plt.show()
Use apply_opening function to our original image with selem_dot:
def apply_opening(image, selem):
 # Perform opening on the given image using the structuring element, selem
 opened_image = opening(image, selem)

 # Display the original and opened images
 fig, axes = plt.subplots(1, 3, figsize=(15, 10))
 ax = axes.ravel()

 ax[0].imshow(selem, cmap='gray',
 extent=[0, selem.shape[1], 0, selem.shape[0]])
 ax[0].set_title('Structuring Element', fontsize=20)

 ax[1].imshow(image, cmap='gray',
 extent=[0, image.shape[1], 0, image.shape[0]])
 ax[1].set_title('Original Image', fontsize=20)

 ax[2].imshow(opened_image, cmap='gray',
 extent=[0, image.shape[1], 0, image.shape[0]])
 ax[2].set_title('Opened Image', fontsize=20)

 plt.tight_layout()
 plt.show()
# Apply opening on the original image with dot structuring element
apply_opening(original_image, selem_dot)
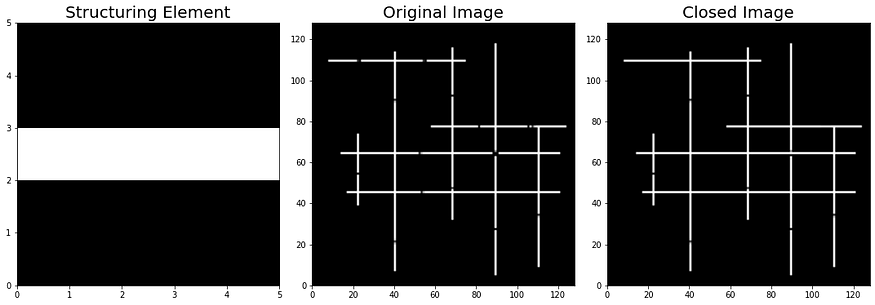
Closing
Closing, the opposite of opening, is a morphological operation that involves dilation followed by erosion. The operation is performed using the same structuring element for both the dilation and erosion operations. Closing is especially beneficial for closing small holes and gaps in larger objects without significantly altering their size or shape. By performing dilation first, small holes and gaps within objects are filled, and the overall connectivity is improved. Subsequently, erosion helps in maintaining the shape and size of larger objects, ensuring their structural integrity.
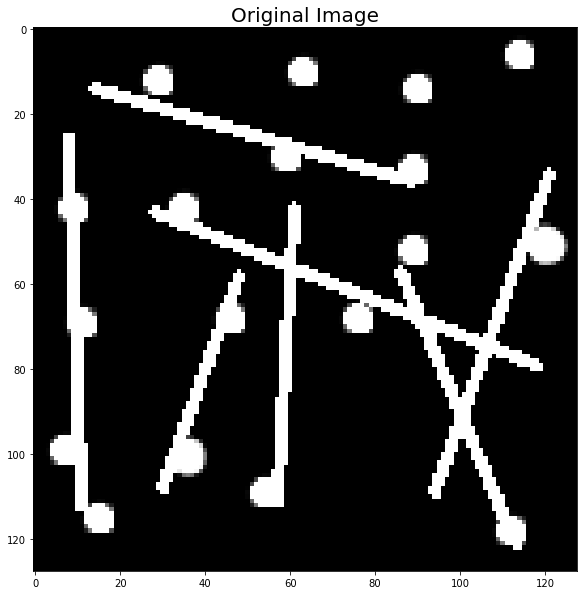
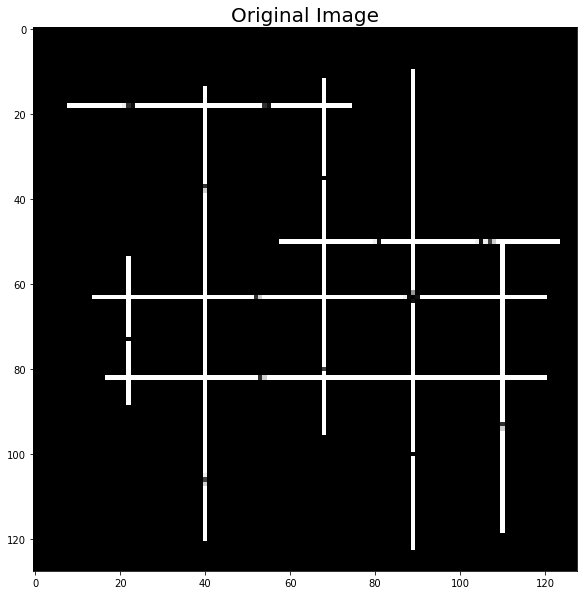
To illustrate closing, let’s use art2.png image and try to connect the gaps:
# Display the original image
original_image = rgb2gray(imread('art2.png'))
plt.figure(figsize=(10,10))
plt.imshow(original_image, cmap='gray')
plt.title('Original Image', fontsize=20);
To connect the broken lines which are present in both horizontal and vertical lines, we have to create two structuring elements:
# Define Structuring element for vertical lines
selem_ver = np.array([[0,0,1,0,0],
 [0,0,1,0,0],
 [0,0,1,0,0],
 [0,0,1,0,0],
 [0,0,1,0,0]])

# Define Structuring element for horizontal lines
selem_hor = np.array([[0,0,0,0,0],
 [0,0,0,0,0],
 [1,1,1,1,1],
 [0,0,0,0,0],
 [0,0,0,0,0]])

# Display the structuring elements as subplots
fig, axes = plt.subplots(1, 2, figsize=(15, 10))
ax = axes.ravel()

ax[0].imshow(selem_ver, cmap='gray')
ax[0].set_title('Vertical structuring element', fontsize=20)

ax[1].imshow(selem_hor, cmap='gray')
ax[1].set_title('Horizontal structuring element', fontsize=20)

plt.tight_layout()
plt.show()

Next, set up and use the following apply_closing function:
def apply_closing(image, selem):
 # Perform closing on the given image using the structuring element, selem
 closed_image = closing(image, selem)

 # Display the original and closed images
 fig, axes = plt.subplots(1, 3, figsize=(15, 10))
 ax = axes.ravel()

 ax[0].imshow(selem, cmap='gray',
 extent=[0, selem.shape[1], 0, selem.shape[0]])
 ax[0].set_title('Structuring Element', fontsize=20)

 ax[1].imshow(image, cmap='gray',
 extent=[0, image.shape[1], 0, image.shape[0]])
 ax[1].set_title('Original Image', fontsize=20)

 ax[2].imshow(closed_image, cmap='gray',
 extent=[0, image.shape[1], 0, image.shape[0]])
 ax[2].set_title('Closed Image', fontsize=20)

 plt.tight_layout()
 plt.show()
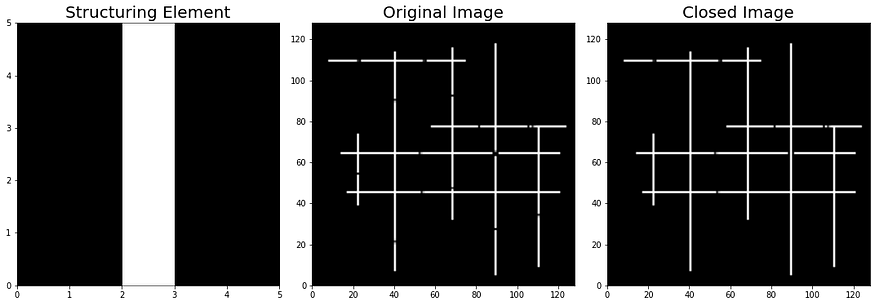
Likewise, to fill the gap in horizontal lines, use selem_hor:
# Apply closing with the horizontal selem
closed_image = apply_closing(original_image, selem_hor)
To fill the gaps in both horizontal and vertical lines, we need to apply closing with one selem first (i.e., selem_ver first), and then use the output of that function as an input for the next run of closing that uses the next selem (i.e., selem_hor).
def apply_closing(image, selem):
 # Perform closing on the given image using the structuring element, selem
 closed_image = closing(image, selem)

 return closed_image


# Apply closing with the vertical selem
closed_image_ver = apply_closing(original_image, selem_ver)

# Apply closing with the horizontal selem
closed_image_hor = apply_closing(closed_image_ver, selem_hor)


# Display the original and closed images
fig, axes = plt.subplots(1, 2, figsize=(15, 10))
ax = axes.ravel()

ax[0].imshow(original_image, cmap='gray',
 extent=[0, original_image.shape[1], 0, original_image.shape[0]])
ax[0].set_title('Original Image', fontsize=20)

ax[1].imshow(closed_image_hor, cmap='gray',
 extent=[0, closed_image_hor.shape[1], 0, closed_image_hor.shape[0]])
ax[1].set_title('Closed Image (Vertical & Horizontal)', fontsize=20);

And there you have it. I have completely demonstrated the basics of spatial filters and morphological operations. Each operation has its unique advantages and uses, and combining these operations in different ways allows us to perform a wide range of image processing tasks.
Conclusion
In this episode, we embarked on an exciting journey through spatial filters and morphological operations, unleashing the true potential of image processing. Here’s a quick recap of what we’ve learned:
- Spatial filters are versatile tools for tasks like noise reduction, edge detection, and smoothing, enhancing our images in remarkable ways. U+1F31F
- Morphological operations allow us to shape and structure objects within an image, opening doors to noise reduction, object segmentation, and boundary extraction. U+1F6AAU+1F50D
- Erosion, dilation, opening, and closing are the fundamental morphological operations that we’ve explored. Each operation has its unique characteristics and applications, giving us the power to mold images to our desired forms. U+1F4AAU+1F5BC️
As we continue our adventure through the captivating world of image processing, remember that these techniques are just the beginning. There’s a vast universe of knowledge and techniques waiting to be discovered. I encourage you to dive deeper, experiment, and apply these techniques to your own projects. Stay tuned for the next episode, where we’ll uncover more awe-inspiring techniques that will take your image-processing skills to new heights! U+1F4DAU+1F680
References
- Gonzalez, R. C., & Woods, R. E. (2018). Digital Image Processing. Pearson. van der Walt, S., Schönberger, J. L., Nunez-Iglesias, J., Boulogne, F., Warner, J. D., Yager, N., … & Yu, T. (2014). scikit-image: image processing in Python. PeerJ, 2, e453.
- Wikipedia contributors. (2023, May 7). Kernel (image processing). In Wikipedia, The Free Encyclopedia. Retrieved 15:37, May 7, 2023, from https://en.wikipedia.org/wiki/Kernel_(image_processing)
- MathWorks. (n.d.). Morphological Dilation and Erosion. In MATLAB Documentation. Retrieved from https://www.mathworks.com/help/images/morphological-dilation-and-erosion.html
- Borja, B. (2023). Lecture 3: Filtering and Morphological Operations [Jupyter Notebook]. Introduction to Image Processing 2023, Asian Institute of Management
Join thousands of data leaders on the AI newsletter. Join over 80,000 subscribers and keep up to date with the latest developments in AI. From research to projects and ideas. If you are building an AI startup, an AI-related product, or a service, we invite you to consider becoming a sponsor.
Published via Towards AI
Towards AI Academy
We Build Enterprise-Grade AI. We'll Teach You to Master It Too.
15 engineers. 100,000+ students. Towards AI Academy teaches what actually survives production.
Start free — no commitment:
→ 6-Day Agentic AI Engineering Email Guide — one practical lesson per day
→ Agents Architecture Cheatsheet — 3 years of architecture decisions in 6 pages
Our courses:
→ AI Engineering Certification — 90+ lessons from project selection to deployed product. The most comprehensive practical LLM course out there.
→ Agent Engineering Course — Hands on with production agent architectures, memory, routing, and eval frameworks — built from real enterprise engagements.
→ AI for Work — Understand, evaluate, and apply AI for complex work tasks.
Note: Article content contains the views of the contributing authors and not Towards AI.
Related posts
Recent Posts


")

