


Object Detection at the Edge with TF lite model-maker
Last Updated on January 6, 2023 by Editorial Team
Last Updated on May 31, 2022 by Editorial Team
Author(s): Poulinakis Kon
Originally published on Towards AI the World’s Leading AI and Technology News and Media Company. If you are building an AI-related product or service, we invite you to consider becoming an AI sponsor. At Towards AI, we help scale AI and technology startups. Let us help you unleash your technology to the masses.
Object Detection at the Edge With TF Lite Model-maker
Do you wonder what is the easiest and fastest way to train an object detection network on a custom dataset ? Are you interested in bringing those AI algorithms at the edge?
Sometimes you need a quick solution. It might be for a prototype or for a non-crucial task. You need a solution that will be fast but still accurate. Frameworks like YoloV5 or Detectron2 are great choices, but they need some effort to set them up, and it’s usually not that easy to deploy their models at the Edge.
Fortunately, Tensorflow team got our backs, they have created an awesome new tool, the Object Detection Model Maker API.
TensorFlow Lite model-maker
Model-maker is a new (experimental as of now: 9/2021) API for building Tensorflow lite models fast! The TensorFlow Lite Model Maker library simplifies the process of training a TensorFlow Lite models using custom datasets. It uses transfer learning to reduce the amount of training data required and shorten the training time.
It currently supports 6 tasks: Image Classification, Object Detection, Text Classification, BERT Question Answer, Audio Classification, and Recommendation system.
Even though the pre-trained models it currently supports are limited, it is pretty useful, and you should expect it to grow bigger in the following months.
You can find the documentation at this link.
Now let’s start building!
We will use Model Maker object detection API for to build a network that can discriminate weeds from broccoli plants. Regarding the models, we are currently limited to the EficientDetLite series (0 up to 4).
First, we need annotated data
Model-maker API for object detection offers 2 methods for loading data. You can either load your data using the from_csv method, or the from_pascal_voc. For this tutorial, I am going to use the from_pascal_voc method since I annotated my data with the PascalVOC format (for more info on VOC check this article)
In order to annotate your datasets, I suggest either Roboflow or LabelImg. I have also tested CVAT and MakeSense.ai, but it seems that there is some incompatibility between the PascalVOC annotations produced by the tools and the ones expected by the API. This results in errors during data loading.
NOTE: Using CVAT for Pascal VOC annotation will probably result in KeyError:'pose'. I found out that is caused because attribute <truncated> was not inserted in the XML annotation. Using MakeSense.ai’s annotations produced an error due to their default value for the attribute <difficult>.API expects a 0 while MakeSense uses ‘Unspecified’.
We are going to build a weed detector, a model that will distinguish my organic broccolis from the weeds that sprout around them. I really need to get those out of there if I want them to grow healthy.
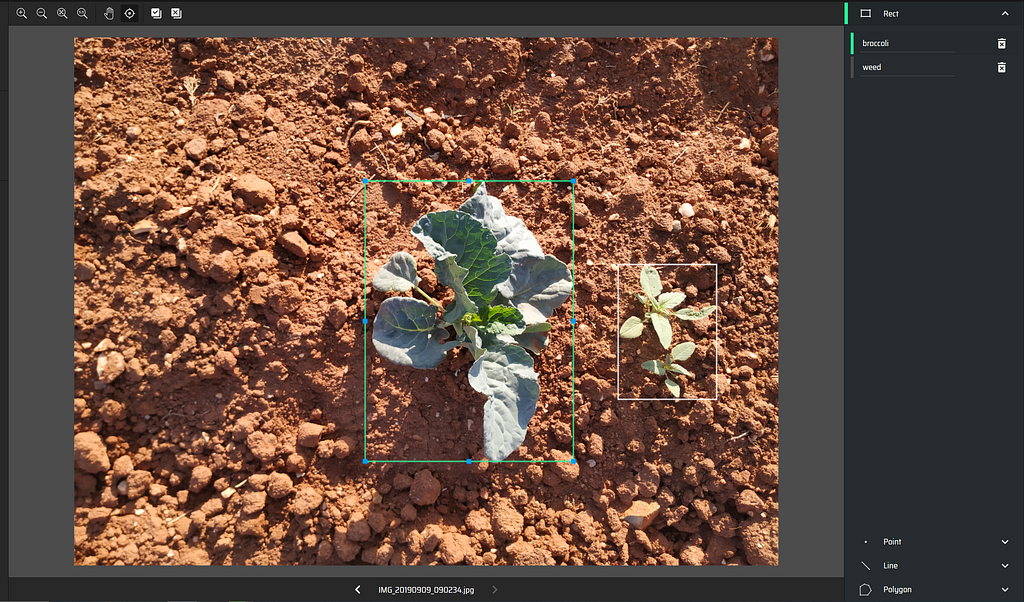
Once you have finished the annotation process, you should have a folder containing all the images together with the XML annotation files, one XML for each image in the dataset. I suggest that you split the annotated dataset into train-val splits beforehand.
Time to Code
My favorite part has come. However, you will probably need to install 2 packages first. I highly suggest you create a conda environment to run your project. Now, try these 2 pip commands :
!pip install  tflite-model-maker
!pip install  pycocotools
Note: It is possible that pip install tflite-model-maker will go into recursive mode to determine which version is compatible with other requirements. This might result in the installation taking way too long or not completing. I managed to solve this by installing the nightly version, pip install tflite-model-maker-nightly. Google colab is another good choice to avoid errors.
Once you have successfully installed the 2 packages, we can move on to the coding part.
1. Import the necessary libraries
import numpy as np
import os
from tflite_model_maker.config import ExportFormat
from tflite_model_maker import model_spec
from tflite_model_maker import object_detector
import tensorflow as tf
assert tf.__version__.startswith('2'
2. Load the Dataset
On the above code, just make sure that in the label_map you begin with the number 1 for the first class, as 0 is a reserved key for background class.
Note: There is a method called split. It is supposed that you can load the whole dataset with the DataLoader and then use the .split() method on the returned object to split it into train and validation sets. However, this method is yet to be implemented, even though it appears in the documentation.
3. Create and train an object detection model.
Model-maker Object detection API offers the EfficientDet series, ranging from EfficientDet 0 to 4, with 0 being the smallest one and 4 being the biggest. We specify which model we want to use with the below line of code (doc).
Since the problem at hand is easy and because I don’t have a lot of data, I will use a smaller network to avoid overfitting issues.
# model specification
spec = model_spec.get("efficientdet_lite1")
Once you have specified the name of the model you can train it with a single command !
Let's check a fraction of the output. Strangely, evaluation results do not always appear after 5 epochs. The evaluation prints the most important object detection metrics such as AP and AR for different IoUs and classes.
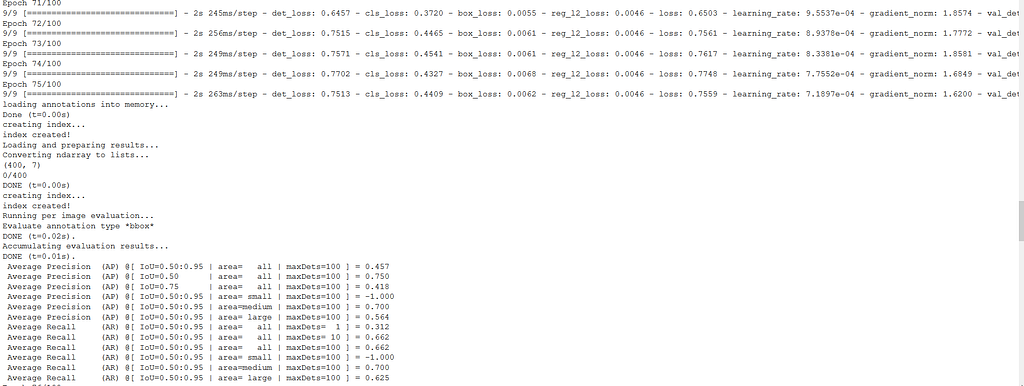
It is also interesting to evaluate our model on our test dataset with the evaluate() method. If you have enough data, split your dataset into train-val-test subsets and use the test dataset in this method. However, if data is in short supply evaluate the validation subset.
model.evaluate(val_ds)
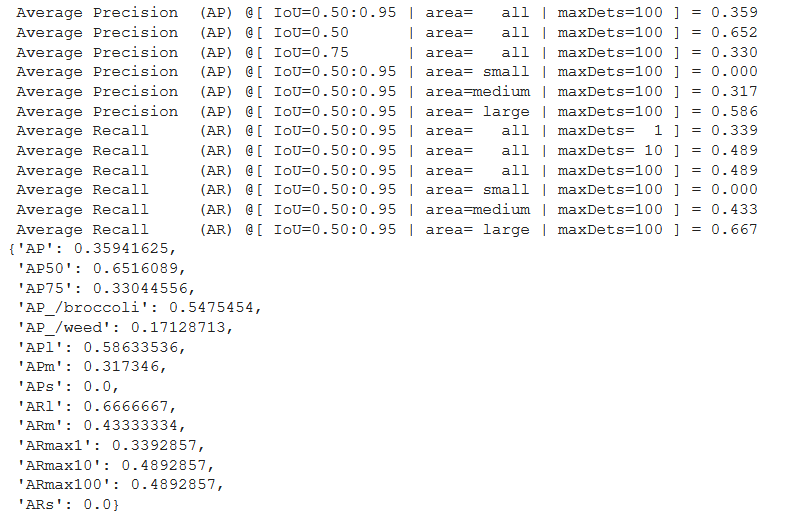
An AP of 0.652 on IoU=0.50 for such a Lite model and with just 45 images is good enough. AP_/weed is not that good, and we should gather more examples of that class for training. However, be sure that you can achieve better performance by using bigger datasets and more complex models, like EfficientDetLite4.
4. Export the model
Now that we have a trained model, we want to export it and use it for predictions. There are 3 export formats offered
- ExportFormat.TFLITE
- ExportFormat.LABEL
- ExportFormat.SAVED_MODEL
Since I want to deploy the model on a portable device I am going to export it in the TFLITE format.
model.export(export_dir= 'MY_EXPORT_PATH',
             tflite_filename= 'MY_FILENAME'
             )
[OPTIONAL]: There is also the option to quantize your model before exporting. Quantization reduces a model’s size by converting the weights to either FLOAT16 or INT8. This can result in faster inference during deployment.
from tflite_model_maker import config
quantization = config.QuantizationConfig.for_float16()
model.export(export_dir= 'MY_EXPORT_PATH',
             tflite_filename= 'MY_FILENAME',
             Quantization_config=quantization
             )
5. Running Inference
Congratulations on making it here! By now you should have a well-trained object detection model and also a tflite exported version of it.
Now you only need to load your model on a device with TensorFlow Lite Interpreter installed. Since I don’t want this article to become too long, I will document the process of deployment in my next article. I will deploy the model on a Raspberry Pi equipped with a camera and run detections directly on the Pi. So stay tuned!
Some Limitations
Model Maker is still an experimental feature and certainly has a lot of limitations. I would mostly rely on it for quick prototyping, experimentation, and personal projects. It is not geared towards production use.
- Lacks a range of models to choose from
- You can not fine-tune models or add custom features
- Lacks callbacks such as early stopping and best_weights_saving.
Still, I am very thankful to the TensorFlow Lite team for developing this great tool.
In the next part of this article, I will showcase how to deploy the model on a Raspberry Pi using TF Lite. In the future, I will also explore other tasks using Model Maker such as Audio Classification. Till then, keep an eye on the tool for new developments.
Thanks for visiting!
My Links: Medium | LinkedIn | GitHub
Object Detection at the Edge with TF lite model-maker was originally published in Towards AI on Medium, where people are continuing the conversation by highlighting and responding to this story.
Join thousands of data leaders on the AI newsletter. It’s free, we don’t spam, and we never share your email address. Keep up to date with the latest work in AI. From research to projects and ideas. If you are building an AI startup, an AI-related product, or a service, we invite you to consider becoming a sponsor.
Published via Towards AI
Towards AI Academy
We Build Enterprise-Grade AI. We'll Teach You to Master It Too.
15 engineers. 100,000+ students. Towards AI Academy teaches what actually survives production.
Start free — no commitment:
→ 6-Day Agentic AI Engineering Email Guide — one practical lesson per day
→ Agents Architecture Cheatsheet — 3 years of architecture decisions in 6 pages
Our courses:
→ AI Engineering Certification — 90+ lessons from project selection to deployed product. The most comprehensive practical LLM course out there.
→ Agent Engineering Course — Hands on with production agent architectures, memory, routing, and eval frameworks — built from real enterprise engagements.
→ AI for Work — Understand, evaluate, and apply AI for complex work tasks.
Note: Article content contains the views of the contributing authors and not Towards AI.
Related posts
Recent Posts


")


