


Hand Cricket Simulation Using CNN and OpenCV
Last Updated on January 6, 2023 by Editorial Team
Last Updated on June 4, 2022 by Editorial Team
Author(s): Abhinav Bandaru
Originally published on Towards AI the World’s Leading AI and Technology News and Media Company. If you are building an AI-related product or service, we invite you to consider becoming an AI sponsor. At Towards AI, we help scale AI and technology startups. Let us help you unleash your technology to the masses.
I have been wanting to work on this for a long time. Growing up, Hand Cricket was one of my favorite games and I feel like this is my way of reminiscing those moments. For those of you who don’t know how it works, here’s a brief description of the game:
- Hand Cricket is quite similar to the game of rock-paper-scissor. You will see how in a few minutes. For the sake of simplicity, I will try and limit the rules to only those that are necessary to play this game.
- You’ll need 2 players to play this game – A ‘Batsman’ and a ‘Bowler’.
- Here, both the batsman and the bowler choose a symbol at the same time, much like rock-paper-scissor. Each symbol is associated with a specific amount of runs/points.
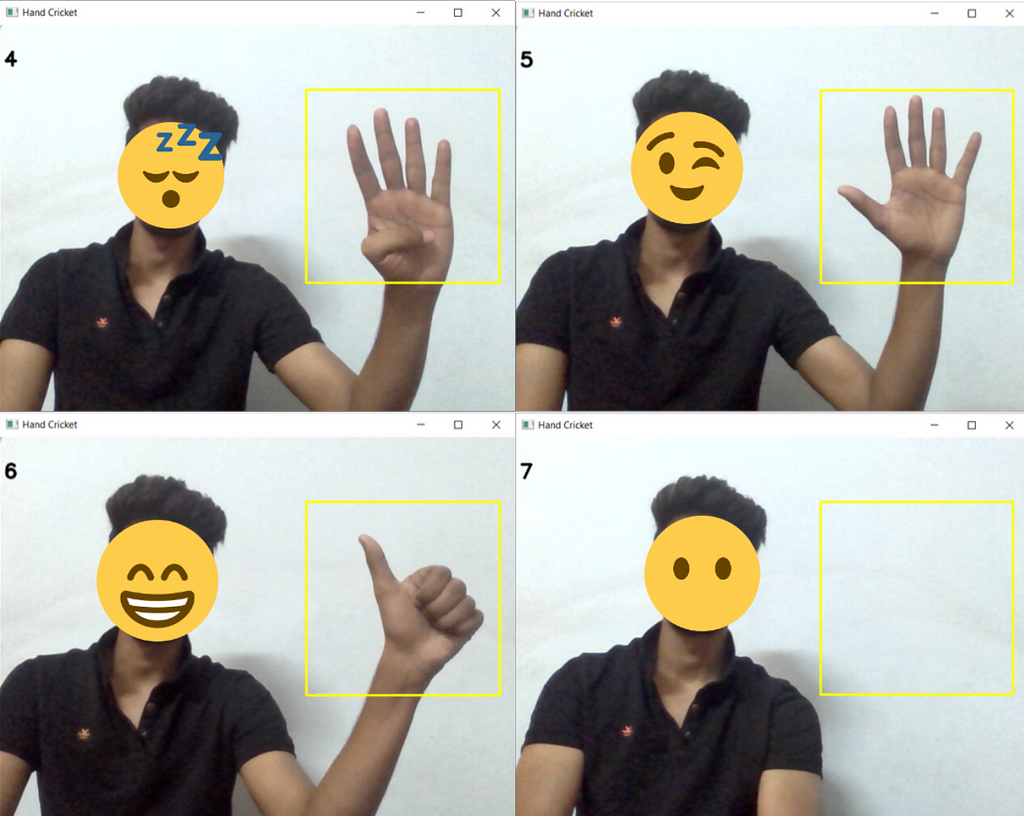
- There are a total of 7 hand gestures/symbols involved in this game
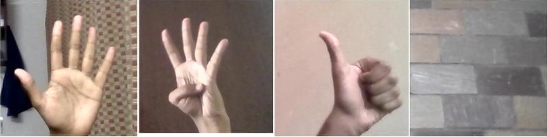
– Index Finger Up = 1 run/1 point
– Index and Middle Fingers up = 2 runs/2 points
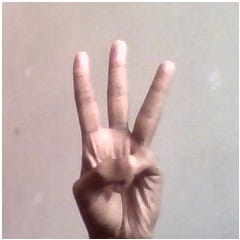
– Index, Middle & Ring Fingers up = 3 runs/3 points
– Index, Middle, Ring & Little Fingers up = 4 runs/4 points
– Index, Middle, Ring, Little Fingers & Thumb up = 5 runs/5 points
– Only the Thumb Up = 6 runs/6 points
– All fingers closed/Closed Fist = Defense (I’ll explain what it means shortly) - The batsman and the bowler are free to choose any symbol they wish.
– Goal of the Bowler: Try and choose the same symbol as the batsman
– Goal of the Batsman: Try and choose a different symbol from the bowler and score points/runs
Now here’s how a batsman can score runs/points and how a bowler can try and stop him.
- Every move in which the batsman chooses a number different than the bowler, he gets as many points as indicated by the number he chose.
- The one exception to the above rule is the closed fist (defense) symbol. This move will get the batsman as many points as indicated by the symbol chosen by the bowler.
- If both the batsman and the bowler choose the SAME hand symbol, it's Game Over!
Here’s a sample scenario to make it more clear:
– Round 1:
Batsman’s Symbol = 4 (Index, Middle, Ring & Little Fingers up)
Bowler’s Symbol = 2 (Index and Middle Fingers up)
Batsman’s Score = 4 runs
– Round 2:
Batsman’s Symbol = 5
Bowler’s Symbol = 3
Batsman’s Score = 9 runs (4+5)
– Round 3:
Batsman’s Symbol = 0 (defense)
Bowler’s Symbol = 1
Batsman’s Score = 10 runs (4+5+1)
– Round 4:
Batsman’s Symbol = 0 (defense)
Bowler’s Symbol = 6
Batsman’s Score = 16 runs (4+5+1+6)
– Round 5:
Batsman’s Symbol = 3
Bowler’s Symbol = 3
GAME OVER!
Batsman’s Final Score = 16 runs
sighs. That was exhausting and fairly complicated, no thanks to me. For your sake, I hope you are familiar with the game beforehand.
Now that we know how the game works, we can dive into my attempt at replicating this game. (I’ll be using Python for the code snippets)
This is quite a long code so bear with me. The process can be divided into the following steps:
- Step-1: Data Collection and formatting
- Step-2: Loading the data and processing it
- Step-3: Designing the CNN model architecture
- Step-4: Training the CNN model to count fingers
- Step-5: Testing the Model in real-time to count fingers
- Step-6: Modifying the rules of Hand Cricket
- Step-7: Implementing the trained CNN model in real-time to simulate Hand Cricket
The code in the following sections expects an intermediate level of proficiency in python, OpenCV, and CNNs. I suggest getting familiar with a simpler code corresponding to the aforementioned topics before continuing with the sections.
Let’s get started!
Step-1: Data Collection and Formatting
The data required for this project must be images that represent the numbers 0-6 (inclusive of 0 and 6). I have collected the data and uploaded it to Kaggle: Hand Symbols. I have collected this data using the OpenCV library of python. Here’s a quick read on how I did it: Data Collection.
I have collected a total of 28800 jpg images of dimensions 240×240 pixels. Of these 28000, 20000 are stored in the ‘train’ folder, and the remaining 8,800 images are in the ‘test’ folder. Why exactly 28000 images? Why a train to test ratio of 20000:8800? Why a picture of size 240×240? No particular reason! I just kept collecting more and more data while simultaneously testing how the model works in real-time. These numbers resulted in a good enough model and so I stuck with them. Anyways, moving on!
Both the train and test folders contain 8 more folders named — ‘0’, ‘1’, ‘2’, ‘3’, ‘4’, ‘5’, ‘6’, ‘none’. Each of the folders in the train folder contains 2500 images and the ones in the test folder containing 1100 images. Confused? I would be too. Here’s a better representation to make it easier.
I have established this structure in hopes of training the model on the data in the train folder and testing it on the data in the test folder. However, I ended up using all the data for training the model, because, my final goal is to implement it in real-time and not report the accuracy achieved by the model. If any of you are interested in finding out the accuracy, a structure similar to the one above could prove useful.
Some of you might notice the folder named ‘none’. This folder has images with no hand symbols. The images in this folder are used to establish a state when no symbol is displayed by the user. It essentially contains images with a random background. In terms of Machine Learning, this is a Multiclass Classification problem where each symbol is a specific class. It was necessary to include a class that indicated the state of no hand symbols displayed by the user to recognize images in real-time when the user did not choose a hand symbol.
Step-2: Loading the data and processing it
The previous step would have us store the data in the working directory. We now have to bring it into the environment (store it in variables in the required format).
Assume that the data is stored in a folder called ‘dataset’. We iterate through this folder and the files inside it using functions from the OS library of python. Every image in every folder is converted into a NumPy array and stored in a list named ‘images_as_numpyarr’. Another list called ‘labels’ is maintained which stores the number represented by the image, at the same index as the image stored in the images_as_numpyarr list.
For those of you familiar with supervised machine learning, the labels list is used to provide supervision by labeling the data.
So, images_as_numpyarr[0] would contain the image pixel data as a NumPy array, and labels[0] would contain the number being shown in the image.
So if this was the very first image, images_as_numpyarr[0] would store this image as a NumPy array, and labels[0] would store the number 3.
The labels 0 through 6 indicate the number being shown whereas the label 7 indicates that no number is being shown (the ‘none’ state mentioned in the previous section).

The labels list would label the above image as number 7 (indicating the class of the image) and store it in the list.
If the following images were found, the labels list would be:
labels = [5, 4, 6, 7]
These labels have then been encoded using the One Hot Encoding technique in line 21.
Step-3: Designing the CNN model architecture
Now that we have the data readily available, we need to design a CNN model and feed the data to it. Instead of building an architecture from scratch, I used Transfer Learning to make it easier to build an effective model. Here’s an article that explains it in detail: Transfer Learning. In simple words, it is the process of using a pre-trained model (with weights), and modifying the last few layers to suit our needs. This technique helps cut down the time taken for building and compiling complex architectures.
Here, I’ve used a lightweight architecture called MobileNet. Here’s the architecture.
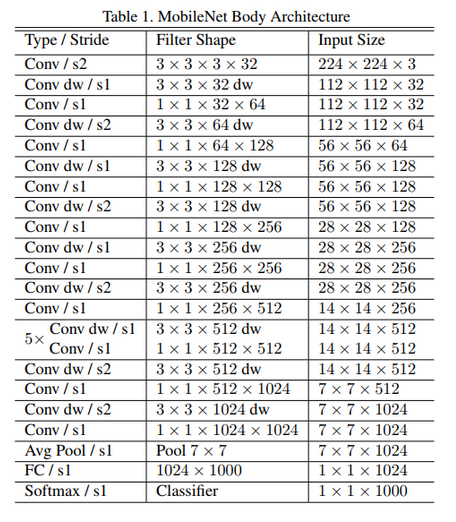
Complicated? I feel you. For now, just understand that MobileNet is pre-built and pre-trained (which means some appropriate weights are generated by training). We will import this architecture, modify the last few layers (usually by adding new layers) and train the model on our data.
Here’s the code. I have imported the MobileNet architecture in Line 8 and added a few layers at the end (Line 9–13). I then compiled it using Adam optimizer with a learning rate of 0.0001. I tried training with different parameters and the ones in the code below proved to be good enough.
Step-4: Training the CNN model to count fingers
Now that we have the architecture ready, we pass in the images along with the labels as NumPy arrays (Line 4).
The shape of images_as_numpyarr[0] is 240x240x3 (240×240 is the image size and 3 indicates the number of channels (RGB)) and that of labels[0] is 28800×8 (28800 is the number of images and 8 is the number of different classes possible in classification (0,1,2,3,4,5,6,7) (7 represents the none class)).
The model is trained for 2 epochs. This process took about 50–60 mins on my machine. This time may vary depending on the processing power available to you.
The model is then saved to checkpoint the progress made and we can just load the model the next time we work with this, instead of training the model again.
Step-5: Testing the Model in real-time to count fingers
Our model is finally ready to count the number of fingers in real-time. Using OpenCV we can use our webcam and have our model detect the number of fingers displayed.
We draw a square on the right side of the screen. In every frame, we will extract this square and pass it to our model. Our model then returns an array of probabilities. Since there are 8 possible classes (0,1,2,3,4,5,6,7), each value in the array represents the probability that the image has a hand representing the number x at index x (except 7 where the probability value at index 7 represents the probability that there is no hand in the image). The value in the array that has the maximum probability is the value that the model predicts is being shown in the image. I displayed this value in the top left of the screen.
Step-6: My adaptation of Hand Cricket
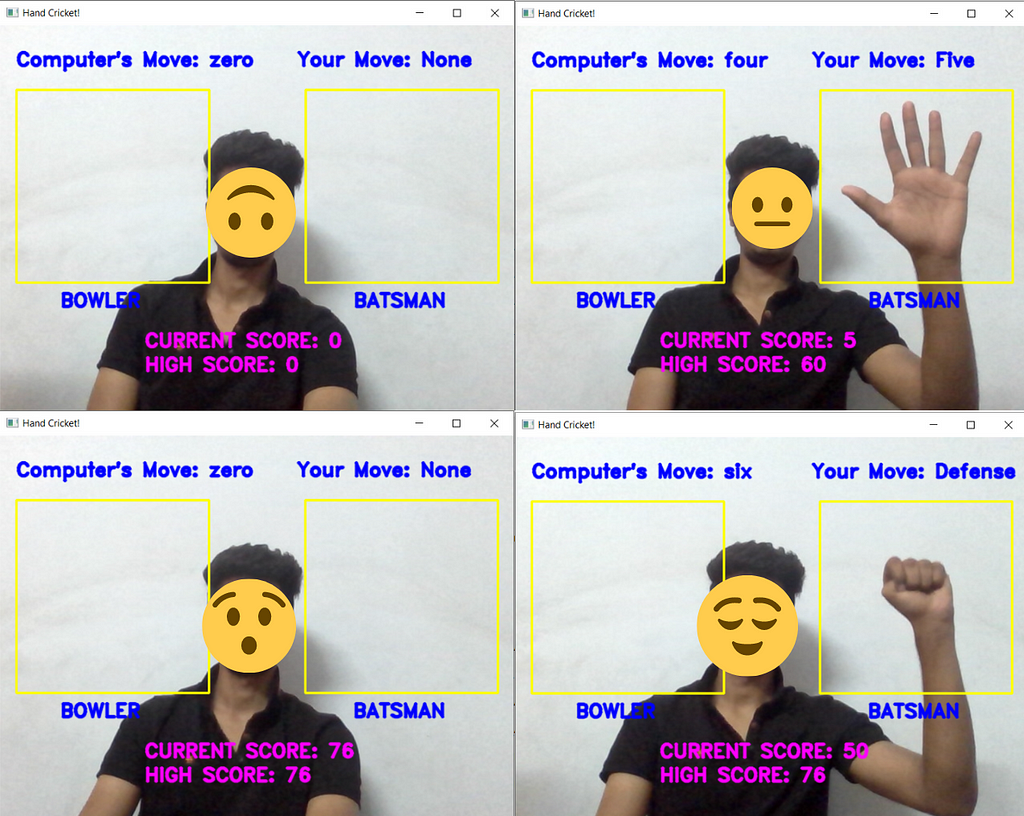
We now have a model that is capable of counting fingers. Now we move on to the technicalities of the game. This project was created to allow a single human to play the game with a bot. If 2 human players wanted to play hand cricket, they could do so in person, or over a video call. So the following program can be used to play only against a bot. To further ease it up, the human will always act as the batsman and the bot will always be the bowler. The bowler will randomly choose a number from 0–6 every second. The moment the batsman chooses a number (signals a number with his hand in the designated area), the number is added to his score. Since a new number is being chosen by the computer every frame, it is difficult to keep up with the bot. We just have to randomly choose a number, irregularly even, and hope that it does not match the number chosen by the bot (the bowler).
Step-7: Implementing the trained CNN model in real-time to simulate Hand Cricket
If you made it this far, pat yourselves on the back because you have some serious dedication to learn. ( I am exhausted )
This is the final piece of code that combines the model that counts fingers (Lines 44–49) with the rules of the game as described in the introductory section (Lines 56–64).
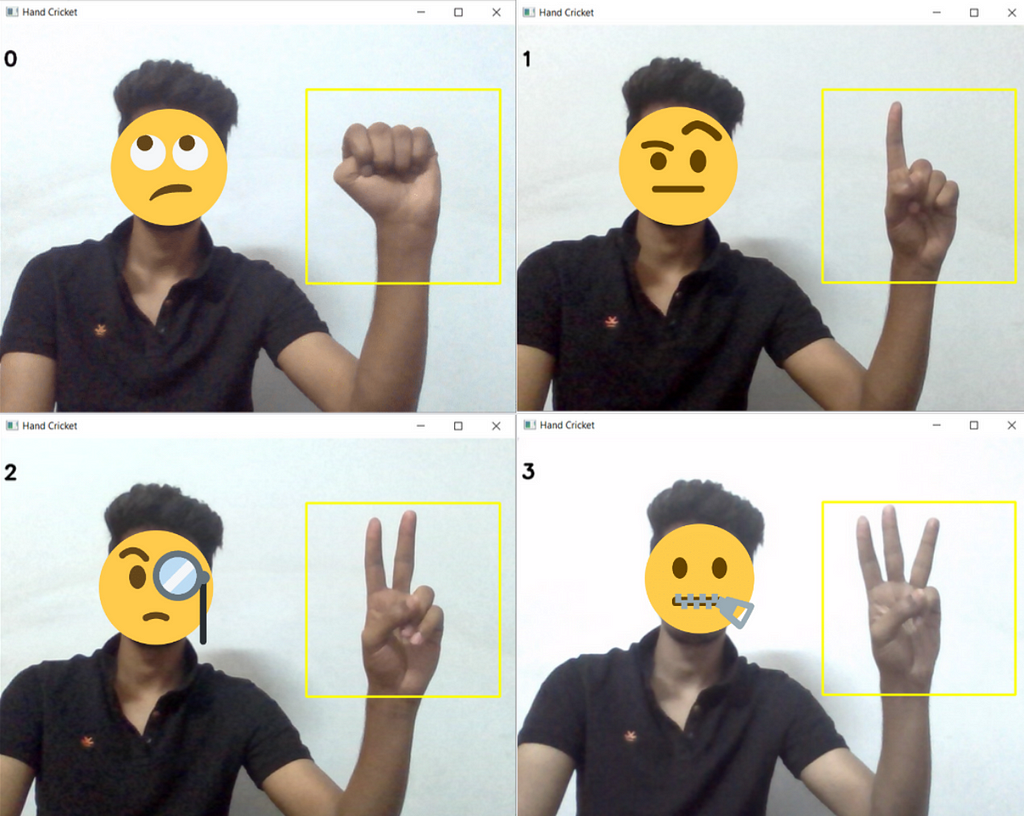
We once again use OpenCV to access the webcam because we need to implement this in real-time. There is a dedicated space on the right half of the screen for the user (batsman). The current score as well as the high score of the user is displayed on the screen (Lines 67–80).
Here’s the game in action! (Ignore the Current and High Scores. Since every second the model detects a number chosen by me (the batsman), say 5, 5 points are added to my score (batsman’s score). So every second 5 points will be added to my score until the bot randomly picks 5 as well which means Game Over for the Batsman (Me). When this happens, my current score is brought back to 0 and my game starts again)
Thank you for sticking around till the end. I put a lot of effort into this project and I hope this was a learning experience for you as well.
Until next time! Ciao!
Hand Cricket Simulation Using CNN and OpenCV was originally published in Towards AI on Medium, where people are continuing the conversation by highlighting and responding to this story.
Join thousands of data leaders on the AI newsletter. It’s free, we don’t spam, and we never share your email address. Keep up to date with the latest work in AI. From research to projects and ideas. If you are building an AI startup, an AI-related product, or a service, we invite you to consider becoming a sponsor.
Published via Towards AI
Take our 90+ lesson From Beginner to Advanced LLM Developer Certification: From choosing a project to deploying a working product this is the most comprehensive and practical LLM course out there!
Towards AI has published Building LLMs for Production—our 470+ page guide to mastering LLMs with practical projects and expert insights!

Discover Your Dream AI Career at Towards AI Jobs
Towards AI has built a jobs board tailored specifically to Machine Learning and Data Science Jobs and Skills. Our software searches for live AI jobs each hour, labels and categorises them and makes them easily searchable. Explore over 40,000 live jobs today with Towards AI Jobs!
Note: Content contains the views of the contributing authors and not Towards AI.
Related posts


Popular posts

 for 2021")


Updates

Recent Posts


