


Getting a Peak of the Big Data/Cloud Computing Workflow Using AWS
Last Updated on October 27, 2022 by Editorial Team
Author(s): Ruiz Rivera
Originally published on Towards AI the World’s Leading AI and Technology News and Media Company. If you are building an AI-related product or service, we invite you to consider becoming an AI sponsor. At Towards AI, we help scale AI and technology startups. Let us help you unleash your technology to the masses.
Although I’ve had the chance now to play with these different technologies, I’m still amazed by the convenience, portability, and computing power that Big Data and Cloud Computing technologies offer, both to consumers and businesses. From a consumer’s perspective, for example, they have the ability to access all their vital information from any device without having to worry much about losing their information or forgetting their device. From the perspective of a tech or data practitioner, they’re able to tap into the raw processing power and data storage capabilities that they would have likely never had access to if the technology had never existed. Although buzzwords like artificial intelligence, machine learning, data science, or analytics are all the hype these days, to me, advances in cloud computing and cloud storage never get enough love as one of the key drivers of innovation; allowing us to work, collaborate, and scale solutions in truly transformative ways.
Now that we’ve sung our praises for Cloud Computing out of the way let’s focus now on the data practitioner’s perspective in harnessing these technologies to leverage Big Data and generate actionable insights. In this article, I want to give a peak at a Data Scientist’s workflow when working with Big Data for those who are curious about the space, using the industry standard tools provided by Amazon Web Services (AWS). More specifically, I will be going over:
- How to access the storage and parallel processing framework, Hadoop File Storage System (HDFS);
- How to upload data into Amazon’s S3 Cloud Storage system;
- How to wrangle and analyze data at scale, using PySpark;
- How to save your work back into HDFS and move it back into S3;
- How to connect a notebook environment, such as JupyterLab or Amazon’s SageMaker.
Keep in mind there are many ways to accomplish the same task on AWS. Besides already having an AWS account, familiarity with Python, Bash, and basic programming concepts are a soft prerequisite for reaping value in this article. You’ll also need the security key that was provided to you in a .pem file when you initially signed up for an AWS account to access the virtual machines on Amazon’s EC2 platform. And with that out of the way, let’s get started!
1. Spinning up an AWS Elastic Map Reduce (EMR) cluster
The first step that’s pretty much universal across cloud computing platforms is to spin up a Hadoop cluster that allows for the storage and parallel processing that we mentioned earlier. Amazon’s EMR platform allows us to interface with Apache’s Hadoop framework to process the large dataset that we’ll be working with and is the factor we’ll have to keep at the top of mind when accounting for the cloud computing costs that Amazon will be charging us whenever we rent their resources.
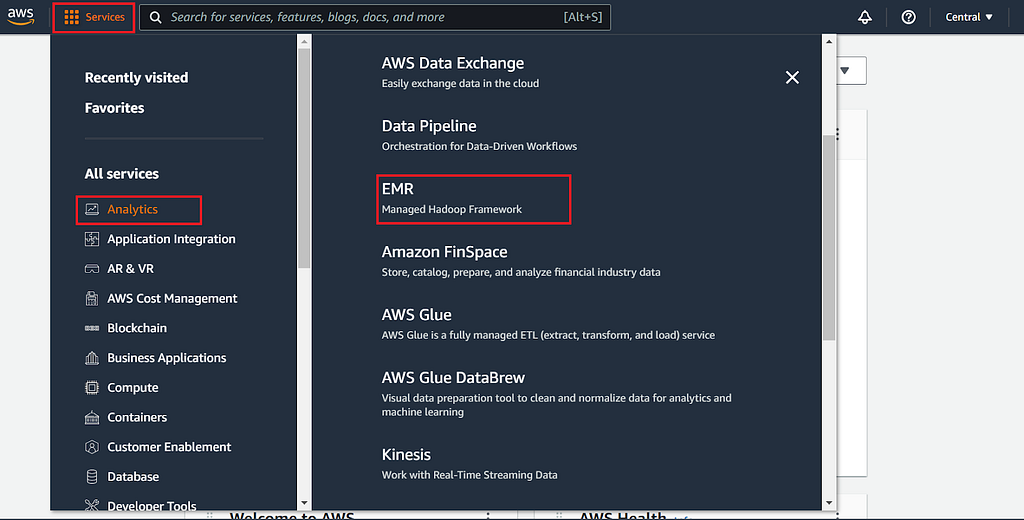
Most of the tools we’ll be using can be found on the “Services” menu bar under the “Analytics” submenu.
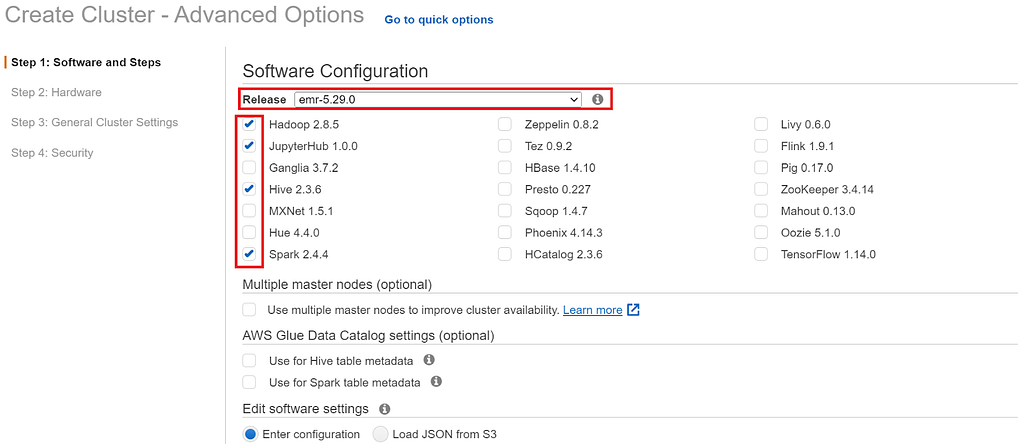
Next, we’ll want to click Create a cluster and outline the specifications we’ll need for our job in step 1. The first thing we’ll want to do here is to click the Go to the advanced settings hyperlink, as specifications for our job will be slightly more granular than those offered on the quick options settings. Navigating to the advanced settings will bring us to Step 1: Software and steps.
For this walkthrough, we’ll be using an older version of Amazon’s EMR cluster to ensure that all the tools we’ll utilize in the AWS ecosystem will work as intended. We’ll also want to check off our tooling kit for this job which in this case will be Hadoop, JupyterHub, Hive, and Spark.
For step 2, we can just leave the default settings as they are. In step 3, you’ll want to name your cluster in the cluster name input bar.
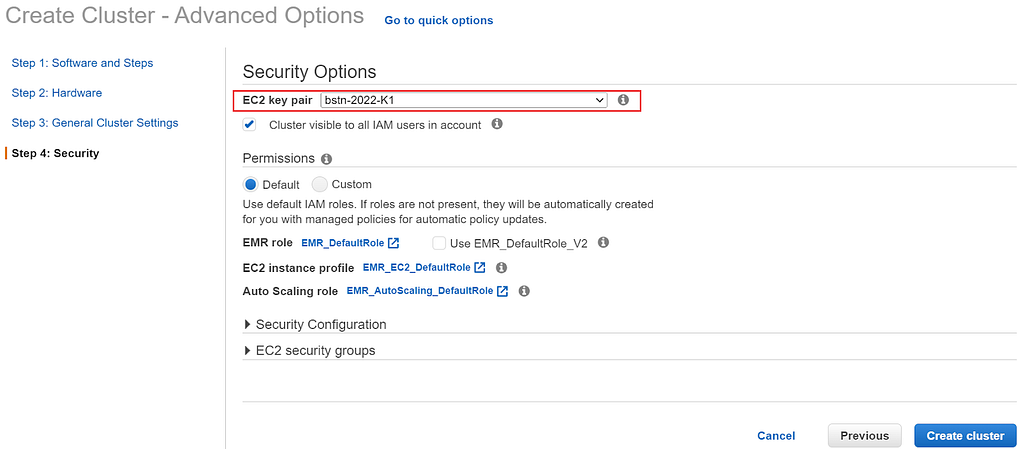
Next, move on to step 4, it’s important to specify the key pair that will give us access to EC2, the AWS virtual machine that gives us full access to the AWS ecosystem. The name of your key pair should be the same as the name you gave your .pem upon sign-up. Once you’ve specified your EC2 key pair, navigate to the bottom right-hand corner of the page and click create a cluster.
2. Using SSH to connect to the cluster’s head node
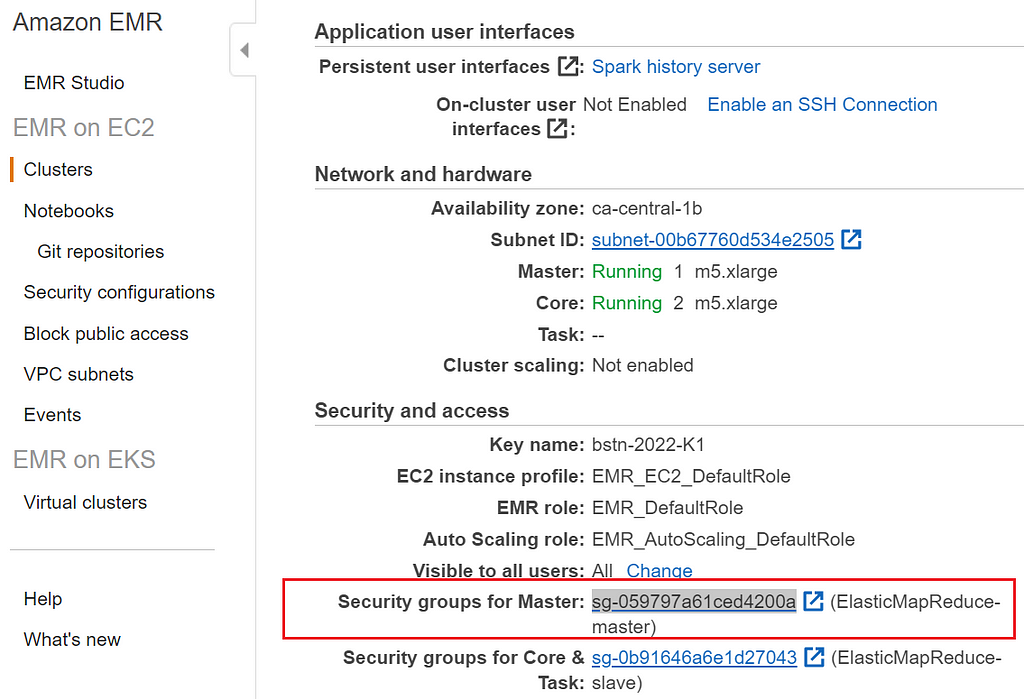
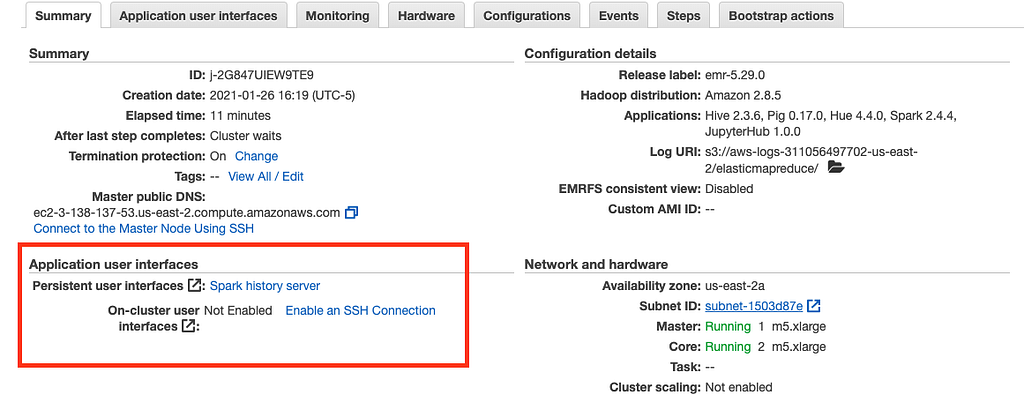
Now that we’ve configured our parameters to the specifications of our job, it will take a couple of minutes for it to be fully up and running. In the meantime, we can check to make sure that our settings are configured in such a way that we’ll be able to access our cluster’s nodes via SSH tunneling. To do so, we’ll want to make sure we’re back on the Summary tab, and under the Security and access subheader, we’ll want to click the link beside the Security groups for the Master label:
Clicking that security link will take you to the Security groups page. There you will want to right-click the security group that mentions the Master group in its description and select edit inbound rules:

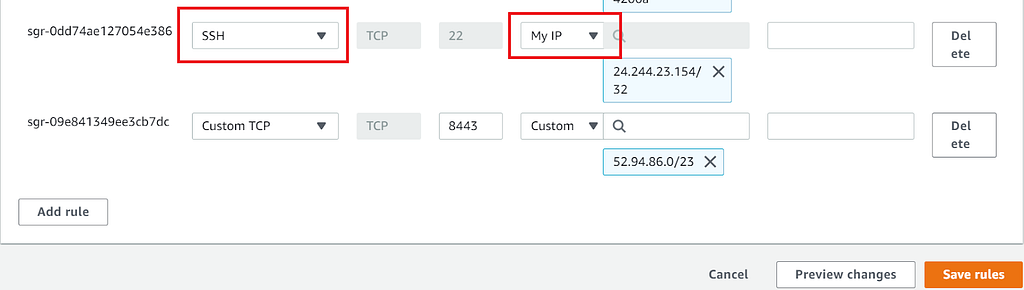
Lastly, you’ll want to ensure that one of the inbound rules has SSH pre-selected, along with the My IP option. If one of these options is missing, use the dropdown menu to select SSH. Without enabling SSH access, we wouldn’t be able to access the EC2 virtual machine interfacing with the compute cluster. Once you’ve checked for these options, go ahead and click Save Rules, then navigate back to the main summary tab. Hopefully, by now, the cluster is at least showing as Starting so that we can begin establishing the SSH connection.
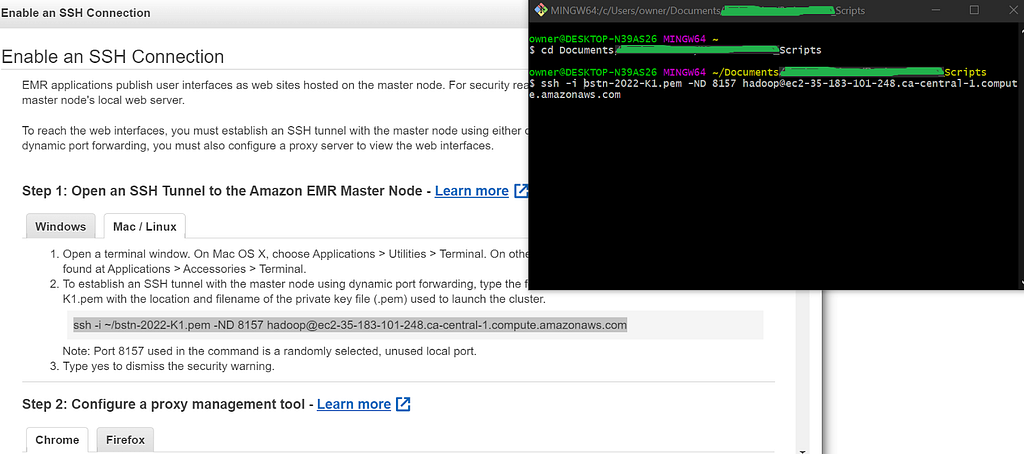
On the summary tab, under where it says Master Public DNS, click the Connect to the Master Node Using SSH hyperlink and navigate straight to the Mac/Linux tab if you already have a Bash Terminal installed in your computer, regardless of the OS. Follow the instructions listed, and it would simplify things if you were to first use the cd command on your Bash terminal to navigate directly to the directory/folder where your EC2 key is stored.
Next, copy and paste (Shift + Insert) the Bash command highlighted in the instructions to your terminal, except make sure to remove the ~/ relative file path characters before hitting Enter, then type yes when the fingerprint prompt comes up, just like in the image below:
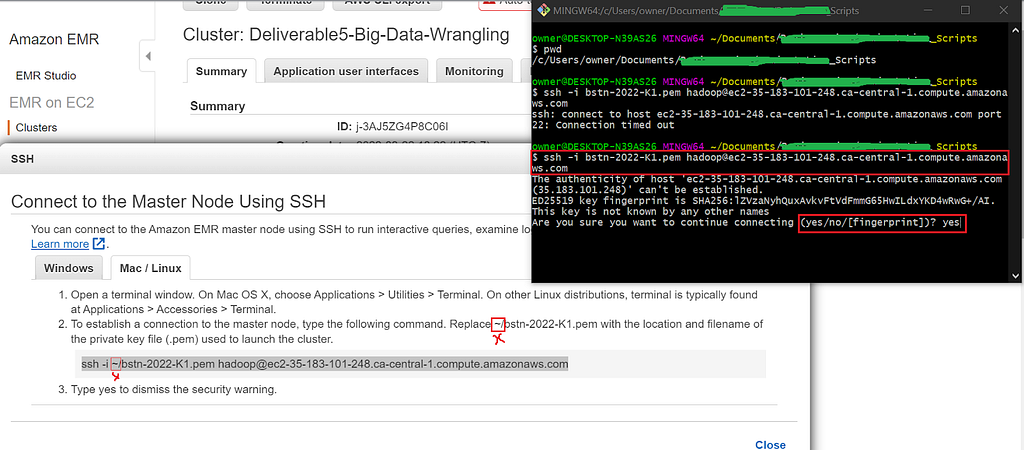
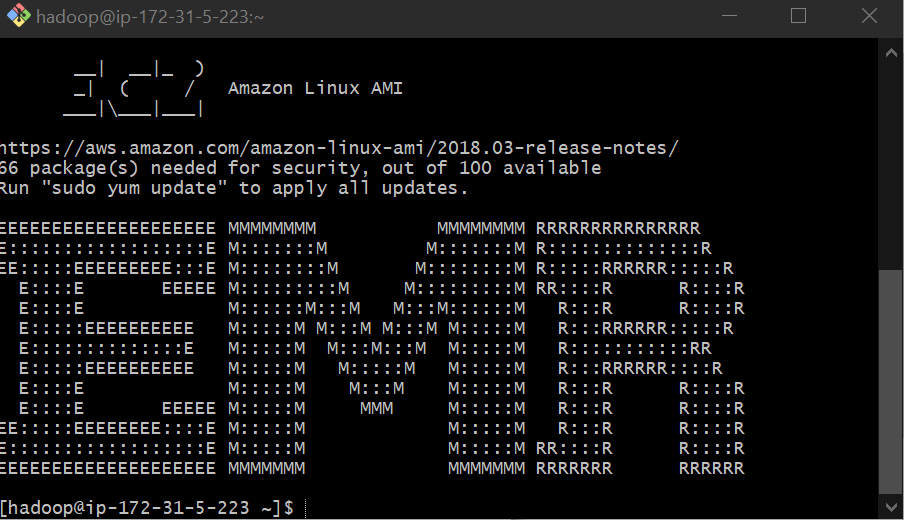
If everything went well, you should see an EMR logo on the terminal, indicating that you’re now fully connected to Amazon’s EMR computer cluster.
3. Moving files from an S3 bucket to HDFS
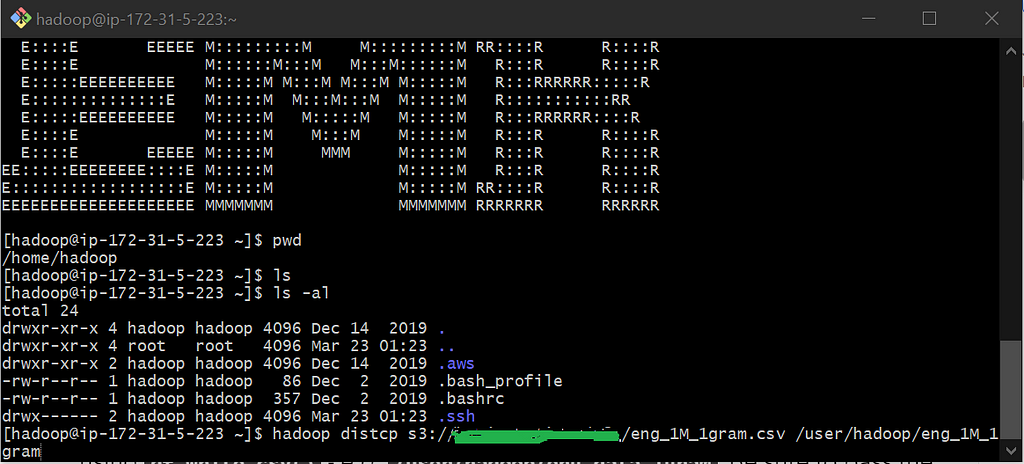
Now that we’re in the EMR Hadoop Framework let’s copy a file from a public S3 bucket into our Hadoop storage system. To do so, use the following command structure:
hadoop distcp {insert the S3 buckets address that you are copying from} {insert the hadoop directory you wish to move the file to}
It’s that easy.
Again, the command structure is:
hadoop distcp {s3 bucket} {emr directory}
4. Reading files from HDFS using PySpark
Awesome! Now that we’ve moved our CSV file from S3 to EMR let’s leverage Apache’s large-scale processing and distributed computing framework, PySpark, to read the data and do some very basic exploratory analysis.
Our first step here is to establish another SSH tunnel for us to access JupyterHub. To do so, let’s navigate back to the main summary tab. Head down to the Application user interfaces subheading and click the Enable an SSH Connection hyperlink:
This will take you to a similar-looking page as what we saw in Step 2, as we’re basically repeating the same step. The big difference between Step 2 and Step 4, in this case, is that you’ll need to open up another Bash terminal page since we’ve already dedicated the previous terminal to establishing an SSH connection with EMR.
Remember not to forget to delete the ~/ characters from the key name’s file path in the SSH command and type yes to the security prompt:
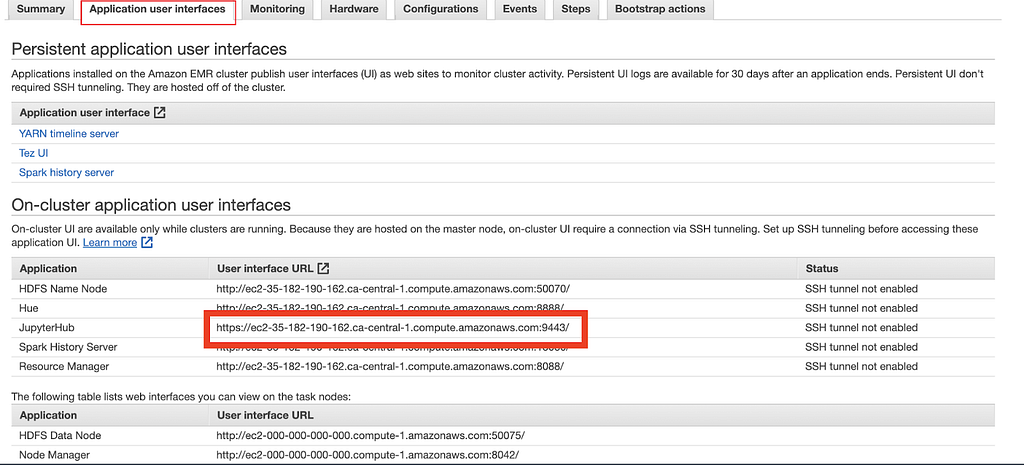
Once you’ve established the connection, navigate back to the main summary tab, click on the Application user interfaces tab right beside the summary tab, then copy and paste the User interface URL associated with JupyterHub into another browser tab:
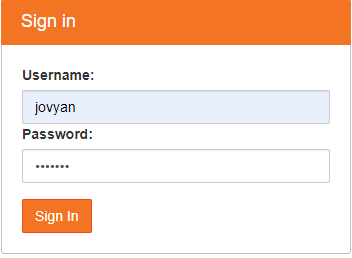
If all the instructions in Step 4 were executed correctly, we should see the following login page below for JupyterHub. You may come across a security warning from your browser when accessing the JupyterHub URL. Just ignore it and proceed to the following login page, where you can input the username and password associated with your account.
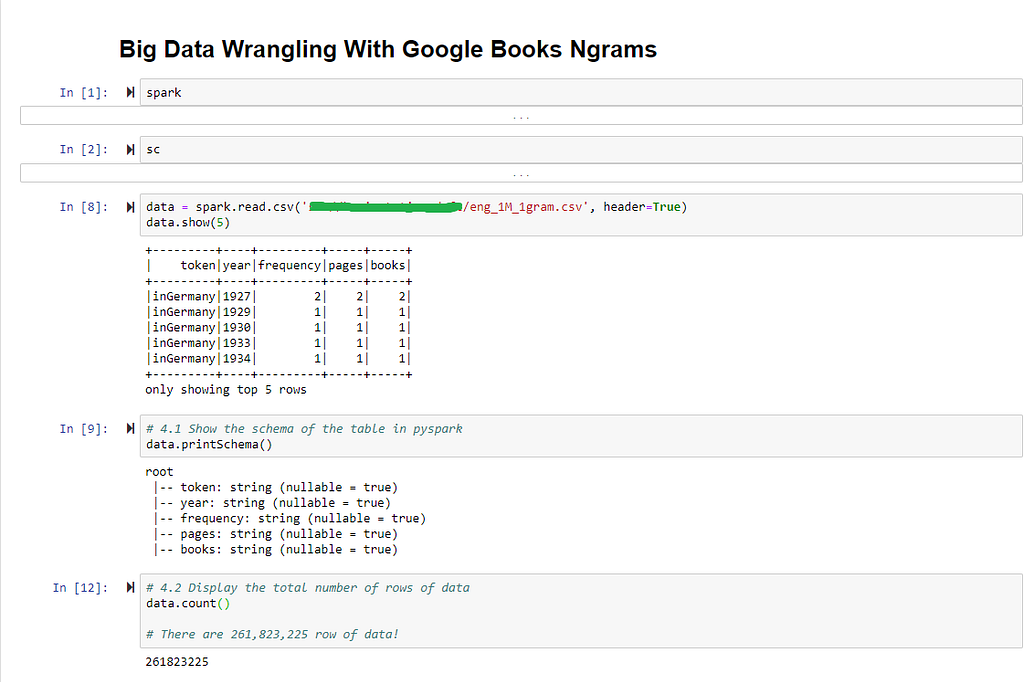
Once you’ve logged in, the interface is pretty much the same as if you were using Jupyter Notebook. With the notebook we’ve created in JupyterHub, we’ll accomplish the following tasks with PySpark:
Reading the data we copied from HDFS, using the spark.read.csv(file_path, header=True) command to convert our data into a DataFrame format that we should now be very familiar with;
- Displaying the DataFrame’s schema;
- Counting the number of rows in the DataFrame;
- Filtering rows where the token is labeled as “data,” using Spark SQL and counting the number of rows that meet this criteria;
- And lastly, save our new dataframe as its own separate file and save it in Hadoop.
- Verifying whether our data was correctly saved in Hadoop. To do this, we ran the Hadoop fs -ls bash command BEFORE running our df.write.csv() code block in Jupyter. AFTER running the last Jupyter code block, we used the Hadoop fs -ls command again to check whether the file we saved as eng_data_1gram appeared in our Hadoop directory, which it did.
Note that we’re only running simple operations for this demonstration as it generally costs money to run these scaled operations in the cloud.

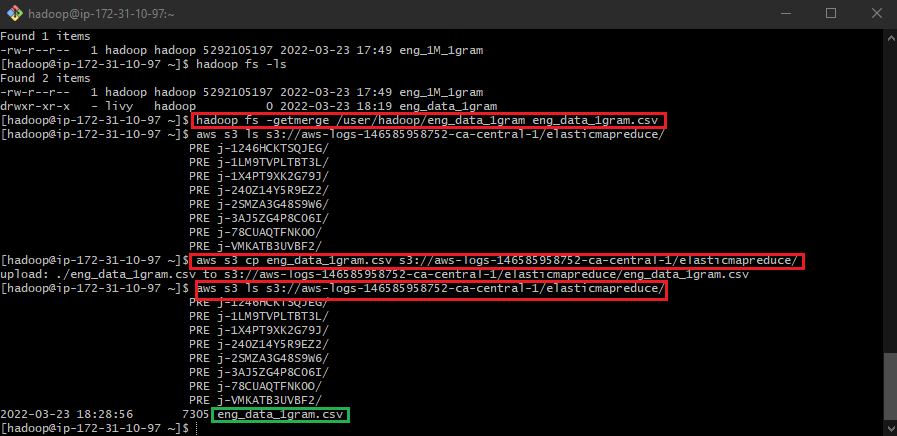
5. Merging Hadoop files and uploading them into S3
After filtering the rows containing the label “data” within the “token” column, let’s now merge it with the original file. We can accomplish this task using the following bash command structure:
hadoop fs -getmerge {filepath_doc1} {doc2_file_name}.
Once the two files have merged, we can then issue the following command structure to move our merged file into an S3 bucket:
aws s3 cp {filename.format} {s3_bucket_address}.
Lastly, you’ll want to list the contents in your S3 bucket to verify whether the file was properly sent to the destination you intended using the command:
aws s3 ls {s3_bucket_address}
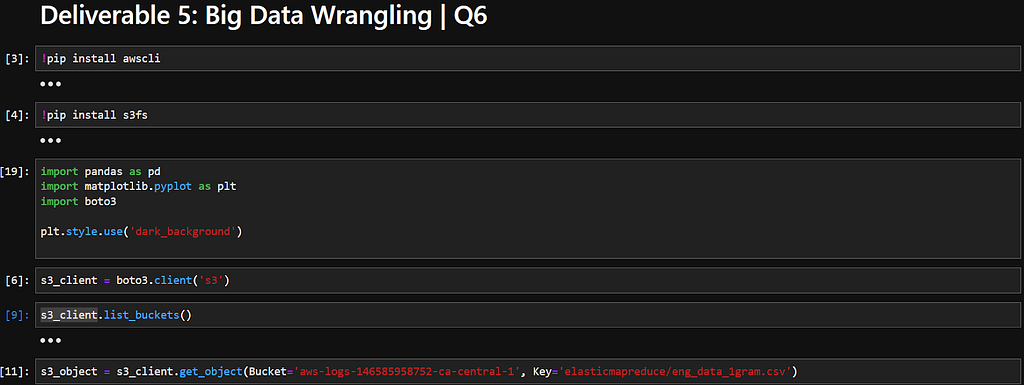
6. Reading files from S3 using SageMaker
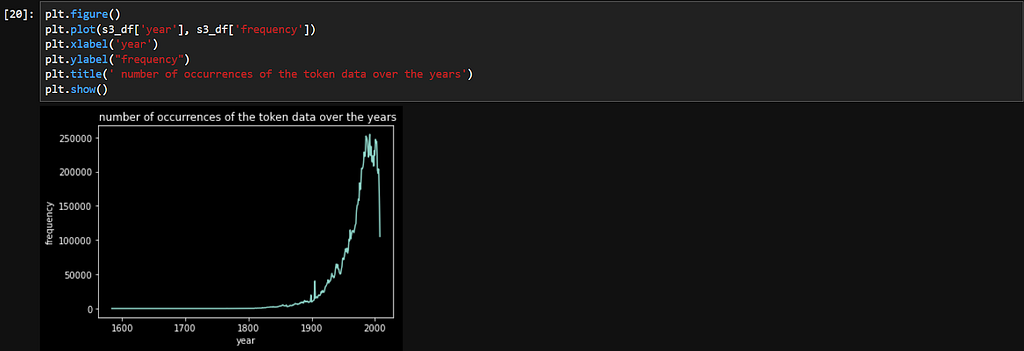
Our last action item in this exercise will be to read our filtered data from the S3 bucket using Amazon’s SageMaker notebook environment and JupyterLab, and plot a graph using traditional Data Science tools such as pandas and matplotlib.pyplot. To do so, we’ll execute the following steps:
- Configuring our notebook environment by running pip installs of awscli and s3fs;
- Importing our required packages, including the AWS package, which we’ll use to directly access our S3 bucket;
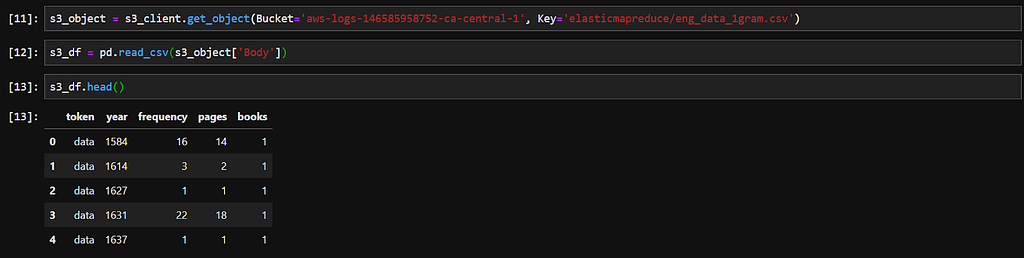
- Reading the S3 data into a pandas dataframe and plotting a line graph using matplotlib.
And that’s a wrap! I hope you found value in reading this article and were able to glean some insight into the workflow of a Big Data practitioner.
Getting a Peak of the Big Data/Cloud Computing Workflow Using AWS was originally published in Towards AI on Medium, where people are continuing the conversation by highlighting and responding to this story.
Join thousands of data leaders on the AI newsletter. It’s free, we don’t spam, and we never share your email address. Keep up to date with the latest work in AI. From research to projects and ideas. If you are building an AI startup, an AI-related product, or a service, we invite you to consider becoming a sponsor.
Published via Towards AI
Towards AI Academy
We Build Enterprise-Grade AI. We'll Teach You to Master It Too.
15 engineers. 100,000+ students. Towards AI Academy teaches what actually survives production.
Start free — no commitment:
→ 6-Day Agentic AI Engineering Email Guide — one practical lesson per day
→ Agents Architecture Cheatsheet — 3 years of architecture decisions in 6 pages
Our courses:
→ AI Engineering Certification — 90+ lessons from project selection to deployed product. The most comprehensive practical LLM course out there.
→ Agent Engineering Course — Hands on with production agent architectures, memory, routing, and eval frameworks — built from real enterprise engagements.
→ AI for Work — Understand, evaluate, and apply AI for complex work tasks.
Note: Article content contains the views of the contributing authors and not Towards AI.
Related posts
Recent Posts

")


