


FastAPI — Create and Deploy Hot Dog Detector
Last Updated on January 6, 2023 by Editorial Team
Last Updated on June 3, 2021 by Editorial Team
Author(s): Sayar Banerjee
Computer Vision
FastAPI — Create and Deploy Hot Dog Detector
And learn to containerize it using Docker
I don’t smoke, except for special occasion — Jian Yang
For those of you familiar with the hit tv-series Silicon Valley, you would have guessed the inspiration for this article.
Jimmy O. Yang’s character in Silicon Valley developed an app that uses Computer Vision to detect whether a photo is of a hot dog or not.
Today, we will look at how to replicate and deploy such an API using FastAPI and Docker.
FastAPI is one of the fastest-growing web frameworks that is used to build APIs in Python.
TL;DR: Github repository
Dataset 📊
The dataset I will be using is from Kaggle. You can find it here.
Training the Model 🏃
To train our Computer Vision model, I decided to use Jeremy Howard’s famous Fastai library.
In short, Fastai is a wrapper on top of the Pytorch library which empowers developers to rapidly develop machine learning models.
For training our hotdog classifier, we used a pre-trained Resnet34 model.
In order to get a better understanding of what other choices were taken during the training process, you can refer to the Google Colab notebook that can be found here.
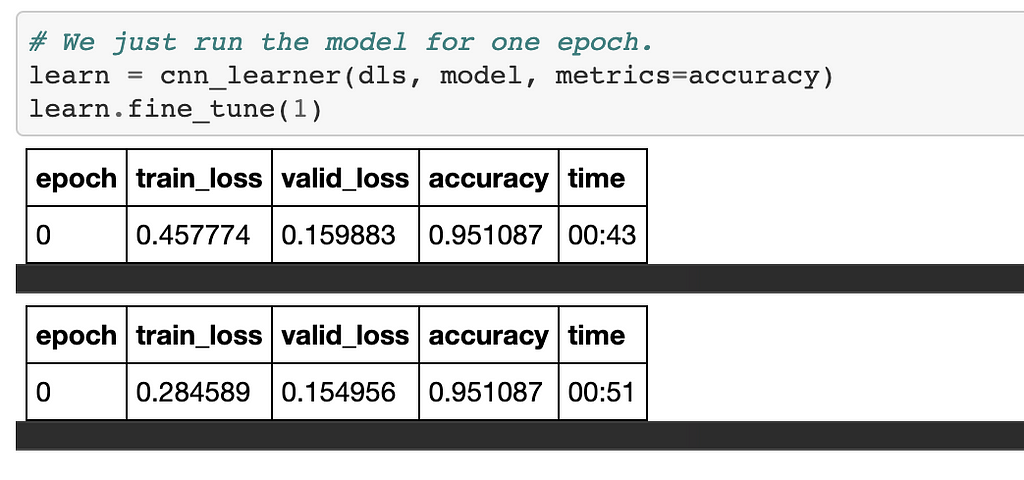
As you see, after training on just one epoch, our model achieves a 95% accuracy on the validation set.
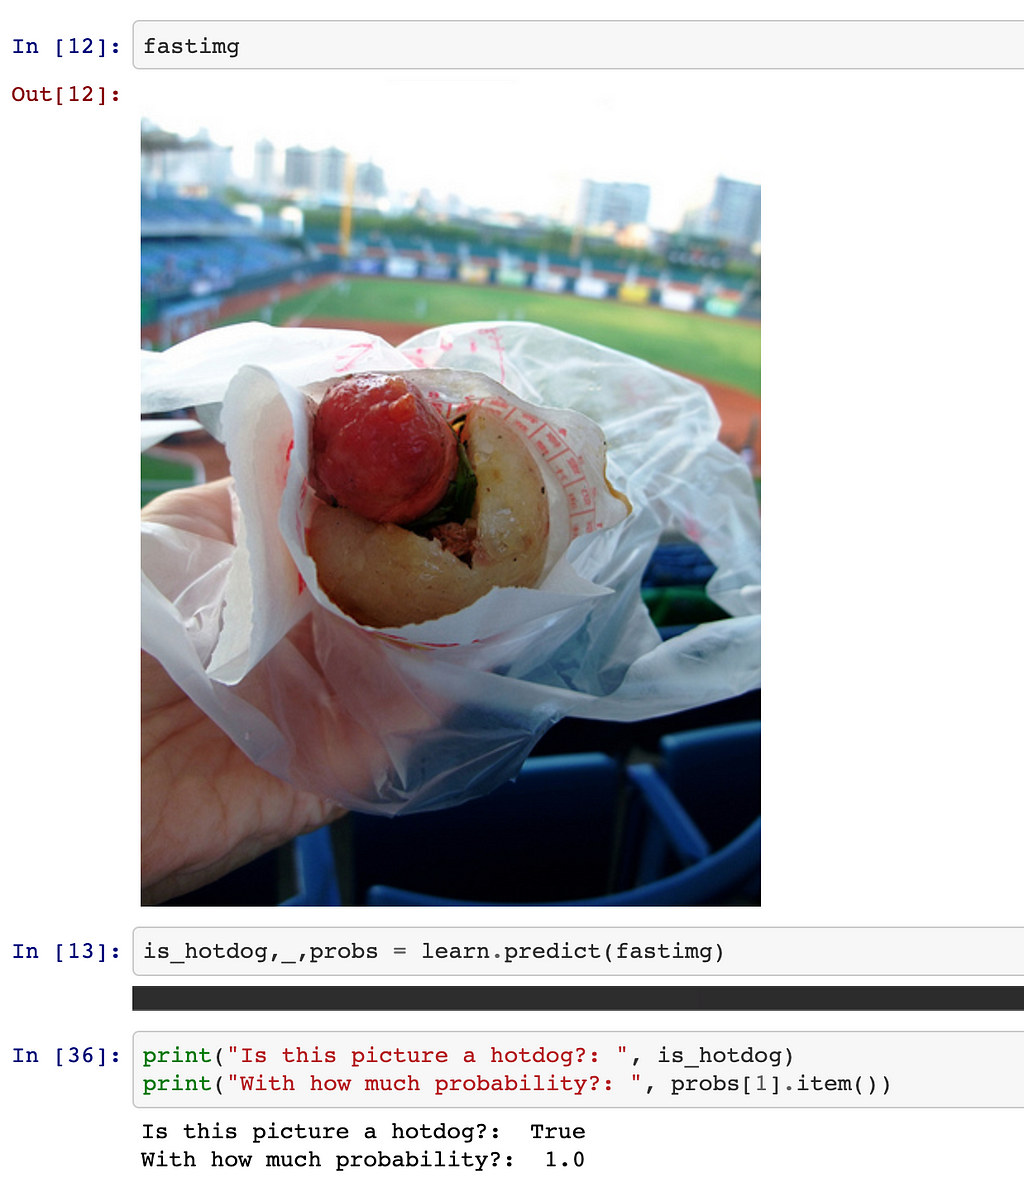
We see that our model works quite well for a sample image taken from our test set.
Creating API 💻
In this section, we will build an API to deploy our trained hotdog detector model into production.
Project Structure
.
├── LICENSE
├── README.md
├── app
│   ├── __init__.py
│   ├── json_models
│   │   ├── __init__.py
│   │   └── request.py
│   ├── main.py
│   ├── models
│   │   ├── __init__.py
│   │   └── model.pkl
│   └── utils.py
├── notebooks
│   └── HotDogOrNot.ipynb
└── requirements.txt
Most of the relevant code resides in the appdirectory. Notice that we have created a directory called models which stores our trained model file.
Before we begin, make sure to install all the requirements by running the following command from the parent directory:
$ pip3 install -r requirements.txt
Let’s have a look at our code.
utils.py
Our utils.pyfile contains three functions. Each of the three functions serves a different purpose:
read_image is quite self-explanatory. This function helps to read the image data as bytes from the request and transform it into an appropriate format in order to be fed into the model for predictions.
is_hotdog is a bit more nuanced function. This function is actually used by our fastai DataLoader for appropriately serving data to our model.
Although our model was stored in a .pkl file after training, it does not store the is_hotdog function as a whole.
Instead, it stores a reference to the function in the file. Hence, we write the function within our utils file so that when the model is loaded, it is able to successfully search for the is_hotdog function and will be able to operate as intended.
For more information about this and ImageDataLoaders, you can read the official Fastai docs and this forum thread.
Finally, our predict_hotdog function loads our model which will utilize the is_hotdog function and serve predictions. The function returns a dictionary which will serve as the response for our API.
response.py
This file that resides within the json_models directory contains aPydantic class for the response model of our API.
In short, Pydantic is a fantastic library that provides data validations using python type annotations at runtime.
This library is especially useful for building APIs and has superb interoperability with FastAPI.
As we can see, the attributes of our Response class have the same names as the keys of our predict_hotdog function.
main.py
Finally, this is the file that our application will run in production.
First, we create a FastAPI class object. Then, we decorate our predict function using this class object. @app.post indicates that our request will be a post request followed by the path for our API /predict/ .
We also have a parameter called response_model here which accepts our Pydantic model as input. This parameter is to validate our response at runtime.
Finally, our predict function has a query parameter called myfile of type UploadFile which will be used to read our image file in the API.
This variable is passed into the read_image function we saw before which will convert our image data in bytes to a PILImage object which we can easily use to feed our FastAI model.
Finally, the image is passed into our predict_hotdog function which serves predictions and returns a dictionary object as a response.
Testing 📝
In order to manually test out the API, you have to run it first.
Go to the app directory in your repo and type the following command:
$ uvicorn main:app --reload
Note: The following excerpt is taken directly from the FastAPI docs.
The command uvicorn main:app refers to:
- main: the file main.py (the Python "module").
- app: the object created inside of main.py with the line app = FastAPI().
- –reload: make the server restart after code changes. Only use for development.
On your terminal, you should see the following line:
INFO: Uvicorn running on http://127.0.0.1:8000 (Press CTRL+C to quit
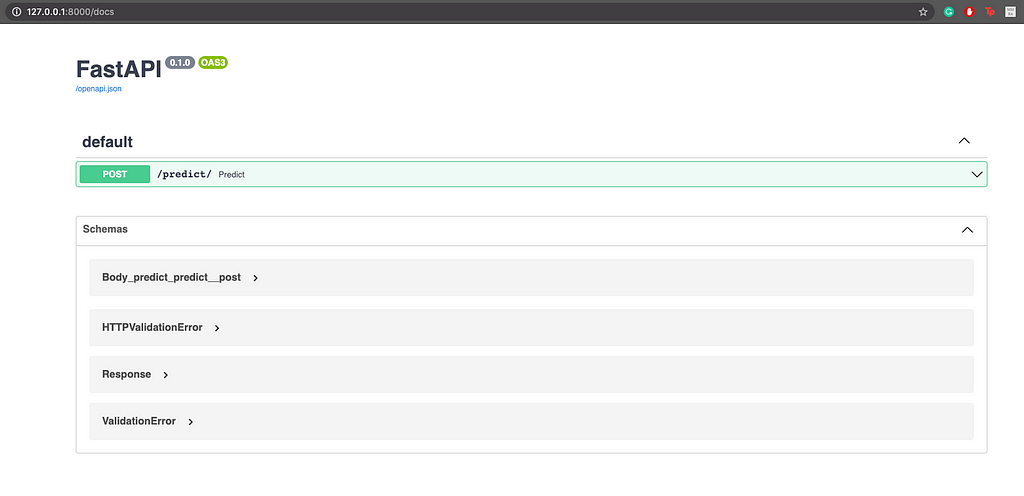
Open http://127.0.0.1:8000/docs on your browser of choice.
You should see something like this which is the Swagger documentation UI.
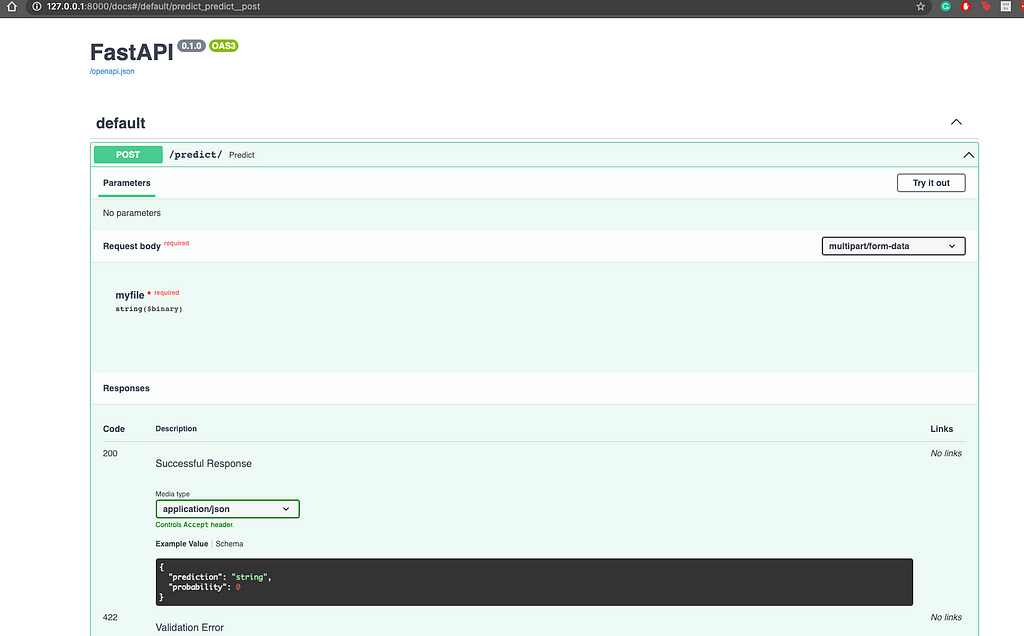
If you click on the dropdown for POST, you should be able to see the following:
Click on Try it out after which you will be prompted to upload your image. Once you do, click on execute and you will get the following:
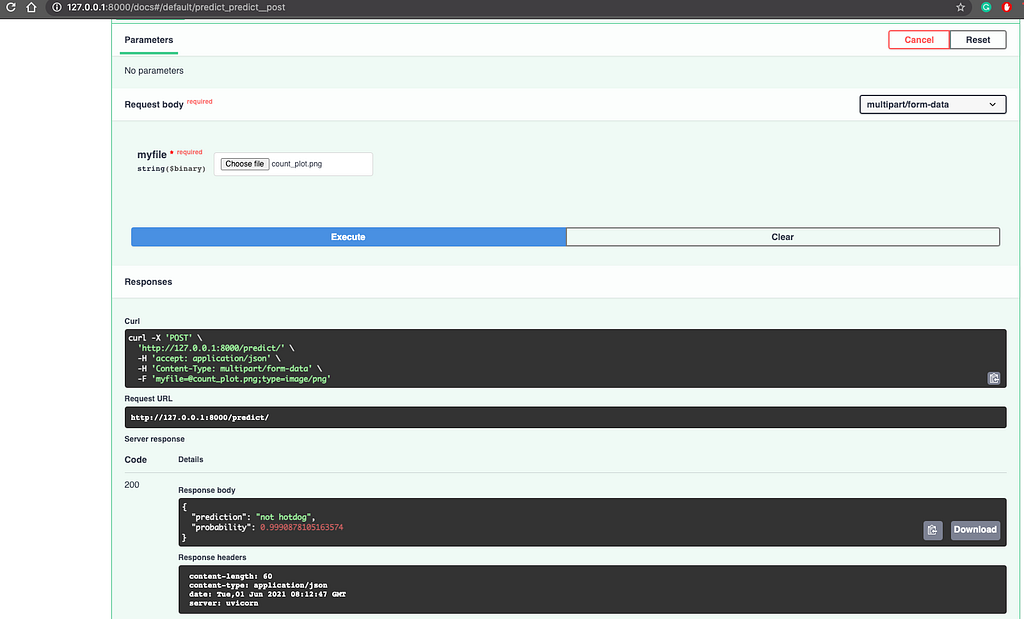
Notice that in addition to the response, the UI also generates a custom curl command for you to use from your terminal. Pretty neat right?
Dockerize 📦
So far, we have seen how to successfully deploy our hotdog detector model locally. However, in practice, one would want to be able to deploy such an application on any machine.
Hence, the best way to do this is to containerize your application using Docker.
Make sure you have Docker installed on your system before proceeding. You can install it from here.
We can leverage the official Docker image created by the creator of FastAPI in order to build our local image. Let's have a look at our Dockerfile:
FROM tiangolo/uvicorn-gunicorn-fastapi:python3.7
COPY ./app /app
COPY requirements.txt requirements.txt
RUN pip3 install -r requirements.txt
Run the following command in the terminal in order to create the image:
$ docker build -t fastimage .
After this, you can run the image in a container as follows:
$ docker run -d --name fastcontainer -p 80:80 fastimage
If you open localhost/docs on the browser, you should be able to see the Swagger UI.
Thus, now we have created our Docker image which can now be pushed to Docker Hub or any other container registry for use in production.
Congratulations! You have reached the end of this article. I hope you have enjoyed reading it. I will leave some resources to learn more about FastAPI, FastAI, and Docker. Until next time! ✋
Resources 📚
- https://fastapi.tiangolo.com/
- https://docs.fast.ai/
- https://docs.docker.com/
- https://www.tutorialspoint.com/docker/index.htm
- https://docs.fast.ai/tutorial.vision
FastAPI — Create and Deploy Hot Dog Detector was originally published in Towards AI on Medium, where people are continuing the conversation by highlighting and responding to this story.
Published via Towards AI
Towards AI Academy
We Build Enterprise-Grade AI. We'll Teach You to Master It Too.
15 engineers. 100,000+ students. Towards AI Academy teaches what actually survives production.
Start free — no commitment:
→ 6-Day Agentic AI Engineering Email Guide — one practical lesson per day
→ Agents Architecture Cheatsheet — 3 years of architecture decisions in 6 pages
Our courses:
→ AI Engineering Certification — 90+ lessons from project selection to deployed product. The most comprehensive practical LLM course out there.
→ Agent Engineering Course — Hands on with production agent architectures, memory, routing, and eval frameworks — built from real enterprise engagements.
→ AI for Work — Understand, evaluate, and apply AI for complex work tasks.
Note: Article content contains the views of the contributing authors and not Towards AI.
Related posts
Recent Posts

")


