


Do You Know VGG 16?
Last Updated on January 16, 2023 by Editorial Team
Author(s): Chinmay Bhalerao
Originally published on Towards AI.
VGG 16 from scratch with python implementation
“By far, the greatest danger of Artificial Intelligence is that people conclude too early that they understand it.”
— Eliezer Yudkowsky
There is always an architecture or framework that comes into the picture and changes the whole scenario of that domain. VGG 16 was the first CNN architecture with design principles and systematic layer planning. Many other architectures are dependent on VGG and use this structure as a base.
Let's start with,
Why do we require Convolutional neural networks and their architectures? Why can't we simply use ANN or multi-layer perceptron for images?
The following are the reasons:
- We have to send the image as a flattened one for each pixel which will act as an input. But when the image is flattened, there is a loss of spatial information. [Spatial information: information related to objects’ topography, geometry, reference, etc.]
- Handling so many pixels as weights and biases will cause a problem of vanishing gradient, and that will cause major trouble while dealing with image data.
- Even if we generate a feature map with MLP but little translation will ruin everything. in CNN, we have options like Pooling which we used for
a. Downsample feature map
b. Model’s invariance to local translations
Due to these reasons, we require CNN and its architectures.
On top of CNN, many architectures are built over time periods, like AlexNet, ZFNet[ A Bigger AlexNet], GoogLeNet, Residual Networks, and many more…
In this blog, let's understand VGG and its variations from scratch.
What is VGG?
It is a typical deep Convolutional Neural Network (CNN) design with numerous layers, and the abbreviation VGG stands for Visual Geometry Group.
The term “deep” describes the number of layers, with VGG-16 or VGG-19 having 16 or 19 convolutional layers, respectively. Innovative object identification models are built using the VGG architecture. The VGGNet, created as a deep neural network, outperforms benchmarks on a variety of tasks and datasets outside of ImageNet. It also remains one of the most often used image recognition architectures today.
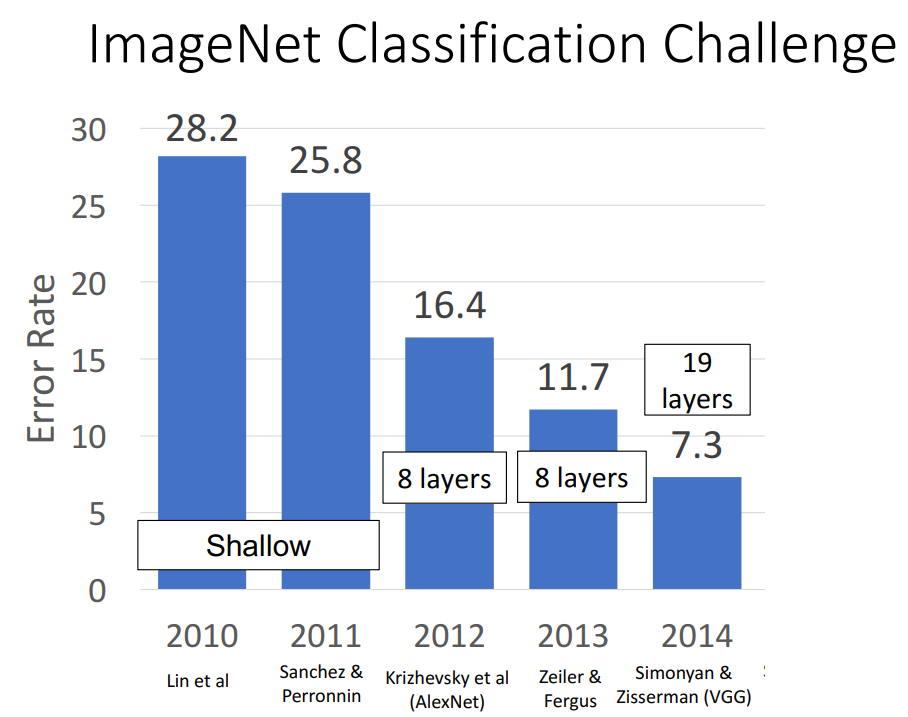
The VGG model was first proposed by Andrew Zisserman and Karen Simonyan in 2013, and a prototype was made for the 2014 ImageNet Challenge. They were a part of Oxford’s Visual Geometry Group (VGG).
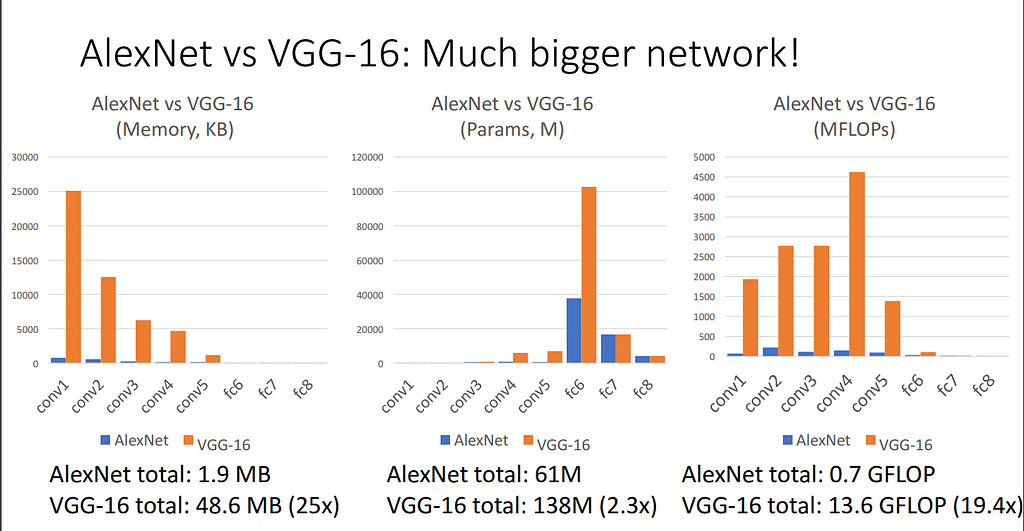
The 16 convolutional layers of VGGNet-16 are quite appealing, and their architecture is very consistent. It has several filters but only 3×3 convolutions, like AlexNet. On 4 GPUs, it can be trained for two to three weeks.
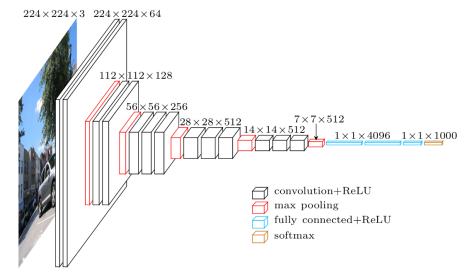
Let's see each layer in detail.
So the 16 or 19 in VGG16 or VGG19 stands for the number of layers in the architecture. Authors refer to the paper as a deeper network is better than the longer one. Rather than randomly adding layers to the networks, the authors decided to set a few rules for the design.
All convolutional layers must contain 3×3 stride 1 pad 1
All max pooling layers should have a 2×2 stride
After pooling, double the number of channels
This made design standard.
Let's start the scratch coding by importing libraries.
import cv2
import keras
import tensorflow as tf
import matplotlib.pyplot as plt
import numpy as np
from tensorflow.keras.layers import Conv2D
from tensorflow.keras.layers import MaxPooling2D
from keras.layers import Dense, Activation, Flatten
from keras.preprocessing.image import ImageDataGenerator
tf.random.set_seed(0)
Now we will read and extract image data
trdata = ImageDataGenerator()
traindata = trdata.flow_from_directory(directory="C:/Users/ChinmayB/BPRoject/train",target_size=(224,224))
tsdata = ImageDataGenerator()
testdata = tsdata.flow_from_directory(directory="C:/Users/ChinmayB/BPRoject/test", target_size=(224,224))
We will use a sequential model here.
model = keras.Sequential()
Let's write the actual first block for the network.
######## BLOCK1 ########

model.add(Conv2D(64, kernel_size = (3,3),padding = 'same',activation = "relu",input_shape = (224,224,3)))
model.add(Conv2D(64, kernel_size = (3,3),padding = 'same',activation = "relu"))
model.add(MaxPooling2D(pool_size=(2, 2), strides=(2,2)))
Now in the same way we will construct all blocks and layers
######## BLOCK1 ########

model.add(Conv2D(64, kernel_size = (3,3),padding = 'same',activation = "relu",input_shape = (224,224,3)))
model.add(Conv2D(64, kernel_size = (3,3),padding = 'same',activation = "relu"))
model.add(MaxPooling2D(pool_size=(2, 2), strides=(2,2)))

######## BLOCK2 ########

model.add(Conv2D(128, kernel_size = (3,3),padding = 'same',activation = "relu"))
model.add(Conv2D(128, kernel_size = (3,3),padding = 'same',activation = "relu"))
model.add(MaxPooling2D(pool_size=(2, 2), strides=(2,2)))


######## BLOCK3 ########

model.add(Conv2D(256, kernel_size = (3,3),padding = 'same',activation = "relu"))
model.add(Conv2D(256, kernel_size = (3,3),padding = 'same',activation = "relu"))
model.add(Conv2D(256, kernel_size = (3,3),padding = 'same',activation = "relu"))
model.add(MaxPooling2D(pool_size=(2, 2), strides=(2,2)))

######## BLOCK4 ########

model.add(Conv2D(512, kernel_size = (3,3),padding = 'same',activation = "relu"))
model.add(Conv2D(512, kernel_size = (3,3),padding = 'same',activation = "relu"))
model.add(Conv2D(512, kernel_size = (3,3),padding = 'same',activation = "relu"))
model.add(MaxPooling2D(pool_size=(2, 2), strides=(2,2)))

######## BLOCK5 ########

model.add(Conv2D(512, kernel_size = (3,3),padding = 'same',activation = "relu"))
model.add(Conv2D(512, kernel_size = (3,3),padding = 'same',activation = "relu"))
model.add(Conv2D(512, kernel_size = (3,3),padding = 'same',activation = "relu"))
model.add(MaxPooling2D(pool_size=(2, 2), strides=(2,2)))

######## Dense ########

model.add(Flatten())
model.add(Dense(4096,activation = 'relu'))
model.add(Dense(4096,activation = 'relu'))
model.add(Dense(3, activation = "softmax"))
After writing all layers in the network, at last, we will build the model.
model.build()
model.summary()
We can see the total config file and how many parameters we have.

Model: "sequential"
_________________________________________________________________
 Layer (type)                Output Shape              Param #
=================================================================
 conv2d (Conv2D)             (None, 224, 224, 64)      1792

 conv2d_1 (Conv2D)           (None, 224, 224, 64)      36928

 max_pooling2d (MaxPooling2D  (None, 112, 112, 64)     0
 )

 conv2d_2 (Conv2D)           (None, 112, 112, 128)     73856

 conv2d_3 (Conv2D)           (None, 112, 112, 128)     147584

 max_pooling2d_1 (MaxPooling  (None, 56, 56, 128)      0
 2D)

 conv2d_4 (Conv2D)           (None, 56, 56, 256)       295168

 conv2d_5 (Conv2D)           (None, 56, 56, 256)       590080

 conv2d_6 (Conv2D)           (None, 56, 56, 256)       590080

 max_pooling2d_2 (MaxPooling  (None, 28, 28, 256)      0
 2D)

 conv2d_7 (Conv2D)           (None, 28, 28, 512)       1180160

 conv2d_8 (Conv2D)           (None, 28, 28, 512)       2359808

 conv2d_9 (Conv2D)           (None, 28, 28, 512)       2359808

 max_pooling2d_3 (MaxPooling  (None, 14, 14, 512)      0
 2D)

 conv2d_10 (Conv2D)          (None, 14, 14, 512)       2359808

 conv2d_11 (Conv2D)          (None, 14, 14, 512)       2359808

 conv2d_12 (Conv2D)          (None, 14, 14, 512)       2359808

 max_pooling2d_4 (MaxPooling  (None, 7, 7, 512)        0
 2D)

 flatten (Flatten)           (None, 25088)             0

 dense (Dense)               (None, 4096)              102764544

 dense_1 (Dense)             (None, 4096)              16781312

 dense_2 (Dense)             (None, 3)                 12291
Lastly, we added a plain neural network or flattened network as it will be our decision node. This was the first network that had principles for designing.
result = model.predict(np.array([img]))
print(result)
There are a lot of advantages of VGG against its predecessors.
The community now views it as the best option for extracting characteristics from photos. The weight configuration of the VGGNet is openly accessible and has been employed as a standard feature extractor in numerous different applications and challenges. As per its paper, VGG 16 is able to classify 1000 images of 1000 different categories with 92.7% accuracy.
If you have found this article insightful
If you found this article insightful, follow me on Linkedin and medium. you can also subscribe to get notified when I publish articles. Let’s create a community! Thanks for your support!
If you want to support me :
As Your following and clapping is the most important thing, but you can also support me by buying coffee. COFFEE.
You can also read my blogs related to
- 10 AI Websites That Will Excite You to The Core! Part:2
- Feature selection techniques for data
- A Chatbot With the Least Number of Lines Of Code
- Genetic Algorithm Optimization
Signing off,
CHINMAY BHALERAO
Do You Know VGG 16? was originally published in Towards AI on Medium, where people are continuing the conversation by highlighting and responding to this story.
Join thousands of data leaders on the AI newsletter. Join over 80,000 subscribers and keep up to date with the latest developments in AI. From research to projects and ideas. If you are building an AI startup, an AI-related product, or a service, we invite you to consider becoming a sponsor.
Published via Towards AI
Towards AI Academy
We Build Enterprise-Grade AI. We'll Teach You to Master It Too.
15 engineers. 100,000+ students. Towards AI Academy teaches what actually survives production.
Start free — no commitment:
→ 6-Day Agentic AI Engineering Email Guide — one practical lesson per day
→ Agents Architecture Cheatsheet — 3 years of architecture decisions in 6 pages
Our courses:
→ AI Engineering Certification — 90+ lessons from project selection to deployed product. The most comprehensive practical LLM course out there.
→ Agent Engineering Course — Hands on with production agent architectures, memory, routing, and eval frameworks — built from real enterprise engagements.
→ AI for Work — Understand, evaluate, and apply AI for complex work tasks.
Note: Article content contains the views of the contributing authors and not Towards AI.
Related posts
Recent Posts


