


Create a Biometric Authenticator Using Deep Learning
Last Updated on January 3, 2022 by Editorial Team
Author(s): Abhishek Jana
Originally published on Towards AI the World’s Leading AI and Technology News and Media Company. If you are building an AI-related product or service, we invite you to consider becoming an AI sponsor. At Towards AI, we help scale AI and technology startups. Let us help you unleash your technology to the masses.
Create a Biometric Authenticator Using Deep Learning
Create a fingerprint authenticator using deep learning.
What is biometric authentication?
Biometric authentication is a mode of verifying a user based on some part of their physical features. Authentication is different from identification, where biometrics such as fingerprint, face, retina scan, etc. are used to identify a person. In authentication, biometrics are used to verify if a user is what they are claiming to be.
Importance of biometric authenticator
This is one of the most popular forms of security when it comes to digital identity. For example, many digital devices like mobiles, laptops use some form of authenticator like fingerprint, facial recognition to verify the user. This is another layer of security on top of the usual password protection.
How to use One-Shot classification and Siamese network to create a fingerprint authentication?
In this article, we will try to use fingerprint authentication using deep learning. This is inspired by Andrew Ng’s deep learning specialization course on Coursera
One-Shot Classification
In the case of standard identification methods, a set of images are fed into the Artificial neural network(ANN) to get an output probability of different classes. For example, if we want to identify between a cat and a dog we want to collect a lot of images (possibly more than 500 images per class) to improve the model accuracy. The drawback of this type of network in fingerprint identification is:
- It is nearly impossible to get a lot of images and,
- If we want to include a new user in our database, we need to retrain the model to identify the new user as well.
It is for these reasons that One-shot classification proves useful as we can use some pre-trained models (like ImageNet) and treat the task as a “difference evaluation problem” instead of a classification problem. That is where the siamese network comes into the picture.
Siamese Network
A siamese network (sometimes called a twin neural network) is an ANN that learns to differentiate between two inputs instead of classifying. It takes two input images, runs through the same network simultaneously, and generates two vector embeddings of the images which are run through a logistic loss to calculate a similarity score between the two images. This is very useful as it does not require many data points to train the model. Secondly, we only need to store one image of the user as a reference image and calculate the similarity for every new instance presented to the network.
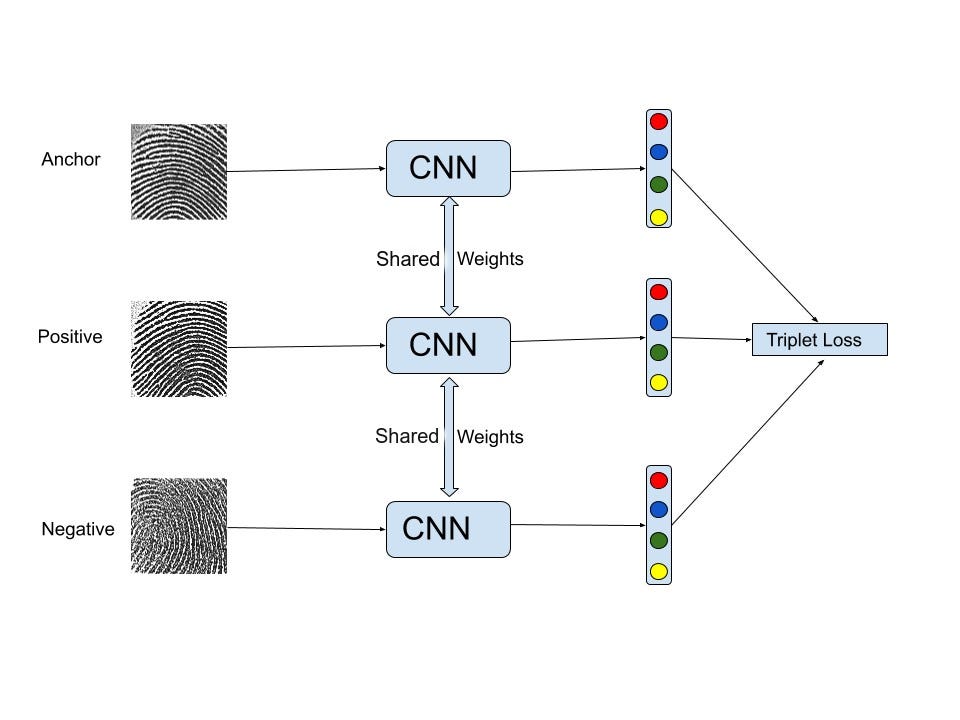
Our Siamese network architecture is depicted in the figure above.
The Loss Function
Even though, logistic loss works well with the siamese network. We used a triplet loss function with Siamese networks for this work. The benefit of using a triplet loss function (explained in the next subsection) in conjunction with a Siamese network is twofold:
1. It extracts more features by learning to maximize the similarity between two similar images (Anchor-Positive) and the distance between two different images (Anchor- Negative) at the same time.
2. It generates more training samples than logistic loss. If we have P similar pairs and N dissimilar pairs then for the logistic loss we will have P + N total training samples. Whereas, we will have PN triplets for training. This will improve the model accuracy.
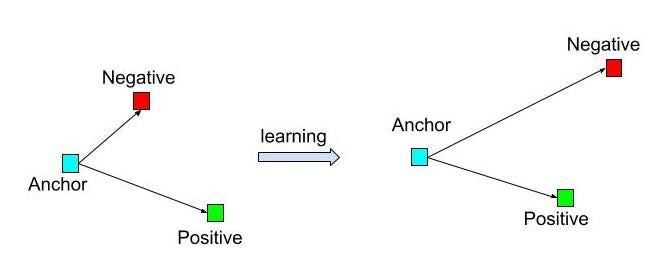
The triplet loss architecture is shown in the figure above.
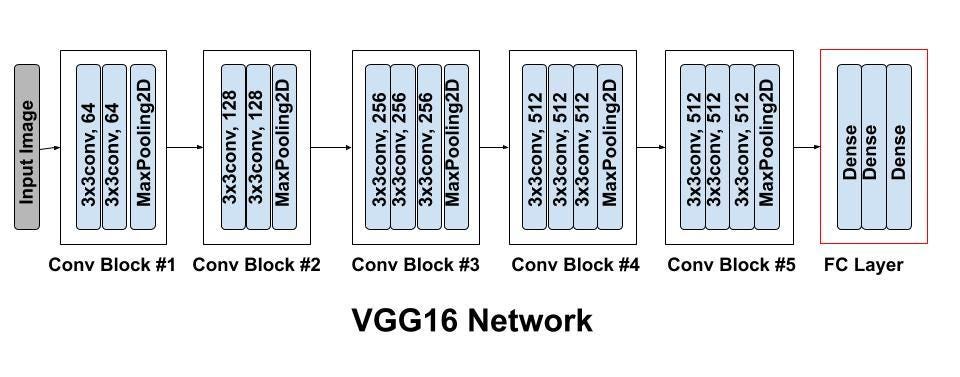
Finally, for the classifier, we used a modified VGG16 model architecture with weights pre-trained on ImageNet using Keras. The model architecture for VGG16 is shown above.
The Set-Up
We first create the triplet loss layer and attach it to our model.
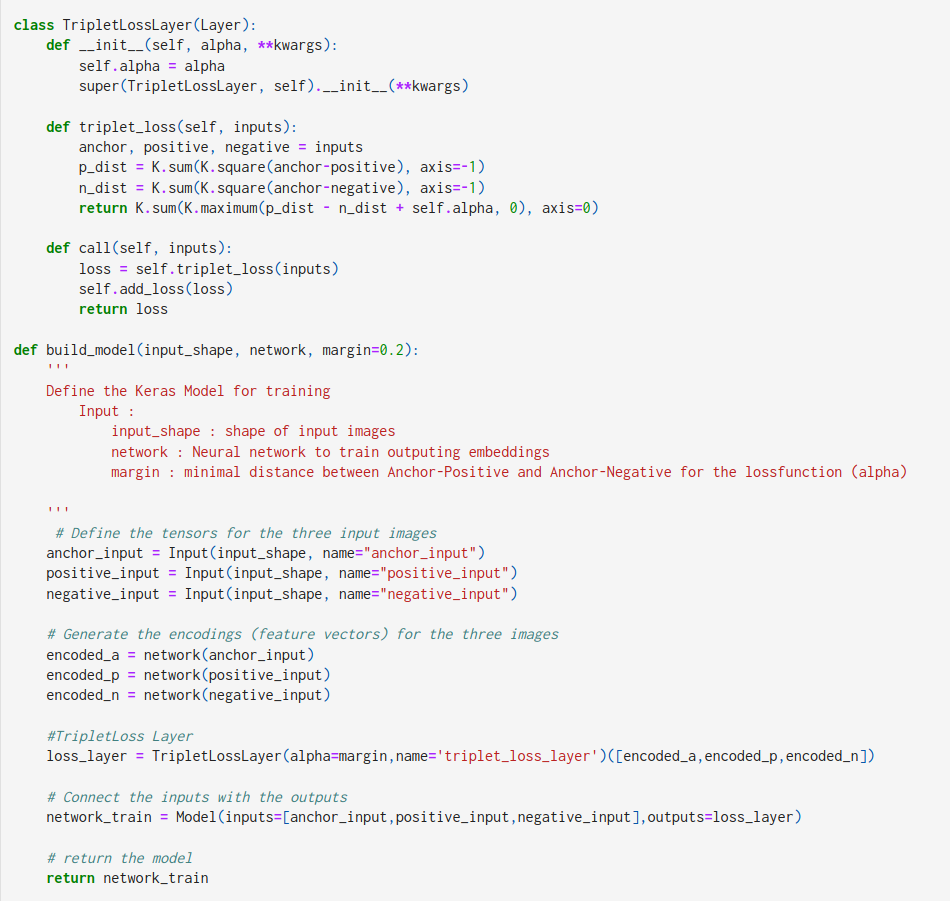
From the above code, the TripletLossLayer function creates the triplet loss function and the build_model function attaches the loss function to the neural network (in our case VGG16).
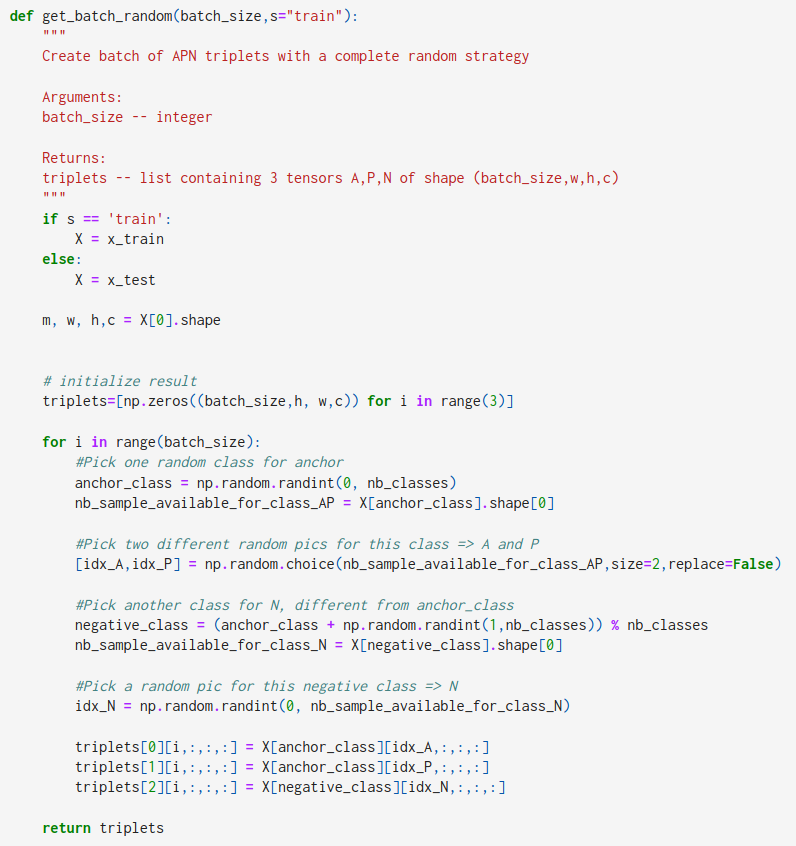
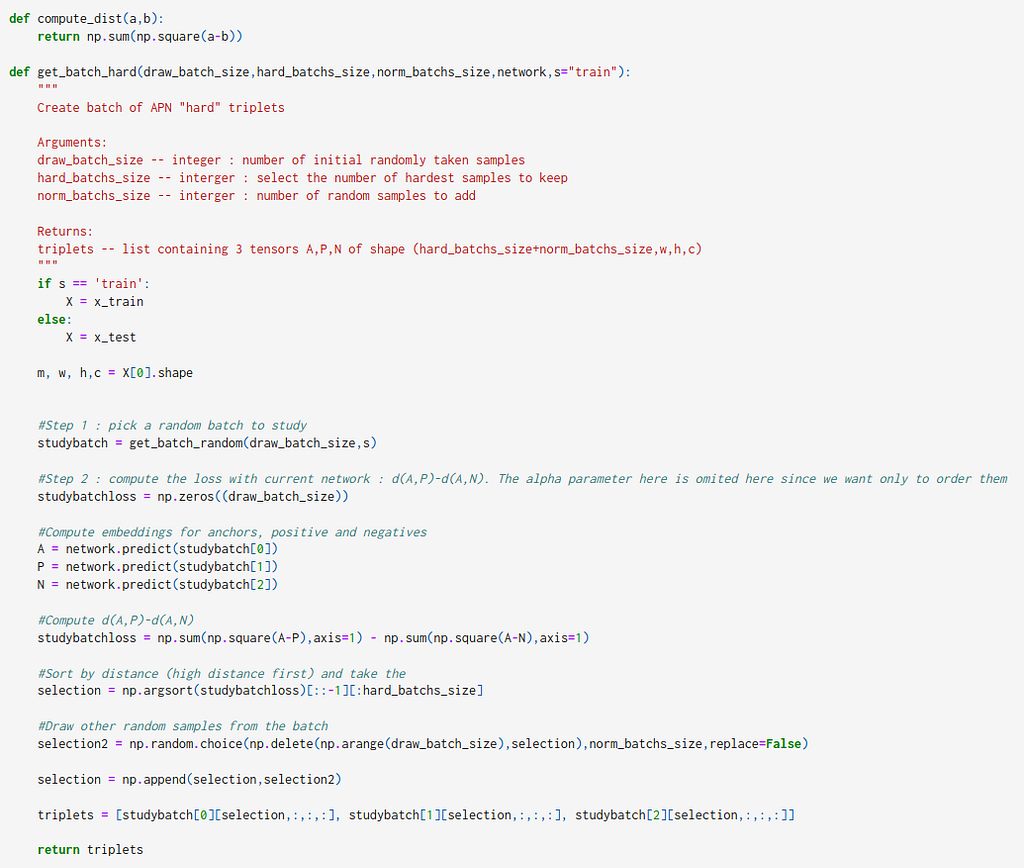
Prepare Batch for Training
Now our model is built, we need to prepare the triplets to feed into the network. We decided to generate 50% random/easy triplets and 50% hard triplets to prevent the network from overfitting. The following code shows how to do it.
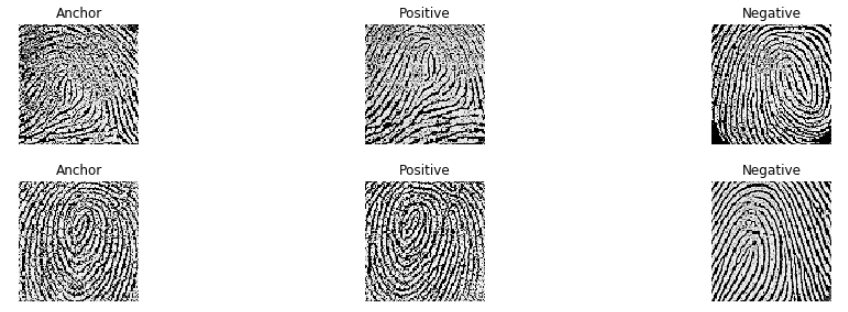
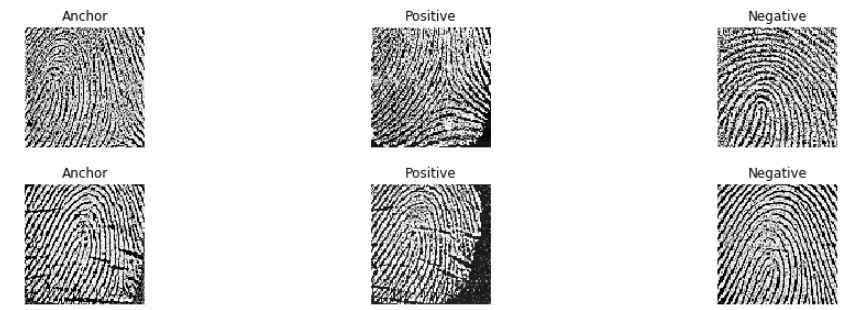
Here’s how the “easy” and “hard” batches look like.
Evaluation
Dataset: We used the FVC2006 Dataset for this project. The database consists of 4 distinct subsets DB1, DB2, DB3, and DB4. Each database consists of 150 fingers and 12 impressions per finger. Each subset is further divided into “set A” and “set B” where “set A” contains 140×12 images and “set B” contains 10×12 images. We only used DB1, which has an image size of 96×96 but we expect similar results with the other databases.
Training Data: For training, we took 10 impressions per finger from DB1-A (total of 140×10 images) and generated the triplet pairs. We used 50% “hard” and 50% “easy” triplet pairs.
Testing Data: For testing, we used 2 impressions per finger from DB1-A (total of 140×2 images).
Once the model is trained, we create a database of 140 images. For the verification, we compute the norm distance between the input image and the image from the database, and if the distance is greater than some threshold distance, we count them as “mismatch” and vice-versa.
Results: We obtained 95.36% accuracy on the testing data (13 mismatches out of 280 fingerprint impressions), with a decoding region radius of 0.7 for all users.
Final Remarks
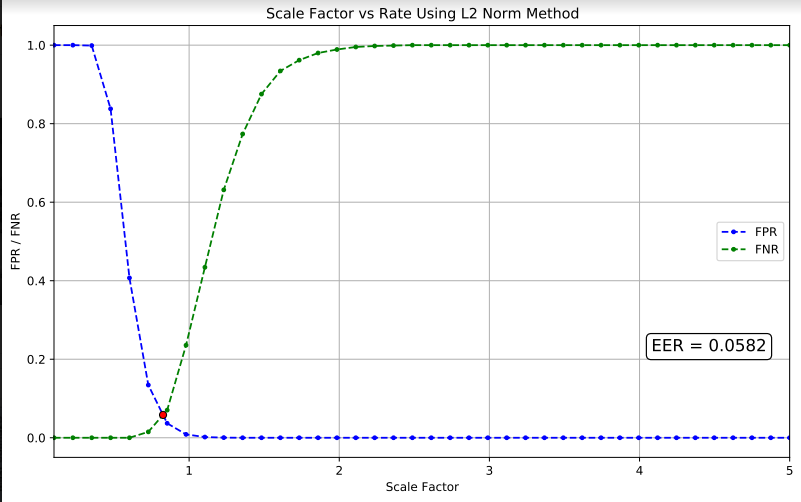
One question still remains is how did we come up with the threshold distance of 0.7?
There are two ways to determine this,
- Once the embeddings are stored in the database, we choose any threshold distance (in our case 0.7) and scale the data for a certain range to find out the Equal Error Rate(EER), and choose our scale factor according to that.
- Alternatively, we can vary the threshold distance and find the EER.
We choose the former method and the graph of False Positive Rate(FPR) and False Negative Rate(FNR) vs Scale Factor is attached below.
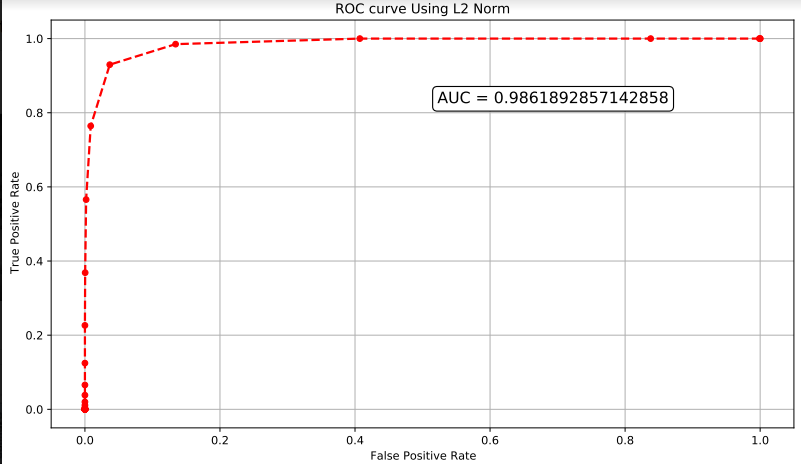
For completeness, we show the Receiver Operating Characteristic(ROC) to calculate the area under the curve(AUC). AUC closer to 1 means the classifier is close to perfect.
Conclusion
In conclusion, triplet loss with a siamese network is a great way to create a fingerprint authenticator.
For a certain threshold distance, we can scale the embeddings and calculate the EER to find the optimal accuracy for the model.
Future Work
This work can be further extended in the following ways,
- Perform similar tests on other biometrics like retina scans, facial images, etc.
- Since VGG16 is a relatively “heavy” network, it will have performance penalties on time. We can try some lightweight networks to test out the accuracy.
A detailed description of the project can be found here. The article related to the project can be found here.
References:
- Deep learning specialization on Coursera.
- https://arxiv.org/pdf/2003.08433.pdf
- https://github.com/abhishek-jana/Fingerprint-Recognition/blob/master/Fingerprint%20Verification%20Using%20Triplet%20loss%20function.ipynb
- http://bias.csr.unibo.it/fvc2006/
- https://en.wikipedia.org/wiki/False_positives_and_false_negatives
- https://en.wikipedia.org/wiki/False_positive_rate
- https://en.wikipedia.org/wiki/Biometrics
Deep Learning was originally published in Towards AI on Medium, where people are continuing the conversation by highlighting and responding to this story.
Join thousands of data leaders on the AI newsletter. It’s free, we don’t spam, and we never share your email address. Keep up to date with the latest work in AI. From research to projects and ideas. If you are building an AI startup, an AI-related product, or a service, we invite you to consider becoming a sponsor.
Published via Towards AI
Towards AI Academy
We Build Enterprise-Grade AI. We'll Teach You to Master It Too.
15 engineers. 100,000+ students. Towards AI Academy teaches what actually survives production.
Start free — no commitment:
→ 6-Day Agentic AI Engineering Email Guide — one practical lesson per day
→ Agents Architecture Cheatsheet — 3 years of architecture decisions in 6 pages
Our courses:
→ AI Engineering Certification — 90+ lessons from project selection to deployed product. The most comprehensive practical LLM course out there.
→ Agent Engineering Course — Hands on with production agent architectures, memory, routing, and eval frameworks — built from real enterprise engagements.
→ AI for Work — Understand, evaluate, and apply AI for complex work tasks.
Note: Article content contains the views of the contributing authors and not Towards AI.
Related posts
Recent Posts


")

