


CPU Real-time Face Detection With Python
Last Updated on January 6, 2023 by Editorial Team
Last Updated on October 3, 2022 by Editorial Team
Author(s): Rokas Balsys
Originally published on Towards AI the World’s Leading AI and Technology News and Media Company. If you are building an AI-related product or service, we invite you to consider becoming an AI sponsor. At Towards AI, we help scale AI and technology startups. Let us help you unleash your technology to the masses.
This tutorial will teach us to detect the faces and face landmarks in the image, video, or webcam stream using the MediaPipe library and display it!
Is it possible to implement real-time performance object detection models without a GPU? MediaPipe face detection is a proof of concept that makes it possible to run single-class face detection in real-time on almost any CPU.
What is the problem?
There may be many scenarios where a single class object detection is required. For instance, we want to detect the location of all objects belonging to a single class. For example, we could detect faces for a face identification system or track faces in real-time camera conversation.
What is more, most of the time, we would like to run these models in real time. To achieve this, we have to capture frames pretty fast, and our model should run inference on these frames even quicker! This allows us to process images as soon as they are available.
The most accessible and used solution to solve this task a few years ago (and many others in computer vision) was to perform transfer learning on previously trained models (in general, standard models trained on massive datasets like those found in Tensorflow Hub or TF Object Detection API).
The general object detection models (as mentioned above) fail to run in real time without a GPU. Many trained object detection architectures (e.g., YOLO, FasterRCNN, SSD) achieve impressive accuracy within a real-time inference running on GPUs. However, having a dedicated GPU to achieve real-time inference just for fun is not viable and not worth it.
The models I mentioned are dedicated to solving multi-class detection problems. Detecting only a face in an image is more straightforward than detecting cars, people, traffic signs, and dogs (all within the same model). If we define more detailed tasks, we can assume that the network needs to learn fewer features to perform the job.
Introduction:
This tutorial will teach us to detect the faces in the image, video, or webcam stream using the MediaPipe library. Plenty of similar algorithms and models could perform the same task. Here we will walk through the detection pipeline with the help of the Mediapipe library and undergo a step-by-step code explanation.
Before moving ahead, don’t confuse face detection with facial landmark detection. Face detection detects your entire face and draws a rectangular box. Facial landmarks detect facial features, such as the nose, eyes, mouth, and ears. In this tutorial, we’ll catch both simultaneously because the MediaPipe face detection algorithms offer both in one model.
IMAGE
Few face detection applications:
- Face detection is only one step before face recognition because before we can recognize a face, we first need to localize it;
- Face emotion recognition is another widely applied use case of face detection;
- So, that application recognizes our faces when we use our smartphone’s lock screen. Face detection is the first step to be followed;
- Security companies use facial recognition to protect their premises;
- Immigration checkpoints use facial recognition to enforce more intelligent border control;
- Fleet companies can use facial recognition to secure their vehicles;
- The ride-sharing companies can use facial recognition to ensure the correct drivers pick up the right passengers;
- Facial recognition is useful for IoT because it allows improving security measures and automatic access control in the home;
- Facial recognition technology as part of AI-powered surveillance systems can be used by Law enforcement;
- Retailers can use facial recognition to customize offline offerings and theoretically map online purchasing habits with their online ones;
Facial detection and recognition technologies have become somewhat of a commodity used by many industries, and I believe it’s impossible to list all available applications.
Face Detection with MediaPipe Library
In this tutorial, we will perform the face detection functionality with Mediapipe’s face detection model. If we open the given depth overview of this model, we can find out that it is completely based on the BlazeFace model, which is well-performing and lightweight. This model focuses on running on low-end CPUs and mobile GPUs to produce real-time inference. It says that the inference speed is 200–1000 frames per second, depending on the specification of the devices.
If you followed my tutorial about real-time selfie segmentation, you should already be familiar with the code I wrote. If you didn’t have a chance to look at it, I recommend having a quick look because I’ll continue working on the same project. This time I’ll focus on creating face detection objects that we’ll use on that Engine.
Here is the complete face Detection object to use the MediaPipe face detector:
Before using the Mediapipe face detection model, we have first to initialize the model. For that, we will use the simple syntax as mp.solution.face_detection, and after initializing the model, we will call the face detection function with some arguments. Here are two essential arguments while initializing the model:
- model_selection: This argument takes the integer index (0 or 1). The 0 is recommended for short-range faces, which works best within 2 meters from the camera. The 1 is recommended for a full-range model, which is best for faces within 5 meters. The default value, if not specified, is 0.
- min_detection_confidence: This argument takes the float value within 0.0 and 1.0 range. Here default value is 0.5, which translates to 50% confidence. For instance, when detecting faces, the results should have at least 50% confidence that the face is there; otherwise, it won’t detect anything.
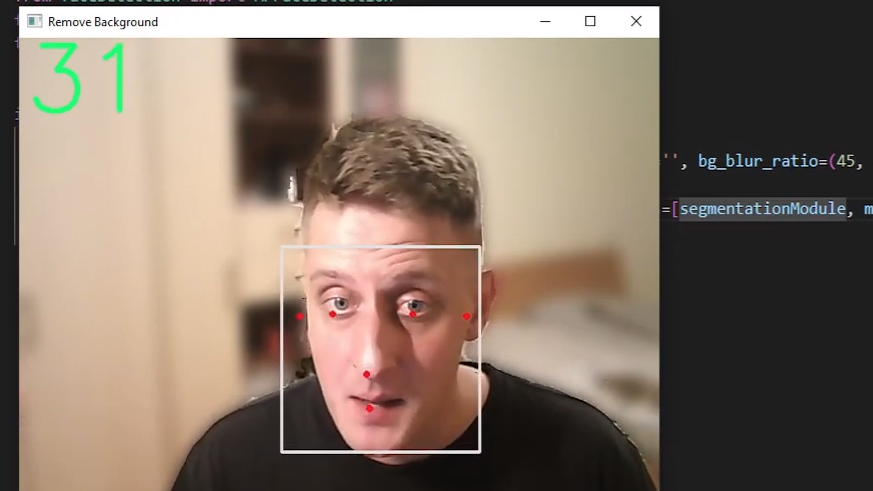
So, when we define our MPfaceDetection objects, we create our model in memory at the exact moment. In the next step, we need to feed our frames to this object. Now, when we provide an image to our object, we will use the process() function from the FaceDetection object. If we looked closer at our results, we would see six coordinates for each detected face. These coordinates represent the right eye, left eye, nose tip, mouth center, right ear region, and left ear region.
To plot a rectangle around our face MediaPipe has a built-in function called mp.drawing, which we initialized in our objects initialization step. To draw rectangles and main face parts is as simple as calling mp_drawing.draw_detection function for each face detection.
I also added an argument “mp_drawing_utils = True", with this argument, we are using mp.drawing utils. Otherwise, we can use the OpenCV cv2.rectangle function to draw detections on our frame with our color and thickness. Also, sometimes we are interested only in getting detection coordinates. We can get them by setting the return_tlbr bool option when we are calling our object. So, we can return only detection results in different cases instead of drawing rectangles on a frame, depending on the use case.
Here is a simple code example of running our Engine only with this face detection object on a webcam stream:
With that, we should see a similar view to mine:
Conclusion:
In this tutorial, we learned how simple it is to use the MediaPipe library to detect the face in the image, saved video, or real-time webcam stream. I introduced you to how we can create a custom object to use in my Engine object. Similarly, we can create an object for any other face detection implementation and use it with the same Engine.
With all this code, we have visualized the detected face results with some landmarks like mouth, ears, eyes, and nose. The results for the landmarks might not be that accurate for different angles, but it is convenient for the frontal face.
In the next tutorial, I’ll create another object that will allow us to sketch or animate ourselves. That will be awesome!
Thanks for reading! As always, all the code given in this tutorial can be found on my GitHub page and is free to use!
Originally published at https://pylessons.com/face-detection
CPU Real-time Face Detection With Python was originally published in Towards AI on Medium, where people are continuing the conversation by highlighting and responding to this story.
Join thousands of data leaders on the AI newsletter. It’s free, we don’t spam, and we never share your email address. Keep up to date with the latest work in AI. From research to projects and ideas. If you are building an AI startup, an AI-related product, or a service, we invite you to consider becoming a sponsor.
Published via Towards AI
Towards AI Academy
We Build Enterprise-Grade AI. We'll Teach You to Master It Too.
15 engineers. 100,000+ students. Towards AI Academy teaches what actually survives production.
Start free — no commitment:
→ 6-Day Agentic AI Engineering Email Guide — one practical lesson per day
→ Agents Architecture Cheatsheet — 3 years of architecture decisions in 6 pages
Our courses:
→ AI Engineering Certification — 90+ lessons from project selection to deployed product. The most comprehensive practical LLM course out there.
→ Agent Engineering Course — Hands on with production agent architectures, memory, routing, and eval frameworks — built from real enterprise engagements.
→ AI for Work — Understand, evaluate, and apply AI for complex work tasks.
Note: Article content contains the views of the contributing authors and not Towards AI.
Related posts
Recent Posts


")