Build E2E CI/CD Pipeline using GitHub Actions, Docker & Cloud
Last Updated on May 9, 2024 by Editorial Team
Author(s): ronilpatil
Originally published on Towards AI.

Hi folks, Are you ready to revolutionize your ML project workflow? Let’s implement an end-to-end CI/CD pipeline for a machine learning project using GitHub Actions, Docker, Docker Hub, and Render. From version control to deployment, let’s unlock the full potential of automation in ML development!
Table of Content
— Introduction
— References
— Pull Production Model from AWS RDS
— Client-side App
— Containerization using Docker
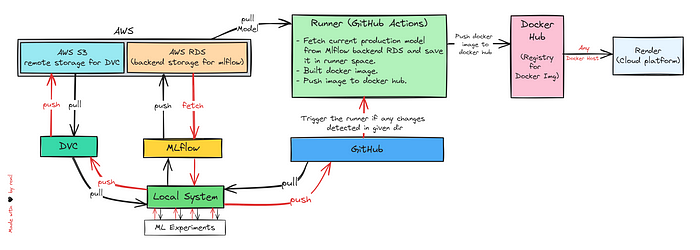
— CI/CD Workflow
— Deploy Container locally
— Deploy Container to Cloud
— GitHub Repository
— Conclusion
Introduction
Automating Machine Learning deployment is truly the icing on the cake, it makes the entire process smoother and more efficient. In this blog, we’ll build a complete end-to-end CI/CD workflow that will retrieve the current production model from the Mlflow backend store — AWS MySQL RDS, create a Docker container, upload it to the Docker hub, and finally host it to cloud. So let’s roll up your sleeves and deep dive into it.
References
In this blog, my major focus would be on the CI/CD pipeline. I won’t deep dive into data tracking, model training, experiments/artifacts tracking, and all. I’ve already covered them in my previous blogs, so please check it out.
Streamline ML Workflow with MLflow️ — I
PoA — Experiment Tracking 🔄 | Model Registry 🏷️ | Model Serving 🚀
pub.towardsai.net
Streamline ML Workflow with MLflow — II
PoA — Experiment Tracking 🔄 | Model Registry 🏷️ | Model Serving
pub.towardsai.net
Deploy MLflow Server on Amazon EC2 Instance
A Step-by-step guide to deploy MLflow server using S3, Amazon RDS, & EC2 Instance
pub.towardsai.net
Configure DVC with Amazon S3 Bucket
A step-by-step guide to configure DVC with Amazon S3 Bucket
pub.towardsai.net
Pull Production Model from AWS RDS
Now this is one of the crucial stage when we work with MLflow. Let’s implement code to fetch a current production model from AWS RDS, our MLflow backend storage.
MLflow REST API provides direct methods to fetch the current production model. Don’t be confused with the fancy word “current production model" Actually, Mlflow provides a way to register the outperforming models and we can tag them an alias such as @champion, @production, @staging, or @archive. This alias came up with some properties, I won’t deep dive into it here. Check out my previous blogs for in-depth details. Once we assign the alias, we can fetch that particular model via the API and use it in further scripts. For reference, I’ve included the code snippet below.
Client-side App
Now let’s build a Client-side Web App, it’ll run inside our docker container. I’ve used the Streamlit web framework for creating a simple UI. I am not adding any advanced functionality, just put the model inputs and get the output, That’s it!
For reference, I’ve included a code snippet and a UI snapshot below.
Web App Snapshot

Note: My primary focus is implementing a comprehensive end-to-end CI/CD pipeline, rather than emphasizing model performance.
Containerization using Docker
If you’re not sure about the docker containers, don’t worry. I’ve covered it in my blog. Check it out.
Develop & Dockerize ML Microservices using FastAPI + Docker
A step-by-step guide to build a REST endpoint using FastAPI and deploy it as Container
ronilpatil.medium.com
Let’s containerize both of these files and remember minimizing the size of the Docker container is crucial for efficient deployment and resource management. To achieve this, ensure that you only include the necessary files and dependencies in your container image. Add all the unnecessary files in .dockerignore to avoid them from being copied into the container image. For reference, I’ve included a code snippet of Dockerfile below.
I’ve externally passed the port 8000 for the Streamlit app to avoid any kind of conflict. I added unnecessary files to .dockerignore based on my project structure. Must follow this step.
CI/CD Workflow
So far, everything is perfect. Now let’s build CI/CD workflow. Here, I spent hours to ensure the workflow is bug-free. I’ll split it into two sections. We’ll first deploy it locally before moving it to the cloud.
— Deploy container locally
Let’s implement the workflow. The steps are quite easy, once you go through it, you’ll understand what’s going on. I’ve also added the comments for better understanding.
Line — 6 of the workflow, provides paths linked to our repository. Any changes detected in these directories will trigger the CI/CD workflow.
At line — 16, in jobs section I split the job into two sub-tasks download_model & build_push_docker_image .
At line — 44, I’ve used upload-artifact@v2 action, it’ll save our artifacts generated while executing the sub-task download_model i.e. model & model_details.json file so that we can utilize them further.
At line — 66 I’m downloading the same artifacts to utilize them in the build_push_docker_image stage.
You’ll notice, I used some ls commands in the workflow. That's just for debugging purposes, you can remove them.
From line — 75, we’re creating the Docker container, logging in to the Docker Hub, & pushing the image to the Docker Hub. Once the image is pushed to the Docker Hub, we can pull it via the Docker Desktop and run it in our local system.
For reference, I’ve included the code snippet & snapshot below.
CI/CD Pipeline Execution

Docker Hub Deployment


Running Container on Docker Desktop
Once the image is deployed successfully, just go to Docker Desktop, pull the image, and run it. That’s it!


— Deploy container to Cloud
As of now, at every trigger, we were just uploading the docker image to Docker Hub, but we got to go one step further than even. Now let’s pull the docker image from Docker Hub and host it on the cloud. We’ve plenty of options to host it on cloud such as ECS (Elastic Container Service — by AWS), EKS (Elastic Kubernetes Service — by AWS), GKS (Google Kubernetes Engine), AKS (Azure Kubernetes Service), and many more. In this blog, we’ll host it on Render.
In the next blog, we’ll deploy it using AWS services. So stay tuned!
Step 1. Go to https://render.com/, Sign-up. Once you’ve successfully signed up, click on New & select Web Services.

Step 2. Click on Deploy an existing image from a registry.

Step 3. Enter the Image URL. You’ll get it from the Docker Hub.

Step 4. Select the Free tier, and click on Create Web Service.

Step 5. Once the container is deployed, you can access the hosted app via the link.

Step 6. Congrats🎉, The container hosted successfully.

Step 7. To automate the deployment process, let us incorporate it into the CI/CD workflow. At line — 92, I used the DEPLOY_HOOK you’ll get it from settings. For reference, I’ve included the code snippet & snapshots below.
CI/CD Workflow
Deploy Hook Snapshot

CI/CD Execution Snapshot

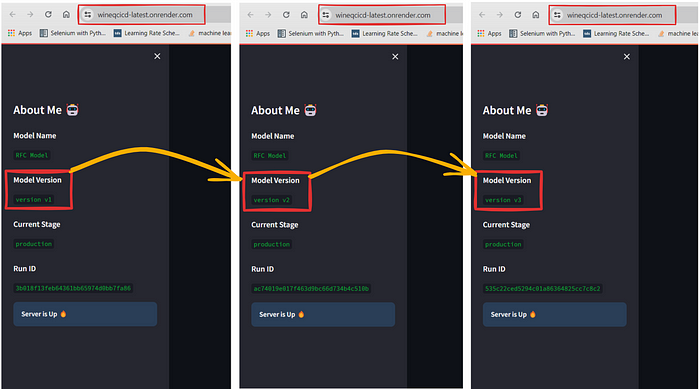
Deployment Snapshot — Client Side

Deployment Snapshot—Cloud (Backend)

GitHub Repo
The codebase is available here, just Fork it and start experimenting with it.
GitHub — Built End-to-End CI/CD Pipeline with GitHub Actions, Docker, and Cloud
github.com/ronylpatil/cicd
Conclusion
If this blog has sparked your curiosity or ignited new ideas, follow me on Medium, GitHub & connect on LinkedIn, and let’s keep the curiosity alive.
Your questions, feedback, and perspectives are not just welcomed but celebrated. Feel free to reach out with any queries or share your thoughts.
Thank you🙌 &,
Keep pushing boundaries🚀
Join thousands of data leaders on the AI newsletter. Join over 80,000 subscribers and keep up to date with the latest developments in AI. From research to projects and ideas. If you are building an AI startup, an AI-related product, or a service, we invite you to consider becoming a sponsor.
Published via Towards AI
Take our 90+ lesson From Beginner to Advanced LLM Developer Certification: From choosing a project to deploying a working product this is the most comprehensive and practical LLM course out there!
Towards AI has published Building LLMs for Production—our 470+ page guide to mastering LLMs with practical projects and expert insights!

Discover Your Dream AI Career at Towards AI Jobs
Towards AI has built a jobs board tailored specifically to Machine Learning and Data Science Jobs and Skills. Our software searches for live AI jobs each hour, labels and categorises them and makes them easily searchable. Explore over 40,000 live jobs today with Towards AI Jobs!
Note: Content contains the views of the contributing authors and not Towards AI.


