PySpark Snowflake Data Warehouse Read Write operations — Part2 (Read-Write)
Last Updated on February 11, 2021 by Editorial Team
Author(s): Vivek Chaudhary
Programming
PySpark Snowflake Data Warehouse Read Write operations — Part2 (Read-Write)
The Objective of this story is to build an understanding of the Read and Write operations on the Snowflake Data warehouse table using Apache Spark API, Pyspark. In continuation to my previous blog, the link shared below, of the PySpark Snowflake Read operations, this is my current blog and I have covered the use case to perform write operations on Snowflake Database tables.

Part1 can b
PySpark Snowflake Data Warehouse Read Write operations — Part1 (Read Only)
In this blog just to make things more diverse or real-time, where we have multiple sources, I have used different data sources such as Apache Parquet file present on HDFS (installed on the local system), Oracle Database. We will extract the data perform simple transformations on the datasets and write the same to Snowflake DB.
- Spark Connectivity and Import Dataset
import pyspark
from pyspark.sql import SparkSession
print(‘modules imported’)
spark= SparkSession.builder.appName(‘Pyspark_snowflake’).getOrCreate()
print(‘app created’)
#snowflake property setting spark._jvm.net.snowflake.spark.snowflake.SnowflakeConnectorUtils.enablePushdownSession(spark._jvm.org.apache.spark.sql.SparkSession.builder().getOrCreate())
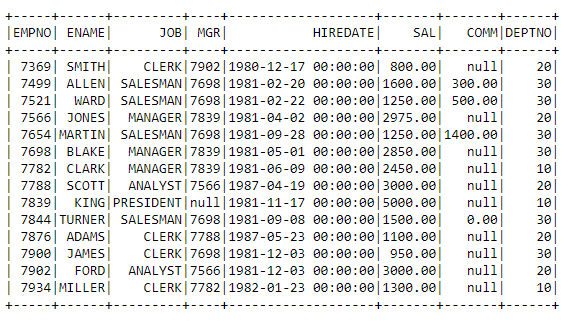
Import Parquet file from local HDFS:

emp_df=spark.read.parquet(r’hdfs://localhost:9000/learning/emp’)
emp_df.show(15)
Import Oracle Database Table records:
#
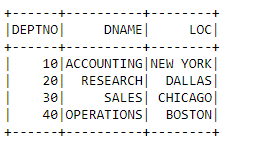
dept_df = spark.read.format(‘jdbc’).option(‘url’, ‘jdbc:oracle:thin:scott/scott@//localhost:1522/oracle’).option(‘dbtable’, ‘dept’).option(‘user’, ‘scott’).option(‘password’, ‘scott’).option(‘driver’, ‘oracle.jdbc.driver.OracleDriver’).load()
dept_df.show()
2. Data Transformation
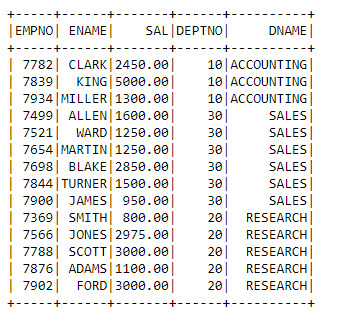
In Data Transformation, we will perform simple transformations such as renaming columns and joining the datasets, as the scope of this story is to understand connectivity with Snowflake.
#rename Dataframe column
emp_df=emp_df.withColumnRenamed(‘DEPTNO’,’DEPTNO_E’)
#join the emp and dept datasets
joined_df=dept_df.join(emp_df,emp_df.DEPTNO_E==dept_df.DEPTNO, how=’inner’)
#create final dataframe
final_df=joined_df.select(‘EMPNO’,’ENAME’,’SAL’,’DEPTNO’,’DNAME’)
final_df.show()
3. Snowflake setup
#set the below snowflake properties for connectivity
sfOptions = {
 “sfURL” : “wa29709.ap-south-1.aws.snowflakecomputing.com”,
 “sfAccount” : “xxxxxxx”,
 “sfUser” : “xxxxxxxxx”,
 “sfPassword” : “xxxxxxxx”,
 “sfDatabase” : “learning_db”,
 “sfSchema” : “public”,
 “sfWarehouse” : “compute_wh”,
 “sfRole” : “sysadmin”,
}

SNOWFLAKE_SOURCE_NAME = “net.snowflake.spark.snowflake”
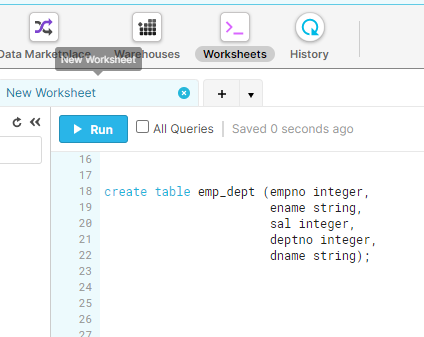
Create Snowflake target table using the script below:
create table emp_dept (empno integer,
 ename string,
 sal integer,
 deptno integer,
 dname string);
4. Load Pyspark DataFrame to Snowflake target
#pyspark dataframe to snowflake
final_df.write.format(“snowflake”).options(**sfOptions).option(“dbtable”, “emp_dept”).mode(‘append’).options(header=True).save()
Validate the data in snowflake using SnowSQL:
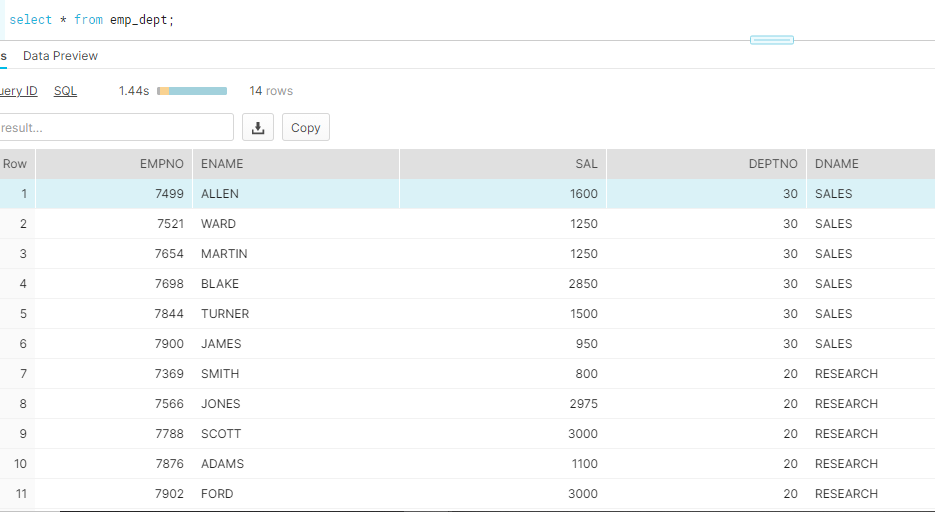
We are successfully able to read datasets from diverse sources and load Spark Data frame to Snowflake DataBase table.
Thanks to all for reading my blog. Do share your views and feedback.
PySpark Snowflake Data Warehouse Read Write operations — Part2 (Read-Write) was originally published in Towards AI on Medium, where people are continuing the conversation by highlighting and responding to this story.
Published via Towards AI
Take our 90+ lesson From Beginner to Advanced LLM Developer Certification: From choosing a project to deploying a working product this is the most comprehensive and practical LLM course out there!
Towards AI has published Building LLMs for Production—our 470+ page guide to mastering LLMs with practical projects and expert insights!

Discover Your Dream AI Career at Towards AI Jobs
Towards AI has built a jobs board tailored specifically to Machine Learning and Data Science Jobs and Skills. Our software searches for live AI jobs each hour, labels and categorises them and makes them easily searchable. Explore over 40,000 live jobs today with Towards AI Jobs!
Note: Content contains the views of the contributing authors and not Towards AI.


