


Learn Programming While Assembling an On-Screen Christmas Tree
Last Updated on January 6, 2023 by Editorial Team
Author(s): Sumudu Tennakoon
Programming
A programming exercise for holiday learning and fun using Python and Julia with a practical comparison between the two languages.
This article is to share some holiday joy with an educational value to computer programming enthusiasts and young learners.
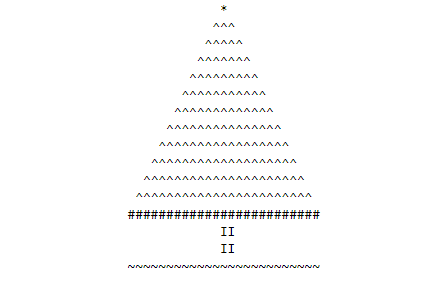
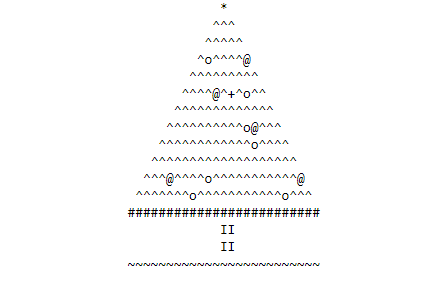
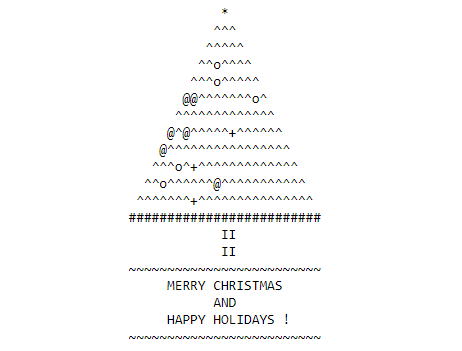
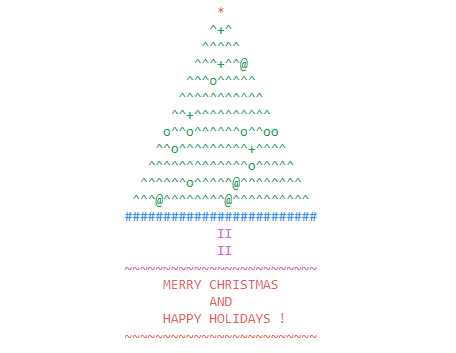
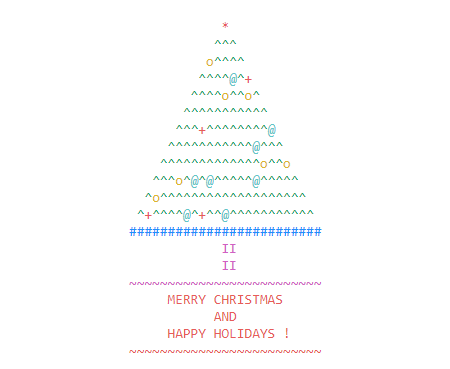
The Output
Goal of the Excercise
To create a Holiday Greeting Card to display in the console/terminal with
- An illustration of a decorated Christmas Tree using characters.
- Randomly distributed Ornaments on the tree body.
- a star at the top of the tree as the tree-topper.
- A border ribbon at the bottom of the tree body.
- A base is attached to the tree.
- Greeting message “MERRY CHRISTMAS AND HAPPY HOLIDAYS”
- Colors: red star green tree, a blue border at the bottom, magenta base, and the message in red.
Concept and Logic
- Use screen print function to output characters to the screen systematically offsetting the placement on the print line.
- To get the triangular shape of the tree body, the number of characters at the top should be one(1). To keep one character at the center, subsequent lines should have an odd number of characters such as 3,5,7…..
- The printed characters should be center aligned to the treewidth. Blank (space: ‘ ‘)characters should be used as padding before the first printed character. How many padding characters need to add to each line should be calculated.
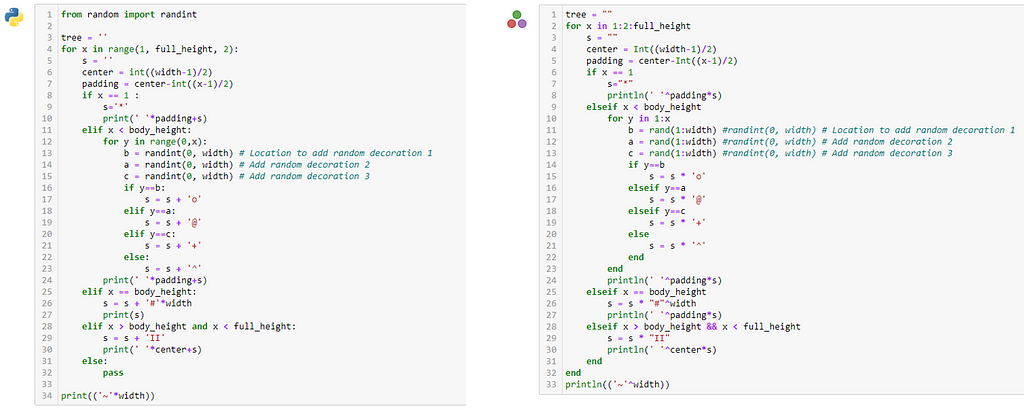
- One character will be chosen as tree leaves (e.g. ^). Three different shapes (characters) of ornaments will be added to the tree (e.g. o, @, +). The position of each ornament is decided based on a random number between 1 and the size of the printed characters of that line. If the location of the character is the same as the random number associated with each ornament the tree leaves character should be replaced by the ornament character. This random number is re-generated every time before adding a new character to the line.
- Characters of each line (string) should be printed before assembling the next line.
- The last line of the tree body (end of the leaves part) should be a ribbon represented by # character in the output.
- The lines for the tree base should be assembled using a pair of character I (II).
- A ground line (string) with the length of treewidth should be added after the base.
- A string containing the greeting message “MERRY CHRISTMAS AND HAPPY HOLIDAYS !” should be printed as three lines.
- Another string similar to the ground line with the length of treewidth will be added after the message.
When applying the colors, designated character colors should be assigned to each print statement above.
What you need to know/What you will learn
By working through this exercise, you will learn or practice your skills on,
- How to print screen output with different options.
- Variables and Value Assignment
- Strings and String Concatenation
- Generate and use a sequence of numbers.
- Operators
- Loops (for…)
- Conditional Statements (if…else)
- Use of built-in functions (print, random number)
- Adding colors to the screen output text
- How to use external libraries/packages
In the next section, we will construct a code step by step to generate the desired output using two different programming languages, Python and Julia. As a Programming enthusiast/learner you are encouraged to focus more on the concept, logic, and algorithm than the programming language-specific syntax or style.
Let’s Start Building the Christmas Tree
Let’s learn how to build the tree using both Python and Julia side by side. Please go to the end of the article to see the full code.
Task 1: Setup Tree Dimensions
Create variables to store width, body height, and full height with the base. These variables will be used later to decide the character placements.
Note that in Julia we used semicolon (;) at the end of the lines to suppress the output being printed. Although, it is optional to have ;.

Task 2: Print Basic Tree Body
the variables center and padding is used to center align the string being printed.
Looping and Sequence Generator
Python range(start, end, step) is used to seed the values of x and y to iterate through the loop. When the step value is not provided python assumes it as 1.
Similarly in Julia start:step:end used in the for a loop.
Here, the value of x varies from 1 to the width of the tree. The step/increment of 2 is used to get only the odd numbers.
String Concatenation and multiplication
In Python, two strings can concatenate using + and multiple copies of the same string can be concatenated other using * with an integer value as a multiplication factor ("a" + "b" yields "ab". whereas "a"*3 yields "aaa").
In Julia, two strings can concatenate using * and multiple copies of the same string can be concatenated other using ^ with an integer value as a multiplication factor ("a" * "b" yields "ab". whereas "a"^3 yields "aaa").
Comparisons
Both python and Julia share the same syntax for comparison operators where x < 25 returns true if x is less than 25 and x > 25 returns true if x is greater than 25. Similarly x == 25 is true only if the value of x is 25.
In Python boolean values are True and False. In Julia it is true and false Note the small case letter in Julia.
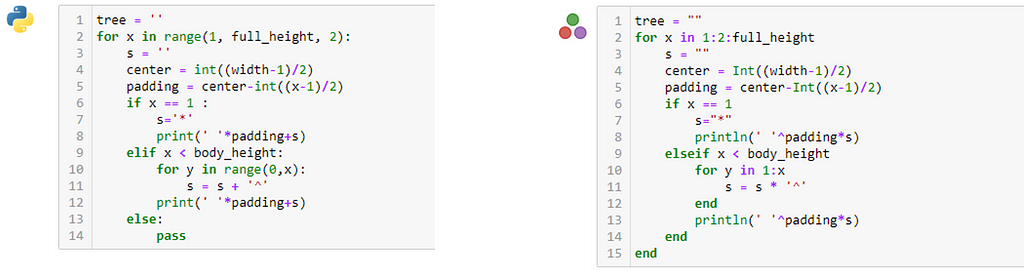

Task 3: Add bottom border ribbon, base, and Ground
Logical operators
Python has logical operators and and or, whereas Julia use && and || as logical operators. The expression a and b in python is equivalent to a && b in Julia and returns the value true only if both the a and b get the value true.
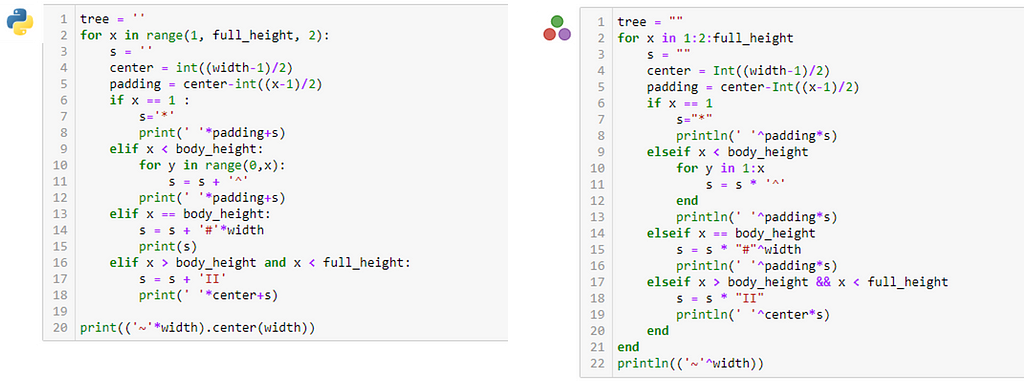
Task 4: Add Ornaments
To generate a random number between given integer values, you have to import random to the Python code. The function randint(start,end) will generate a random integer between the given integer values start and end.
Julia has the function rand(start,end) works similar to the randint function in Python.
Task 5: Add Greeting Message
Add three print lines "MERRY CHRISTMAS" , "AND", and "HAPPY HOLIDAYS !" to complete the Greeting.
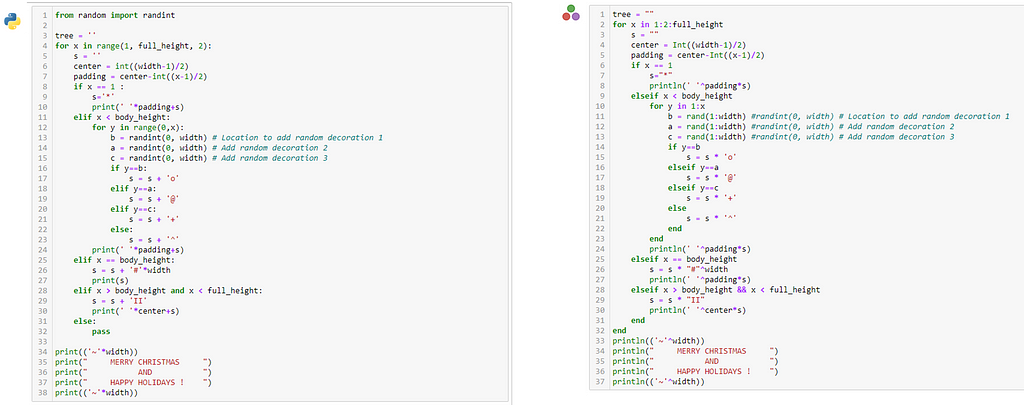
Task 6:
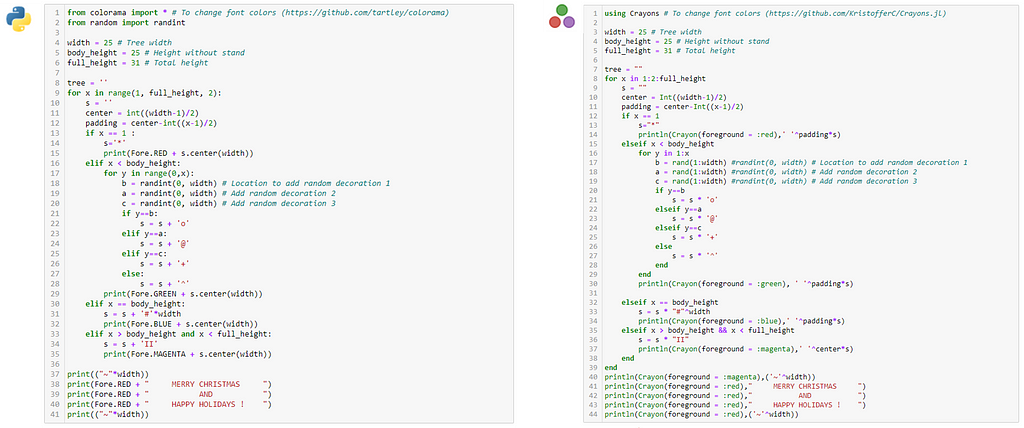
Add colors to strings. In python, coloram a library can be used to set the color of the string being printed on the console. Julia has Crayons a package that can use to generate colored and styled strings.
What’s Next?
If you completed all 6 tasks above, Congratulations! You have completed building a programmatically Generated Holiday Greeting using both Python and Julia.
You can also add your own creativity to the output e.g. Changing the colors and characters, Adding more Ornaments, Assigning different colors for ornaments, varying the color of the leaves, adding some animation, etc.
Adding colors to each character
In Python, you can use the end parameter in the print() function. print(Fore.RED + ‘*’, end=’’). This will eliminate adding a new line ('n')character to each string being printed.
In Julia, you can use print() function instead of println(). Julia functionprint() does not add a new line ('n')character to each string being printed.
The complete code
Python
Julia
The notebooks can also be downloaded from GitHub using the links below.
Even this exercise is completed using Python and Julia, you can try it using your favorite programming language utilizing the same concept and logic.
Disclaimer
The views and opinions expressed in this paper are those of the author and do not represent those of the employer or other institutions related to the author. This article is part of a broader publication aimed at addressing data literacy in the community. The author has put a good amount of effort into researching the topics discussed, simplifying the technical jargon to increase the understanding of the content, finding relevant references to ensure the validity of the facts presented. Discussion, criticism, alternative thoughts, and suggestions are welcome.
References
- Python 3 Documentation. Retrieved December 24, 2020.
- Python Colorama library for producing colored terminal text and cursor positioning. Retrieved December 24, 2020.
- Julia 1.5 Documentation. Retrieved December 24, 2020.
- Julia Crayons.jl for Colored and styled strings for terminals. Retrieved December 24, 2020.
Learn Programming While Assembling an On-Screen Christmas Tree was originally published in Towards AI on Medium, where people are continuing the conversation by highlighting and responding to this story.
Published via Towards AI
Towards AI Academy
We Build Enterprise-Grade AI. We'll Teach You to Master It Too.
15 engineers. 100,000+ students. Towards AI Academy teaches what actually survives production.
Start free — no commitment:
→ 6-Day Agentic AI Engineering Email Guide — one practical lesson per day
→ Agents Architecture Cheatsheet — 3 years of architecture decisions in 6 pages
Our courses:
→ AI Engineering Certification — 90+ lessons from project selection to deployed product. The most comprehensive practical LLM course out there.
→ Agent Engineering Course — Hands on with production agent architectures, memory, routing, and eval frameworks — built from real enterprise engagements.
→ AI for Work — Understand, evaluate, and apply AI for complex work tasks.
Note: Article content contains the views of the contributing authors and not Towards AI.


Recent Posts


")

