


Introduction to Quantum Computing with Python and Qiskit
Last Updated on November 3, 2020 by Editorial Team
Author(s): Bala Priya C
First steps into the realm of quantum computing
This is a blog post on getting started with quantum computing using Python and IBM Qiskit, inspired by Sara A. Metwalli’s webinar in the Women Who Code Python Track.
What is Quantum Computing?
Quantum Computing refers to the use of quantum mechanical phenomena such as superposition and entanglement to perform computation. To understand quantum phenomena, it’s important to understand qubit, the unit of quantum information, and the concepts of superposition and entanglement.
What is a ‘Qubit’?
Qubit or Quantum Bit is the unit of quantum information, analogous to the ‘bit’ in classical computing. In order to differentiate between a classical bit and a qubit, Dirac notation (kit notation) is used. So, the qubits are represented as |0〉and |1〉and are often read as ‘zero state’ and ‘one state’.
Superposition and Schrodinger’s cat
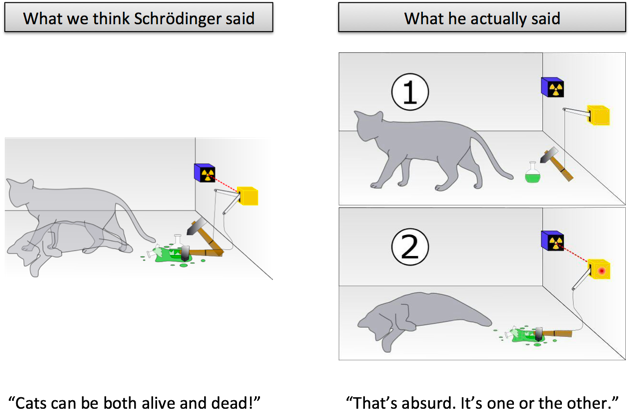
The infamous Schrodinger’s cat story is as follows:
- There’s a cat locked in a closed box along with a bottle of poison;
- Did the cat die as the poison bottle broke or is the cat still alive because the poison bottle is intact?
- Unless we open the closed box, there’s no way we can get to know if the cat is alive or dead!
The cat is said to be in a state of superposition between the dead and alive states. This doesn’t mean the cat is both dead and alive! The superposition of states is valid only because we have no way of knowing if the cat is alive or dead until we actually open the box and check, at which point there’s no superposition!
Entanglement
Entanglement is a physical phenomenon that refers to the relation between two or more particles or in our context, qubits; that affect their properties in such a way that it’s not possible to describe the state of one of them independently of the others.
One of the most commonly used qubits is photon spins. A photon can either have spin up (one state) or spin down (zero states). If we have two entangled photons, then they must have opposite spins, if one is up then the other must be down.
Getting started with the Qiskit Library
- As the first step, let’s install the Qiskit Library and matplotlib for visualization
!pip install qiskit
!pip install matplotlib
- We then go ahead and import the necessary modules to describe a quantum circuit and custom functions to simplify tasks. The custom functions are part of the library presented in this paper
from qiskit import QuantumRegister,ClassicalRegister,Aer,execute
import Our_Qiskit_Functions as oq
- In the next step, let’s import a few backend simulators to visualize our quantum circuits and Classical registers and Quantum Registers. Note that we need classical registers to hold and read in the values of the qubits.
# Initializing backend simulators to visualize circuits
S_simulator = Aer.backends(name='statevector_simulator')[0]
Q_simulator = Aer.backends(name='qasm_simulator')[0]
# Creating quantum registers to hold quibits
q = QuantumRegister(2)
# Creating classical registers to hold bits
c = ClassicalRegister(2)
# Create a quantum circuit with these registers
qc=quantumCircuit(q,c)
Understanding Quantum Gates
Just as classical computing involves programming at the gate level, quantum computing also involves gate-level programming; This requires an understanding of how quantum gates work.
Identity Gate: An identity gate is a single qubit gate that retains the state of the qubit. It’s similar to buffers in classical computing which we use to hold the values of the bits to be used for further computation when there’s a lag in the circuit.

# Identity Gate
qc.iden(q[0])
print(oq.Wavefunction(qc))
qc.draw(output = “mpl”)
NOT Gate: NOT gate is a single qubit gate that flips the state of the incoming qubit.

# NOT gate
qc.x(q[0])
print(oq.Wavefunction(qc))
qc.draw(output = "mpl")
Controlled NOT gate: The Controlled-NOT is a two qubit gate that uses one qubit to control the state of the other.
- If the controlling qubit’s state is |0〉, then the incoming qubit’s state is left unchanged
- If the controlling qubit’s state is |1〉, then the incoming qubit’s state is flipped.
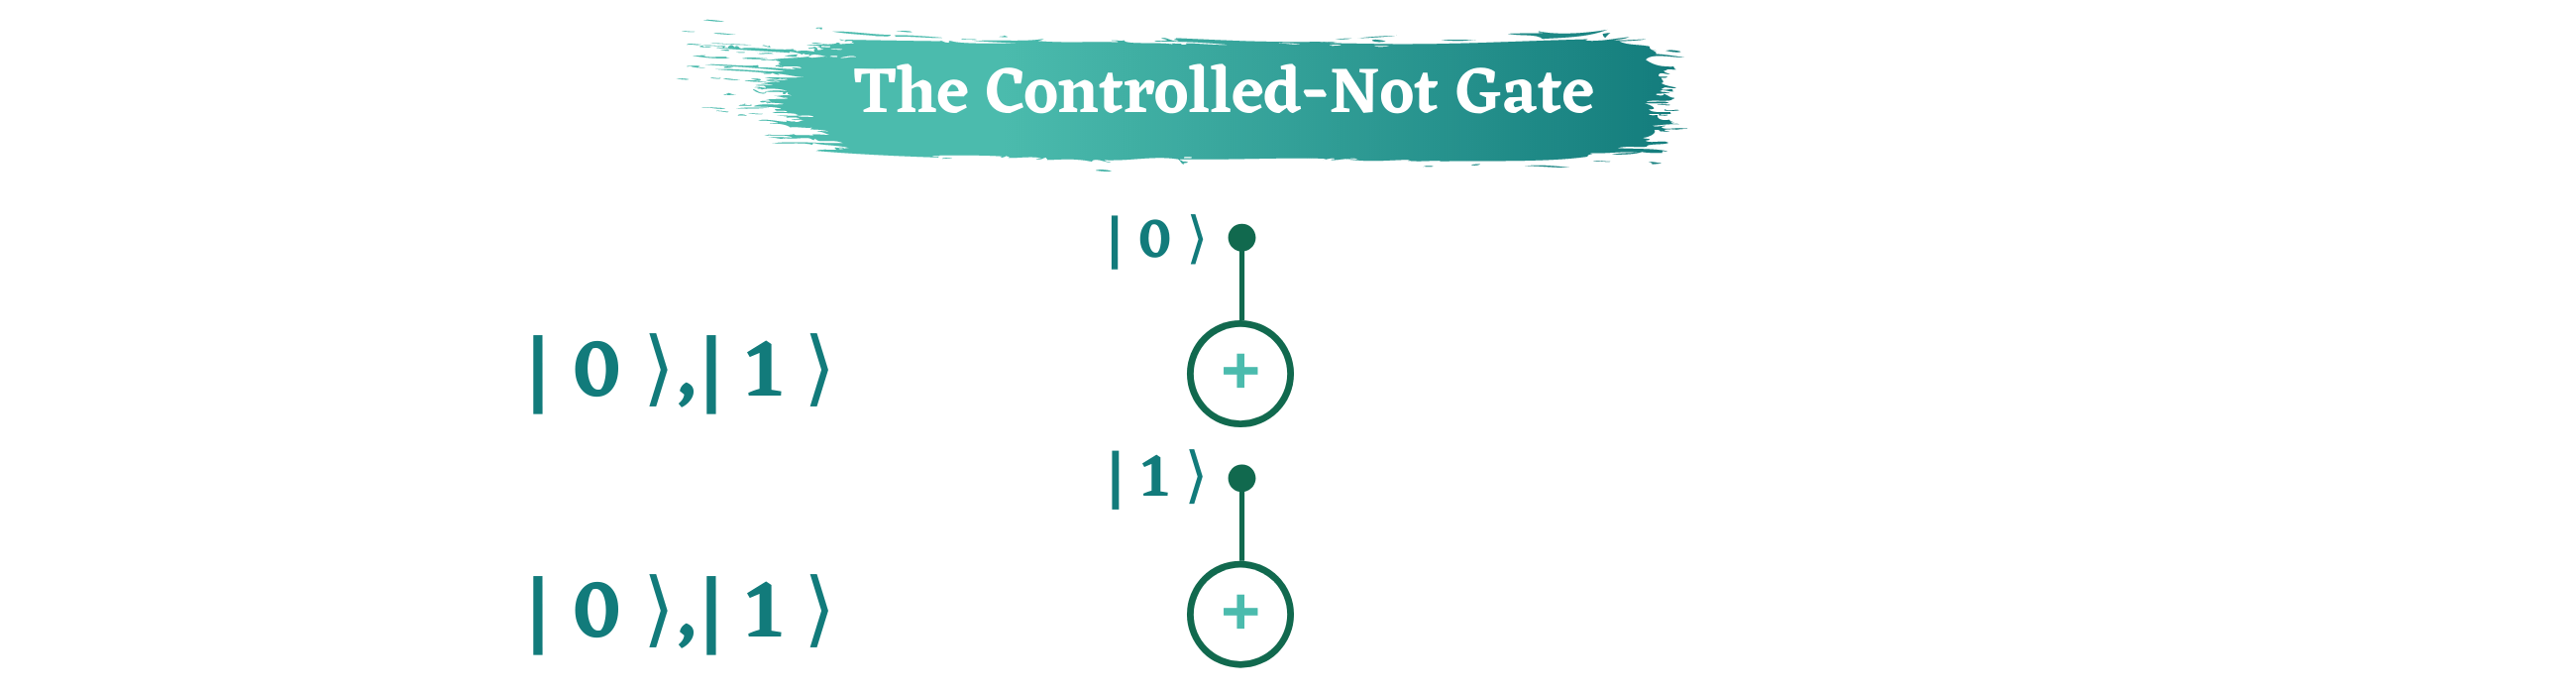
# Controlled-NOT gate
qc.cx(q[0],q[1])
print(oq.Wavefunction(qc))
qc.draw(output = "mpl")
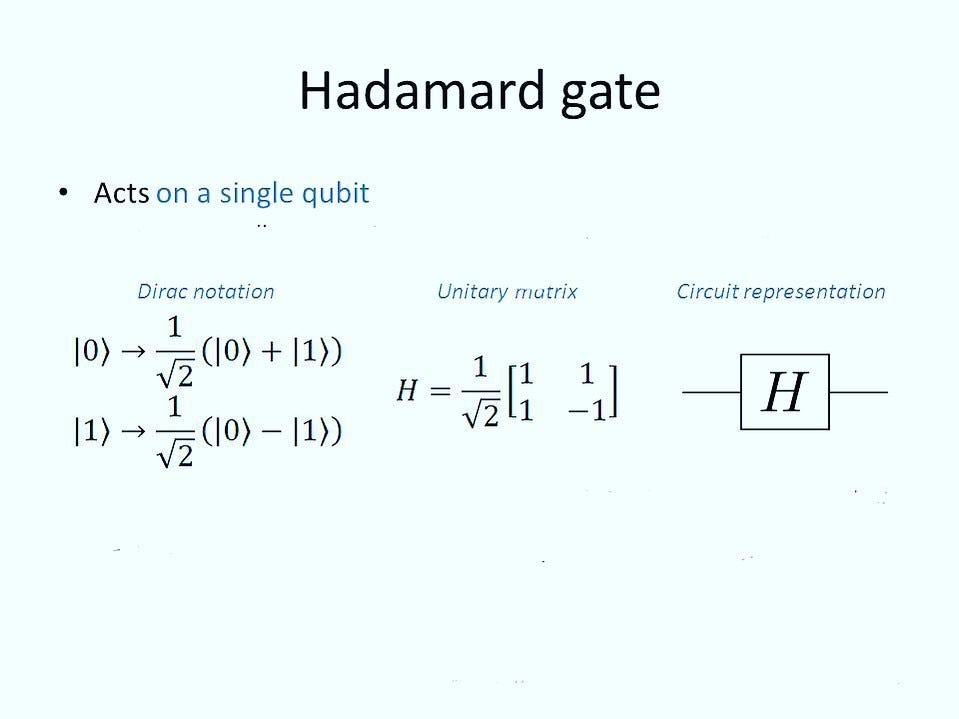
Hadamard Gate (H): It is the gate responsible for creating the superposition of states. This gate puts the qubit in a 50/50 superposition of states |0⟩ and |1⟩ despite the fact that the input state was either |0⟩ or|1⟩.
Quantum Circuit Simulators
Quantum Circuit Simulators such as the IBM Quantum Experience, allow us to drag and drop to compose circuits without having to write code.
For those starting out, it’s often easier to build circuits using such simulators as the user need not have any concerns about the details of implementation and hardware constraints, but can get started with experimenting right away!
Our First Quantum Circuit
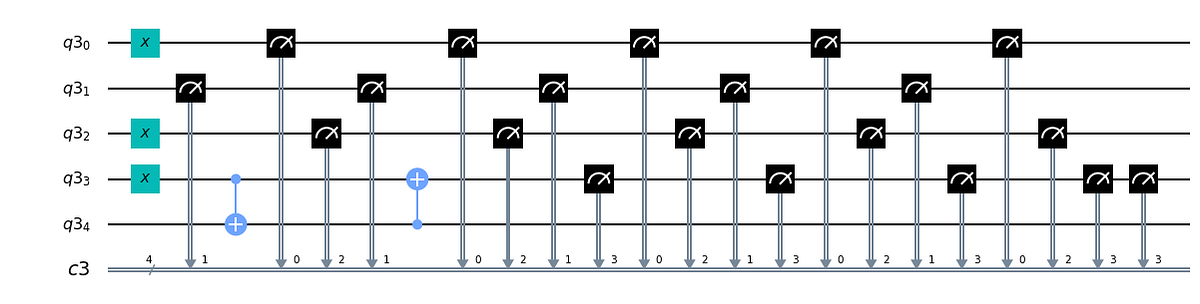
Assume we want to create a circuit that flips the last qubit of any given state only if it was 1. For example, the state |1011⟩ would become |1010⟩ because the last bit was 1. However, if the input state is |1100⟩, the circuit won’t make any changes and will return the same state. Initially, all qubits are set to the |0⟩ state, so we need to create the starting state, say, state |1011⟩ first, and then apply some gates to flip the last qubit of that state. Before we start, in the composer, states are read from top to bottom.

Step 1: Create the initial state |1011⟩
Step 2: Now, we should add gates such that the last qubit’s state is flipped if it is 1.
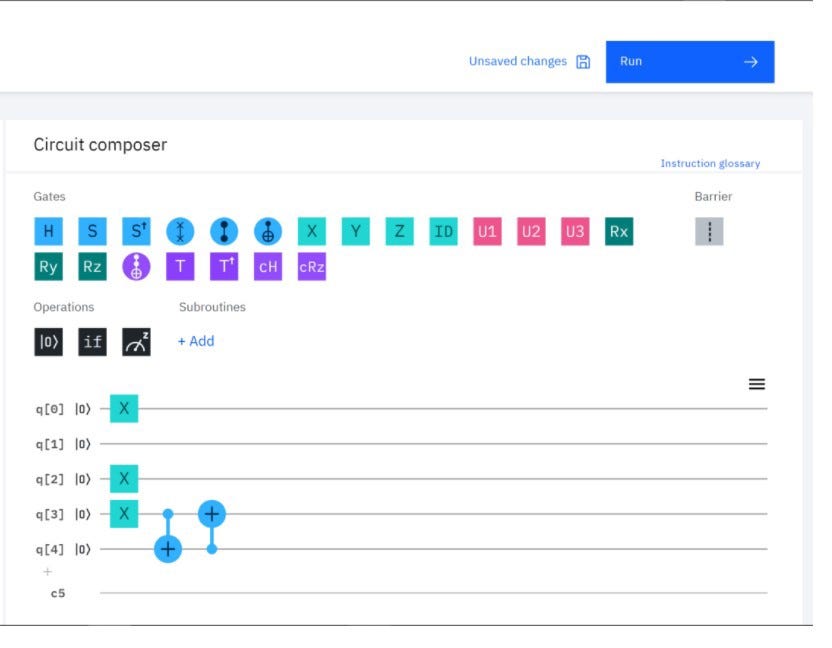
Step 3:
- We can now see how the controlled-NOT gates are used here. We add an additional q[4]=0 to accomplish the functionality
- Input state q[3] is the controlling qubit for q[4]; the result of the Controlled NOT operation is, in turn, the controlling qubit for q[3]
- If q[3] = 0; then q[4] =0 as the controlling qubit = 0
- If q[3]=1; then q[4] gets flipped to 1 and in turn, this is the controlling qubit for q[3] and hence q[3] is flipped. (which is what we wanted!)
- We shall now write the code to do the same operation; going by the same example; q[0],q[2], and q[3] are initially in state ‘1’ and then we call Controlled NOT operation on q[3] and q[4] as in the circuit composer figure
# Create the circuit and add the gates
q = QuantumRegister(5)
c = ClassicalRegister(4)
qc = QuantumCircuit(q,c)
qc.x(q[0])
qc.x(q[2])
qc.x(q[3])
qc.cx(q[3],q[4])
qc.cx(q[4],q[3])
qc.draw(output = "mpl")
Let’s measure the output of our quantum circuit; As the circuits are prone to errors, we seek to run the circuit a large number of times and then compute the average as a way to mitigating the error. In the code snippet below, shots=1024 implies that we would like to run the circuit 1024 times.
# Execute the circuit
ex = execute(qc, Q_simulator, shots = 1024)
res = ex.result()
M = res.get_counts(qc)

# Plot the results
plot_histogram(M, bar_labels=False)
Let’s see what the histogram looks like.
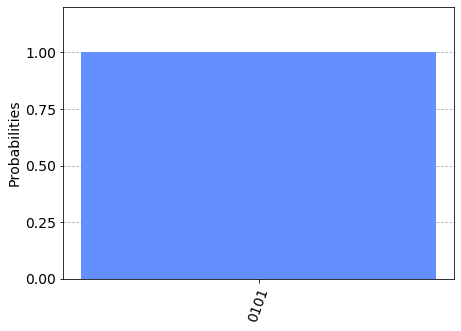
We see that the output state is |1010⟩ which is what we expected. The notebooks, helper functions, and references that were used in the webinar can be found in this GitHub repo and the recording of the webinar can be found on YouTube
Towards AI Academy
We Build Enterprise-Grade AI. We'll Teach You to Master It Too.
15 engineers. 100,000+ students. Towards AI Academy teaches what actually survives production.
Start free — no commitment:
→ 6-Day Agentic AI Engineering Email Guide — one practical lesson per day
→ Agents Architecture Cheatsheet — 3 years of architecture decisions in 6 pages
Our courses:
→ AI Engineering Certification — 90+ lessons from project selection to deployed product. The most comprehensive practical LLM course out there.
→ Agent Engineering Course — Hands on with production agent architectures, memory, routing, and eval frameworks — built from real enterprise engagements.
→ AI for Work — Understand, evaluate, and apply AI for complex work tasks.
Note: Article content contains the views of the contributing authors and not Towards AI.


Recent Posts


")


Comments are closed.