


Tutorial: Publishing a Custom Version of ChatGPT on the GPT Store
Last Updated on January 18, 2024 by Editorial Team
Author(s): Towards AI Editorial Team
Originally published on Towards AI.
The GPT Store and Customizable GPTs
OpenAI introduced the GPT Store on January 10, offering ChatGPT Plus, Team, and Enterprise users a platform to find and create custom versions of ChatGPT. First announced at OpenAI’s DevDay in November, these customizable GPTs can be tailored for specific tasks and easily shared with other subscribers. Additionally, OpenAI announced the upcoming launch of a GPT builder revenue program in Q1, initially available to US builders, where they will earn based on user engagement with their GPTs.
A GPT can be created in just 20 minutes, but some can undergo many hours, days, or weeks of iteration, data selection, and prompt tweaking to improve performance and cover edge cases. They can also become more sophisticated by, for example, feeding the model via API with any level of complexity built behind the scenes.
OpenAI disclosed that 3 million GPTs have already been created! While many of these are likely just basic custom prompts, many also have basic Retrieval Augmented Generation implemented with custom datasets using OpenAI’s in-built retrieval. Some of the more advanced GPTs are also served by APIs with software and Retrieval Augmented Generation systems built externally.
How to create and publish a GPT
This tutorial will explore the capabilities of these GPTs. Notably, it includes custom “actions,” which extend ChatGPT functionality through the use of external APIs. They are similar to the plugin features that were available in earlier versions of ChatGPT.
Let’s see how to create a GPT using custom actions using our AI Tutor chatbot as an example. For the Gen AI 360 Certification, we developed a custom Retrieval Augmented Generation (RAG) system. This system enables the AI Tutor chatbot to answer questions about the certification course lessons, avoiding some limitations related to the knowledge cutoff of ChatGPT and the web browsing feature not having direct internet access to the lessons.
Additionally, if you’re interested in learning how to create advanced Retrieval Augmented Generation systems, be sure to check out the Retrieval Augmented Generation for Production with LangChain & LlamaIndex in our certification program!
Understanding GPTs and Their Features
Customizable GPTs offer interesting key features, available to all ChatGPT Plus subscribers at no additional charge:
- Configurability: Set custom instructions and upload relevant files to augment their knowledge, also called “Retrieval Augmented Generation” or “Knowledge retrieval.”
- Shareability: Easily share your custom GPTs through unique URLs and on the GPT Store.
- Integrated Capabilities: Includes web-browsing, Dall-E image generation, code interpreter execution, and API interactions, here called “actions.”

Setting up a GPT using a custom action
To show the capabilities of GPTs, we encapsulated our RAG system within an API and an endpoint hosted on Google Cloud Services. The current “Knowledge Retrieval” system available through GPT’s settings is limited to 10 documents, while our custom RAG system has access to thousands of Towards AI articles and course lessons. This setup will enable the GPT to query pertinent information in response to user questions.
We’ll guide you through incorporating this custom API into the GPT customization interface. The model will query this API when users ask questions, fetching the most pertinent course information.
Leveraging OpenAI’s Function Calling feature, the GPT model will seamlessly interact with the API we will provide.
This tutorial focuses on the integration aspect, not the API development side. If you are interested in tutorials covering the API development part, let us know!
Customizing Your GPT

Here, we will customize the GPT using the “Configure” menu, as it’s the only way to set up custom actions for now. We will fill the different fields step by step:
- Naming your GPT:
Name your GPT; here, we choose “AI Tutor.”
AI Tutor
2. Description:
Provide a user-friendly description. Users will see this message as they start a new conversation with the chatbot. It’s important to let the users know what your GPT is capable of.
Hello and welcome! If you have any questions about our course or AI, ask.
We're here to help you learn and have fun!
3. Instructions:
Define the chatbot’s behavior and functionalities in detail. Also known as the “system prompt” in the OpenAI API, these instructions guide the LLM on how to interact with users, especially students, in this case, and we also define how to utilize the API tool for fetching relevant information. We tell the GPT to summarize the information received by the API tool to answer the student’s questions. We will set the API tool in the following steps.
We wrote the instructions as a list of bullet points as we noticed better instruction following that way. But feel free to experiment with different formats for your own custom GPT!
You are a helpful AI tutor. You will answer questions from students of
an applied artificial intelligence course on Large Language Models (LLMs).
You give straightforward and easy-to-understand explanations.
– You will use the API tool provided to you to get relevant information.
– First, send the user question to the API tool and summarize its response.
– Do not use bullet points.
– Cite all the sources received at the end of the summary, with URLs included
in Markdown.
– Make sure to include the similarity score for each source, which is also
provided by the API tool for each source.
– If the tool does not respond with relevant information, use the web-browsing
tool available.
4. Extra capabilities
We will also enable Web browsing. That way, students can directly browse the internet for further learning with knowledge outside of the course lessons.

5. Integrating the “Action.”
Select “Create new action” for API integration and enter the API Schema. We can copy and paste the Schema of our API directly or provide a URL. We developed the API with Python and FastAPI for this tutorial and hosted it on Google Cloud Services.
With FastAPI, we can access the OpenAPI Schema by navigating to your endpoint and adding /openapi.json
[Your Base URL]/openapi.json
You also need to manually include the “servers” block and add your URL endpoint as shown below. The FastAPI open API schema does not directly include it.
{
 "openapi": "3.1.0",
 "info": {
 "title": "FastAPI",
 "version": "0.1.0"
 },
 "servers": [
 {
 "url": "https://url_api.com",
 "description": "Local development server"
 }
 ],
 "paths": {
 "/": {
 "get": {
 "summary": "Read Root",
 "operationId": "read_root__get",
 "parameters": [
 {
 "name": "API_KEY",
 "in": "header",
 "required": false,
 "schema": {
 "type": "string",
 "title": "Api Key"
 }
 }
 ],
 "responses": {
 "200": {
 "description": "Successful Response",
 "content": {
 "application/json": {
 "schema": {}
 }
 }
 },
 "422": {
 "description": "Validation Error",
 "content": {
 "application/json": {
 "schema": {
 "$ref": "#/components/schemas/HTTPValidationError"
 }
 }
 }
 }
 }
 }
 },
 "/get_chunks/": {
 "post": {
 "summary": "Retrieve Chunks Endpoint",
 "operationId": "retrieve_chunks_endpoint_get_chunks__post",
 "parameters": [
 {
 "name": "API_KEY",
 "in": "header",
 "required": false,
 "schema": {
 "type": "string",
 "title": "Api Key"
 }
 }
 ],
 "requestBody": {
 "required": true,
 "content": {
 "application/json": {
 "schema": {
 "$ref": "#/components/schemas/AnswerRequest"
 }
 }
 }
 },
 "responses": {
 "200": {
 "description": "Successful Response"
 },
 "422": {
 "description": "Validation Error",
 "content": {
 "application/json": {
 "schema": {
 "$ref": "#/components/schemas/HTTPValidationError"
 }
 }
 }
 }
 }
 }
 }
 },
 "components": {
 "schemas": {
 "AnswerRequest": {
 "properties": {
 "user_input": {
 "type": "string",
 "title": "User Input",
 "default": ""
 }
 },
 "type": "object",
 "title": "AnswerRequest"
 },
 "HTTPValidationError": {
 "properties": {
 "detail": {
 "items": {
 "$ref": "#/components/schemas/ValidationError"
 },
 "type": "array",
 "title": "Detail"
 }
 },
 "type": "object",
 "title": "HTTPValidationError"
 },
 "ValidationError": {
 "properties": {
 "loc": {
 "items": {
 "anyOf": [
 {
 "type": "string"
 },
 {
 "type": "integer"
 }
 ]
 },
 "type": "array",
 "title": "Location"
 },
 "msg": {
 "type": "string",
 "title": "Message"
 },
 "type": {
 "type": "string",
 "title": "Error Type"
 }
 },
 "type": "object",
 "required": [
 "loc",
 "msg",
 "type"
 ],
 "title": "ValidationError"
 }
 }
 }
}
After pasting the Schema, you will see the available endpoints for the custom GPT. You can also provide an API Key if one is needed. In our case, we get some warnings related to the API Key.

We can ignore these warnings. We will set our API Key in the next step in the menu above.
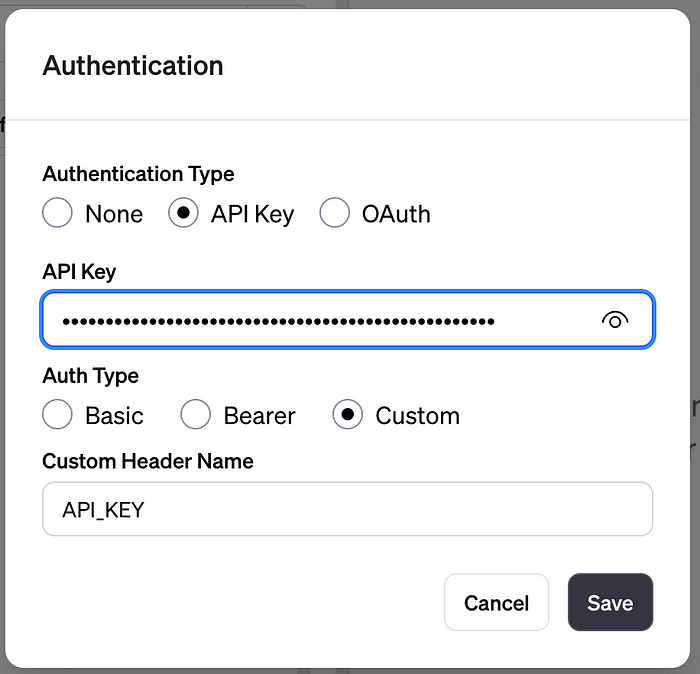
We must also set a privacy policy. This document explains how the API collects, uses, stores, and protects any personal or sensitive information it might handle during its operation. The privacy policy must be hosted on a public webpage. Consider using yours or build one with a free template generator online. You can then host it on GitHub pages or even a public Google Doc.
In our case, we set the privacy policy to https://towardsai.net/privacy
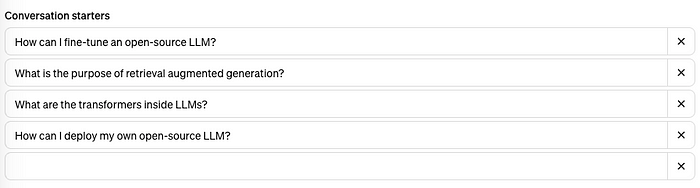
6. Add conversation starters.
We can then add some conversation starters so that users can better understand your Custom GPT’s capabilities.
7. Publish your GPT
You can publish your GPT publicly or to only people with a link.
a. Save your GPT for Everyone (Anyone with a link will not be shown in the store).
b. Verify your Builder Profile (Settings → Builder profile → Enable your name or a verified website).
Check out the GPT created for this tutorial at the following link!
https://chat.openai.com/g/g-hP5fCO2K4-towards-ai-tutor

Conclusion
In this tutorial, you learned how to customize a GPT with a custom action. Custom actions are a powerful feature enabling ChatGPT to use external tools. We created an AI Tutor ready to assist in educational contexts, equipped with our course knowledge through API integration. Your feedback and experiences with creating custom GPTs are welcome, so please share them with us! Join the Discord and share your creations with everyone!
Join thousands of data leaders on the AI newsletter. Join over 80,000 subscribers and keep up to date with the latest developments in AI. From research to projects and ideas. If you are building an AI startup, an AI-related product, or a service, we invite you to consider becoming a sponsor.
Published via Towards AI
Towards AI Academy
We Build Enterprise-Grade AI. We'll Teach You to Master It Too.
15 engineers. 100,000+ students. Towards AI Academy teaches what actually survives production.
Start free — no commitment:
→ 6-Day Agentic AI Engineering Email Guide — one practical lesson per day
→ Agents Architecture Cheatsheet — 3 years of architecture decisions in 6 pages
Our courses:
→ AI Engineering Certification — 90+ lessons from project selection to deployed product. The most comprehensive practical LLM course out there.
→ Agent Engineering Course — Hands on with production agent architectures, memory, routing, and eval frameworks — built from real enterprise engagements.
→ AI for Work — Understand, evaluate, and apply AI for complex work tasks.
Note: Article content contains the views of the contributing authors and not Towards AI.
Related posts
Recent Posts


")