
TensorFlow Callbacks in Action
Last Updated on May 15, 2020 by Editorial Team
Author(s): Abhinav Prakash

In layman terms, if I want to introduce callbacks, then it’s the controller by which you can control your plane. Without these controllers, you’re not having any control over the plane, and you’ll crash.
Callbacks: from keras.io, a callback is an object that can perform actions at various stages of training (e.g., at the start or end of an epoch, before or after a single batch, etc.).
It means that callbacks are the functions by which you can perform a particular task during the training
process of your model.
So, what can you do with these callbacks?
1. You can perform a particular task after the starting and ending of the training/batch/ epochs.
2. You can periodically save the model states in the disk.
3. You can schedule the learning rate as per your task.
4. You can automatically stop the training when a particular condition becomes True.
5. And you can do anything during the training process by subclassing these callbacks.
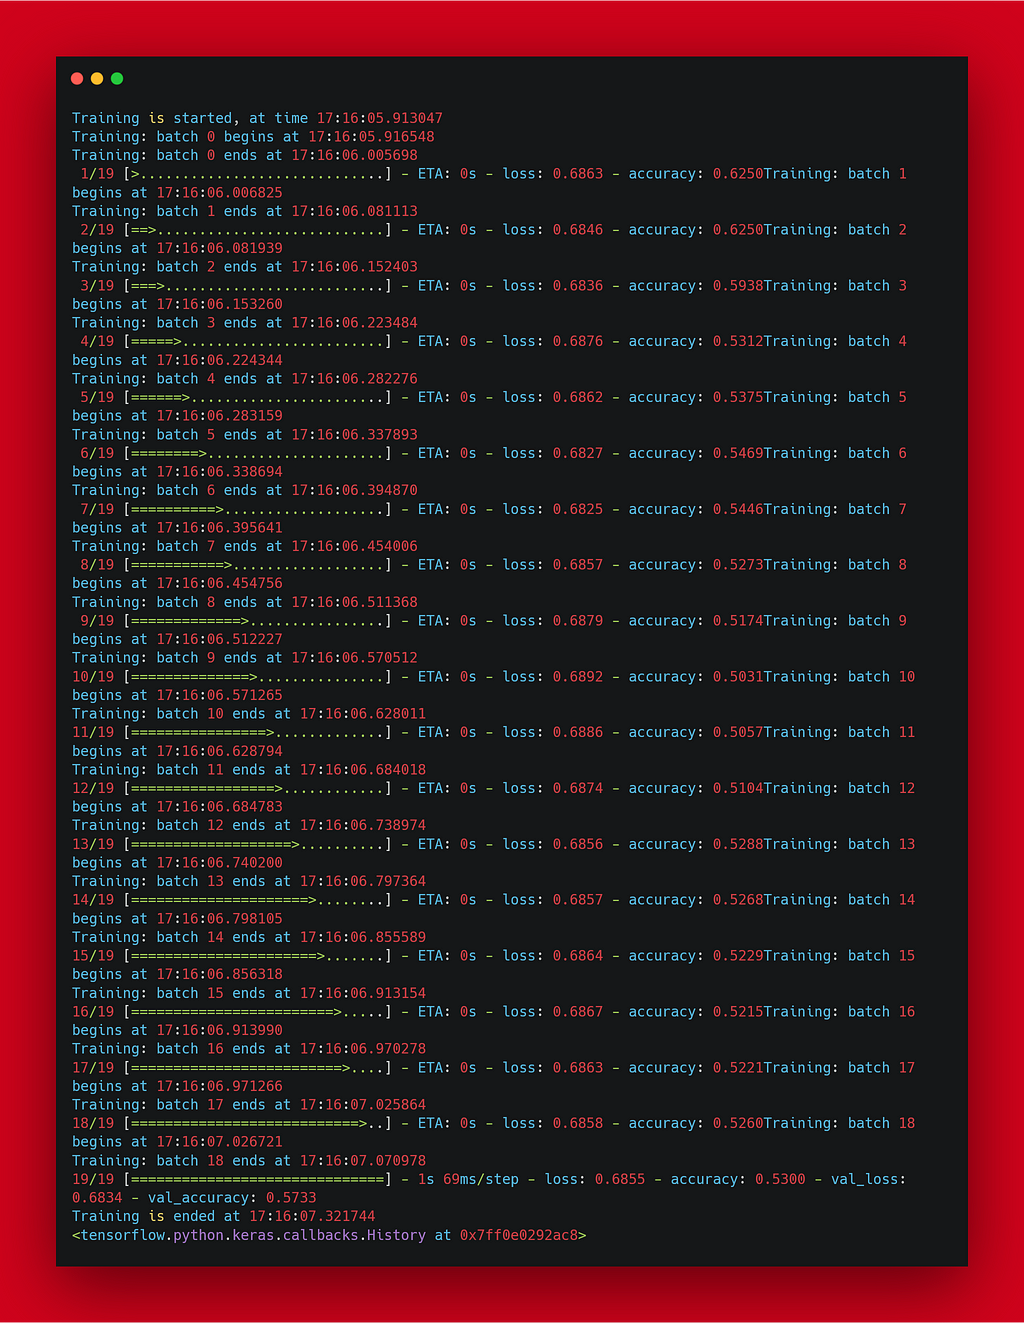
For example, you can make your training output clean and colorful like this, pretty awesome, right?

Tensorflow provides a wide range of callbacks under the base class “tf.keras.callbacks. “For the full list of callbacks please visit TensorFlow’s website.
In this article, we’re going to cover some of the essential TensorFlow callbacks and how to use them to have full control over the training.
The context of this article are:-
1. custom callbacks by subclassing callback class.
2. Early stopping callback.
3. Model checkpoint callback.
4. ReduceOnPlateu callback.
5. Learning rate Scheduler.
6. Bonus package for making the output clean and colorful, as shown above.
But let’s first load the cats_vs_dogs dataset, I’ve been using the very small subclass of the original dataset. And then, let’s define our model architecture using sequential API. Throughout this article, I’m using this dataset and this model architecture.
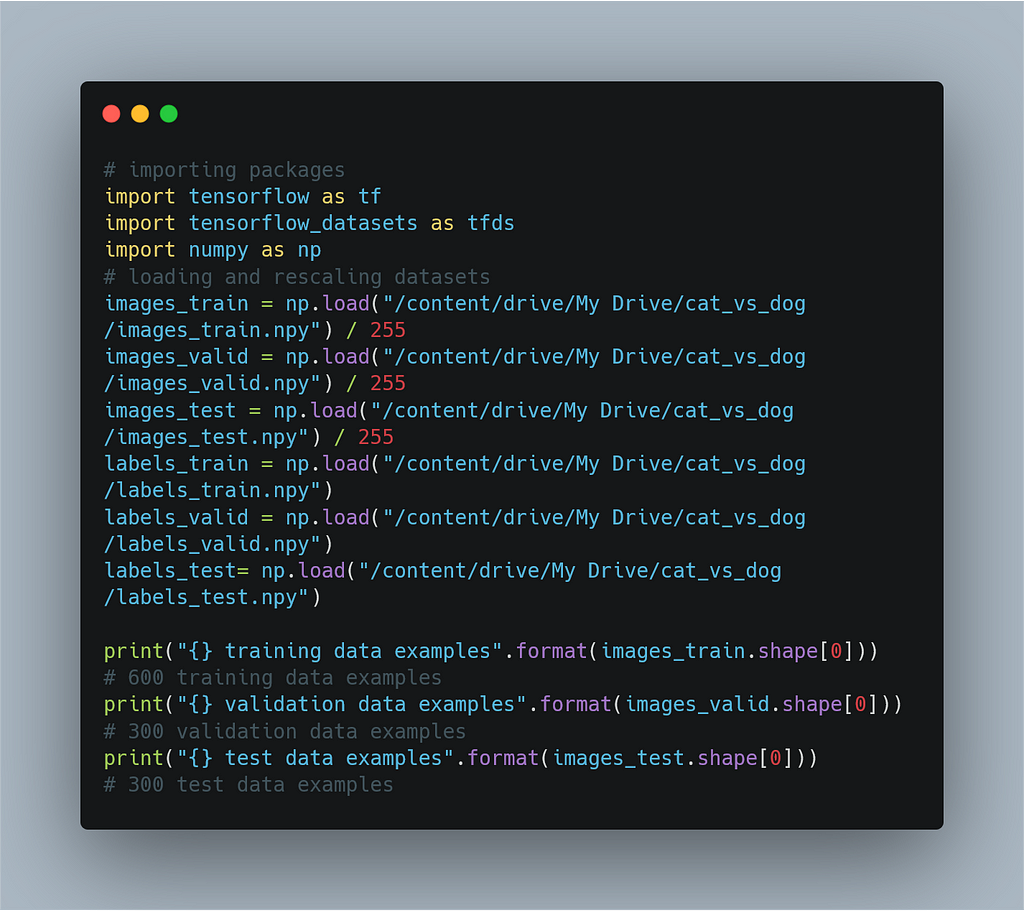
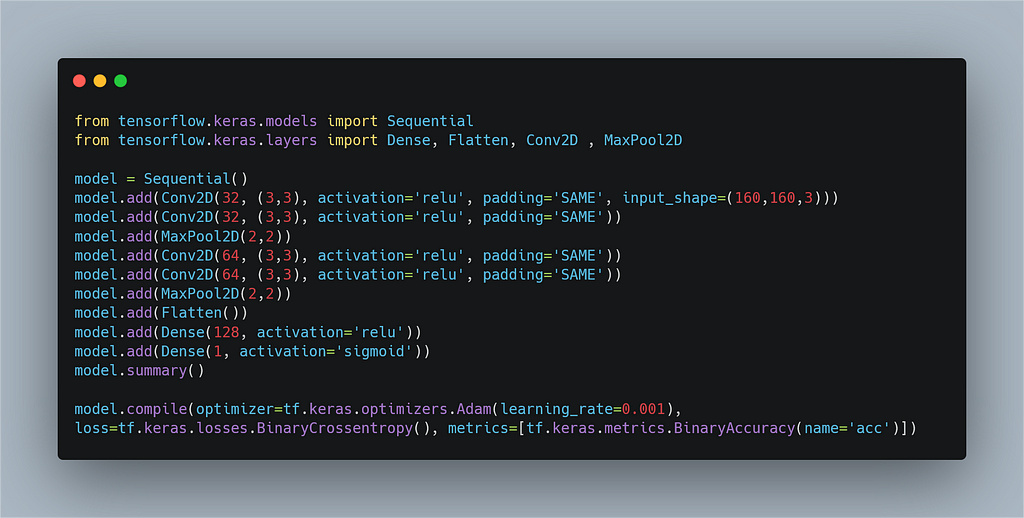
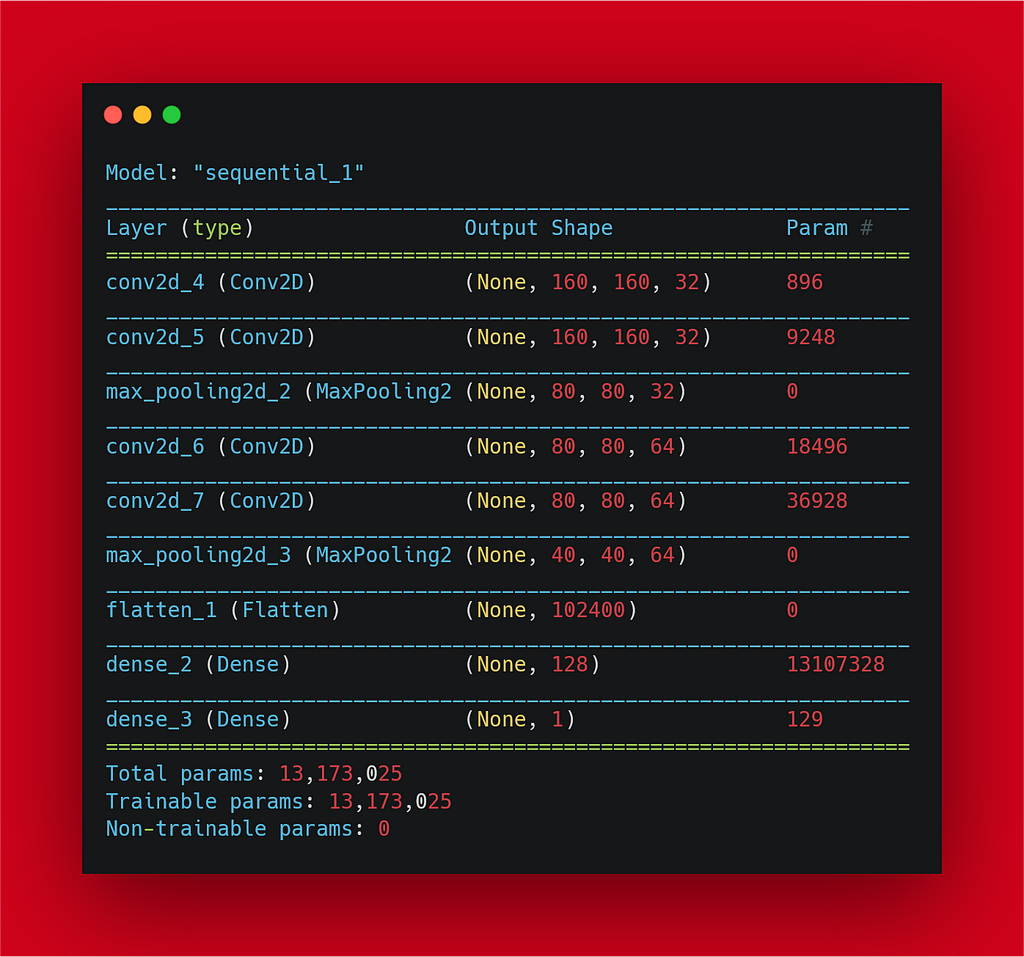
Note:- This article is all about the TensorFlow callbacks and not for making a world-class ML model and for achieving the state-of-art result. So, throughout this article, ignore the loss and the metrics and try to focus on how to use these callbacks. The dataset is minimal, and it may overfit, but you can ignore all these things.
So, without further delay, let’s start learning about the callbacks mentioned above.
1. Custom callbacks by subclassing callback class.
These callbacks come under the base class “tf.keras.callbacks.”
By subclassing these callbacks, we can perform certain functions when the training/batch/epochs have started or ended.
For this, we can override the function of callback classes.
The name of these functions is self explain their behavior.
For example def on_train_begin(), this means what to do when
training will begin.
Let’s see below how to override these functions. We can
also, monitor logs and perform certain actions, generally at
the starting or the ending of the training/batch/epochs.
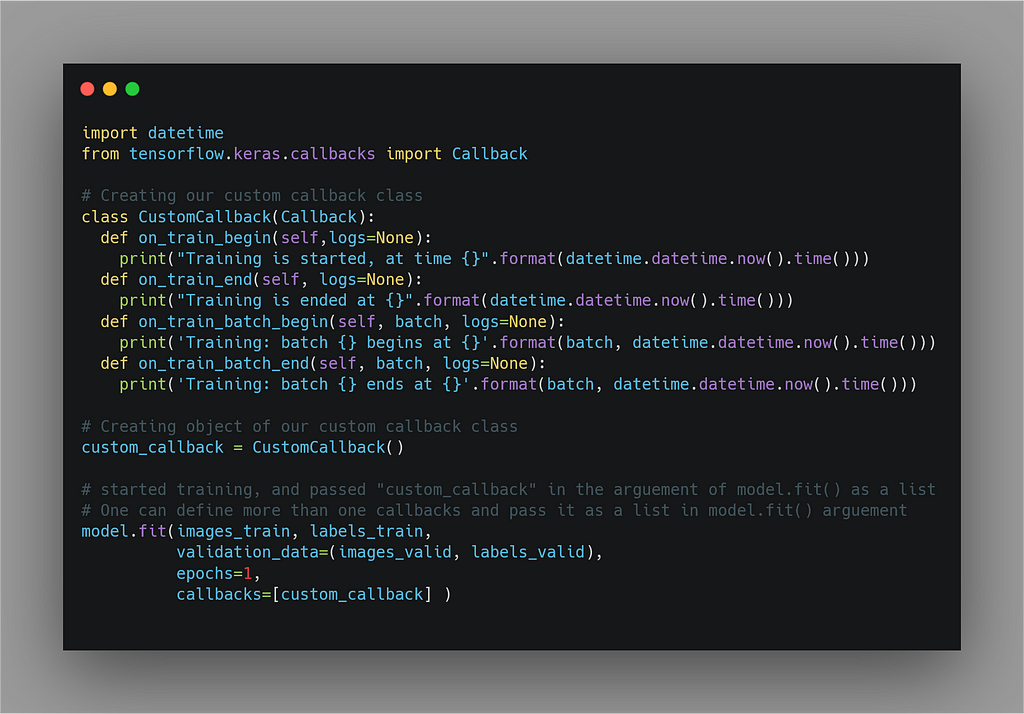
Output:
2. EarlyStopping Callback.
Suppose we don’t know about the callbacks, and you want to prevent the overfitting of the model caused by training our model into extra epochs(we’re not god so that we know at how many epochs our model is going to converge). So, we plot the val_loss vs. epochs graph and examine
how many epochs it’s started overfitting the data. Then we’ll re-train our model in less than that epoch number.
What if I’ll tell you don’t have to do this thing manually.
Yes, you can do this by using EarlyStopping Callback.
So, let’s see how one can use this callback.
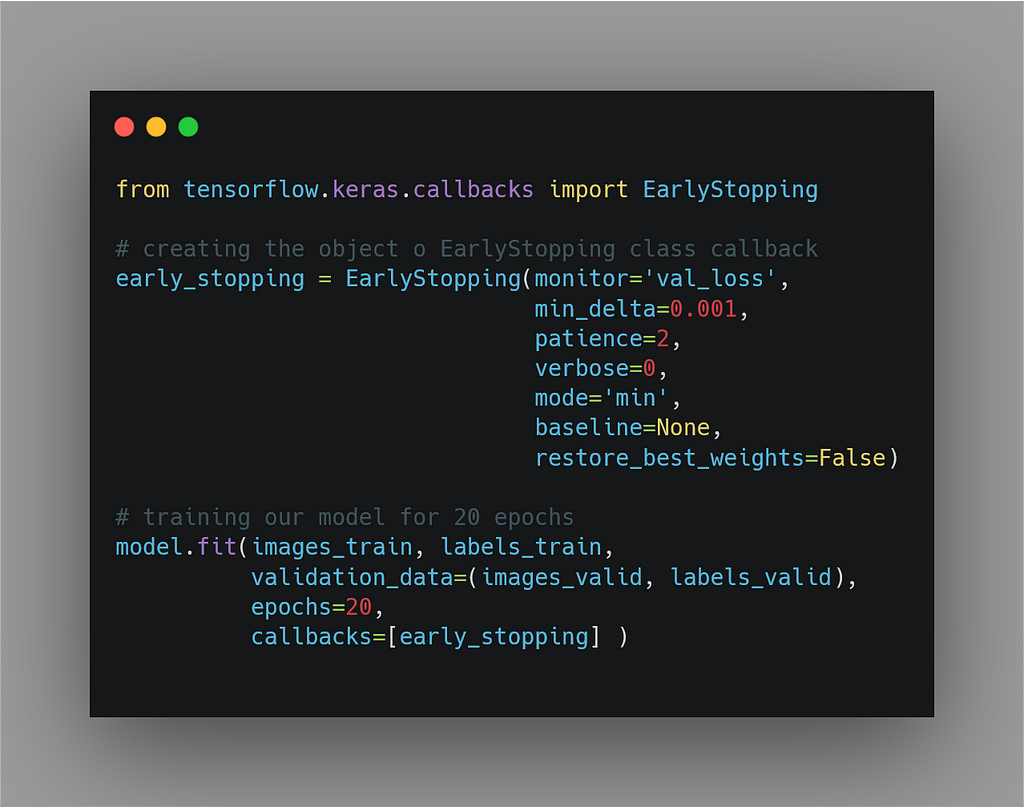
First, import the callback, and then create the instance of the
EarlyStopping callback and pass the arguments as per our needs.
Lemme explain these arguements .
- “monitor” you can pass the loss or the metric.
Generally, we pass val_loss and monitor it. - “min_delta” you can pass an integer in this argument.
In simple words, you’re telling the callback that the model
is not improving if it’s not decreasing more/less than the loss/metrics. - “patience,” it means about how many epochs to wait.
And after that, if there is no improvement seen in the
model performance according to the value of “min delta,” then stop the training. - “mode”
By default it’s set to ‘auto’ this comes handy when
you’re dealing with the custom loss/metric. So, you can
tell the callback whether the model is improving when
its custom loss/metric is decreasing then set it to “min”
or increasing then set it to “max.”
3. ReduceLROnPlateau.
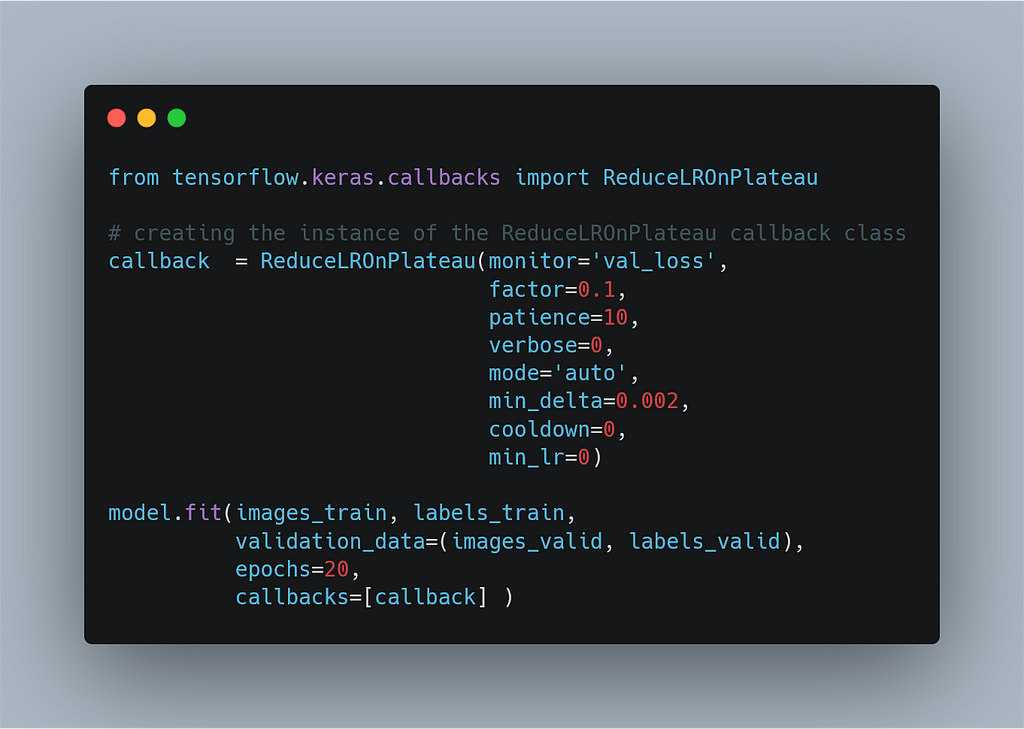
This callback is used to reduce the learning rate if there is
not any improvement in the loss/metric.
The arguments are:
* “monitor” it’s set to that loss/metric as a string
of which we are reducing the learning if it’ll not improve.
- “factor” You can pass an integer in this argument,
and say your current learning rate is LR, then if
there is not any improvement seen in the monitored loss/metric,
then the learning is going to decrease by that “factor.”
i.e new learning rate = lr * factor - “Verbose”
You can set verbose =1 to see the learning rate at every epoch.
Or verbose = 0 to disable it.
The argument min_delta and mode are the same as explained in the arguments of EarlyStopping Callback.
4. ModelCheckpoint
Let’s imagine you’re training a heavy model like Bert in colab,
and it requires a lot of time for training. So, you started the model training and went for sleep. And then the next morning
you wake up, and you open your colab.
But you’ll see the “Runtime Disconnect” message on your screen.
Sounds like a nightmare tough?
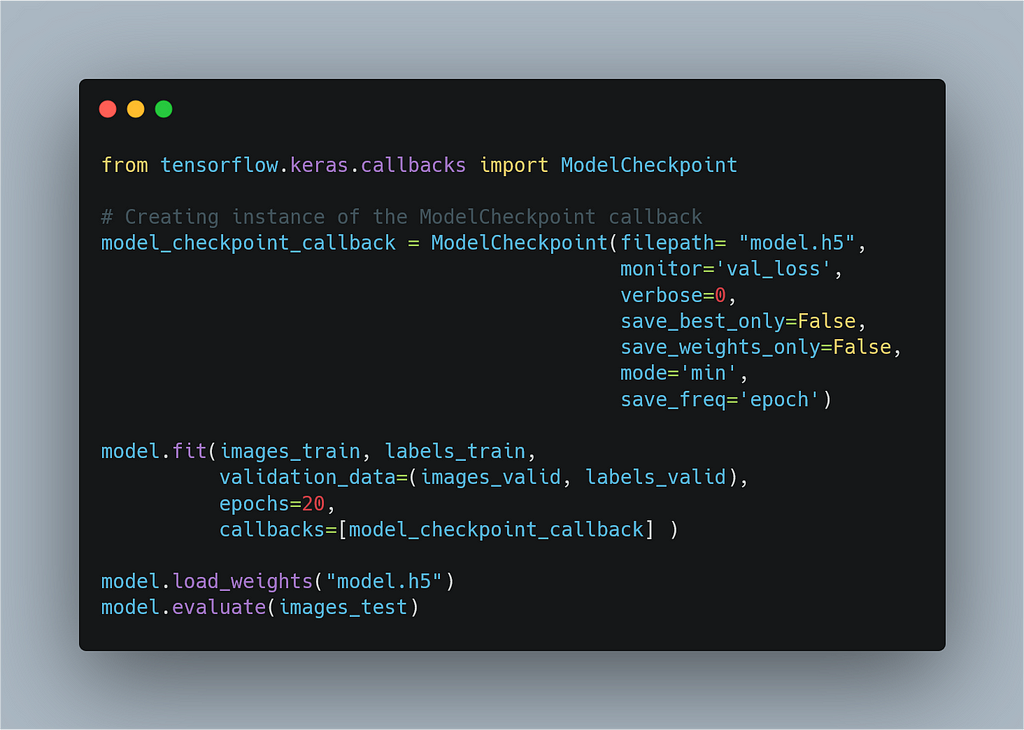
For this problem, ModelCheckpoint comes as a savior in our life. We can save the checkpoints at the end of every epoch.
So, that we can load the weights or resume the training if
something terrible happens while training.
So, let’s see how we can use this callback. We can save
the model checkpoint in Keras h5/hd5 format or TensorFlow pb
format. If you pass the argument “filepath= model.h5”(.h5 extension)
it’ll be saved in the Keras format or “filepath= model.p”(.pb extension)
for saving in the TensorFlow model format.
Also, there are two options to save the checkpoint either you can save the entire architecture+weights or just the weights. You can do this by setting “save_only_weights=True” or “save_only_weights=False”
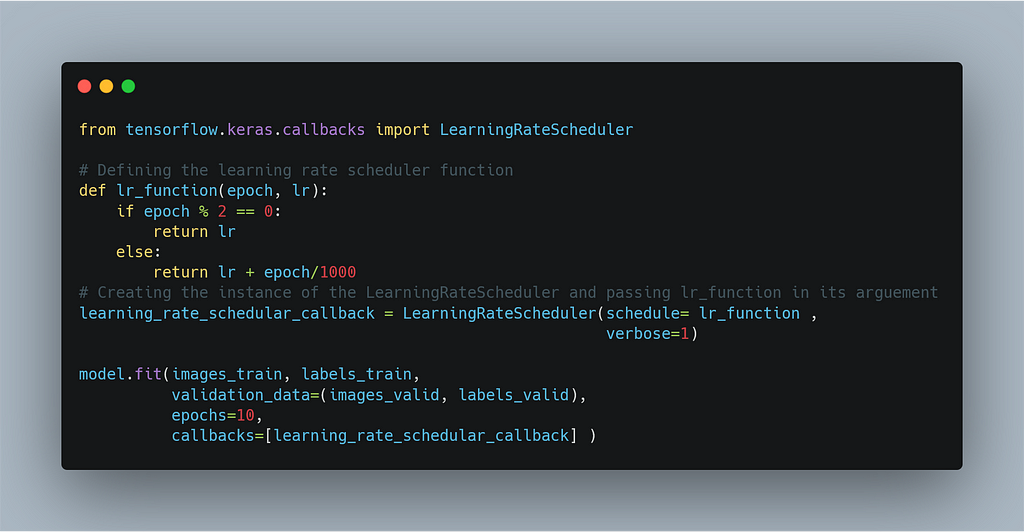
5. LearningRateScheduler
The simplest way to schedule the learning is to decrease the learning rate
linearly from a large initial value to a small value.
This allows large weight changes at the beginning of the
the learning process and small changes or fine-tuning towards
the end of the learning process.
Let’s see how to schedule the learning rate. For this, we have to
define an auxiliary function that contains the rules for
alternating the learning rate.
And then we can simply pass the name of this auxiliary function
to the argument of the object of the LearningRateScheduler class.
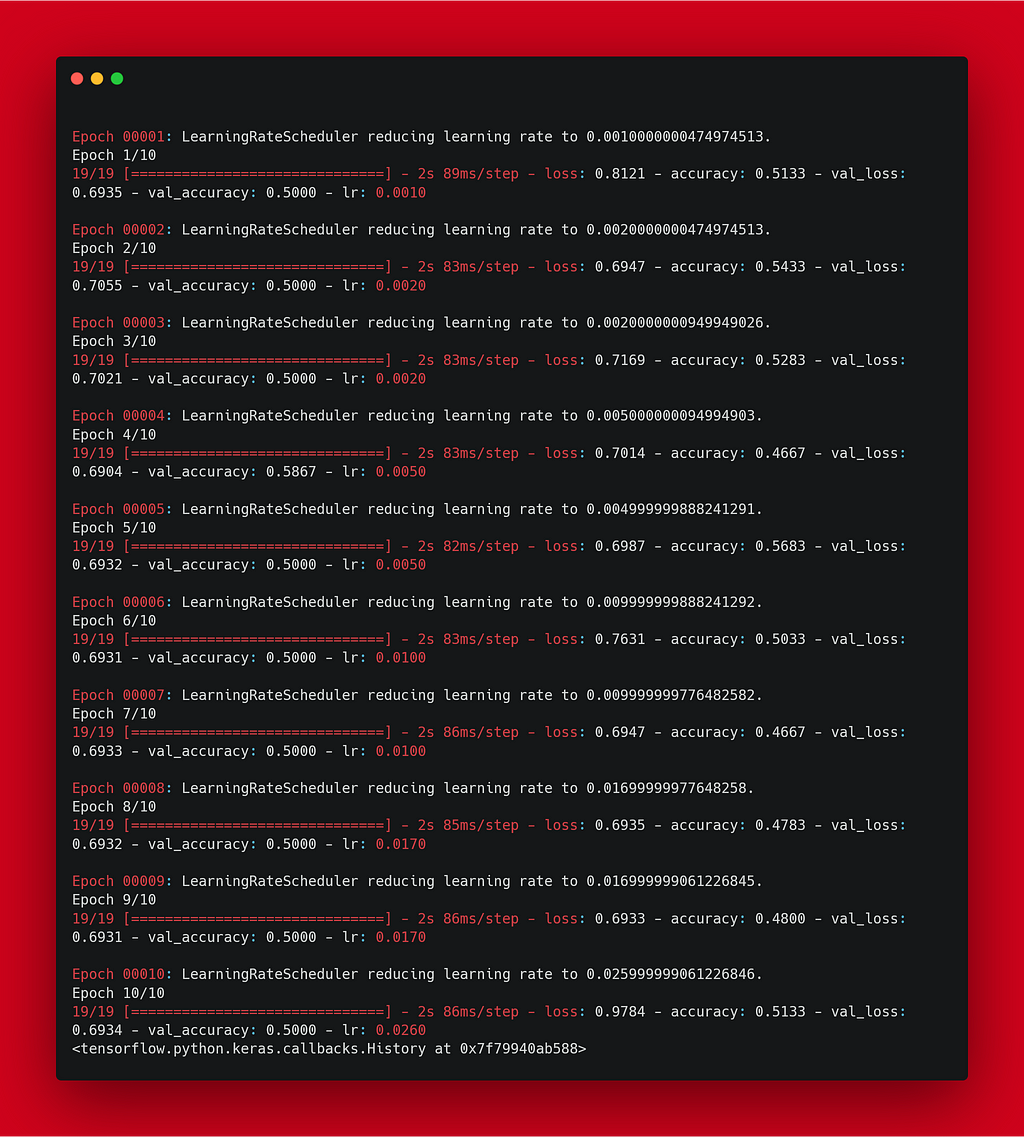
Output:
lastly here is the utility file to make training output cleaner and colorful.

Resources
You can run all the code above on Google’s colab.
TensorFlow Callbacks in Action was originally published in Towards AI — Multidisciplinary Science Journal on Medium, where people are continuing the conversation by highlighting and responding to this story.
Published via Towards AI
Take our 90+ lesson From Beginner to Advanced LLM Developer Certification: From choosing a project to deploying a working product this is the most comprehensive and practical LLM course out there!
Towards AI has published Building LLMs for Production—our 470+ page guide to mastering LLMs with practical projects and expert insights!

Discover Your Dream AI Career at Towards AI Jobs
Towards AI has built a jobs board tailored specifically to Machine Learning and Data Science Jobs and Skills. Our software searches for live AI jobs each hour, labels and categorises them and makes them easily searchable. Explore over 40,000 live jobs today with Towards AI Jobs!
Note: Content contains the views of the contributing authors and not Towards AI.


