


MLOps: Build and Deploy First Machine Learning Application with Kubernetes
Last Updated on July 12, 2023 by Editorial Team
Author(s): Maria Zorkaltseva
Originally published on Towards AI.
This tutorial will walk through the process of building and deploying a machine learning application using Kubernetes — an open-source platform for automating deployment, scaling, and management of containerized applications. The tutorial covers a brief Kubernetes architecture introduction, use cases, and basics of setting up a Kubernetes cluster locally (Minikube distribution), creating a Docker container for your machine learning application, and deploying it to the cluster.
Table of Contents
- What is Kubernetes and its use cases?
- Install Kubernetes on your local machine (Mac OS, M1)
- Machine learning workload deployment using Kubernetes (Minikube)
- References
What is Kubernetes and it’s use cases?
This article assumes that the reader is already familiar with Docker containers, and we will pass on this part. The article will mainly focus on the Kubernetes framework. But what is Kubernetes, and why is it needed?
A decade ago, Google utilized the Borg system for container management. Then, in 2014, Google released its project named Kubernetes, which originates from the Greek word “Helmsman.” Google made this project accessible to the general public, resulting in an incredible surge in the popularity of k8s, the abbreviated name for Kubernetes.
Kubernetes is an open-source container orchestration platform that automates the deployment, scaling, and management of containerized applications. Kubernetes provides a way to manage and orchestrate containerized applications across a cluster of machines. It allows you to declaratively (in yaml or json) define the desired state of your applications and the resources they need, and Kubernetes will automatically ensure that this state is maintained, even as conditions change.
At a high level, Kubernetes architecture consists of two main components: the control plane (also known as the master) and the worker nodes (also known as the minions).
The control plane is responsible for managing the overall state of the Kubernetes cluster, including scheduling workloads, scaling resources, and performing upgrades. It consists of several components, including the Kubernetes API server, etcd, the scheduler, and the controller manager.
The worker nodes are responsible for running the actual workloads, such as containers, on the cluster. Each worker node runs a Kubernetes agent called the kubelet, which communicates with the control plane to receive workloads to run. The worker nodes also run a container runtime, such as Docker or containers, to manage the actual containers.

What tasks could you solve with Kubernetes?
- different containerized applications and frameworks deployment: WEB and microservices-based applications, machine learning workloads, databases, data processing frameworks (Apache Spark, Apache Flink, Apache Kafka), DevOps tools (Jenkins, Travis, CircleCI, Ansible), monitoring and logging frameworks (Prometheus, Grafana, ELK stack) and etc.
- set up automatic control replicas number of your application
- allocate and manage resources (such as CPU and memory) for containers, ensuring that each container has the resources it needs to run
- set up autoscaling (horizontal or vertical) of your application when the load increases
- set up load balancing
- Kubernetes provides a secure way to manage sensitive information such as API keys, passwords, and certificates, using Kubernetes secrets
- set up user access
- do blue-green deployments
- do rollback in case of unsuccessful deployment
- set up canary deployments using Istio (for example, the new version of the application will receive 5% of the traffic, the old 95%)
- stop traffic hitting an application replica that fails a health-check
- reload an application that has not passed health-check
- Kubernetes provides built-in service discovery and DNS functionality, allowing containers to easily discover and communicate with each other.
- can integrate with monitoring and logging tools to provide insight into the health and performance of containerized applications running in the cluster.
Install Kubernetes on your local machine (Mac OS, M1)
To install Kubernetes on a local machine and experiment with it, we need:
- MacOS Ventura 13.3.1
- open source distribution, let’s choose Minikube
- command-line tool kubectl to interact with the cluster from command line
- Open Terminal on your Mac and type the following command to install package manager Homebrew
/bin/bash -c "$(curl -fsSL https://raw.githubusercontent.com/Homebrew/install/HEAD/install.sh)"
2. Install XCode Command Line Tools
xcode-select --install
For updating, type the following command
softwareupdate --all --install --force
Alternatively, you can download Command Line Tools from Apple website
3. Install Minikube, it will install Kubectl as well
brew install minikube
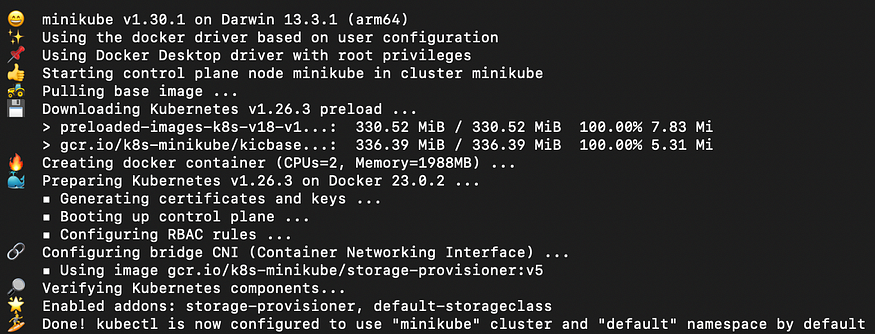
4. Run the docker service and type the following command, this command starts a local Kubernetes cluster using MiniKube
minikube start --driver=docker
You will see something like this
minikube status

kubectl get all

To stop cluster, you can run
minikube stop

To delete cluster, type
minikube delete
Machine learning workload deployment using Kubernetes (Minikube)
Let’s consider stages of machine learning model deployment within Kubernetes cluster.
Training module
To experiment with the cluster, let’s add some simple and minimalistic machine-learning models. Let’s take the Logistic regression method to classify Iris flowers into species.
import pickle
from sklearn.datasets import load_iris
from sklearn.model_selection import train_test_split
from sklearn.linear_model import LogisticRegression
from sklearn.metrics import f1_score


class IrisModelTrainer:

 def __init__(self):
 self.model = None
 self.X_train = None
 self.X_test = None
 self.y_train = None
 self.y_test = None

 def load_data(self):
 iris = load_iris()
 X = iris.data
 y = iris.target
 self.X_train, self.X_test, self.y_train, self.y_test = train_test_split(
 X, y, test_size=0.3, random_state=42)

 def train_model(self):
 self.model = LogisticRegression(random_state=42, solver='liblinear')
 self.model.fit(self.X_train, self.y_train)

 def evaluate_model(self):
 y_pred = self.model.predict(self.X_test)
 f1 = f1_score(self.y_test, y_pred, average='macro')
 return f1

 def save(self, filename):
 with open(filename, 'wb') as file:
 pickle.dump(self.model, file)


if __name__ == "__main__":
 trainer = IrisModelTrainer()
 trainer.load_data()
 trainer.train_model()
 score = trainer.evaluate_model()
 print("F1 score:", score)
 trainer.save('iris_model.pkl')
Application module
The next step will be to develop an API to interact with our model. Let’s use the FastAPI framework for this purpose.
import os
import pickle
import numpy as np

from typing import List
from fastapi import FastAPI
from pydantic import BaseModel

os.environ["MODEL_FILE_NAME"] = 'iris_model.pkl'

model_file_name = os.getenv("MODEL_FILE_NAME")

# Load the trained model
with open(model_file_name, 'rb') as f:
 model = pickle.load(f)

app = FastAPI()


# Define input data model
class IrisData(BaseModel):
 sepal_length: float
 sepal_width: float
 petal_length: float
 petal_width: float


# Define output data model
class IrisResponse(BaseModel):
 prediction: str


# Define the prediction function
def predict_iris_species(input_data):
 # Convert the input data into a numpy array
 input_array = np.array([
 input_data.sepal_length, input_data.sepal_width,
 input_data.petal_length, input_data.petal_width
 ]).reshape(1, -1)

 # Make the prediction using the loaded model
 prediction = model.predict(input_array)[0]

 # Map the integer prediction to the corresponding species name
 species_map = {
 0: 'Iris Setosa',
 1: 'Iris Versicolour',
 2: 'Iris Virginica'
 }
 prediction_name = species_map[prediction]

 # Return the prediction result
 return IrisResponse(prediction=prediction_name)


# Define the endpoint for single prediction
@app.post("/predict")
def predict_single(data: IrisData):
 return predict_iris_species(data)


# Define the endpoint for batch prediction
@app.post("/predict_batch")
def predict_batch(data: List[IrisData]):
 predictions = [predict_iris_species(item) for item in data]
 return predictions
Dockerfile preparation
After that, prepare the requirements.txt file, one can use pipreqs utility to get the current project requirements list.
numpy==1.22.3
scikit_learn==1.0.2
Dockerfile specification will look as follows
FROM tiangolo/uvicorn-gunicorn-fastapi:python3.9

COPY . /app

COPY requirements.txt .
RUN pip install --no-cache-dir -r requirements.txt

EXPOSE 80

CMD ["uvicorn", "app:app", "--host", "0.0.0.0", "--port", "80"]
Build the corresponding Docker image by typing the following command
docker build -t iris-fastapi-service:v1 .
Push Docker image to container registry
For this step, let’s use Docker Hub to save our image version.
- Make sure you have a Docker Hub account and that you’re logged in to the Docker CLI using
docker logincommand - Tag your local Docker image with your Docker Hub username and the desired image name and version:
docker tag iris-fastapi-service:v1 <dockerhub-username>/iris-fastapi-service:v1
3. Push the tagged image to Docker Hub
docker push <dockerhub-username>/iris-fastapi-service:v1
Prepare deployment and service yaml specification
The following YAML file creates a Kubernetes deployment with one replica and a load-balanced service that exposes port 80. The deployment ensures that the desired number of replicas of the application is running at any given time, and the service provides a stable IP address and DNS name for accessing the application.
# deployment yaml specification
apiVersion: apps/v1
kind: Deployment
metadata:
 name: iris-predictor-deployment
spec:
 replicas: 1
 selector:
 matchLabels:
 app: iris-fastapi-service
 template:
 metadata:
 labels:
 app: iris-fastapi-service
 spec:
 containers:
 - name: iris-fastapi-service
 image: <dockerhub-username>/iris-fastapi-service:v1
 ports:
 - containerPort: 80
 env:
 - name: MODEL_FILE_NAME
 value: "iris_model.pkl"
# service yaml specification
apiVersion: v1
kind: Service
metadata:
 name: iris-predictor-service
spec:
 selector:
 app: iris-fastapi-service
 ports:
 - name: http
 port: 80
 targetPort: 80
 type: LoadBalancer
The deployment approach we used here is called declarative (Infrastructure-as-Code, IaC) and it’s usually recommended to use instead of an imperative approach to manage the state of the cluster.
The declarative approach is based on defining the desired state of the resources in a YAML or JSON file, and then using Kubernetes tools to apply the configuration to the cluster. This approach is recommended for most scenarios, as it allows for better automation, version control, and reproducibility. With the declarative approach, you describe what you want to happen, and the Kubernetes system takes care of the how.
On the other hand, the imperative approach is based on using Kubernetes commands to directly modify the state of the cluster. If we were to use the imperative approach, we would enter the following command to create a deployment
kubectl create deployment iris-fastapi-service --image=<dockerhub-username>/iris-fastapi-service:v1 --port=80
Then to expose the deployment to the network using the imperative approach, the command will look as follows
kubectl expose deployment iris-fastapi-service --type=LoadBalancer --port=80 --target-port=80
- Start your Minikube cluster
minikube start --driver=docker
2. The following commands create a new deployment object and load balancer instance using the specifications defined in the YAML file. If the deployment and service objects already exist, it will be updated with the new specifications. Note that you need to be in the directory where the YAML file is located, or specify the full path to the file in the command.
kubectl apply -f iris-classifier-deployment.yaml
kubectl apply -f iris-classifier-service.yaml

3. Verify your deployment using the following command
kubectl get pods

In Kubernetes, a pod is the smallest deployable unit in the cluster. It represents a single instance of a running process in the cluster, and can contain one or more containers that share the same network namespace and storage volumes. By default, the output will include the following fields:
- NAME: The name of the pod.
- READY: The number of containers in the pod that are ready to run.
- STATUS: The current status of the pod (e.g., Running, Error, Completed). If deployment is finished successfully, STATUS should take the Running state.
- RESTARTS: The number of times the containers in the pod have been restarted.
- AGE: The amount of time that has passed since the pod was created.
To check the load balancer service and IP addresses, type the following command
kubectl get services

In Kubernetes, a service is an abstraction that defines a logical set of pods and a policy by which to access them. Services allow pods to be accessed by other pods within the same cluster, as well as by external clients outside the cluster. By default, the output will include the following information for each service:
- NAME: The name of the service.
- TYPE: The type of service (e.g., ClusterIP, NodePort, LoadBalancer).
- CLUSTER-IP: The IP address assigned to the service within the cluster.
- EXTERNAL-IP: The external IP address assigned to the service (if any).
- PORT(S): The port(s) on which the service is listening.
- AGE: The amount of time that has passed since the service was created.
Finally, to display URL of the iris-predictor-service service in the command line output, type the following command
minikube service iris-predictor-service --url

This URL should be used to make POST http requests to your API.
4. Check your service by sending HTTP requests, let’s use the simple Python script using requestslibrary
import requests

from app import IrisData

data = IrisData(sepal_length=5.1,
 sepal_width=3.5,
 petal_length=1.4,
 petal_width=0.2)

response = requests.post("http://127.0.0.1:49580/predict", json=data.dict())

print(response.json())

References
U+1F449U+1F3FB Full code is also accessible through my GitHub.
Join thousands of data leaders on the AI newsletter. Join over 80,000 subscribers and keep up to date with the latest developments in AI. From research to projects and ideas. If you are building an AI startup, an AI-related product, or a service, we invite you to consider becoming a sponsor.
Published via Towards AI
Related posts


Popular posts

 for 2021")


Updates

Recent Posts


