


How I built my own custom 8-bit Quantizer from scratch: a step-by-step guide using PyTorch
Last Updated on June 30, 2024 by Editorial Team
Author(s): Milan Tamang
Originally published on Towards AI.
A step-by-step approach to build custom 8-bit quantizers from scratch using PyTorch and quantize facebook/opt-350m.
Are you curious how popular quantizers such as BitsAndBytes, AWQ, and GGUF work under the hood? My response to this question would be why not we build our own 8-bit quantizer from scratch and find out ourselves?
Let’s start building.
In this post, we will build a custom 8-bit quantizer from scratch using our favorite PyTorch. Let’s call it MYQ 8-bit (My Quantizer) to make it sound more interesting. Below is our step-by-step plan of attack to achieve our goal.
- Step 1: We’ll build a MYQ 8-bit quantizer class and the associated functions.
- Step 2: We’ll get our model from the Hugging Face. We will choose the base model called facebook/opt-350m as this is a relatively small model so it would be faster to perform quantization and verify the result.
- Step 3: We will perform quantization on our base model using the MYQ 8-bit quantizer we would build in Step 1. Then, we’ll verify the new quantized model size and perform inferencing to observe the generated output.
- Step 4: This is a bonus step. I’ll share the full source code of the 4-bit quantizer at the end of this post and explain the technique I have used to build this 4-bit quantizer. You can use that code and enhance it further for your use case.
Note: This quantizer can be used to quantize any open-source LLM such as Llama 3, Mistral etc (provided you’ve sufficient resources — processing and memory). Also, if you’re not familiar with the basic concept of quantization, I would advise you to learn that first. I have also covered the quantization fundamentals extensively in my previous post. You might want to check the post in the link below:
Want to Learn Quantization in The Large Language Model?
A simple guide to teach you intuition about quantization with simple mathematical derivation and coding in PyTorch.
pub.towardsai.net
Step 1: Building MYQ 8-bit quantizer class
How does the quantization algorithm function at a granular level inside the deep neural network? let’s look at the diagram below to build up our understanding.

If you look at the diagram above, we can sum up the entire process in a single line “Replace the linear layer from the base model with the quantized layer in the quantized model”. And it’s quite simple to do so. Let me explain the entire process in pointers first and then we’ll write code together.
- We’ll first create a class called QuantizedLinearLayer that replicates all the characteristics of the base model Linear Layer. We must do this as our goal is to replace it later with our QuantizedLinearLayer.
- The QuantizedLinearLayer class needs to be initialized with in_features, out_features, and bias just like the linear layer in the base model.
- We’ll then create a forward function that works just like the activation in a deep neural network. It implements the in-built linear function of PyTorch (torch.nn.functional.linear) which replicates the linear function in the original base model.
- Finally, we will create the most important function called quantize inside QuantizedLinearLayer. This function is responsible for taking weight in fp16 from the base model and converting that to int-8. For simplicity, we’ll only quantize the weight parameters and we’ll use the Symmetric linear quantization method to build our quantizer.
Now, we’re ready to write code to create the QuantizedLinearLayer. I’ve provided comments on every line of code to explain the code, I hope that would help you understand the code better.
# Make sure to install these two libraries
# !pip install transformers
# !pip install -U "huggingface_hub[cli]" #For hugging face authentication

# First of all, import all the necessary libraries.
import torch
import torch.nn as nn
import torch.nn.functional as F
from transformers import AutoTokenizer, AutoModelForCausalLM, pipeline

# Since we're taking basemodel-facebook/opt-350m from huggingface,
# we must authenticate first. Please create your own token with huggingface

!huggingface-cli login --token hf_THkbLhyIHHmluGkwwnzpXOvR##########

# Define QuantizedLinearLayer class
class QuantizedLinearLayer(nn.Module):
 # As our target is to replace the linear layer from the base model. We must use the same parameters
 # such as in_features, out_features, bias = True, dtype=torch.float32, The dtype is a type of bias
 def __init__(self, in_features, out_features, bias = True, dtype=torch.float32):
 super().__init__()

 # Note that we're using self.register_buffer to store parameter variable value. This is because if we use nn.Parameter, the network will start calculating the gradient.
 # We don't want that as we're not using this for training.
 # weight will be initialized randomly between (-128, 127) which is a range of signed int-8
 self.register_buffer("weight", torch.randint(-128, 127, (out_features, in_features)).to(torch.int8))

 # scale will have dimension and data type same as the output as this will be multiplied to the output of linear layer
 self.register_buffer("scale", torch.randn((out_features), dtype=dtype))

 # bias is an optional parameter, so we only add it if is not none.
 # bias dimension is (1, out_features) as it can later broadcasted during addition.
 if bias:
 self.register_buffer("bias", torch.randn((1, out_features), dtype=dtype))
 else:
 self.bias = None

 # 8-bit quantization function
 def quantize(self, weight):
 # Clone the weight and outcast it to fp32 which is necessary to calculate the scale as both types must be in fp32
 weight_f32 = weight.clone().to(torch.float32)

 # calculating the min and max of int-8 quantized range. qmin=-128, qmax=127
 Qmin = torch.iinfo(torch.int8).min
 Qmax = torch.iinfo(torch.int8).max

 # calculating per channel scale
 # In per channel scale, you'll be calculating the scale for every row. So, you'll store the scale in a tensor in this case.)
 # In per tensor scale, you'll calculate one scale for entire tensor. Per channel will be more accurate but take more memory footprint as it has to store more scale value.
 # weight_f32.abs().max(dim=-1).values -> this give the max-value for original weight value range in fp32.
 scale = weight_f32.abs().max(dim=-1).values/127
 scale = scale.to(weight.dtype)

 # This gives the quantized weight value for the given weight tensor.
 # This formula was derived from symmetric quantization. please read the link I've shared above if you want to learn in detail.
 quantized_weight = torch.clamp(torch.round(weight/scale.unsqueeze(1)), Qmin, Qmax).to(torch.int8)

 self.weight = quantized_weight
 self.scale = scale

 def forward(self, input):
 # This gives the output the same way as the linear function in the base model.
 # The only difference is that the weight value is now the quantized weight value.
 # Hence, this gives less processing by faster calculation and less memory utilization.

 output = F.linear(input, self.weight.to(input.dtype)) * self.scale
 if self.bias is not None:
 output = output + self.bias
 return output
Now, that we’ve defined our QuantizedLinearLayer class, we’ll create a function that replaces the base model LinearLayer class with our QuantizedLinearLayer class. Let’s do it.
def replace_linearlayer(base_model, quantizer_class, exclude_list, quantized=True):

 # Finding only the instance of base_model which has the linear layer
 # Also we have to make sure to exclude those linearlayer that are in the exclude list.
 for name, child in base_model.named_children():
 if isinstance(child, nn.Linear) and not any([x == name for x in exclude_list]):
 old_bias = child.bias
 old_weight = child.weight
 in_features = child.in_features
 out_features = child.out_features

 # This is the stage where we'll initialize the quantizer class with the in_features, out_features, bias and dtype.
 # The base_model parameters values are given to the quantizer class parameters.
 quantizer_layer = quantizer_class(in_features, out_features, old_bias is not None, old_weight.dtype)

 # After the quantizer class is initialized, The replacement takes place as below.
 setattr(base_model, name, quantizer_layer)

 # Now that after replacement, base_model linear layer is now a quantizer layer.
 # We can now call the quantize_layers quantize function to quantize the old_weights of FP16 new quantized weights of int8 type.
 if quantized:
 getattr(base_model, name).quantize(old_weight)

 # If bias is not none, we'll also update bias with the base model bias value
 if old_bias is not None:
 getattr(base_model, name).bias = old_bias

 # If the base model child instance has further sub-components with linear layers, we'll have to quantize them by calling the replace_linear_layer function with the child as base_model now.
 # This will replace all the linear layers with quantized layers that are under the child sub-section.
 else:
 replace_linearlayer(child, quantizer_class, exclude_list, quantized=quantized)
Step 2: Now that we’ve created our quantizers, let’s get our base model(facebook/opt-350m) from the hugging face. Please make sure to have an account with the Hugging Face and use your own auth token. The process is simple and it is free too.
# Take note that we'll be downloading the model in bfloat16 instead of its original fp32 datatype.
# This will reduce the size of the base model and our quantization time later.

tokenizer = AutoTokenizer.from_pretrained("facebook/opt-350m")
model = AutoModelForCausalLM.from_pretrained("facebook/opt-350m", torch_dtype=torch.bfloat16)

print("facebook/opt-350m: base model architecture before quantization")
print("-"*50)
print(model)

In the base model architecture above, all the linear layers in the blue dotted box will replaced with quantized layers while the one in the green dotted box will be excluded. LLM models are made up of many transformer layers connected to each other and each layer’s output layer acts as input to the next layer. So, quantizing the outmost layer might impact the overall accuracy of the model. Hence the better approach would be to exclude it.
Let’s check the size of this base model before quantization. The size is 0.66 GB (662 MB).
# check the size of this base model before quantization
model_memory_size_before_quantization = model.get_memory_footprint()
print(f"Total memory size before quantization (in GB): {model_memory_size_before_quantization / 1e+9}")

Let’s perform inference on this facebook/opt-350m base model.
# Let's perform inference on this facebook/opt-350m base model
pipe = pipeline("text-generation", model=model, tokenizer=tokenizer)
pipe("Malaysia is a beautiful country and ", max_new_tokens=50)

Step 3: We’ll now run the replace_linearlayer function. It does two important tasks.
- It invokes the quantizer class and quantizes all weights in the linear layer except the one in the exclude list.
- It will then replace all the linear layers with the quantized layer except the one in the exclude list.
Let’s write a code that runs the replace_linearlayer function.
# model: base_model, QuantizedLinearLayer: quantized layer we've created in step 1, ["lm_head"]: exclude list
# quantized=True: If we set quantized value to False, the quantizer will only replace the linear layer with quantized layer but it won't quantized the weight.
# We'll need this if we're to save the quantized model to say huggingface or other cloud provider.
# Later, any user can download this quantized model and create the base model skeleton in order to load the model.

replace_linearlayer(model, QuantizedLinearLayer, ["lm_head"], quantized=True)
print("facebook/opt-350m: quantized model architecture")
print("-"*50)
print(model)
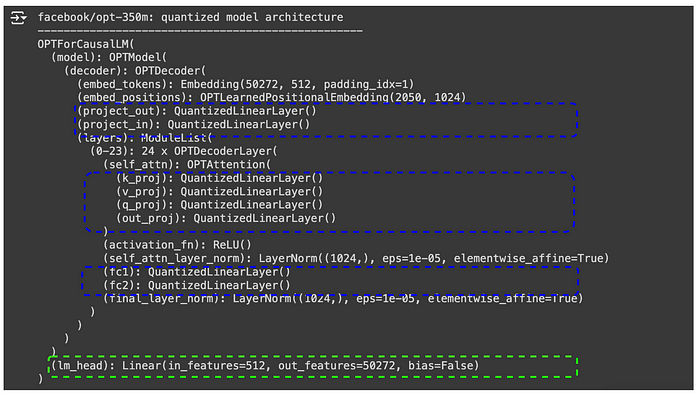
In the quantized model architecture above, you can see now that all the Linear layers in the blue box are replaced with QuantizedLinearLayer while the one in the green dotted box is still unchanged.
Let’s check the size of this quantized model now. The size is 0.35 GB (359 MB). This is 54% less than the base model size. This is pretty great.
model_memory_size_after_quantization = model.get_memory_footprint()
print(f"Total memory size after quantization (in GB): {model_memory_size_after_quantization / 1e+9}")

And, Let’s perform inference on this quantized model.
pipe = pipeline("text-generation", model=model, tokenizer=tokenizer)
pipe("Malaysia is a beautiful country and ", max_new_tokens=50)

Surprisingly, the inferencing in the quantized model gives the same accuracy. That is very impressive. I invite you to try it yourself.
Step 4: MYQ 4-bit quantizer
To build a 4-bit quantizer, in addition to all the tasks we’ve performed earlier, you will also implement a new technique. The technique is called weight-packing and weight-unpacking. As of today, PyTorch doesn’t support 4-bit or 2-bit or anything lesser than Int-8. So, we’ll have to use the weight-packing technique to achieve our goal.
Weight-Packing: If we are to store a 4-bit encoded weight parameter value as an int8 data type, the memory footprint remains the same as that of an actual 8-bit encoded tensor. So, we’ll have to find a way where a 4-bit encoded value should only allocate 4-bit memory space. This way if we quantized in 4-bit, the overall quantized model memory footprint remains nearly half a size smaller than the 8-bit quantized model. Hence, the weight-packing technique helps us achieve this. In the weight-packing technique, we’ll add multiple 4-bit encoded values into a single 8-bit tensor as long as it fits in. This way, the 4-bit encoded value allocates only 4-bit space, and the remaining space is utilized by another 4-bit encoded value.
Weight Unpacking: The model only processes the floating point values during inferencing. Hence, we’ll have to use the Weight-Unpacking technique that takes each packed weight tensor and separates them into individual 4-bit encoded values which will be individually assigned an Int8 data type. Each 4-bit encoded value gets 8-bit memory space and we can then convert them to fp32 for inferencing.
I will also share the source code for the 4-bit quantizer below. FYI, the 4-bit quantization process took me a long time. Feel free to use the code, test it, and modify it and you may share your experience upon testing yourself.
And this is it! we have successfully built a custom 8-bit quantizer ourselves from scratch.
My closing thoughts
- If you have coded along and completed building 8-bit quantizers, you should now be able to understand the core algorithm of any new quantizers that come into the AI space. You can easily use them in other use cases with much less effort.
- One of the main challenges during the quantization of the LLM model above billions of parameters is that you’ll need larger resources in terms of processing and memory. However, for smaller models below 1 billion parameters, I suggest you try with Kaggle Notebook, which now gives up to 30GB RAM (GPU T4 x 2 accelerator), which is pretty awesome.
Stay tuned, and Thanks a lot for reading!
References
- From hugging face Blog: https://huggingface.co/docs/optimum/en/concept_guides/quantization#pratical-steps-to-follow-to-quantize-a-model-to-int8
- From deeplearning.ai: Quantization in Depth
- From hugging face blog: https://huggingface.co/blog/hf-bitsandbytes-integration
Join thousands of data leaders on the AI newsletter. Join over 80,000 subscribers and keep up to date with the latest developments in AI. From research to projects and ideas. If you are building an AI startup, an AI-related product, or a service, we invite you to consider becoming a sponsor.
Published via Towards AI
Towards AI Academy
We Build Enterprise-Grade AI. We'll Teach You to Master It Too.
15 engineers. 100,000+ students. Towards AI Academy teaches what actually survives production.
Start free — no commitment:
→ 6-Day Agentic AI Engineering Email Guide — one practical lesson per day
→ Agents Architecture Cheatsheet — 3 years of architecture decisions in 6 pages
Our courses:
→ AI Engineering Certification — 90+ lessons from project selection to deployed product. The most comprehensive practical LLM course out there.
→ Agent Engineering Course — Hands on with production agent architectures, memory, routing, and eval frameworks — built from real enterprise engagements.
→ AI for Work — Understand, evaluate, and apply AI for complex work tasks.
Note: Article content contains the views of the contributing authors and not Towards AI.
Related posts
Recent Posts


")