


How do the text2image Models Work?
Last Updated on July 17, 2023 by Editorial Team
Author(s): Anton Lebedev
Originally published on Towards AI.
You probably have heard about Dalle-2, Midjourney, and Stable Diffusion. These are models that generate images from text. Recently, they have advanced to the point where artists are protesting by putting pictures with calls to ban AI in stock images, and recently even a lawsuit was filed. In this article, we will be discussing how these models work. We will start with the basics and gradually add details and techniques for a generation. But we will avoid complex mathematics — if you want to delve into it, I recommend this article (link).
Diffusions
All the popular text2image models are diffusions. So, we will start with an explanation of what diffusion is. Diffusions in neural networks is a method of image generation. And we will start discussing this method in the context of generation without any conditions. Without text.
The diffusion process in the context of image generation is two processes: the forward and the backward. The forward process corrupts the image; the backward process restores it. We will start with the forward process. It corrupts the image into white noise. And this is an important detail. As a result, we want to not just corrupt the image and make it uninterpretable, but we want to get a normal independent distribution of pixels. Why do we need this? To sample from this normal distribution. In other words, our forward process simplifies the distribution of images, and in the end, it becomes so simple that we can easily generate these “corrupted” images.

We will corrupt the image according to the following formula:

This formula means that at each step, we will multiply the image by a number less than one and add noise. Thus, after many steps, we will make the white noise from the image.
To understand the process, I like the image below. It shows well how at each step of the process, we simplify the distribution of images to something very clear.

Now for the most interesting part. We’ve generated a noisy image. It needs to be denoised. The denoising will be done by a trainable neural network. Here, we need to remember how we added noise: we multiplied the image by a constant and added noise. We know the constants. We know the result. Therefore, to restore the image, we need the noise. Specifically, we will predict the noise with the neural network.
Now we need to choose the neural network. We will be predicting noise the same size as the image. For such tasks, the Unet is often used. And that is what we will be using. Unet is a symmetrical architecture. The image on input, image on output. In our case, the input will be not only the image but also the time. To add it, some use a small MLP to get embedding from the time, trigonometric transformations, or both. The resulting features are fed through multiplication or concatenation into the feature maps of the Unet.

As a result, we get these algorithms. Here, t is the step number (time), x_i are images, \epsilon_i are noise, and \epsilon_{\theta} is our network.
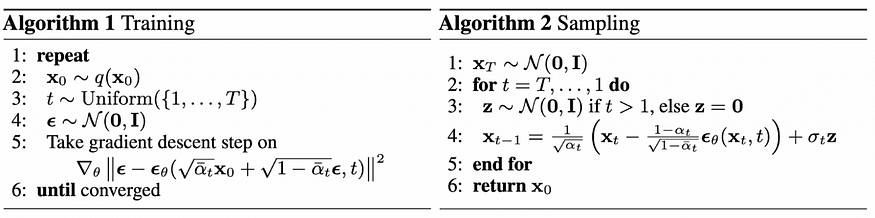
Pay attention to sampling. The sampling described above is basic and very clear. We literally do the whole process backward. However, sampling algorithms can be different. And they can run on top of a trained model without additional training. The idea is that we can “cut corners” during the reverse process. Do not take all the steps, but only part, and adjust the constants in the formulas. However, since we have agreed not to use math, we will not describe any math behind it.

Stable Diffusion
As we have covered the general principles of diffusions, it’s time to take a closer look at specific methods. We will be discussing Stable Diffusion, one of the most talked-about text2image models. This model is distinguished by its openness. There is an article, source code, and weights available for it. The most important thing, perhaps, is the weights because their availability has generated many interesting techniques over the already trained model.
The first enhancement is that the diffusion process runs in the latent space. The thing is that Unet is a heavy architecture. Ьay is not in terms of the number of weights but in terms of the number of operations. It works in the original resolution of the input image and takes a lot of time. Especially if you consider that in the diffusion process, the network needs to be run many times. This is where the idea comes from — the diffusion process needs to be run not on images but on their representations in lower resolution. In other words, not in the space of images, but in the hidden, latent space. To convert the image into such a space, an autoencoder is used. This is a neural network of two subnetworks. The encoder compresses the image, and the decoder, which decompresses it back. The compressed image will be our latent representation.
The second modification is the conditioning method. Specifically, how we will give the diffusion information about the text. The feature of Stable Diffusion is that the mechanism is modular, and information can be transferred not only about the text but also about anything.
How does it work? In two stages. In the first stage, features are extracted from the condition using a pre-trained network. In the case of text, CLIP ViT-L/14 is used. The output is feature vectors for each text token.
The second stage is the injection of these features into the diffusion process. This is done using a cross-attention mechanism. With its help, we will pass information about the text to the intermediate layers of the Unet.

Cross-attention was invented for neural networks that work with text. In short, the idea is that as input to the cross-attention, Q, K, and V are given. In our case, Q, V are token embeddings from the text multiplied by trainable projecting matrices. K has also projected features, but this time from the Unet. What formally happens next is well seen in the picture. But in terms of interpretation, attention is responsible for calculating the attention mask (a tensor of numbers between 0 and 1) based on K and Q, and then multiplying V by this mask.

These are the most striking details of Stable Diffusion. If you want more details, it is better to go to the paper, but we will stop here. As a result, we have an algorithm that can generate many meanings in high-quality images. But we will go further and see what else can be done with it. And it can be done a lot, and first of all, because of the modularity. Since stable diffusion consists of many parts, and modules, producing intermediate results, by replacing these results, you can control generation.
Prompt-to-Prompt Image Editing

Let’s start with the task of editing the input text. If you just edit the text and send it for generations, you never know what will come out. Most likely something completely new. But what if we want to get the same image but slightly modified? Modified exactly where the text has changed? To do this, let’s remember how cross-attention works. Cross-attention creates masks between the features of the Unet and the embeddings of the tokens (words) in the request. If you look at these masks, it will unexpectedly turn out that they are meaningful and represent the object generated for the corresponding word. And they also change over time in a meaningful way. From a blurry mush spread all over the picture to a recognizable image.

The idea is that for text editing, let’s use the masks of the original text on the first reverse diffusion iterations and modified ones on the last. And this idea works. The later you start changing the masks from the original text, the better the original image will be preserved.

Dreambooth
Now let’s imagine that we want to generate an image of a person, not of any person, but of ourselves. And even in different styles. Unfortunately, the network doesn’t know who you are, and there are no labeled photos of yourself in the datasets. So we will fine-tune it. We’ll invent a new word ‘w’, gather photos of ourselves, and fine-tune the network to restore ourselves when the query is ‘w person’.

And then generate ourselves in different styles. Or our dog. Or anything.
Vision Decoding
And finally, we will learn how to read minds. Or, more precisely, to restore what the subject sees from a fMRI image. fMRI is almost the same as MRI. A huge machine you lie in and wait while your brain is scanned. Like MRI, it measures oxygen, but it does it faster and at a lower resolution. The result is a 3D tensor, where the amount of oxygen is recorded in each voxel. We will compress this tensor with an autoencoder, put it in StableDifusion instead of text, and train.
It will work with an accuracy of 22%, meaning that in 22% of cases, the network will generate the same object that the patient saw. And that’s a lot for such a task!

That’s it. There is still a lot to talk about. How to generate music with the same technology, and how to make videos. But that’s for another time.
Join thousands of data leaders on the AI newsletter. Join over 80,000 subscribers and keep up to date with the latest developments in AI. From research to projects and ideas. If you are building an AI startup, an AI-related product, or a service, we invite you to consider becoming a sponsor.
Published via Towards AI
Related posts


Popular posts

 for 2021")


Updates

Recent Posts


