


FastAPI Template for LLM SaaS Part 2 — Celery and Pg-vector
Last Updated on December 11, 2023 by Editorial Team
Author(s): Euclidean AI
Originally published on Towards AI.
This blog post is part of the FastAPI + Supabase Template for LLM SaaS series, building on the concepts introduced in Part 1 (Auth and File Upload).
FastAPI Template for LLM SaaS Part 1 — Auth and File Upload
FastAPI’s rising popularity among Python developers is highlighted for its simplicity and native Swagger UI support…
pub.towardsai.net
Most of the code examples are referenced from Quivr.
Celery Worker and Message Queue for Long-running Process
The illustration below depicts how Celery workers and message queues collaborate in the FastAPI ecosystem. The process begins with FastAPI sending tasks to a designated broker (in this case, Redis). Subsequently, Celery workers retrieve and process these tasks within a distributed task queue, saving results to the Result backend (also Redis). Concurrently, FastAPI can monitor task status and outcomes. While the example uses a single Redis instance for both the Broker and Result backend, separate instances can be employed if necessary.
To initiate the development process, a Redis instance must be spun up using the following Docker commands:
# Pull the latest Redis image
docker pull redis:latest
# Run a Redis instance
docker run --name redis -d -p 6379:6379 redis:latest
Configure environment variables for the Broker and Result backend in your FastAPI project:
# Broker instance - Redis
CELERY_BROKER_URL=redis://localhost:6379/0
# Result backend - Redis
CELERY_RESULT_BACKEND=redis://localhost:6379/0
Create a dummy task in main.py for testing:
from celery import Celery
import time
celery = Celery(
 __name__,
 broker=os.getenv("CELERY_BROKER_URL"),
 backend=os.getenv("CELERY_RESULT_BACKEND"),
)@Celery.task
def test():
 import time
 time.sleep(5)
 return "Hello, I like eating celery!"
Go back to terminal and type in the celery command (assume you already have celery installed in the environment. If not, just use pip install)
celery --app=main.celery worker --concurrency=1 --loglevel=DEBUG
Note: if you are testing the script on a windows machine, you might need to add ‘-P solo’ on command to make it work in the local environment. This should not be needed for production.
You will see something like this below.
-------------- celery@xxxx v5.2.7 (dawn-chorus)
--- ***** -----
-- ******* ---- Windows-10-10.0.22621-SP0 2023-11-20 07:03:38
- *** --- * ---
- ** ---------- [config]
- ** ---------- .> app: main:0x22d23e16d70
- ** ---------- .> transport: redis://localhost:6379/0
- ** ---------- .> results: redis://localhost:6379/0
- *** --- * --- .> concurrency: 4 (prefork)
-- ******* ---- .> task events: OFF (enable -E to monitor tasks in this worker)
--- ***** -----
 -------------- [queues]
 .> celery exchange=celery(direct) key=celery
Now, you can open another terminal based off the working directory and use Python REPL for a quick test.
(.venv) PS C:\Users\xxx\backend> python
Python 3.10.11 (tags/v3.10.11:7d4cc5a, Apr 5 2023, 00:38:17) [MSC v.1929 64 bit (AMD64)] on win32
Type "help", "copyright", "credits" or "license" for more information.
>>> from main import app, celery, test
>>> test.delay()
<AsyncResult: 2ba428c1-5d82-4f37-aa89-5cef76b7a6eb>
Go back to the other terminal where you have Celery worker running, uou should observe the task execution in the Celery worker’s terminal.
[2023-11-20 12:21:46,743: INFO/MainProcess] Task main.test[2ba428c1-5d82-4f37-aa89-5cef76b7a6eb] received
[2023-11-20 12:21:51,754: INFO/MainProcess] Task main.test[2ba428c1-5d82-4f37-aa89-5cef76b7a6eb] succeeded in 5.014999999999418s: 'Hello, I like eating celery!'
File upload and vector datastore (pg-vector plug in)
Building upon the Celery test, the actual use case involves running a background Celery task to embed a PDF document and save it to a vector datastore. The process involves uploading the file to a Supabase Storage Bucket and triggering a Celery task to download and process it for the vector datastore.

The whole process is a little bit complicated. The file will firstly be uploaded to Supabase Storage Bucket. Then we trigger a celery task to download this file and process it for the vector datastore. The process will involve a Document Loader to convert from the original file format into raw text and a Text Splitter to split the text into chunks (due to the size limit of a single vector on vector datastore). Also, we will add metadata for any particular text chunks. Then finally, the text chunks will be embedded into vectors and uploaded to Supabase vector datastore (postgres pg-vector plug-in).
SQL tables on Supabase
First of all, ensure two tables are created on Supabase for this demonstration: (more sql script examples, you can refer to https://github.com/StanGirard/quivr/tree/main/scripts)
-- Create users X vectors table
CREATE TABLE IF NOT EXISTS user_vectors (
 user_id UUID,
 vector_id UUID,
 PRIMARY KEY (user_id, vector_id),
 FOREIGN KEY (vector_id) REFERENCES vectors (id),
 FOREIGN KEY (user_id) REFERENCES auth.users (id)
);

-- Create vector extension
CREATE EXTENSION IF NOT EXISTS vector;

-- Create vectors table
CREATE TABLE IF NOT EXISTS vectors (
 id UUID DEFAULT uuid_generate_v4() PRIMARY KEY,
 content TEXT,
 metadata JSONB,
 embedding VECTOR(1536)
);
Define Routes and Endpoints
In the main.py, add a new router ‘upload_router’.
from routes.upload_routes import upload_router
app.include_router(upload_router)
Create a new directory named ‘routes’, and create a file named ‘upload_routes.py’
from fastapi.responses import JSONResponse
from auth import AuthBearer, get_current_user
from celery_worker import process_file
from celery.result import AsyncResult
from fastapi import APIRouter, Depends, HTTPException, Request, UploadFile
from repository.files.upload_file import upload_file_storage
from logger import get_logger
from models import UserIdentity
logger = get_logger(__name__)
upload_router = APIRouter()
@upload_router.get("/upload/healthz", tags=["Health"])
async def healthz():
return {"status": "ok"}
@upload_router.post("/upload", dependencies=[Depends(AuthBearer())], tags=["Upload"])
async def upload_file(
request: Request,
uploadFile: UploadFile,
current_user: UserIdentity = Depends(get_current_user),
):
file_content = await uploadFile.read()
filename_with_user_id = str(current_user.id) + "/" + str(uploadFile.filename)
logger.info(f"file name is: {filename_with_user_id}")
try:
fileInStorage = upload_file_storage(file_content, filename_with_user_id)
logger.info(f"File {fileInStorage} uploaded successfully")
except Exception as e:
if "The resource already exists" in str(e):
raise HTTPException(
status_code=403,
detail=f"File {uploadFile.filename} already exists in storage.",
)
else:
raise HTTPException(
status_code=500, detail="Failed to upload file to storage."
)
task = process_file.delay(
file_name=filename_with_user_id,
file_original_name=uploadFile.filename,
user_id=current_user.id,
)
return JSONResponse({"task_id": task.id})
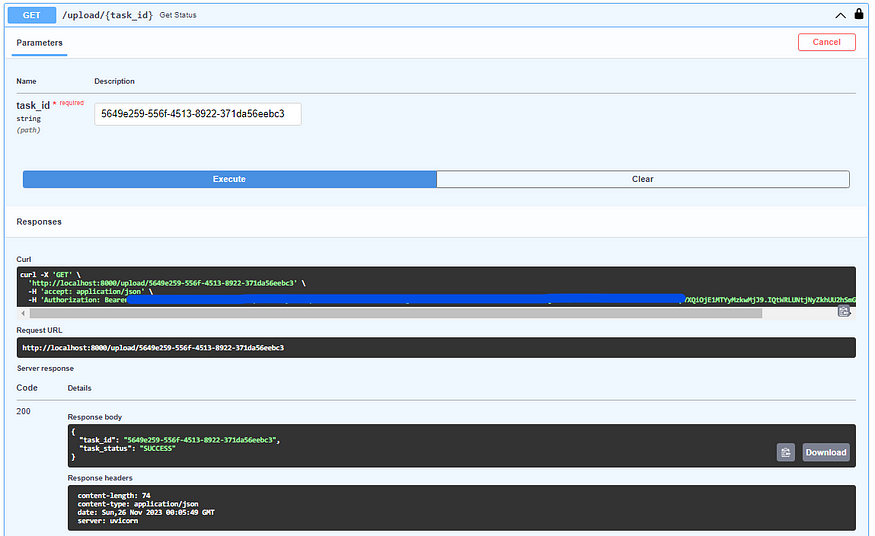
@upload_router.get("/upload/{task_id}", dependencies=[Depends(AuthBearer())], tags=["Upload"])
def get_status(task_id: str):
task_result = AsyncResult(task_id)
result = {
"task_id": task_id,
"task_status": task_result.status
}
return JSONResponse(result)
This script will define two endpoints in ‘upload_routes.py’ for uploading files and checking the task status.

You will see there is a celery task called ‘process_file’ in /upload. Let’s now create this task in celery.
Celery worker and tasks
Firstly, create a file in the main directory called ‘celery_worker.py’.
import os
from celery import Celery
import asyncio
from utils.process_file import get_supabase_client,file_handler

celery = Celery(
 __name__,
 broker="redis://127.0.0.1:6379/0",
 backend="redis://127.0.0.1:6379/0"
)

@celery.task(name="process_file")
def process_file(
 file_name: str,
 file_original_name: str,
 user_id: str,
):
 supabase_client = get_supabase_client()
 tmp_file_name = "tmp-file-"+file_name
 tmp_file_name = tmp_file_name.replace("/", "_")

 with open(tmp_file_name, "wb+") as file:
 res = supabase_client.storage.from_("quivr").download(file_name)
 file.write(res)
 loop = asyncio.new_event_loop()
 message = loop.run_until_complete(
 file_handler(
 file=tmp_file_name,
 user_id=user_id,
 file_original_name=file_original_name
 )
 )

 file.close
 os.remove(tmp_file_name)
This ‘process_file’ task will (refer to the process diagram above) download the file, use file_handler to process the file, then remove the temporary file after completion.
File Handling and Embedding
For simplicity, you can use the file_handler script below. This script has a worker to do all the embeddings. You can also look into Quivr’s code base where they have another shared task to have embeddings assigned to multiple workers.
# utils/process_file.py to process the uploaded file
import os
import time
from logger import get_logger

from repository.files.upload_file import DocumentSerializable
from langchain.document_loaders import UnstructuredPDFLoader
from models.databases.supabase.supabase import SupabaseDB
from supabase.client import Client, create_client
from langchain.vectorstores import SupabaseVectorStore
from langchain.embeddings.openai import OpenAIEmbeddings
from langchain.text_splitter import RecursiveCharacterTextSplitter
from dotenv import load_dotenv

load_dotenv()

logger = get_logger(__name__)

def get_supabase_client() -> Client:
 supabase_client: Client = create_client(
 os.getenv("SUPABASE_URL"), os.getenv("SUPABASE_SERVICE_KEY")
 )
 return supabase_client

def get_supabase_db() -> SupabaseDB:
 supabase_client = get_supabase_client()
 return SupabaseDB(supabase_client)

def get_embeddings() -> OpenAIEmbeddings:
 embeddings = OpenAIEmbeddings(
 openai_api_key=os.getenv("OPENAI_API_KEY")
 ) # pyright: ignore reportPrivateUsage=none
 return embeddings

def get_documents_vector_store() -> SupabaseVectorStore:
 # settings = BrainSettings() # pyright: ignore reportPrivateUsage=none
 embeddings = get_embeddings()
 supabase_client: Client = create_client(
 os.getenv("SUPABASE_URL"), os.getenv("SUPABASE_SERVICE_KEY")
 )
 documents_vector_store = SupabaseVectorStore(
 supabase_client, embeddings, table_name="vectors"
 )
 return documents_vector_store

def create_vector(doc):
 documents_vector_store = get_documents_vector_store()
 try:
 sids = documents_vector_store.add_documents([doc])
 if sids and len(sids) > 0:
 return sids

 except Exception as e:
 logger.error(f"Error creating vector for document: {e}")

def create_user_vector(user_id, vector_id):
 database = get_supabase_db()
 response = (
 database.db.table("user_vectors")
 .insert(
 {
 "user_id": str(user_id),
 "vector_id": str(vector_id),
 }
 )
 .execute()
 )
 return response.data

def create_embedding_for_document(user_id, doc_with_metadata):
 doc = DocumentSerializable.from_json(doc_with_metadata)
 created_vector = create_vector(doc)
 created_vector_id = created_vector[0] # pyright: ignore reportPrivateUsage=none
 create_user_vector(user_id, created_vector_id)

def compute_documents_from_pdf(file,loader):
 loader = loader(file)
 documents=[]
 documents = loader.load()
 # split the documents into chunks
 text_splitter = RecursiveCharacterTextSplitter.from_tiktoken_encoder(
 chunk_size=500, chunk_overlap=0
 )
 documents = text_splitter.split_documents(documents)
 return documents


async def file_handler(
 file: str,
 file_original_name: str,
 user_id,
 loader_class=UnstructuredPDFLoader, #the loader class from Langchain
):
 dateshort = time.strftime("%Y%m%d")

 documents = compute_documents_from_pdf(file,loader_class)

 for doc in documents: # pyright: ignore reportPrivateUsage=none
 metadata = {
 "file_name": file_original_name,
 "date": dateshort
 }
 doc_with_metadata = DocumentSerializable(
 page_content=doc.page_content, metadata=metadata
 )

 create_embedding_for_document(
 user_id, doc_with_metadata.to_json()
 )

 return "Hello, processing is done!"
For demonstration purposes, only pdf files are tested here. For more file formats, you can refer to Quivr’s code base, where a File class is used to process a wide range of file formats.
Testing End-to-End
The test this, simply switch on both the Uvicorn server (for FastAPI) and Celery server.
uvicorn main:app --reload
celery -A celery_worker worker --loglevel=info --logfile=celery.log --concurrency=1 -P solo
— logfile (optional): can save a celery log file in your working directory
— concurrency (optional): sets how many workers you want to turn on concurrently
— P solo: I need this to make celery run on a windows laptop. If you run it on Mac/Docker, you probably don’t need this.
Here is the snippet from testing the endpoints.

Join thousands of data leaders on the AI newsletter. Join over 80,000 subscribers and keep up to date with the latest developments in AI. From research to projects and ideas. If you are building an AI startup, an AI-related product, or a service, we invite you to consider becoming a sponsor.
Published via Towards AI
Related posts


Popular posts

 for 2021")


Updates

Recent Posts


