


Efficient Data Import into MySQL and PostgreSQL: Mastering Command-Line Techniques
Last Updated on December 21, 2023 by Editorial Team
Author(s): Abdulraqib Omotosho
Originally published on Towards AI.
In the field of database management, the ability to seamlessly import data is a crucial skill for any developer or data professional. While graphical user interfaces (GUIs) and tools like PgAdmin Workbench provide convenient interfaces for managing databases, there’s a distinct power and efficiency in using the command line to import data directly into MySQL and PostgreSQL. This article will guide you through the command-line methods for importing data, offering a hands-on approach that not only enhances your command-line prowess but also provides a deeper understanding of the underlying processes. It will empower you to efficiently import data into MySQL and PostgreSQL, paving the way for streamlined and scriptable database interactions whether you’re a seasoned command-line enthusiast or a newcomer looking to broaden your database management skills.
PostgreSQL
PostgreSQL, often referred to as “Postgres,” stands as a robust and open-source relational database management system (RDBMS). What sets PostgreSQL apart is its extensibility, standards compliance, and advanced features, making it a powerful choice for handling diverse data scenarios. Its support for various data types, indexing options, and complex queries positions it as a versatile solution for data management. When it comes to data import into SQL databases, PostgreSQL’s reliability, scalability, and extensibility make it an ideal candidate. Its ability to handle large datasets, coupled with support for complex operations, ensures a seamless and efficient data import process, making PostgreSQL a go-to choice for those seeking a powerful, open-source solution in the realm of SQL databases.
Without further ado, let’s get to the heart of the matter….
Firstly, for Windows users, let’s navigate to the SQL Shell (psql) on the desktop. Open the application by searching for “SQL Shell” or “psql” in the Start menu. Now, for Mac users, access the Terminal application, which serves as the command line interface. You can find it in the Applications > Utilities folder or by searching for “Terminal” using Spotlight.
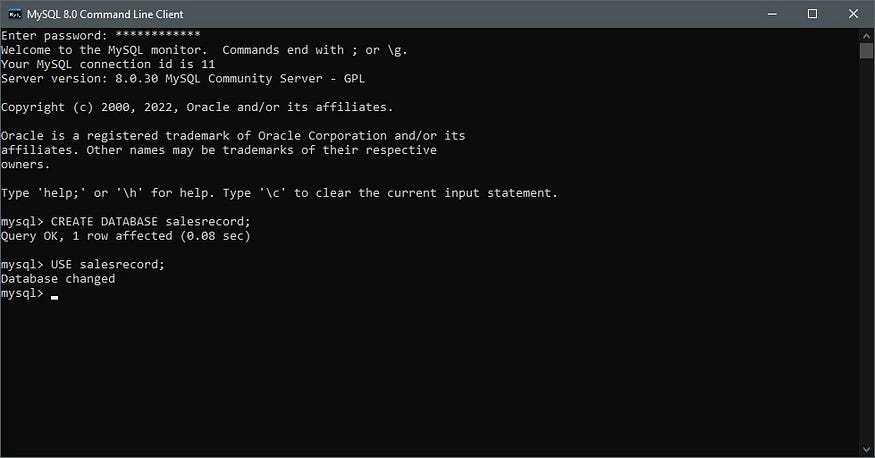
Next, in the Terminal or SQL Shell, hit Enter to navigate through the Server (localhost), Database (postgres), Port (5433), and Username (postgres). You’ll then be prompted to enter the password for the database. After entering the password successfully, you should see the below.

Following the navigation steps, create a database using the command below. In this instance, I’ve named it “salesrecord”.
CREATE DATABASE salesrecord;
Now, let’s connect to the newly created database, “salesrecord,” using the following command:
\c salesrecord;

Next, let’s create a table named “salesdata” in the database with specified column names and data types using the following command:
CREATE TABLE salesdata (
 region VARCHAR(255),
 country VARCHAR(255),
 item_types VARCHAR(255),
 sales_channel VARCHAR(255),
 order_priority VARCHAR(255),
 order_date DATE,
 order_id BIGINT,
 ship_date DATE,
 units_sold BIGINT,
 unit_price NUMERIC,
 unit_cost NUMERIC,
 total_revenue DECIMAL(10, 2),
 total_cost NUMERIC,
 total_profit DECIMAL(10, 2)
);

Finally, effortlessly import data into the “salesdata” table within seconds using the command below. Remember to specify the complete path of the file directory for seamless execution. In this instance, I’m importing from the “Datasets” directory within the “Python” folder on the Desktop, located in the Users directory on my local drive.
COPY salesdata
FROM 'C:/Users/user/Desktop/__Python__/Datasets/500000 Sales Records.csv'
WITH (FORMAT csv, DELIMITER ',', HEADER true);

After following all the above steps, we have our data successfully imported into the table in the database in just a few seconds.

MYSQL
MySQL, often called MySQL, is a strong and open-source database system. It’s known for being adaptable, following standards, and having advanced features, making it great for handling different types of data. With support for various data types and efficient ways of organizing data, MySQL is a versatile choice. When it comes to importing data into SQL databases, MySQL is reliable, scalable, and flexible. It can handle large amounts of data and complex operations, ensuring a smooth and effective importing process. MySQL is a top pick for those seeking a powerful, open-source solution for SQL databases.
Without further ado, let’s get to the heart of the matter….
For Windows users, search for “Command Prompt” in the Start menu, then right-click on “Command Prompt” and select “Run as administrator” to launch the MySQL Command Line Client with elevated privileges.
Navigate to the MySQL command line directory on your local drive using the terminal. In my case, I achieved this by executing the following command. This command ensures that you are in the correct directory for accessing MySQL’s command-line tools.
cd C:\Program Files\MySQL\MySQL Server 8.0\bin
Next, run the below command, which prompts you to enter your password.
mysql -u root -p --local_infile
After entering the password successfully, you should see the below.

Following the navigation steps, create a database using the command below. In this instance, I’ve named it “salesrecord”.
CREATE DATABASE salesrecord;
Now, let’s connect to the newly created database, “salesrecord,” using the following command:
USE salesrecord;
Enabling ‘SET GLOBAL local_infile = ‘ON’;’ becomes essential when efficient data loading from a local file into a MySQL table using the ‘LOAD DATA LOCAL INFILE’ statement is desired. This feature streamlines the data import process, contributing to a smoother user experience. However, it’s important to be aware that activating ‘local_infile’ introduces security considerations, particularly if the MySQL server is accessible over a public network. Once the data import is completed, the ‘local_infile’ option should be promptly disabled by executing ‘SET GLOBAL local_infile = ‘OFF’;’ to minimize potential vulnerabilities and ensure a secure MySQL environment. Users are encouraged to enable ‘local_infile’ selectively for specific tasks and disable it promptly afterward, prioritizing security within their MySQL setups.
SET GLOBAL local_infile = 'ON'
Next, let’s create a table named “salesdata” in the database with specified column names and data types using the following command:
CREATE TABLE salesdata (
 region VARCHAR(255),
 country VARCHAR(255),
 item_types VARCHAR(255),
 sales_channel VARCHAR(255),
 order_priority VARCHAR(255),
 order_date DATE,
 order_id BIGINT,
 ship_date DATE,
 units_sold BIGINT,
 unit_price DECIMAL(10, 2),
 unit_cost DECIMAL(10, 2),
 total_revenue DECIMAL(10, 2),
 total_cost DECIMAL(10, 2),
 total_profit DECIMAL(10, 2)
);

Finally, effortlessly import data into the “salesdata” table within seconds using the command below. Remember to specify the complete path of the file directory for seamless execution. In this instance, I’m importing from the below directory in my local drive.
LOAD DATA LOCAL INFILE 'C:\\ProgramData\\MySQL\\MySQL Server 8.0\\Uploads\\500000 Sales Records.csv'
INTO TABLE salesdata
FIELDS TERMINATED BY ','
ENCLOSED BY '"'
LINES TERMINATED BY '\n'
IGNORE 1 ROWS;
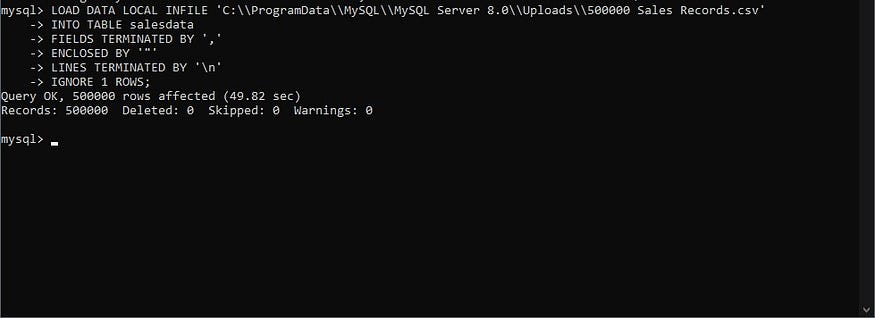
After completing the aforementioned steps, our data has been seamlessly imported into the database table within a matter of seconds.

In conclusion, this tutorial has equipped you with essential command-line skills for swift and efficient data management in both MySQL and PostgreSQL. By steering clear of the sluggish import processes associated with graphical interfaces like Workbench or PgAdmin, this tutorial champions the command line for a faster and more efficient data import experience. Ditch slow clicks and embrace speedy command lines.
Happy querying!!
Thanks for reading — I hope you found this piece enjoyableU+1F917! Connect with me on X (formerly Twitter), GitHub or LinkedIn and explore more of my stories here. Cheers!
Join thousands of data leaders on the AI newsletter. Join over 80,000 subscribers and keep up to date with the latest developments in AI. From research to projects and ideas. If you are building an AI startup, an AI-related product, or a service, we invite you to consider becoming a sponsor.
Published via Towards AI
Take our 90+ lesson From Beginner to Advanced LLM Developer Certification: From choosing a project to deploying a working product this is the most comprehensive and practical LLM course out there!
Towards AI has published Building LLMs for Production—our 470+ page guide to mastering LLMs with practical projects and expert insights!

Discover Your Dream AI Career at Towards AI Jobs
Towards AI has built a jobs board tailored specifically to Machine Learning and Data Science Jobs and Skills. Our software searches for live AI jobs each hour, labels and categorises them and makes them easily searchable. Explore over 40,000 live jobs today with Towards AI Jobs!
Note: Content contains the views of the contributing authors and not Towards AI.
Related posts


Popular posts

 for 2021")


Updates

Recent Posts


