


Detecting Bad Posture With Machine Learning
Last Updated on January 6, 2023 by Editorial Team
Author(s): Leon Eversberg
According to the World Health Organization, musculoskeletal conditions are the leading contributor to disability worldwide, with low back pain being the main contributor [1]. Using state-of-the-art machine learning and computer vision, it is now possible to automatically detect bad posture and give feedback in real-time, which can significantly decrease the risk of musculoskeletal disorders [2].
In this article, you will first learn about relevant observational methods for evaluating ergonomics. Then, we will apply this knowledge in practice to create a working example in Python using a webcam and machine learning models from Google’s MediaPipe.
Methods for Evaluating Ergonomics
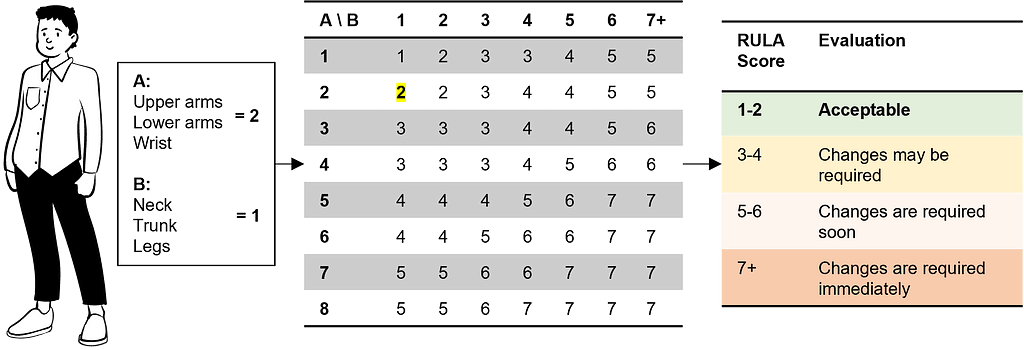
In observational ergonomic evaluation methods, experts observe people performing their job. Meanwhile, they fill out standardized worksheets such as Rapid Upper Limb Assessment (RULA), Rapid Entire Body Assessment (REBA), Ovako Working Posture Analysis System (OWAS) or Ergonomic Assessment Work Sheet (EAWS). In this article, we will focus on RULA because it is commonly used in practice, is quick and easy to apply, and the results correlate well with associated musculoskeletal conditions [3].
RULA was published by McAtamney and Corlett in the scientific journal Applied Ergonomics in 1993 and focuses mostly on the posture of the upper limbs. RULA defines joint angle ranges for the neck, trunk, arms, wrists, and legs. The worse the posture, the more points you get. At the end, all points are added up, and a total score is given, whereas the total score ranges from “acceptable posture” to “changes are required immediately” [4].
Automatic Back Angle Evaluation Using MediaPipe and OpenCV
In the following section, we will write a script in Python to evaluate the trunk flexion angle in real time from a webcam, as shown in the demo GIF below.
First, we need a pre-trained machine learning model that detects body joints in an image/video. Here, we will use Google’s MediaPipe Pose, which is based on the convolutional neural network BlazePose [5]. MediaPipe estimates 33 body key points called pose landmarks, given only an RGB image as input and does not require a GPU. Each landmark has x, y and z real-world coordinates in meters originating at the hips.
To install MediaPipe using Pip, we only need to execute the command pip install mediapipe. The documentation provides the following minimal Python example using a webcam, which we will use and expand upon.
The most important line is results = pose.process(image), which contains the 33 body key points. We can access them with landmarks_3d = results.pose_world_landmarks.
Each landmark index corresponds to a body key point. For a list of all available key points, see the documentation of the pose landmark model. For example, we can access the x, y and z coordinates of the nose with the following lines of code:
# get key points from mediapipe results
results = pose.process(image)
landmarks_3d = results.pose_world_landmarks
# nose equals index 0
x_nose = landmarks_3d.landmark[0].x
y_nose = landmarks_3d.landmark[0].y
z_nose = landmarks_3d.landmark[0].z
As shown in the figure below, with MediaPipe Pose, we can now get the joints of the shoulders, the hips, and the knees. Using the mid-points by averaging the left and right joints, we get the following three points A, B, and C, with an angle θ in-between.
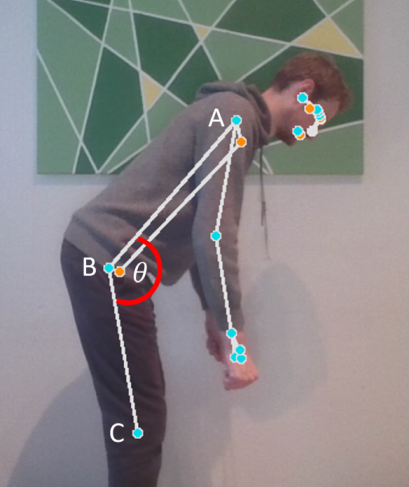
The angle θ can be computed using basic geometry:
According to RULA, REBA, and EAWS, the trunk flexion angle can be classified into three classes: 0–20°, 20°-60° and >60°. We will use these three classes to distinguish between low, medium, and high-risk back posture. Note that our angle θ starts at 180° in an upright position, whereas the methods for evaluating ergonomics define this position as 0°. Therefore, we must adjust our angle by subtracting 180°.
The Python code below creates an Ergonomy class, where update_joints() reads the 3D landmarks from MediaPipe, computes the trunk flexion angle with our three points A, B, and C using get_angle() and visualizes the three classes in green, yellow, and red using get_trunk_color().
The full working code for the webcam demo is available on my GitHub. Feel free to experiment with and build upon the code, e.g., add the evaluation of the neck, arms, and legs. In addition to its use for ergonomics in the workplace, another area of application is in the fitness industry, e.g., for checking posture during squats or pressing movements.
The demo video below from the university’s chair, Industry Grade Networks, and Clouds from TU Berlin, shows a detailed ergonomics evaluation based on RULA using a Microsoft Azure Kinect camera [6]. The automatic ergonomics evaluation is performed according to the methodology described in this article. Similar research work has been published recently, e.g., the ErgoSentinel tool [7] is based on RULA, and the ErgoExplorer [8] is based on REBA.
Conclusion
Using modern machine learning and computer vision for body tracking, you can easily build applications for real-time ergonomic feedback. Possible areas of application are in the workplace or, for example, in the fitness industry.
Additional Resources
A Step-by-Step Guide to the RULA Assessment Tool from ErgoPlus: https://ergo-plus.com/rula-assessment-tool-guide/
RULA Employee Assessment Worksheet from ErgoPlus: https://ergo-plus.com/wp-content/uploads/RULA.pdf
References
[1] World Health Organization, Musculoskeletal health (2022), https://www.who.int/news-room/fact-sheets/detail/musculoskeletal-conditions
[2] N. Vignais et al., Innovative system for real-time ergonomic feedback in industrial manufacturing (2013), https://doi.org/10.1016/j.apergo.2012.11.008
[3] D. Kee, Systematic Comparison of OWAS, RULA, and REBA Based on a Literature Review (2022), https://doi.org/10.3390/ijerph19010595
[4] L. McAtamney and E. N. Corlett, RULA: a survey method for the investigation of work-related upper limb disorders (1993), https://doi.org/10.1016/0003-6870(93)90080-S
[5] V. Bazarevsky et al., BlazePose: On-device Real-time Body Pose tracking (2020), https://arxiv.org/abs/2006.10204
[6] L. Eversberg, C. Sohst, J. Lambrecht, Assistenzsystem zur Verbesserung der Ergonomie/Assistance system to improve ergonomics — Preventing musculoskeletal disorders in manufacturing with artificial intelligence (2022), https://doi.org/10.37544/1436-4980-2022-09-68
[7] V. M. Manghisi et al., AUTOMATIC ERGONOMIC POSTURAL RISK MONITORING ON THE FACTORY SHOPFLOOR ‒THE ERGOSENTINEL TOOL (2020), https://doi.org/10.1016/j.promfg.2020.02.091
[8] M. M. Fernandez et al., ErgoExplorer: Interactive Ergonomic Risk Assessment from Video Collections (2022), https://arxiv.org/abs/2209.05252
Detecting Bad Posture With Machine Learning was originally published in Towards AI on Medium, where people are continuing the conversation by highlighting and responding to this story.
Towards AI Academy
We Build Enterprise-Grade AI. We'll Teach You to Master It Too.
15 engineers. 100,000+ students. Towards AI Academy teaches what actually survives production.
Start free — no commitment:
→ 6-Day Agentic AI Engineering Email Guide — one practical lesson per day
→ Agents Architecture Cheatsheet — 3 years of architecture decisions in 6 pages
Our courses:
→ AI Engineering Certification — 90+ lessons from project selection to deployed product. The most comprehensive practical LLM course out there.
→ Agent Engineering Course — Hands on with production agent architectures, memory, routing, and eval frameworks — built from real enterprise engagements.
→ AI for Work — Understand, evaluate, and apply AI for complex work tasks.
Note: Article content contains the views of the contributing authors and not Towards AI.
Related posts
Recent Posts


")

