


Building A Multilingual NER App with HuggingFace
Last Updated on March 31, 2024 by Editorial Team
Author(s): Tirendaz AI
Originally published on Towards AI.
Nowadays, NLP is one of the most trending fields. This is not a surprise as NLP tools like ChatGPT are a game changer in AI.
Believe me, there are transformers at the NLP center today. Transformers, in short, are deep learning architectures that allow you to find meaningful relationships between words in text.
Depending on your task, you can use many transformers. For example, BERT-based models excel at classification tasks. GPT-based language models, on the other hand, are particularly powerful for text-generation tasks. T5 and BARD-based models are well-suited for translation.

When it comes to implementing the Transformer model, the HuggingFace U+1F917 ecosystem is perfect. You can take this platform into account when implementing your end-to-end deep learning project, from data pre-processing to model deployment.
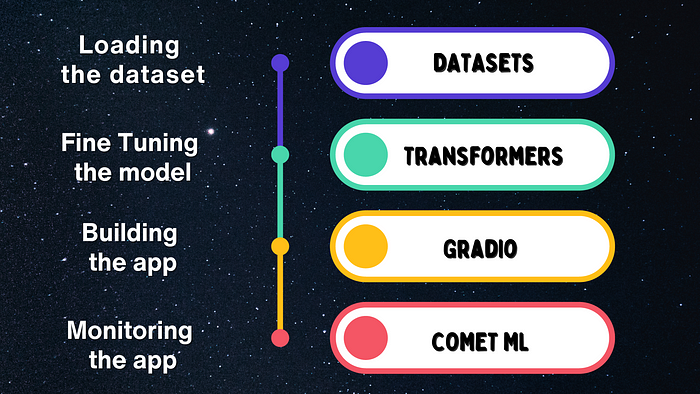
Today, I’ll walk you through how to create an end-to-end NLP project. First, we’ll load a benchmark dataset with the datasets library. Next, we’ll leverage a RoBERTa-base model with the transformers library. After that, we’ll build an app using the Gradio library. Finally, we’ll monitor this app in the Comet library.
After building the app, it looks like this:

Note that you can access the notebook we’ll use in this blog from our GitHub repo or our Kaggle page.
Before diving into building the app, let’s take a brief look at what NER is.
What is Named Entity Recognition?
As you know, text classification is an NLP task that refers to finding the category of a text. Token classification, on the other hand, is used to assign a tag to each token in a sentence like this:
Named entity recognition (NER) is a subtask of token classification that allows you to find entities such as a person, location, or organization.
Our goal in this project is to create a NER app to identify named entities in a text. To do this, we’ll utilize a multilingual transformer called XLM-RoBERTa.
At this point, you may wonder what a multilingual transformer is. Let me briefly explain this.
What are Multilingual Models?
Let’s say you want to train a model and then use it for many languages. This is where multilingual models come in.
These models have similar architectures to their monolingual counterparts, except that you can utilize multilingual models for multiple languages.
Here’s a scenario. Get a multilingual transformer model from the HuggingFace Hub. Train this model on a corpus. Use the model for a task in another language. That’s it. This is what we’re going to do in this blog.
It’s time to get our hands dirty. Let’s start with setting the necessary libraries first.
Step 1. Setting Required Libraries
Before loading the dataset, let’s initialize a project in Comet ML to track hyperparameters and monitor our NLP app.
Comet ML is an MLOps platform that helps you monitor, compare, explain, and optimize your models. The good news is that you can use this platform with many machine-learning frameworks and libraries, such as HuggingFace, TensorFlow, PyTorch, PySpark, XGBoost, and more.
In Comet ML, it is very easy to start an experiment using the init method, as shown below:
# Initializing the project
import comet_ml
comet_ml.init(project_name="multilingual-ner")
After running this cell, you need to enter your API key. Feel free to get an API key from Comet ML here.
After that, let’s log in to the HuggingFace Hub to load our trained model.
# Loggining HuggingFace Hub
from huggingface_hub import notebook_login
notebook_login()
At this point, you need to use your HuggingFace API key. If you don’t have an API key, go to this link to get one for free.
Okay, we have logged in to the platforms we’re going to use in this project. Let’s move on to loading the dataset.
Step 2. Loading the Dataset

The dataset we’re going to use is the PAN-X subset in XTREME, consisting of various Wikipedia articles in many languages. Each article is labeled with PER (person), LOC (location), and ORG (organization) tags.

Let’s install the datasets in English (en), German (de), and Turkish (tr) from PAN-X with the datasets library. Note that we’ll train the model with the English corpus and then use it on German and Turkish datasets for NER.
# Loading the datasets
from datasets import load_dataset
from collections import defaultdict
from datasets import DatasetDict

# Selecting the languages
langs = ["en", "de", "tr"]
fracs= [0.5, 0.5, 0.5]

panx_ds = defaultdict(DatasetDict)

# Getting the datasets from the XTREME dataset
for lang, frac in zip(langs, fracs):
 dataset = load_dataset("xtreme", name=f"PAN-X.{lang}")
 for split in dataset:
 panx_ds[lang][split] = (dataset[split].shuffle(seed=42).select(range(int(frac*dataset[split].num_rows))))

Cool, we’ve loaded our datasets. Before preprocessing, let’s take a look at the first row of the English dataset.
# Looking at the first sample
row = panx_ds["en"]["train"][0]

for key, value in row.items():
 print(f"{key}: {value}")

# Output:
"""
tokens: ["''", 'January', '21', "''", '–', 'Nanny', 'and', 'the', 'Professor']
ner_tags: [0, 0, 0, 0, 0, 1, 2, 2, 2]
langs: ['en', 'en', 'en', 'en', 'en', 'en', 'en', 'en', 'en']
"""
Awesome, our datasets are ready. Before building the model, let’s move on to exploring the dataset.
Step 3. Exploring the Dataset
As we mentioned, our dataset contains numerical representations of three tags. To better understand the dataset, let’s assign label names to these representations.
# Assigning label names to numerical representations
labels = panx_ds["en"]["train"].features["ner_tags"].feature

def create_label_names(example):
 return {"ner_tags_str": [labels.int2str(idx) for idx in example["ner_tags"]]}

panx_en = panx_ds["en"].map(create_label_names)
en_example = panx_en["train"][0]

pd.DataFrame([en_example["tokens"], en_example["ner_tags_str"]], ["Tokens", "Labels"])

As you can see, each token has a label. There are seven labels, as explained below:

Nice, we saw our dataset. Let’s move on to loading the tokenizer and the model.
Step 4. Loading the XLM-RoBERTa Tokenizer & Model
Data preprocessing is one of the most difficult stages in a NLP project. But, it is easy with the tokenizer in Transformers. I have good news you can easily load the tokenizer of the model you’ll use with AutoTokenizer.
# Loading our tokenizer
from transformers import AutoTokenizer
xlmr_tokenizer = AutoTokenizer.from_pretrained("xlm-roberta-base")
Awesome, our tokenizer is ready. To test this tokenizer, let’s get a text and tokenize it:
# Looking at how to work our tokenizer
text = "My name is Sarah and I live in London"
xlmr_tokens = xlmr_tokenizer(text).tokens()
pd.DataFrame([xlmr_tokens], index=["tokens"])

As you can see, the XLM-R tokenizer broke words down into the smallest units. When doing this, it added <s> and </s> to show the start and end of a sequence. Also, it used underlines to denote how each word is split.
Excellent, our tokenizer works well. Next, let’s load the XLM-RoBERTa model.
# Loading the pretrained multilingual model
import torch
from transformers import XLMRobertaForTokenClassification

xlmr_model_name = "xlm-roberta-base"
index2label = {idx: label for idx, label in enumerate(labels.names)}
label2index = {label: idx for idx, label in enumerate(labels.names)}
num_labels = labels.num_classes

# Setting the GPU
device = torch.device("cuda" if torch.cuda.is_available() else "cpu")

# Instantiating the model
xlmr_model = XLMRobertaForTokenClassification.from_pretrained(
 xlmr_model_name,
 num_labels = num_labels,
 id2label=index2label,
 label2id=label2index
).to(device)
XLM-RoBERTa is a multilingual model trained using 100 different languages. It was developed based on Facebook’s RoBERTa model.
Okay, now we have a transformer model. Let’s create a function to test this model.
# Looking at how our model predicts the tokens of a text
def label_text(text, labels, model, tokenizer):
 tokens = tokenizer(text).tokens()
 input_ids = xlmr_tokenizer.encode(
 text, return_tensors = "pt").to(device)
 outputs = model(input_ids)[0]
 predictions = torch.argmax(outputs, dim=2)
 preds = [labels.names[p] for p in predictions[0].cpu().numpy()]
 return pd.DataFrame([tokens, preds], index = ["Tokens", "Tags"])

label_text(text, labels, xlmr_model, xlmr_tokenizer)

Hmm, our model worked, but the predictions are not good. This is normal, as we have not yet fine-tuned our model on our dataset.
Let’s go ahead and discuss how to set our tokenizer for NER.
Step 5. Tokenizing for NER
So far, we’ve loaded the model and its tokenizer. But we need to make some adjustments.
Pay attention, the XLM-R tokenizer we’ve loaded is a subword approach.
This technique splits words into subwords. This means that a single word with a single label may now be divided into two subwords. In addition, this tokenizer adds some special tokens, such as <s> and </s>.
This leads to a mismatch between tags and inputs. To overcome this problem, we can realign the labels and tokens by mapping each single-word token to its corresponding new tag.
To match tags and inputs correctly, we can assign the label -100 to the special tokens <s> and </s>. This is because PyTorch ignores the -100 value by default during loss calculation.
Plus, we can label the first token of a given word. To achieve this, we can give -100 to other sub-tokens from the same word.
Let’s create a function to put them together and then encode the entire dataset with this function.
# Preparing dataset for multilingual NER
def tokenize_and_align_labels(examples):
 tokenized_inputs = xlmr_tokenizer(examples["tokens"], truncation = True,
 is_split_into_words = True)
 labels = []
 for idx, label in enumerate(examples["ner_tags"]):
 word_ids = tokenized_inputs.word_ids(batch_index=idx)
 previous_word_idx = None
 label_ids = []
 for word_idx in word_ids:
 if word_idx is None or word_idx == previous_word_idx:
 label_ids.append(-100)
 else:
 label_ids.append(label[word_idx])
 previous_word_idx = word_idx
 labels.append(label_ids)
 tokenized_inputs["labels"] = labels
 return tokenized_inputs

# Applying our tokenizer to all dataset
def encode_panx_ds(corpus):
 return corpus.map(tokenize_and_align_labels,
 batched=True,
 remove_columns=["langs", "ner_tags", "tokens"])
panx_en_encoded = encode_panx_ds(panx_ds["en"])
Nice, our dataset was tokenized for NER.
Now our data set is ready to fine-tune the model. But wait, how does this tokenizer work? To test this, let’s get the first sample of the training dataset and then tokenize it.
# Looking at how to work our tokenizer
tokenized_input = xlmr_tokenizer(panx_ds["en"]["train"][0]["tokens"], is_split_into_words=True)
tokens = xlmr_tokenizer.convert_ids_to_tokens(tokenized_input["input_ids"])
word_ids = tokenized_input.word_ids()
tags = panx_en_encoded["train"][0]["labels"]

pd.DataFrame([tokens, word_ids, tags], index=["Tokens", "Word IDs", "Tags"])

As you can see, our tokenizer assigned -100 to special tokens such as <s> and </s> as well as pieces of words that will not be used.
Nice, our tokenizer works perfectly and identifies words that the model should ignore.
Let’s move on to creating model metrics.
Step 6. Setting Model Metrics
To evaluate the model during training, we can leverage metrics. This is very easy with the Evaluate library. To see the performance of our model, let me use four metrics: accuracy, precision, recall, and f1.
What we are going to do now is to create a function that calculates the metrics.
# Setting metrics with the evaluate library
import evaluate
import numpy as np

seqeval = evaluate.load("seqeval")
label_list = panx_ds["en"]["train"].features["ner_tags"].feature.names

def compute_metrics(p):
 predictions, labels = p
 predictions = np.argmax(predictions, axis=2)
 true_predictions = [
 [label_list[p] for (p, l) in zip(prediction, label) if l != -100]
 for prediction, label in zip(predictions, labels)
 ]
 true_labels = [
 [label_list[l] for (p, l) in zip(prediction, label) if l != -100]
 for prediction, label in zip(predictions, labels)
 ]
 results = seqeval.compute(predictions=true_predictions, references=true_labels)
 return {
 "precision": results["overall_precision"],
 "recall": results["overall_recall"],
 "f1": results["overall_f1"],
 "accuracy": results["overall_accuracy"],}
Nice, our metrics are ready to evaluate our model. We’ll utilize this function later in model training.
Let’s move on to training the model.
Step 7. Model Training
A transformer model has many hyperparameters. Before starting the model training, we can set the hyperparameters. This is where the TrainingArguments the class comes in.
# Setting training arguments
from transformers import TrainingArguments

training_args = TrainingArguments(
 output_dir = "roberta-base-NER",
 learning_rate=2e-5,
 per_device_train_batch_size = 12,
 per_device_eval_batch_size = 12,
 num_train_epochs = 4,
 weight_decay = 0.01,
 evaluation_strategy = "epoch",
 save_strategy="epoch",
 load_best_model_at_end=True,
 log_level="error",
 report_to= ["comet_ml"],
 push_to_hub = True,
)
Here, we used the report_to parameter to track the model metrics. We also set the push_to_hub parameter to send the model to the Hub.
Let’s go ahead and handle padding.
When training the model, the texts in a batch may have different lengths. To address this problem, we can use the padding technique.
# Setting data collator
from transformers import DataCollatorForTokenClassification
data_collator = DataCollatorForTokenClassification(xlmr_tokenizer)
Now, we can move on to training the model. To do this, let’s first instantiate an object from the Trainer API and then train the model by calling the train method. Finally, we’ll push the trained model to the Hub using the push_to_hub method.
# Fine-tuning the pretrained model with our dataset
from transformers import Trainer

trainer = Trainer(
 model = xlmr_model,
 args = training_args,
 data_collator = data_collator,
 compute_metrics = compute_metrics,
 train_dataset = panx_en_encoded["train"],
 eval_dataset = panx_en_encoded["validation"],
 tokenizer = xlmr_tokenizer,
)

# Training the model
trainer.train()

# After training the model, pushing it to the HuggingFace Hub
trainer.push_to_hub()

Awesome. Model training is done, and the model metrics are calculated. These metrics are not bad for NER.
Let’s get the text we created earlier and classify its tokens with our fine-tuned model.
# Looking at how to work our fine-tuned model
text = "My name is Sarah and I live in London"
label_text(text, labels, trainer.model, xlmr_tokenizer)

As you can see, our model correctly predicted all tokens in the text.
Okay, our model is good for the English corpus. Remember, this model is a multilingual model. This means that it can also be used for other languages.
Let’s see how it works for other languages.
Step 8. Unlocking the potential of our model
So far, we’ve preprocessed the dataset and then trained a multilingual model using this dataset. The performance of this model is not bad.
In this section, we’re going to explore how this model works on German and Turkish corpora. To see this, let’s first create a function that calculates the f1 score.
# Calculating the f1 score
def get_f1_score(trainer, dataset):
 return trainer.predict(dataset).metrics["test_f1"]
Now, all we need to do to evaluate the model is to use the test sets of the languages. To do this, let’s create a function and pass it each test set.
# Model evaluation on datasets
def evaluate_lang_performance(lang, trainer):
 panx_dataset = encode_panx_ds(panx_ds[lang])
 return get_f1_score(trainer, panx_dataset["test"])

f1_scores_on_en = evaluate_lang_performance("en", trainer)
f1_scores_on_de = evaluate_lang_performance("de", trainer)
f1_scores_on_tr = evaluate_lang_performance("tr", trainer)

pd.DataFrame([f1_scores_on_en,f1_scores_on_de,f1_scores_on_tr],
 index=["English","German","Turkish"]).plot(kind="barh")
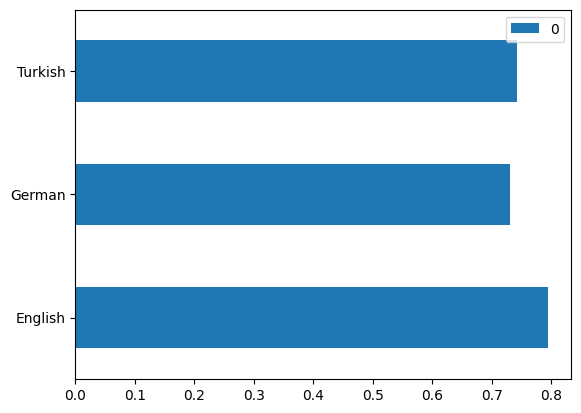
As you can see, the performance of our model is also not bad in other languages. Remember, our model was trained only in English. This means that it never saw the German and Turkish text.
Now, we have a good multilingual model. It’s time to deploy it with Gradio.
Step 9. Deploying like a Pro
Trust me, it is very easy to deploy and monitor large language models with recently developed tools.
All we need to do is use Gradio to create the model and then use Comet ML to monitor this app. To do this, let’s first load our model from the Hub using the pipeline.
# loading the model with the pipeline
from transformers import pipeline
ner_pipeline = pipeline("ner", model = "Tirendaz/roberta-base-NER")
Okay, our model is ready to predict the classification of tokens. Let’s build an app with Gradio using this model.
# Building a multilingual app with Gradio
import gradio as gr

examples = [
 "My name is Tim and I live in California.",
 "Ich arbeite bei Google in Berlin",
 "Ali, Ankara'lı mı?"
]

# Creating a function to predict
def ner(text):
 output = ner_pipeline(text, aggregation_strategy="simple")
 return {"text": text, "entities": output}

# Creating a demo
demo = gr.Interface(
 ner,
 gr.Textbox(placeholder="Enter sentence here..."),
 gr.HighlightedText(),
 examples=examples)

demo.launch(inline=False, share=True)

# Monitoring the app with Comet ML
experiment = comet_ml.Experiment()
experiment.add_tag("Ner-Analysis")

demo.integrate(comet_ml=experiment)

Voila, our app is built. We can see how it works on the Comet ML dashboard as shown above.
We produce content about generative AI on YouTube. Don’t forget to subscribe to our channel for the latest content on AI.
Tirendaz AI
Don't just use AI – Learn how to build AI. Hi there, I'm a generative AI engineer, Ph.D. I aim to make the latest…
www.youtube.com
Conclusion
In this article, we’ve explored how to build a NLP app. First, we’ve fine-tuned a large language model based on RoBERTa for NER using an English dataset.
As this model is multilingual, we’ve used it for other languages. It turned out that our multilingual model was not bad on the German and Turkish datasets, although it did not see any text in these languages.
Finally, we built an NLP app using Gradio and then monitored it on the Comet ML dashboard.
As a result, you don’t have to train a transformer model from scratch. With recently developed libraries and frameworks, it is very easy to fine-tune the pre-trained model using your own dataset and build NLP apps.
That’s it. Thanks for reading. Let’s connect YouTube U+007C X U+007C LinkedIn.
How to Use ChatGPT in Daily Life?
Save time and money using ChatGPT
levelup.gitconnected.com
7 Steps to Become a Machine Learning Engineer
A comprehensive guide with courses and books
heartbeat.comet.ml
If you enjoyed this article, please don’t forget to press the clap U+1F44F button below a few times U+1F447
Resources
- NLP with Transformers
- Token classification
- Named Entity Recognition with Deep Learning
- Comet ML docs
- Gradio interface docs
Join thousands of data leaders on the AI newsletter. Join over 80,000 subscribers and keep up to date with the latest developments in AI. From research to projects and ideas. If you are building an AI startup, an AI-related product, or a service, we invite you to consider becoming a sponsor.
Published via Towards AI
Take our 90+ lesson From Beginner to Advanced LLM Developer Certification: From choosing a project to deploying a working product this is the most comprehensive and practical LLM course out there!
Towards AI has published Building LLMs for Production—our 470+ page guide to mastering LLMs with practical projects and expert insights!

Discover Your Dream AI Career at Towards AI Jobs
Towards AI has built a jobs board tailored specifically to Machine Learning and Data Science Jobs and Skills. Our software searches for live AI jobs each hour, labels and categorises them and makes them easily searchable. Explore over 40,000 live jobs today with Towards AI Jobs!
Note: Content contains the views of the contributing authors and not Towards AI.
Related posts


Popular posts

 for 2021")


Updates

Recent Posts


