Logo:
Logo:  Areas Served:
6 Minutes Mantra To Create Resources On Google Cloud
Last Updated on July 24, 2023 by Editorial Team
Author(s): Ritheesh Baradwaj Yellenki
Originally published on Towards AI.
Cloud Computing
How to create computing resources using Google Deployment Manager within a few steps
I have a friend who is good at Machine Learning, like the genius of that world. He has done a number of projects but was hit by challenges while trying to bring his applications into production. So he decided that he should create his own infrastructure with all databases and networks linked to a virtual machine. But again kept facing issues due to lack of scope. So, we together sat on it and came up with an idea which was to have a template that could do everything he wants in just one click. Similarly, in a real scenario, developers often provide a template with their requirements to build an agent where they want his application to work. Then Infrastructure Engineers design and build the servers and network.
Going by the conventional way, they create resources and acknowledge the developers, which is a manual process. To make it even easier, there’s again something known as Infrastructure as Code (IaC), which simply means writing code or script that automates the environment necessary for the development, i.e., a method to provision and manage IT infrastructure through the use of source code, IaC helps you automate the infrastructure deployment process in a repeatable, consistent manner which has many benefits.
In this article, I am going to show how to create a Google Compute Engine (a virtual machine on Google Cloud Platform — IaaS) using Google Deployment Manager, an infrastructure deployment service that automates the creation and management of Google Cloud resources. Let’s Get Started!!
Initial Set-up
In order to use Google Cloud Services, we need to create a Google Cloud Account. You may visit https://cloud.google.com/ to Sign Up for a new account. If you already have one, then quickly sign-in, and let’s get going.
Google offers you 300$ credits for new customers in order to get started on Google Cloud Platform for free. If you are not using free tier, Google charges you for every resource you create.
Sign in and visit Google Cloud Console

The above image shows my console, now to manage our resources, we need to create a project, for that click on Select a project from the top left corner of your screen.

If you already have a project created, select it. To create a new project, click on NEW PROJECT at the top right corner of your screen.

Give a pretty name to your project. The organization’s name is optional (if you are working with an organisation you can choose it) I. Now that we have created a project select it. From now on, the resources you create will be concerned only with this project.
Enable the APIs
- In the GCP Console, on the Navigation Menu (Hamburger icon), click APIs & Services.

- Select the Dashboard and click on Enable APIs and Services available at the top. Search for the API Cloud Deployment Manager v2 API by name and enable it for your current project. After creating a project, enable billing account for that project.
Create a Deployment Manager Deployment
- In the GCP console, on the top right toolbar, click on Open Cloud Shell button and click Continue. Now the Cloud shell will open. We also have the option of opening it in the new window as per our convenience. The below command will set the project and zone (as the environment variable).
gcloud config set project "Your Project ID"
export MY_ZONE=us-central1-a
- Copy the below Deployment Manager template file, which will create a compute engine (virtual machine) on GCP and run the Nginx light server. Do not disturb the spaces in the file. Deployment Manager uses YAML templating language, which relies on indented lines as part of its syntax.
sudo vim mydeployment.yaml
You can make any modifications to this file. Here I created just one compute resource “vm-created-by-deployment-manager” of type “compute.v1.instance” within the same file we can also provide multiple resources.
- Insert your Google Cloud Platform project ID into the file in place of the string PROJECT_ID using the below command.
sed -i -e ‘s/PROJECT_ID/’$DEVSHELL_PROJECT_ID/ mydeployment.yaml
- Insert your assigned Google Cloud Platform zone into the file in place of the string ZONE using the below command.
sed -i -e ‘s/ZONE/’$MY_ZONE/ mydeploy.yaml
- You can preview a configuration using the below command.
gcloud deployment-manager deployments create example-depl-config mydeployment.yaml --preview
- Build a deployment from the template using the below command.
gcloud deployment-manager deployments create example-depl-config mydeployment.yaml
- To update the template, make changes into the file and use the below command to update.
gcloud deployment-manager deployments update example-depl --config mydeployment.yaml
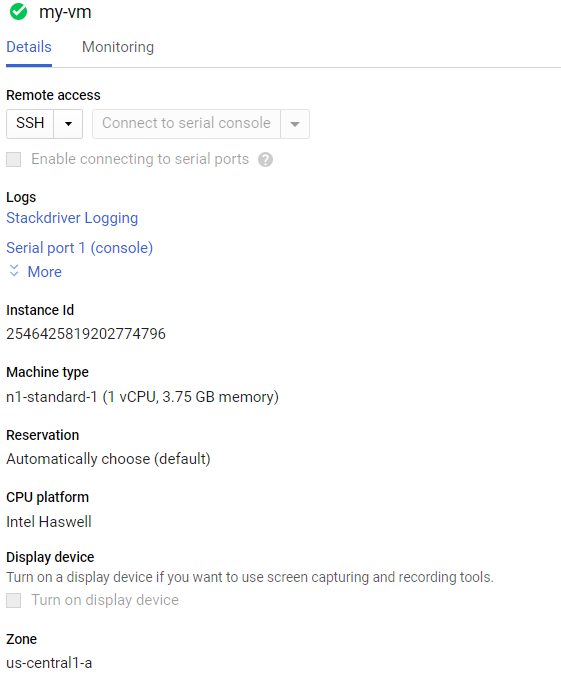
That’s all! Your virtual machine is ready to rock, now navigate to Compute Engine, and you will notice a VM running with the given name and configuration.
You can check the startup script below (this will run for the first time when VM is created).

Connect to VM using SSH (click on SSH under the remote access). You can find the details of the VM which you have given through the sourceImage property under resources.

Finally, I have provisioned a Google Compute Engine using Deployment Manager. IaC Minimizes Risk and Increases Speed. There are many IaC tools like Terraform, ARM templates by Azure, JuJu, Vagrant, etc. to provision your instances within a few simple steps.
For Machine Learning Applications
To deploy a flask server that runs the machine learning model, create a GitHub repository and main working directory, as shown below.

Now update the value property (line 10) under metadata in the template YAML file provided above with the following:
value: "apt-get update; sudo apt install git; git clone <url_for_GitHub_repo>; pip install requirements.txt; python app.py"
Note: If you want different versions of python or any other previous versions to run your application, simply change the value property with your script.
To access the flask running on the VM, you need to create a firewall rule and add the required ports to that tag. Go to the Firewall tab under the VPC Networks section. Create a Firewall rule or update the existing default-allow-http rule with required ports.


Now you can share your application with anyone using the URL format http://IP_ADDRESS:PORT
Write Once, Run Anytime!
Conclusion
Google Cloud Deployment Manager allows us to define a template with all resources to run our application in a declarative format using YAML. It also supports the Python template. In this article, I demonstrated the detailed steps to create a Compute Engine with a deployment manager. By using IaC, one can provision instances with the required configuration. Now my friend, who we talked about in the beginning, has his problem solved and will be easily able to get his applications to production.
Happy Coding!!
Please feel free to suggest changes wherever you find a scope of improvement. I will catch up with you soon. Till then, Stay Home and Stay Safe!
If you would like to get in touch, connect with me on LinkedIn.
Join thousands of data leaders on the AI newsletter. Join over 80,000 subscribers and keep up to date with the latest developments in AI. From research to projects and ideas. If you are building an AI startup, an AI-related product, or a service, we invite you to consider becoming a sponsor.
Published via Towards AI
Related posts
Popular posts

 for 2021")


Updates

Recent Posts