


Fake News Detection using BERT Model Python
Last Updated on September 7, 2022 by Editorial Team
Author(s): Muttineni Sai Rohith
Originally published on Towards AI the World’s Leading AI and Technology News and Media Company. If you are building an AI-related product or service, we invite you to consider becoming an AI sponsor. At Towards AI, we help scale AI and technology startups. Let us help you unleash your technology to the masses.
In this article, we will try to build a BERT Classification model to detect Fake News using Python.
The rise of social media amplified the influence of Fake News in our society. People often perceive whatever they read/heard as True, and it is affecting the world on a large scale, both politically and financially. So Today We are going to develop an application that can Detect Fake News automatically using BERT Model and Python.
Loading the Data
Data used in this article can be found here. Copy the data, unzip them and paste them into your folder. Let’s start our code by importing the libraries —
import pandas as pd
import csv
Once you have copied the data —
df_fake = pd.read_csv("Fake.csv")
df_true = pd.read_csv("True.csv")
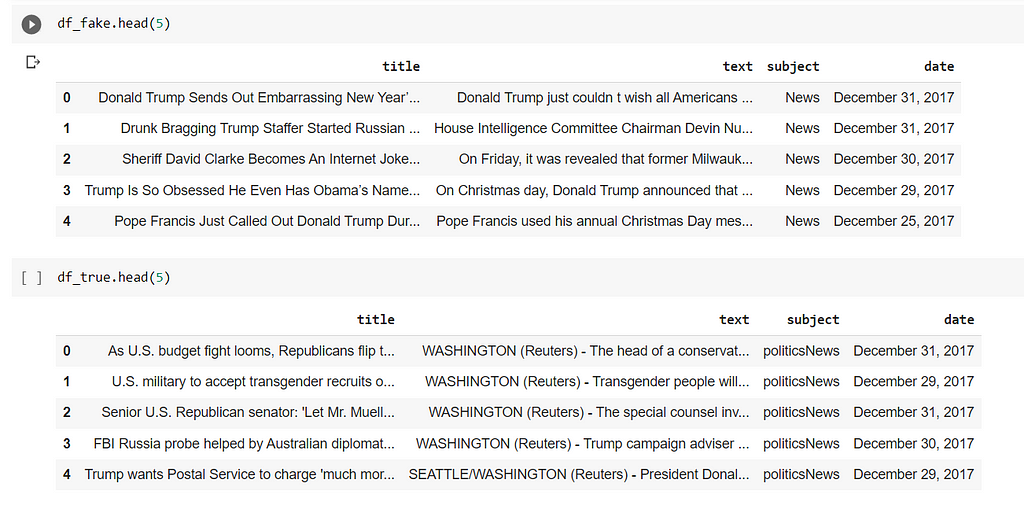
We have imported the data and created two DataFrames. Now let’s do some data cleaning and Analysis —
we will start it by creating a dataframe by merging both the DataFrames above.
df_fake["Label"] = "Fake"
df_true["Label"] = "True"
To differentiate the Fake/True News, we added a new Column — Label.. Which will be our dependent Column.
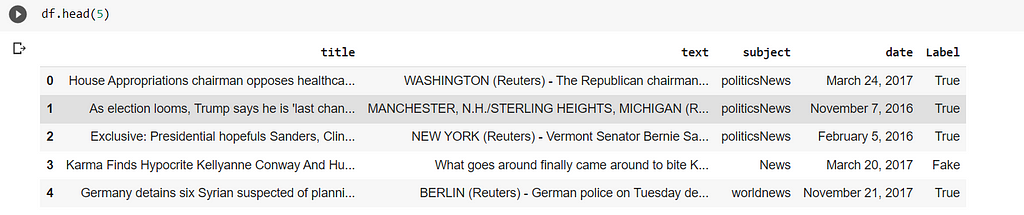
df = pd.concat([df_fake,df_true])
df = df.sample(frac=1).reset_index(drop=True)
Above, we are merging both the DataFrames and Shuffling it.
Finally, we have our Data ready —
df.head(5)
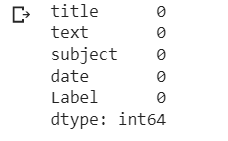
Let’s check whether we have any missing values —
df.isnull().sum()
Data Analysis
So Now let’s try and analyze some columns in our data — As we know, title and text are necessary, as we have to predict the labels depending on them; And it is obvious that date doesn’t play a huge part in predicting whether news is Fake or True. Let’s Visualize the subject column using Seaborn library —
import matplotlib.pyplot as plt
import seaborn as sns
#Creating Figure
fig, axes = plt.subplots(1,2, figsize = (15,6))
#Adding the histogram1 - Fake News
sns.histplot(df_fake.subject, palette = 'Set1', alpha = 0.5, ax = axes[0])
axes[0].tick_params(axis = 'x', rotation = 90)
axes[0].set_title('Fake News Subject')
#Adding the histogram2 - True News
sns.histplot(df_true.subject, palette = 'Set1', alpha = 0.5, ax = axes[1])
axes[1].tick_params(axis = 'x', rotation = 90)
axes[1].set_title('True  News Subject')
#Printing the count of Subject
print("Fake News Subject : ",dict(df_fake.subject.value_counts()))
print("True News Subject : ",dict(df_true.subject.value_counts()))
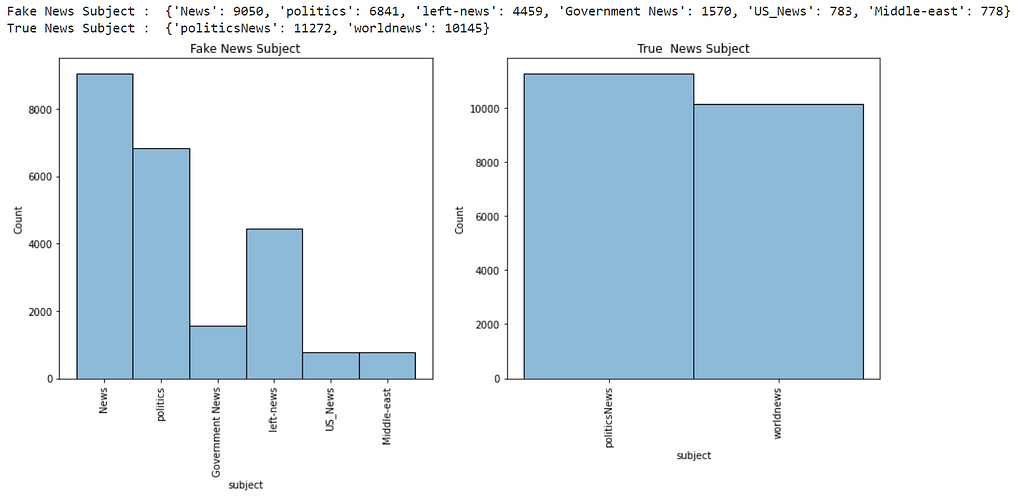
As we can see, the subject column has different values in both the DataFrames. So We cannot include that column going further.
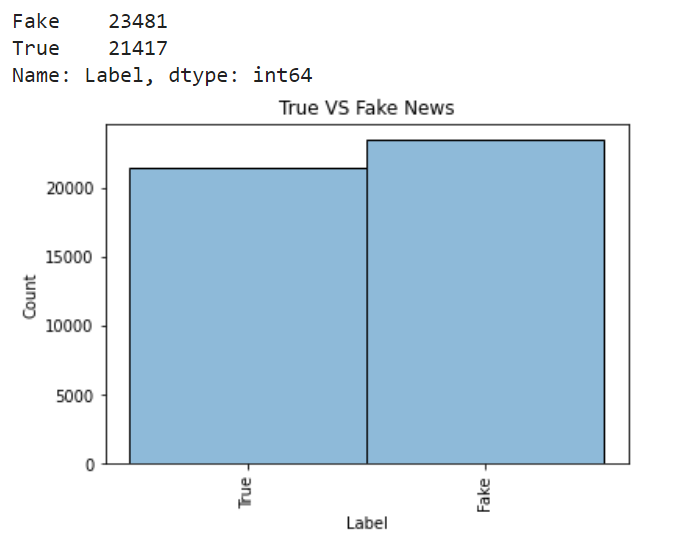
Let’s see whether the data is balanced or not.
sns.histplot(df.Label, palette = 'Set1', alpha = 0.5)
plt.tick_params(axis = 'x', rotation = 90)
plt.title('True VS Fake News')
df.Label.value_counts()
df["text"] = df["title"]+df["text"] #considering text and title as X
As we can see, the Label column is in Object format, let's Encode it to Numerical format.
df['Label'] = df['Label'].map({'True':1, 'Fake':0})
Here as we need to Encode only two values, I have used map() method from DataFrame Python. But for a detailed explanation of Python Encoding methods, refer my article below:
Encoding Methods to encode Categorical data in Machine Learning
So our data is ready. Let’s perform the train-test-split of Data —
from sklearn.model_selection import train_test_split
X_train, X_test, y_train, y_test = train_test_split(X, y, stratify = y, test_size = 0.2, random_state = 10)
We have our training and testing data ready, So let’s Learn about the BERT Model Now.
BERT MODEL
BERT Stands for Bi-Directional Encoder Representations from Transformers. It consists of several Transformer Encoders stacked together. It uses Transformers to understand the contextual relation between words in a sentence/text. BERT Transformer generally has two mechanisms: An encoder that reads the text input and a decoder that predicts for a given task.
One of the main reasons for the good performance of BERT on different NLP tasks was the use of Semi-Supervised Learning. This means the model is trained for a specific task that enables it to understand the patterns of the language. After training, the model (BERT) has language processing capabilities that can be used to empower other models that we build and train using supervised learning.
Initially, BERT is released in two Sizes — Base and Large models. BERT(BASE) has 12 layers in the Encoder stack, while BERT(LARGE) has 24 layers in the Encoder stack.
BERT Model takes classification token(CLS) as input first, followed by the sequence of words. It then passes the input to the above layers. Each layer applies self-attention and passes the result through a feedforward network after then, it hands off to the next encoder. The model outputs a vector of size according to the size of BERT. If we want to output a classifier from this model, we can take the output corresponding to the CLS token.
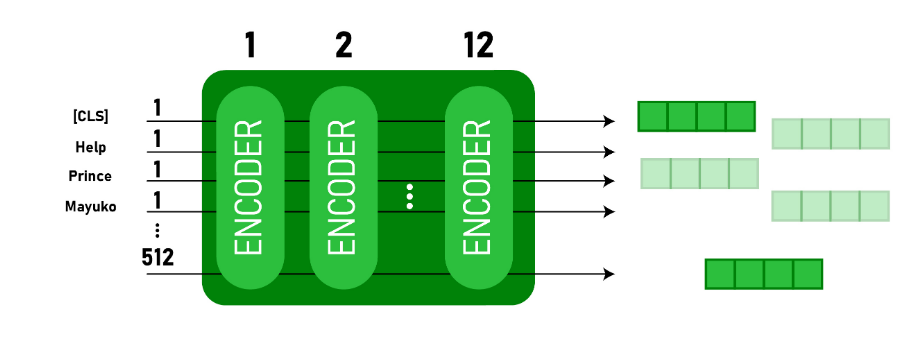
This trained vector can be used to perform a number of tasks such as classification, translation, etc.,
Fake News Detection
So Let’s concentrate on our task and start the classification — As said, we need to pass tokenized Values as Input to the BERT Model. So let’s use the tokenizer from the transformers library.
Tokenization
Let’s start this by installing transformers that provide BERT Model.
!pip install transformers
Let’s start the tokenization —
In this method, we will use AutoTokenizer from BERT (base) Model —
Similar to all neural networks, transformers cannot process the raw input text directly, So we need to tokenize the input and convert them into numbers. Tokenization performs the following functions — It splits input text into tokens (words, letters, etc.), Mapping each token with a unique integer and arranging them according to the model.
Since we are using the BERT BASE Model for our application, we have also used the corresponding AutoTokenizer for tokenization.
from transformers import AutoTokenizer
def tokenize(X):
    X = tokenizer(
        text = list(X),
        add_special_tokens = True,
        max_length = 100,
        truncation = True,
        padding = 'max_length',
        return_tensors = 'tf',
        return_token_type_ids = False,
        return_attention_mask = True,
        verbose = True
        )
return X
tokenizer = AutoTokenizer.from_pretrained('bert-base-uncased')
Let’s tokenize the values —
X_train_tokens = tokenize(X_train)
X_test_tokens = tokenize(X_test)
Designing Model
Importing Necessary Libraries —
import tensorflow as tf
from keras.models import Model, Sequential
from keras.layers import Input, Dense, Dropout, Embedding
from tensorflow.keras.optimizers import Adam
from transformers import TFBertModel
Designing BERT Function —
Length = 100
def get_model():
dropout_rate = 0.2
    input_ids = Input(shape = (Length,), dtype = tf.int32, name = 'input_ids')
    input_mask = Input(shape = (Length,), dtype = tf.int32, name = 'input_mask')
    embeddings = bert([input_ids, input_mask])[1] #pooler output
    print(embeddings)
    out = Dropout(0.2)(embeddings)
#64 units dense layer
    out = Dense(64,activation = 'relu')(out)
    out = Dropout(0.2)(out)
y = Dense(1,activation = 'sigmoid')(out)
    model = Model(inputs=[input_ids, input_mask], outputs=y)
    model.layers[2].trainable = True
   #define optimizer
   optimizer = Adam(learning_rate=1e-05, epsilon=1e-08, decay=0.01,clipnorm=1.0)
    #complile the model
    model.compile(optimizer = optimizer, loss = 'binary_crossentropy', metrics = 'accuracy')
return model
Loading the BERT Model —
bert = TFBertModel.from_pretrained('bert-base-uncased')
Let’s plot the BERT Model Created —
model = get_model()
tf.keras.utils.plot_model(model)
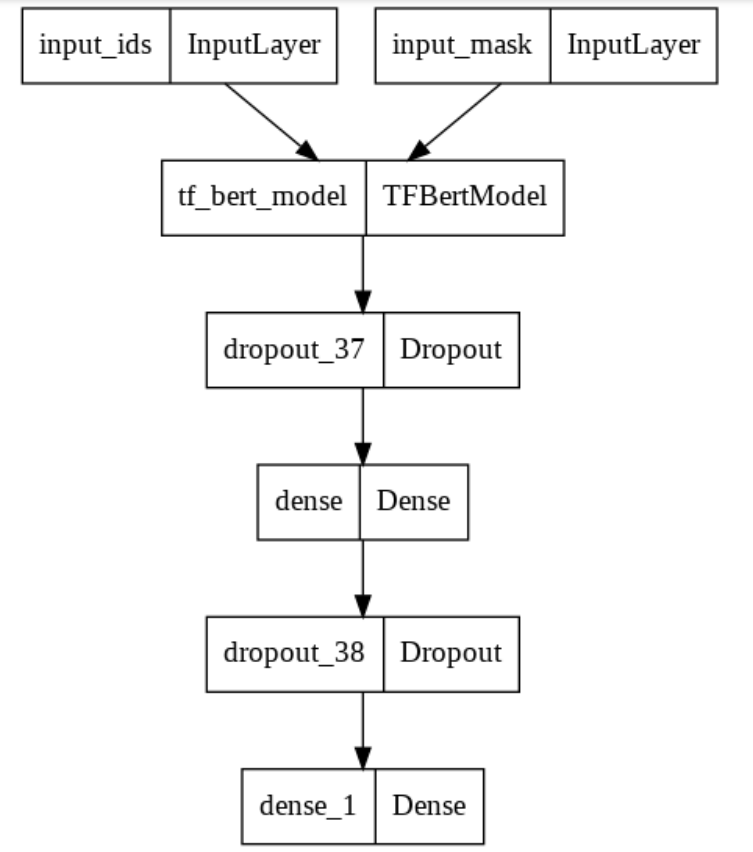
We have created the Model according to the above explanation.
Training Our Model
from keras.callbacks import EarlyStopping
history = model.fit(x = {'input_ids':X_train_tokens['input_ids'],'input_mask':X_train_tokens['attention_mask']}, y = y_train, epochs=3, validation_split = 0.2, batch_size = 64, callbacks=[EarlyStopping( monitor='val_accuracy' ,mode='max', patience=3,verbose=False,restore_best_weights=True)])
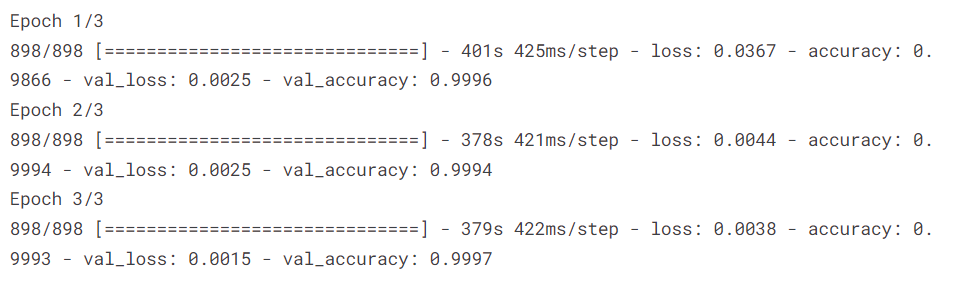
As we can see, we got 99.9% Training Accuracy. Let’s Evaluate our model —
yhat = np.where(model.predict({ 'input_ids' : X_test_seq['input_ids'] , 'input_mask' : X_test_seq['attention_mask']}) >=0.5,1,0)
print(classification_report(y_test,yhat))
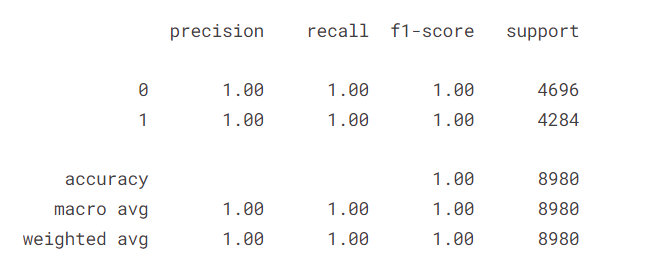
We can see our model is performing very well even on the evaluation data.
We Can use this model, even to evaluate any daily news that we see.
That’s all, Folks…… To follow my content and know more about me, refer my below article —
Medium Partner Program and My Next Journey
Happy Coding….
Fake News Detection using BERT Model Python was originally published in Towards AI on Medium, where people are continuing the conversation by highlighting and responding to this story.
Join thousands of data leaders on the AI newsletter. It’s free, we don’t spam, and we never share your email address. Keep up to date with the latest work in AI. From research to projects and ideas. If you are building an AI startup, an AI-related product, or a service, we invite you to consider becoming a sponsor.
Published via Towards AI
Towards AI Academy
We Build Enterprise-Grade AI. We'll Teach You to Master It Too.
15 engineers. 100,000+ students. Towards AI Academy teaches what actually survives production.
Start free — no commitment:
→ 6-Day Agentic AI Engineering Email Guide — one practical lesson per day
→ Agents Architecture Cheatsheet — 3 years of architecture decisions in 6 pages
Our courses:
→ AI Engineering Certification — 90+ lessons from project selection to deployed product. The most comprehensive practical LLM course out there.
→ Agent Engineering Course — Hands on with production agent architectures, memory, routing, and eval frameworks — built from real enterprise engagements.
→ AI for Work — Understand, evaluate, and apply AI for complex work tasks.
Note: Article content contains the views of the contributing authors and not Towards AI.
Related posts
Recent Posts


")

