


Easy Object Detection with Transformers: Simple Implementation of Pix2Seq model in PyTorch
Last Updated on January 6, 2023 by Editorial Team
Author(s): Moein Shariatnia
Originally published on Towards AI the World’s Leading AI and Technology News and Media Company. If you are building an AI-related product or service, we invite you to consider becoming an AI sponsor. At Towards AI, we help scale AI and technology startups. Let us help you unleash your technology to the masses.
Easy Object Detection with Transformers: Simple Implementation of Pix2Seq Model in PyTorch
Introduction
Object detection does not have to be a difficult task! I clearly remember the first time I implemented YOLO from scratch, and it was a pain to understand how it works under the hood. For beginners in computer vision applications, I believe that object detection is the hardest one to understand among classification, segmentation, etc.
Once I first heard about the paper “Pix2seq: A Language Modeling Framework for Object Detection” from ICLR 2022, I got pretty excited, and I was sure my next blog post would be about it; so, here I am writing this post and hoping that you’ll like it and find the pix2seq model easy to understand and implement.
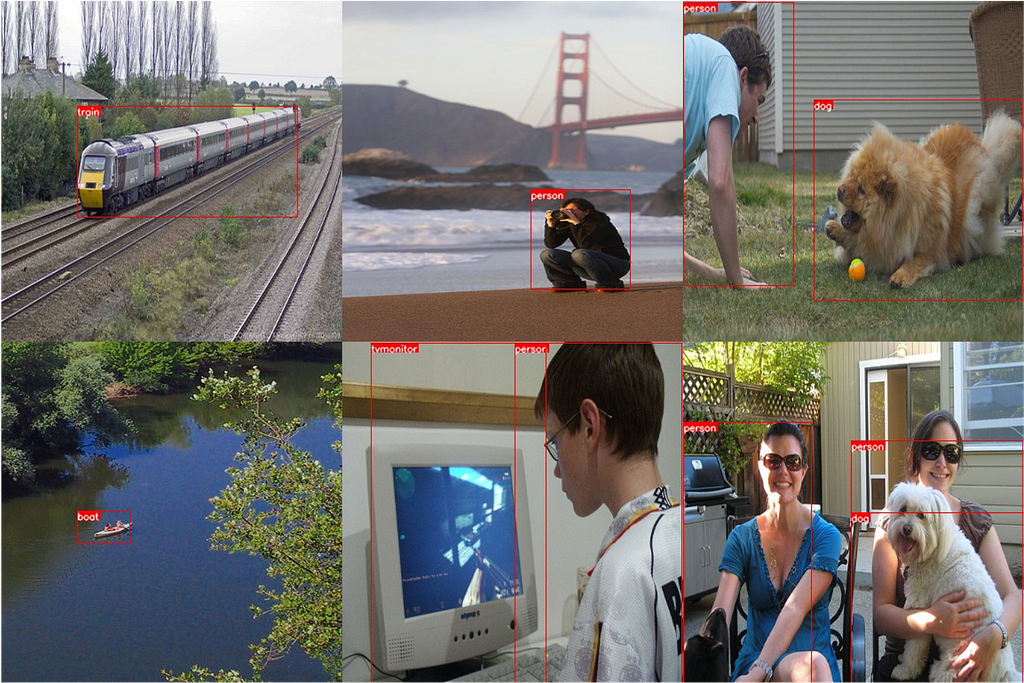
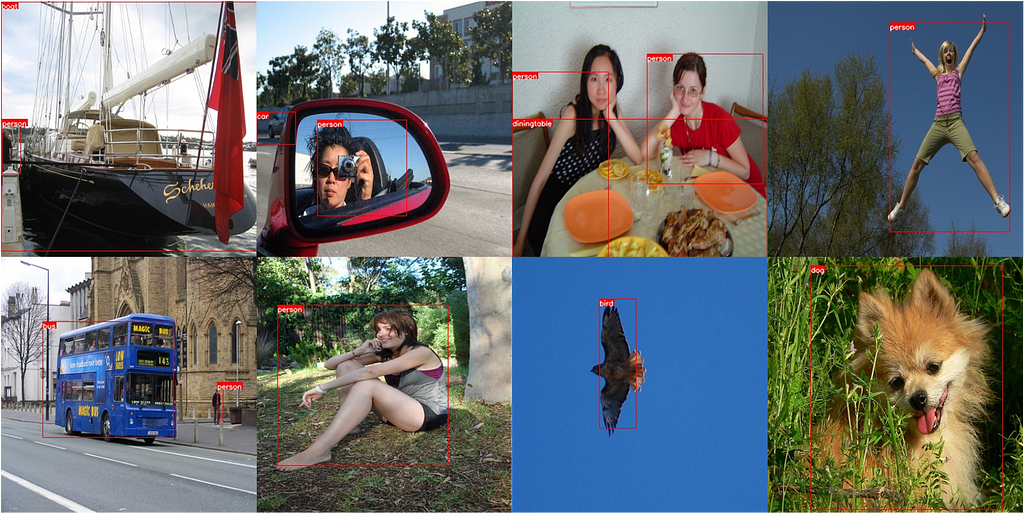
At the end of this tutorial, you’ll learn to implement a simple model for object detection which produces the following results:
I have made all of my code available as Google Colab Notebook and a Kaggle Notebook. I’ve also put the whole project and codes on my GitHub.
What’s interesting about this paper
The idea is pretty simple: Reframe the object detection problem as a task of text (token) generation! We want the model to “tell us” what objects exist in the image and also the (x, y) coordinates of their bounding boxes (bboxes), all in a specific format in the generated sequence, just like text generation!
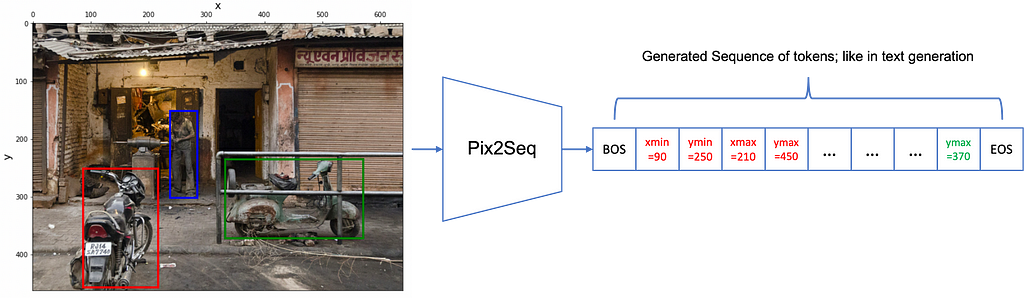
As you see, the object detection task is transformed into an image-captioning-ish task: describe the image in the text (sequence) but this time tell us exactly where the objects are.
Pix2Seq: Simple Implementation
Needed Modules
The closest task to what Pix2Seq does is image-captioning. So, we are going to need an image encoder to convert an image into vectors of hidden representation and then a decoder to take the image representations and those of the previously generated tokens and predict the next token. We also need a tokenizer to convert object classes and coordinates into tokens that form their special vocabulary, just like the words in a natural language.
My Simple Implementation of Pix2Seq
You can see the high-level pipeline of this project in the picture above. As you see, we need a dataset of images and their bboxes for which we will use Pascal VOC 2012 dataset. Next, we will write our own tokenizer from scratch to convert the bbox classes and coordinates into a sequence of tokens. Then, we will use DeiT (from this paper) as our image encoder and feed the image embeddings to a vanilla Transformer Decoder (from this paper). The decoder’s task is to predict the next token given the previous ones. The outputs of the decoder are given to the language modeling loss function.
The codes of this tutorial are available in the following links:
– Google Colab Notebook
– Kaggle Notebook
– My GitHub repo
Dataset
As I mentioned earlier, we will use VOC 2012 dataset with images and their corresponding objects from 20 classes. The paper uses the COCO dataset, which is an order of magnitude larger than VOC, and they also pre-train the models on a much larger dataset before training on COCO. But, to stay simple, I’m going to use this rather small VOC dataset.
We need a PyTorch dataset class that gives us an image and its bbox coordinates and classes in the form of a sequence.
As you see, most of the code here is what you expect from a simple dataset for classification, but there are small differences too. We need a Tokenizer to convert our labels and bbox coordinates (x and y) to a sequence so that we can perform train our model for the language modeling task (predicting the next tokens conditioned on the previously seen tokens).
Tokenizer
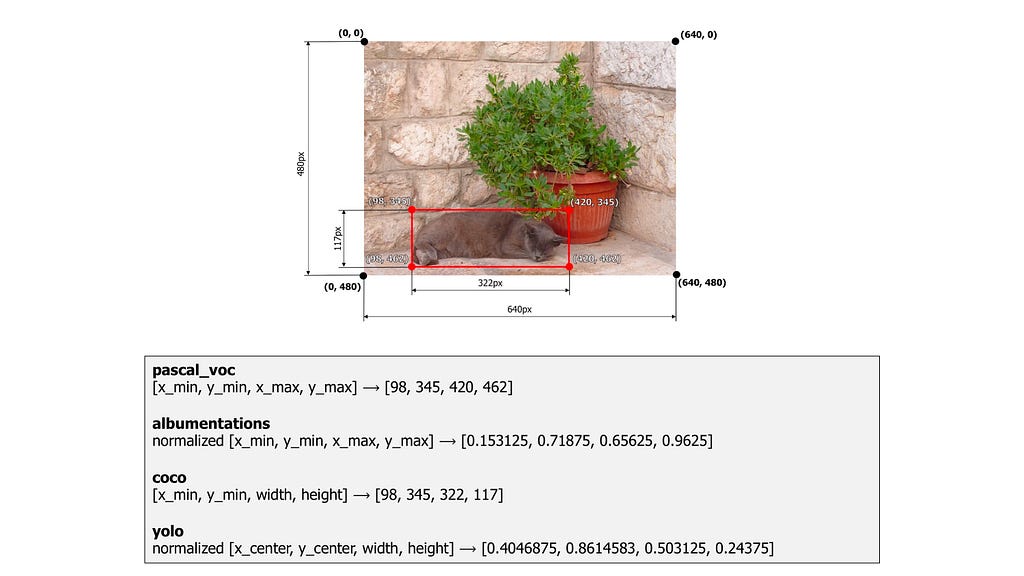
How are we going to convert this information into a sequence? Well, it’s not that difficult. To represent an object in an image, we need 5 numbers: 4 coordinate numbers and 1 to indicate which class it belongs to.
You actually need to know the coordinates of 2 points of a bounding box to be able to draw it in an image; in pascal format, we use the top left point and the bottom right point of the bbox as those 2 critical points, and each point is represented by its x and y values → so, we will need 4 numbers overall to draw a bounding box. You can see alternative formats to represent a bounding box down below. Also, look at where the start of x and y axis is (the 0, 0 point).
As you see in the dataset’s code, we give the bbox coordinates and labels to our tokenizer and get a simple list of tokens out. The tokenizer needs to do the following tasks:
- mark the start and end of the sequence w/e special tokens (BOS and EOS tokens).
- quantize the continuous value of coordinates (we can have x=34.7 as the coordinate of a point, but we need discrete values like 34 as our tokens because we are finally doing classification on a finite set of tokens)
- encode the label of the objects into their corresponding tokens
- randomize the order of objects in the final sequence (more on this below)
If you are familiar with NLP applications, these steps might sound familiar to you as they are also done when we are dealing with words in a natural language; we need to tokenize them and assign each word to its own discrete token, mark the start and end of the sequence, etc.
Regarding the number 4 in this list, this is what the paper does, and there is an extensive ablation study on whether it is a good idea. What it says is that each time that we show the same image to the model (in different epochs), we randomize the order in which the objects appear in the corresponding sequence, which we feed to the model (with one token shifted) and our loss function. For example, if there is a “person”, a “car”, and a “cat” in an image, the tokenizer and dataset will put these objects in random order in the sequence:
- BOS, car_xmin, car_ymin, car_xmax, car_ymax, car_label, person_xmin, person_ymin, person_xmax, person_ymax, person_label, cat_xmin, cat_ymin, cat_xmax, cat_ymax, cat_label, EOS
- BOS, person_xmin, person_ymin, person_xmax, person_ymax, person_label, car_xmin, car_ymin, car_xmax, car_ymax, car_label, cat_xmin, cat_ymin, cat_xmax, cat_ymax, cat_label, EOS
- …
Another note on how to quantize the continuous values of coordinates: imagine that the image size is 224. You can have a bbox with these 4 coordinates (12.2, 35.8, 68.1, 120.5).
You will need at least 224 tokens (num_bins) to be able to tokenize (quantize) these 4 numbers with a precision of 1 pixel (you will lose information below 1 pixel). As you see in the tokenizer code, to convert these bbox coordinates to their tokenized version, we need to do the following:
- normalize the coordinates (make them between 0 and 1 by dividing them by the max value = 224)
- do this: int(x * (num_bins-1))
so, the converted version will be: (12, 35, 67, 119). Remember that int() function in Python does not round the number to the closest integer, but it will keep only the integer part of the number. As you see, we have lost some information on the exact position of the bbox but it is still a very good approximation. We can use a larger number of tokens (num of bins, as stated in the paper), and we will have a more precise location. Our tokenizer also has decode() function, which we will use to convert sequences into bbox coordinates and labels.
Collate Function
Here, we will implement a custom collate_function to give to our PyTorch data loader. This function will take care of Padding for us: to make all the sequences the same length by adding PAD_IDX to the shorter ones in order to be able to build a batch with them. We are going to pad the sequence to a fixed max length of 300 tokens.
Encoder
I finally arrived to the coolest part for every deep learning lover: The Model 😍
Let’s take a second look at the first image of this tutorial. First, we will need an encoder to take the input image and give us some embeddings (representations). The paper uses a ResNet50 (and also in other experiments uses ViT), but I decided to use DeiT. As the name suggests, this is a data-efficient vision transformer, and I thought it would be a good fit for our small dataset. Like ViT, it splits the image into patches and processes them like words in a sentence which again could be great for our task, as we will have a separate embedding for each of these patches, and we can give them to our decoder in the next section to predict the target sequence (see it like translation from English to French, where our image is like a sentence in English and our target sequence containing the coordinates and labels of bboxes is like the equivalent sentence in French).
I will use timm library to implement a pre-trained DeiT model.
The bottleneck layer is to reduce the number of features of these embeddings to that of the decoder. The paper used a decoder dim of 256, and that’s the reason why I am reducing it here using Average Pooling. Also, the first token in this model relates to the CLS token, and I am skipping it in the forward method (features[:, 1:]).
Decoder
Our decoder takes the patch embeddings of the input image and learns to predict the sequence containing bboxes. Here I am using PyTorch nn.TransformerDecoder module to implement a 6-layer decoder with a feature dimension of 256. We also need to add positional embeddings to the embeddings so that the model knows about each token’s position in the sequence (I am adding positional embedding for both encoder tokens and decoder tokens. While we have to do this for the decoder, we might not need to add them to the encoder tokens as the DeiT model knows about the order of patches itself). I am doing this by those nn.Parameter modules will learn 1 parameter per token position. Finally, we will use a nn.Linear layer to predict the next token from our vocabulary.
The create_mask function gives us two masks needed for training the decoder: one to tell the model to ignore the PAD tokens and not incorporate them in its attention modules and another to mask the future tokens in order to make the decoder predict tokens only by looking at the current token and the previous ones.
Putting Them Together
This is a simple class encapsulating the encoder and decoder. It also has a predict function which calls the predict function of Decoder (not shown above, we will see it later) to detect objects in an image.
Training
Now let’s see how we can train this model. Most of the following code is just standard PyTorch training boilerplate, but there is a simple but important point in it. As mentioned earlier, we train the model like a language model (GPT for e.g.), and it works like this → the model needs to predict the next token only by seeing the previous ones (tokens to the left). At the start, it only sees the BOS sentence, and it needs to predict the next token, and so on and so forth. And this is achieved simply by this part:
- y_input = y[:, :-1]
- y_expected = y[:, 1:]
- preds = model(x, y_input)
I trained this model on Kaggle using a single GPU and only for 25 epochs in 6 hours. This is not much, but it was enough to get a decent performance on the evaluation metrics.

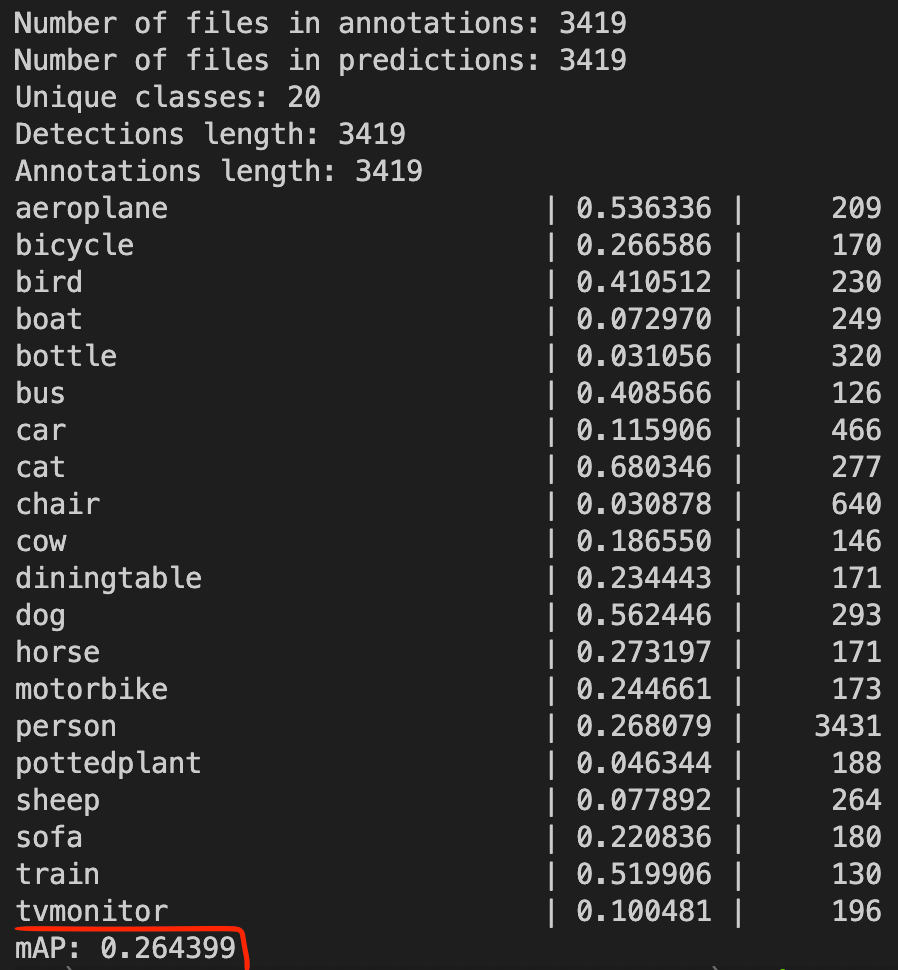
The most common metric for object detection is Average Precision (AP) which you can read more about it here. The paper gets an AP of 43 w/ ResNet50 backbone after training on a whole lot of data for many hours of training. I could get an AP of 26.4 on my validation set with this small model and short training time, which was cool as this is a tutorial on how to implement this paper easily, and I didn’t aim to beat the SOTA with this!
Inference
Now let’s take a look at how we can generate a detection sequence with this model for a test image. This is the prediction method of the Decoder’s class. It takes the previously generated tokens, pads them to the max_length and predicts the next token for each sequence in the batch, and returns those new tokens.
The following generate() function shows a simplified version of the whole sequence generation pipeline → First, we will create a batch with shape (batch_size, 1) containing only a BOS token for each image in the batch. The model takes the images and these BOS tokens and then predicts the next token for each image. We take the model’s predictions, perform softmax and argmax on it to get the predicted token, and concatenate this newly predicted token with the previous batch_preds tensor, which had BOS tokens. We then repeat this loop for max_len number of times.
We finally decode the predicted tokens by our tokenizer’s decode() method. You can take a look at the exact implementation on my GitHub, the Colab Notebook, or the Kaggle Notebook.
Results
Finally, let’s take a look at some of the results of our model so far. The model is not always this good (these are somewhat cherry-picked!), but these results show that the implementation is good enough, and w/ a bigger dataset and model and longer training times, you can easily get those perfect as stated in the paper.
Our model works best when there are 1 to 2 bboxes in the image, and its performance degrades when there are lots of objects in the image. The next image shows some of the failure cases of our model:

Final Words
I hope you’ve enjoyed this tutorial and learned something new. As always, I will be glad to hear your comments on this tutorial or answer any questions you might have regarding the paper and model.
Have a nice day!
I have made all of my code available as Google Colab Notebook and a Kaggle Notebook. I’ve also put the whole project and codes on my GitHub.
About Me
I’m Moein Shariatnia, a medical student, machine learning developer and researcher. I am interested in deep learning model’s generalization and transfer learning performance for my research. I also love implementing state of the art deep models and understand how they work.
My Google Scholar: https://scholar.google.com/citations?user=YLHsTOUAAAAJ&hl=en
My GitHub: https://github.com/moein-shariatnia
Easy Object Detection with Transformers: Simple Implementation of Pix2Seq model in PyTorch was originally published in Towards AI on Medium, where people are continuing the conversation by highlighting and responding to this story.
Join thousands of data leaders on the AI newsletter. It’s free, we don’t spam, and we never share your email address. Keep up to date with the latest work in AI. From research to projects and ideas. If you are building an AI startup, an AI-related product, or a service, we invite you to consider becoming a sponsor.
Published via Towards AI
Towards AI Academy
We Build Enterprise-Grade AI. We'll Teach You to Master It Too.
15 engineers. 100,000+ students. Towards AI Academy teaches what actually survives production.
Start free — no commitment:
→ 6-Day Agentic AI Engineering Email Guide — one practical lesson per day
→ Agents Architecture Cheatsheet — 3 years of architecture decisions in 6 pages
Our courses:
→ AI Engineering Certification — 90+ lessons from project selection to deployed product. The most comprehensive practical LLM course out there.
→ Agent Engineering Course — Hands on with production agent architectures, memory, routing, and eval frameworks — built from real enterprise engagements.
→ AI for Work — Understand, evaluate, and apply AI for complex work tasks.
Note: Article content contains the views of the contributing authors and not Towards AI.
Related posts
Recent Posts


")


