


Data Collection Using OpenCV
Last Updated on January 7, 2023 by Editorial Team
Last Updated on June 5, 2022 by Editorial Team
Author(s): Abhinav Bandaru
Originally published on Towards AI the World’s Leading AI and Technology News and Media Company. If you are building an AI-related product or service, we invite you to consider becoming an AI sponsor. At Towards AI, we help scale AI and technology startups. Let us help you unleash your technology to the masses.
OpenCV, short for “Open Source Computer Vision”, is a machine learning library that was designed to enable image processing and computer vision applications. A rather unexplored application of OpenCV, as opposed to object detection and recognition, is its ability to collect data. More precisely, it can be used to create a dataset by locally saving images in your machine. Allow me to elaborate.
OpenCV allows you to access the webcam in your machine and manipulate the image captured by it. The idea involves processing the
Here’s a simple code snippet. (I will be using Python v 3.9.7 for this demonstration)
Importing the Libraries: We would need OpenCV and OS libraries of python to perform data collection. If you do not have these packages pre-installed you can install them by executing the following commands in your command prompt:
- OpenCV: pip install opencv-python
- OS: pip install os-sys
Initialization: The next step involves creating a VideoCapture object that captures video in real-time from your system’s web camera. Here’s a link to the original documentation — Docs. We will also need three variables:
- flag_collecting: This is a boolean variable that works as a pause/resume button.
- images_collected: This is an integer variable that is used to indicate the number of images collected and saved in the system.
- images_required: This is an integer variable that is used to indicate the number of images we are intending to collect.
We then have to create a folder/directory (testing_demo in this case) using the mkdir (short for make-directory) command from the OS library.
The Crux of the Code: If this is your first time working with OpenCV, I suggest you go through this documentation to understand the boilerplate part of the code. I will be explaining all the modifications to the standard code, line by line to make sure it’s easier to understand.
Line 3: I had to flip the frame along the y-axis using the flip() command to make sure that the video appeared the right way to me.
Line 5: The while loop will keep running until the images collected are equal to the images required.
Line 8: Using the cv2.rectangle command, I draw a black square on my screen between the mentioned coordinates.
Line 11–14: I extract the sliced frame or part of the screen inside the black square. I will then save these extracted frames in the directory created above. This will result in an image of dimensions 240×240 pixels. The origin of the coordinate system in OpenCV is situated at the top left corner. The (80,320) are the y-coordinates starting from the origin and it increases as it moves downward. The (380, 620) are the x-coordinates starting from the origin and it increases as it moves rightward. So (380, 80) and (620, 320) correspond to the top-left and bottom-right coordinates of the black square.
Line 16–18: Displaying the number of images collected at the given coordinates.
Line 21–22: The keyboard character ‘s’ (for start/stop) is used to pause or resume the collection of images. It essentially acts as a toggle button.
Line 23: The keyboard character ‘q’ (for quit) is used to close the window
Application: I originally used this technique to collect images of hand symbols to create an image dataset (available on Kaggle: Hand Symbols), but the limit is only your imagination. You can create image datasets out of anything. Get Creative!
Implementation: I have added a few images of this code in action. It is suggested to collect data with a plain wall behind you, to make sure that there is no external noise in the frame.
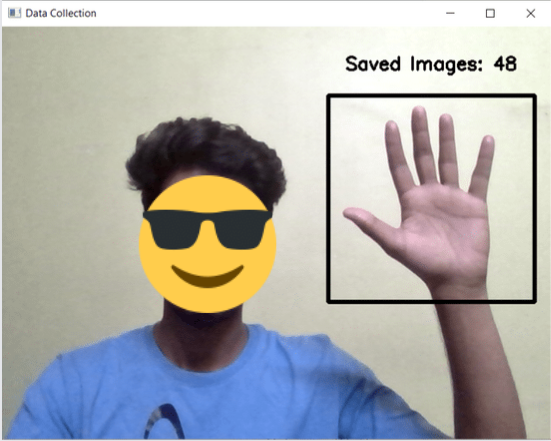
Kindly forgive my crude dressing sense.
The following image is taken after I ran the code and before I pressed the character ‘s’ on my keyboard, which starts the process of collection of images.
Now this image is taken after I ran the code and after I pressed the character ‘s’ on my keyboard. As you can see the number of images collected is displayed above the black square. The size of this black square can be changed to any shape or size as per the wishes of the user.
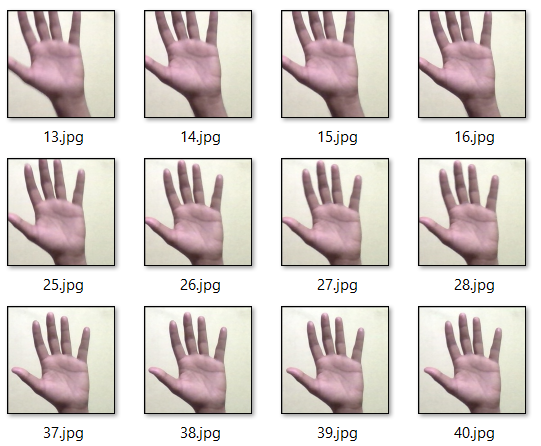
Here’s the result of the image collection.
This is one of the easiest ways to collect and format image data that I have ever encountered. That’s all for now! Catch you later!
Data Collection Using OpenCV was originally published in Towards AI on Medium, where people are continuing the conversation by highlighting and responding to this story.
Join thousands of data leaders on the AI newsletter. It’s free, we don’t spam, and we never share your email address. Keep up to date with the latest work in AI. From research to projects and ideas. If you are building an AI startup, an AI-related product, or a service, we invite you to consider becoming a sponsor.
Published via Towards AI
Towards AI Academy
We Build Enterprise-Grade AI. We'll Teach You to Master It Too.
15 engineers. 100,000+ students. Towards AI Academy teaches what actually survives production.
Start free — no commitment:
→ 6-Day Agentic AI Engineering Email Guide — one practical lesson per day
→ Agents Architecture Cheatsheet — 3 years of architecture decisions in 6 pages
Our courses:
→ AI Engineering Certification — 90+ lessons from project selection to deployed product. The most comprehensive practical LLM course out there.
→ Agent Engineering Course — Hands on with production agent architectures, memory, routing, and eval frameworks — built from real enterprise engagements.
→ AI for Work — Understand, evaluate, and apply AI for complex work tasks.
Note: Article content contains the views of the contributing authors and not Towards AI.
Related posts
Recent Posts


")

