


A Step-by-Step Approach To Building a Text Summarization Webapp in Python From Scratch
Last Updated on January 6, 2023 by Editorial Team
Author(s): Dr. Dharini R
Originally published on Towards AI the World’s Leading AI and Technology News and Media Company. If you are building an AI-related product or service, we invite you to consider becoming an AI sponsor. At Towards AI, we help scale AI and technology startups. Let us help you unleash your technology to the masses.
Using Hugging Face Inference API, Flask, HTML & CSS
What is the aim? To build a web application that can get an input text and show its summary.
What are we going to use? Hugging Face Accelerated Inference API, Python Flask Framework, HTML, CSS.
How is it done? By carrying out the following steps.
The 3-Step process
1. Identify the inference API of a text summarization model from the Hugging Face library.
3. Build the back end with Python Flask and include the summarization task.
Text summarization is the task of extracting a brief from a given set of sentences. A summary can be of two types — an abstractive summary or an extractive summary. An extractive summary has words extracted from the given input, placing them together to form a brief. The abstractive summary generates the summary not only by replicating the words in the input, but also coining new words based on the understanding of the text.
We are going to build an abstractive summarization application using the Hugging Face Accelerated Inference API. To utilize a model by providing input to it and to get the model’s output, we just have to make an API call.
The accelerated inference enables the ‘plug-and-play’ kind of usage to the machine learning models by means of API calls.
Kindly refer to the following blog link to understand the working of Inference API and its benefits with an implementation demo.
Plug-and-Play ML Models with ‘Accelerated Inference API’ from Hugging Face
The web application part of our project can easily be built with the Flask framework. The Flask helps with the development of a web application and renders an HTML file, which can be viewed in a web browser.
Welcome to Flask – Flask Documentation (2.2.x)
The front end of our web application is built with HTML and CSS. The Hyper Text Markup Language (HTML) and Cascading Style Sheets (CSS) are used to design the structure of a webpage and presentation of a webpage, respectively.
Having looked at the gist of everything we are going to use, let's have an idea of what we will build. Our web app is going to have
- a front end — a web page that gets the user input text and shows the summary as output.
- a back end — where the user input is fed to the model, and the results are extracted from the model.
Now kindly make sure to go through the 3 step process of building our summarization application.
1. Identify and utilize a text summarization model from Hugging Face
- For our project, we will be using the model facebook/bart-large-cnn provided by Lewis et al. [BART: Denoising Sequence-to-Sequence Pre-training for Natural Language Generation, Translation, and Comprehension]
- To use the model’s Inference API, select the model from the Hugging Face library and then clickInference APIunder the Deploy button.
- On clicking that, we will see a python script that can be utilized for the inference, as shown below.
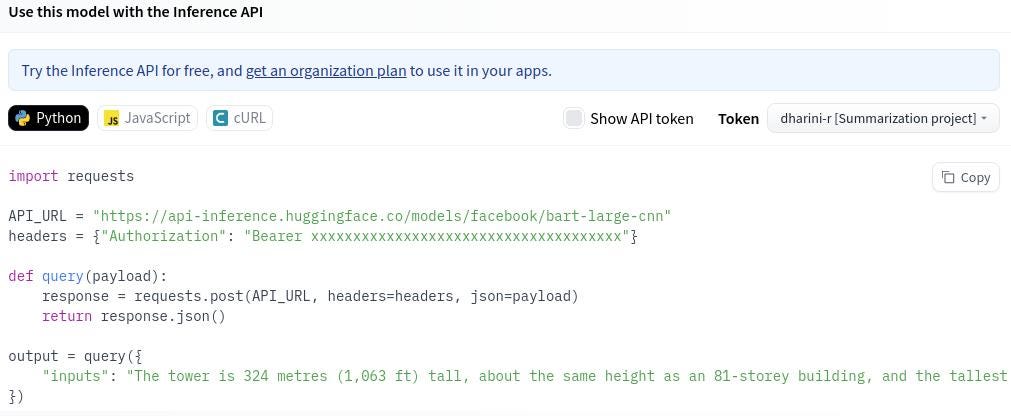
- An Access Token is needed to get the API_URL and headers.
- Create a profile in Hugging Face and create a new access token by following this path Profile -> Settings -> Access Tokens Tab.
- The newly created access token can be used in place of Bearer and headers
- Now let's move to the next part of our project to create a web application.
2. Build the front end with HTML and CSS.
- The code for the front end is written in two parts
— A static file
— A HTML file
The static file consists of customizations to improvise the look of our front end. As the name suggests, the contents of a static file are not going to be changed according to the user’s input or actions. A static file can include anything such as images, videos, cascading style sheets(CSS), flash files, etc., and these are not dynamically generated by the web server like a typical HTML response because they remain static.
- In the desired location, create two folders named staticand templates
- In the static folder, create a new file named main.css, where CSS is the cascading style sheet that is used to style the HTML.
- main.css consists of tags present in the HTML code with their corresponding styling and formatting. For a more detailed tutorial on how CSS is used, please refer to this link.
- The code for the static file main.css is given below, followed by an explanation.
- As we can see, the above CSS file consists of appearance-based formatting and customization for most of the tags used in our HTML code.
Code Explanation
- Lines 2 to 9 — consist of styling and formatting aimed at the tag header.
- Lines 11 to 25 — consist of formatting for tag h1.
- Lines 28 to 34 — have the styling for body tag, along with a background image named image.gif
- Lines 35 to 39 — formatting for container
- Lines 41 to 47 — styling for div tag, which specifies the division of some content
- Lines 49 to 64 — formatting for tags h2 and h3
- Lines 68 to 77 — consist of formatting aimed at placing two text boxes side by side with the help of tags parent and child. Let's move on to creating the front end with our HTML code.
The HTML is built with the objective of providing a structured pleasant user interface, a space for users to provide input and a space for showing the summary.
- In the already created folder named templates, create a new file named index.html.
- The code for index.html is given below, followed by the explanation.
Code Explanation
- Lines 4 to 11— Header of the HTML
- Line 9 — We have added the source of the static file (main.css).
- Line 10 — We have given a title for our webpage named Summarization Application.
- Lines 13 to 42 — Body of the HTML
- Lines 14 to 19 — Contains the headertag, which is used to provide the introductory part of a web page. In our case, we have given “My Summarization App”
- Lines 23 and 34 — Two text boxes are created and placed side by side
- Lines 25 to 31 — The form created for getting the input data and sending it to the back end. We have utilizedform action to specify that the submitted data has to be sent toget_summary the method written in the back end for processing.
- Line 27 — The text box for input is created and is named with the variable nameinput_text which is used in the back end for processing input data.
- Lines 29 and 30 — Buttons Submit and Clear are created.
- Line 38 — A text box for displaying the output is created with the name result which is used in the back end to store the summarized text.
- Having built the front end for the web app, let us move on to build the back end.
3. Build the back end with Python Flask and include the summarization task.
The job of the back end is to
- get the input from the front end,
- utilize the Hugging Face’s Inference API by sending the input data to the summarization model and gathering its output(summary)
- send the summary to the front end
Let’s name our backend python file asapp.py, kindly refer to the code given below, followed by the explanations.
- We have to remember that the front end and the back end should be connected with common variable names.
- The inputs to the summarization model are
— Text to be summarized (obtained from the front end)
— Minimum length of the summary (initialized)
— Maximum length of the summary (initialized)
Code Explanation
- To begin with, let’s install Flask using the command pip install flask
- Line 6 — includes the path for the static file
- Lines 7 to 9 — index method to render the index.html file
- Lines 12 to 38 — get_summary method
- Lines 15 and 16 — includes the URL for the Inference API and the authentication tokens, respectively. Make sure to paste your authentication token in the Bearer part.
- Line 25 — specify the input from the front end using the variable input_text
- Lines 26 and 27 — specify the maximum and minimum lengths for the summary with variables min_len and max_len
- Lines 30 to 33 — send the query to the model, including the input variables. The result is stored in output variable.
- Line 36 — the summary from the model stored inoutput[“summary_text”] is sent to the front end using the result variable.
- As we can see, the common variable names used for connecting the front end and back end are input_text, get_summary, result.
- The full code for the project is given in this GitHub link.
Summarization App
- On running the app.py python code, the front end (created using main.css and index.html files) is rendered in the local host http://127.0.0.1:5000.
- Opening the local host link in a browser will give us the web application.
- A screenshot of the output is given below.
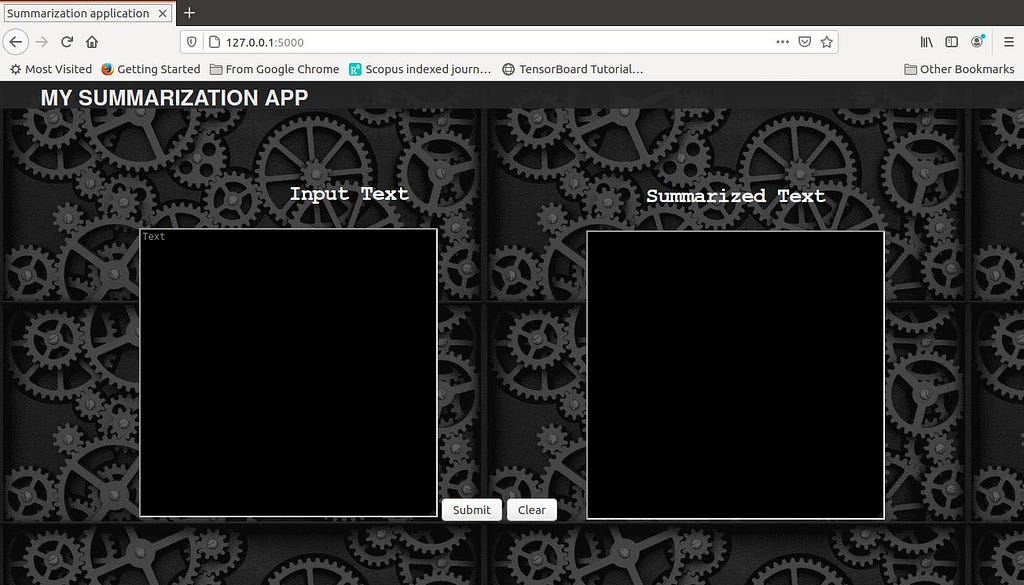
- We can see Summarization Application as our page title, MY SUMMARIZATION APP as the header content, two text boxes side by side with titles Input Text and Summarized Text, two buttons Submit and Clear.
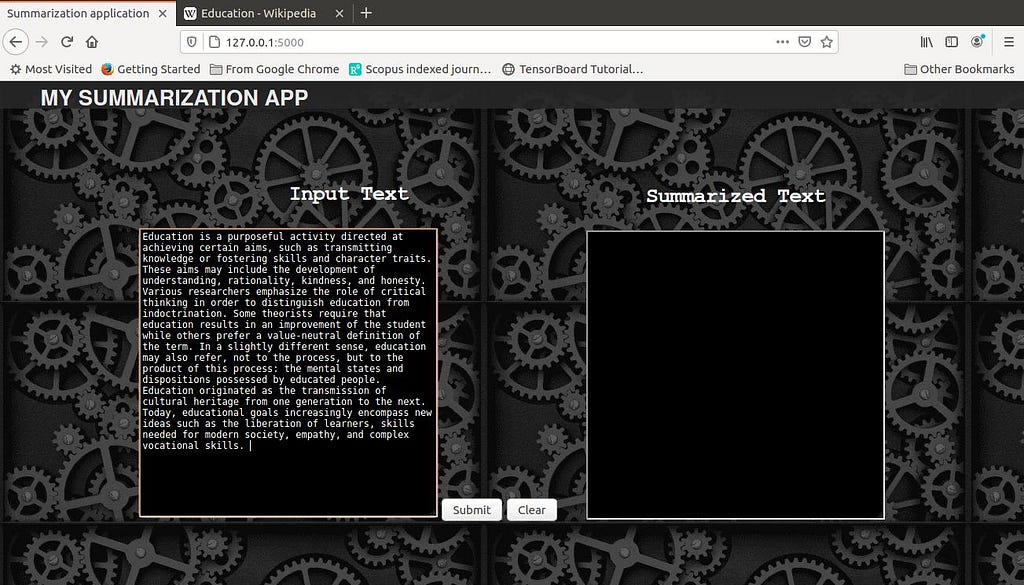
- If an input text is given in the left side box and Submit button is pressed, the get_summary method is invoked and the summarization model is utilized.
- In the following screenshot, we can see that the input text is pasted and Submit button is clicked.
- As a result the get_summary method is invoked and the change in the address bar can be noted in the following screenshot (http://127.0.0.1:5000/get_summary).
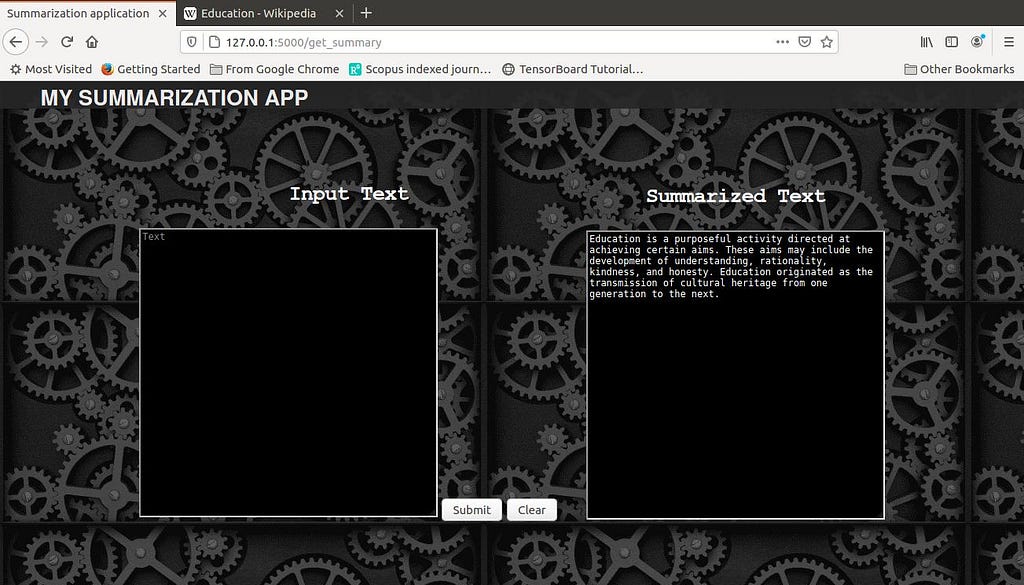
- When the get_summary method is invoked, the inference API of the Summarization model is utilized, and the output is shown in the Summarized Texttext box.
Hurray!!! We have successfully created a Web application for the most popular Summarization task in Natural Language Processing.
Summary
We had an introduction on summarization, how we are going to build the web app for extracting the summary of a text, and a gist of all the elements to be used. We proceeded to understand the simple 3 step process of developing the web app, starting with selecting a model from Hugging Face for the task. Next, we understood the usage of HTML and CSS with a code example for building the front end. Followed by that, we inferred the usage of Flask with a code example for building the back end. Finally, we saw the result of our hard work, the rewarding Summarization Web Application. The same procedure can be extended to build any other kind of Natural Language Processing task using a model from Hugging Face. Proceed with your task and succeed!!!!
A Step-by-Step Approach To Building a Text Summarization Webapp in Python From Scratch was originally published in Towards AI on Medium, where people are continuing the conversation by highlighting and responding to this story.
Join thousands of data leaders on the AI newsletter. It’s free, we don’t spam, and we never share your email address. Keep up to date with the latest work in AI. From research to projects and ideas. If you are building an AI startup, an AI-related product, or a service, we invite you to consider becoming a sponsor.
Published via Towards AI
Towards AI Academy
We Build Enterprise-Grade AI. We'll Teach You to Master It Too.
15 engineers. 100,000+ students. Towards AI Academy teaches what actually survives production.
Start free — no commitment:
→ 6-Day Agentic AI Engineering Email Guide — one practical lesson per day
→ Agents Architecture Cheatsheet — 3 years of architecture decisions in 6 pages
Our courses:
→ AI Engineering Certification — 90+ lessons from project selection to deployed product. The most comprehensive practical LLM course out there.
→ Agent Engineering Course — Hands on with production agent architectures, memory, routing, and eval frameworks — built from real enterprise engagements.
→ AI for Work — Understand, evaluate, and apply AI for complex work tasks.
Note: Article content contains the views of the contributing authors and not Towards AI.
Related posts
Recent Posts


")

