


A guide to Persistent storage in Docker
Last Updated on December 15, 2022 by Editorial Team
Author(s): Prithivee Ramalingam
Originally published on Towards AI the World’s Leading AI and Technology News and Media Company. If you are building an AI-related product or service, we invite you to consider becoming an AI sponsor. At Towards AI, we help scale AI and technology startups. Let us help you unleash your technology to the masses.
What is the need for persistent storage in Docker?
Applications generate 2 kinds of data, persistent and non-persistent. Non-persistent data can be ignored, and they don’t have to be saved anywhere. On the other hand, persistent data needs to be saved for future use; it can’t be lost at any cost. If the application is hosted as a container, persistent data must be accessible to multiple containers as they share the load and storage. The data must persist, devoid of the status of the container. Since we have understood the need for persisting data, let’s look at how data is stored inside a container.
A container consists of multiple layers, and the files inside the container are stored in the writable layer. The data can only be persisted as long as the container exists, which means when the container is deleted, all the data inside it will be lost. Which presents the following problems,
- It would be difficult for another container to access the data which is present inside the container.
- Since the container’s writable layer is tightly coupled to the host machine, it would be difficult to move data to a different system.
To solve this problem, docker came up with 2 ways of persistent storage, Volumes and bind mounts. Docker also supports temporary file storage for in-memory use cases.
In this article we will be learning about the different persistent storage options, their implementation, their use case along with code samples.
Table of contents
1. Code walkthrough
2. Bind Mounts
3. Volumes
4. Temporary file storage mounts
5. Conclusion
1. Code walkthrough
For this article, we have taken the example of a simple python application that takes in the file name and content of the file as parameters and creates the file with the specified content. The source code for this application can be found here.
from flask import Flask, request
import os

app = Flask(__name__)

if not os.path.exists("docker_bind"):
    os.makedir("docker_bind")

@app.route("/create_file",methods=["POST"])
def run():
    data = request.get_json()
    file_name, content =  data['file_name'], data['content']
    file_path = f"docker_bind/{file_name}"
    with open(file_path,'w') as write_file:
        write_file.write(content)
    return {"Status":"Success"}

app.run(debug=False,host='0.0.0.0',port = 5000)
To run this application as a container, the prerequisite is that docker has to be installed. After installing docker, open the command prompt and execute the following commands. The list of all the commands can be found here.
To build the container.
docker build -t create_file_py_image .
To run the container.
docker run --name create_file_py_container -p 5001:5000 create_file_py_image
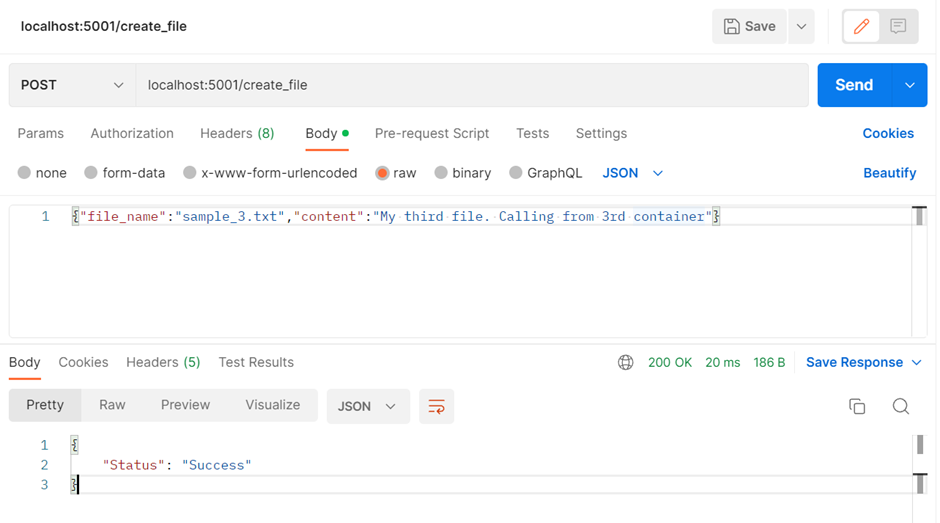
After running the above command, we can open postman and send a request to the running container with file name and content as parameters. The application takes in the parameters, creates the file with the specified name and content, and returns the Status as success. We will be using the same code to explain both volume and bind mounts.
2. Bind Mounts
2.1 What are Bind Mounts?
2.2 Creating a Bind Mount.
2.3 Multiple containers accessing the same Bind mount.
2.4 Demonstrating persistence with Bind mount.
2.5 Where can we use Bind Mounts
2.1 What are Bind Mounts?
Bind mounts are used for persistence, and they have been available since the early days of docker. When we use a bind mount, a directory on the host is mounted into a container. In bind mounts, the directory is managed by us and not by docker.
Bind Mounts also come up with a slight disadvantage as the containers have the ability to modify, delete and create resources in the host OS. Attention has to be provided if non-docker elements need to access the mount folder.
2.2 Creating a Bind Mount
The mount flag is used to mention the kind of persistence we require. It could be bind, tmpfs, or volume. In this case, we set it to bind. For creating a bind mount, we need to provide the source path explicitly. It has to be an absolute path and not a relative. The source path is the path in the host. Similarly, we need to provide the target path. This is the path inside the container which we want to mount.
docker run -d -it -p 5000:5000 --name create_file_py_container1 --mount type=bind,source="C:\Users\prithiveer\Documents\Docker_Bind",target=/app/docker_bind create_file_py_image
With the above command, a container will be created. We sent a request from Postman to create a file named “sample_1.txt” with the content “My first file”. As shown below, we can use exec inside the container and find the file which we created.

2.3 Multiple containers accessing the same Bind mount
In real life, an application would be hosted in multiple containers, and we require them to be mounted to a single bind mount. So, for demonstration purposes, we create two more containers.
docker run -d -it -p 5002:5000 --name create_file_py_container2 --mount type=bind,source="C:\Users\prithiveer\Documents\Docker_Bind",target=/app/docker_bind create_file_py_image

docker run -d -it -p 5003:5000 --name create_file_py_container3 --mount type=bind,source="C:\Users\prithiveer\Documents\Docker_Bind",target=/app/docker_bind create_file_py_image
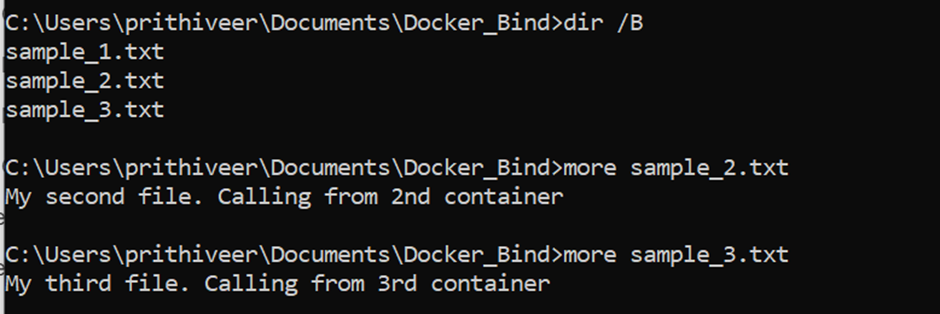
Like the first container, we send requests from containers 2 and 3 and generate files sample_2.txt and sample_3.txt, respectively. While creating the bind mount, we provided a source address. We can find all the files which we created inside the containers in the specified location. Similarly, we can also find all the files in the docker_bind folder of all the 3 containers, irrespective of the files which were created by each container.
2.4 Demonstrating persistence with Bind mount.
To demonstrate persistence, we delete all the 3 containers and create them again. Since the data is written to the writable layer when we delete the container, all the data inside the container should be lost. But due to bind mounts, we will be able to see all the files created.

2.5 Where can we use Bind Mounts?
We can use Bind mounts when we are sure that the directory structure of the host will be consistent. It can also be used to share configuration files from containers to the host.
3. Volumes
3.1 What are volumes?
3.2 Creating a volume and mounting it to a container.
3.3 Multiple containers accessing the same volume.
3.4 Demonstrating persistence with volume.
3.5 Where can we use volumes?
3.1 What are volumes?
Volumes are the preferred way to handle persistent file storage. Volumes are basically bound mounts except docker manages the storage on the host. So you don’t have to know the fully qualified path to a file or directory.
1. Volumes are independent of containers.
2. They can be mapped to external storage
3. Multiple containers can access the same volume.
3.2 Creating a volume and mounting it to a container.
A volume is a first-class object in docker. It can be created explicitly or on the fly while mounting a container. During mounting, docker checks if the volume is available, if not, it creates a volume.
Creating volume explicitly
docker volume create my_volume
Creating volume while mounting
docker run -d -p 5000:5000 --name container1 --mount type=volume, source="my_volume", target=/app/docker_bind create_file_py_image
Using the above command, we create a container called container1 with 5000 as the port. Using the mount flag type set to type volume, we mount “my_volume” to the container. The source will have the name of the volume, while the target will be the folder that needs to be connected inside the container. When we send the requests after mounting, the files are created in docker_bind folder and persisted in the volume created by us.
To list volumes and inspect it
docker volume ls
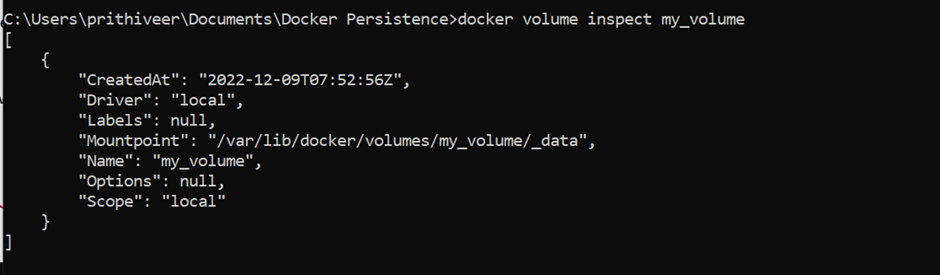
docker volume inspect my_volume
If we need to check where the files are persisted in the volume, we can use the inspect command. This will return the mountpoint location and metadata. All the files which are generated in /app/docker_bind can be found in the location /var/lib/docker/volumes/my_volume/_data.
3.3 Multiple containers accessing the same volume.
docker run -d -p 5002:5000 --name container2 --mount type=volume, source="my_volume", target=/app/docker_bind create_file_py_image
.
docker run -d -p 5003:5000 --name container3 --mount type=volume, source="my_volume", target=/app/docker_bind create_file_py_image
Now container1, container2, and container3 are accessing the same volume. So, the files created by all the 3 containers will reside in the same volume.
3.4 Demonstrating persistence with volume.
We send a request to container1 to create a file called volume_file.txt. Inside the content, we write, “I am inside volume file storage”. The file will be created in container1's docker_bind folder. Then it will be copied to my_volume. To demonstrate persistence, we delete container1. After that, we exec into container2 and check if volume_file.txt exists. As we can see in the below image, we are able to display the contents of volume_file.txt, which was created in container1 from container2. This demonstrates persistence with volume.

3.5 Where can we use volumes?
- Volumes can be used when we want to store the data in a remote host or cloud provider instead of storing it locally.
2. Volumes can be used to migrate, create a backup or restore data from one Docker Host to another. We can stop the running container and get the data from the mount path directory.
4. Temporary file storage mounts(tmpfs)
4.1 What are temporary file storage mounts?
4.2 Creating a temporary file storage.
4.3 Demonstrating the “temporary” in temporary file storage.
4.4 Demonstrating the in-memory property.
4.5 Where can we use temporary file storage?
4.1 What are temporary file storage mounts?
As the name states, temporary file storage mounts do not store data permanently. They are ephemeral in nature. They are in-memory file storage. They can’t be accessed by any other container, and the information will be lost once the container is down. In the case of tmpfs, no volume will be created.

4.2 Creating temporary file storage.
For creating temporary file storage, we need to set up the mount flag to type, tmpfs. After executing the below command, a folder will be created by the name my_temp_storage.
docker run -it --name ubututu_container1 --mount type=tmpfs,dst=/my_temp_storage ubuntu
After creating the temporary file storage, we can create a file in the tmpfs directory, in this case it will be my_temp_storage.
echo "This is my file in temporary file storage" > my_temp_storage/logs.txt

4.3 Demonstrating the “temporary” in temporary file storage.
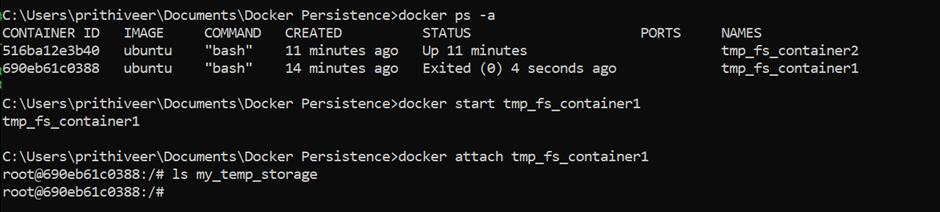
To demonstrate the ephemeral behavior of temporary file storage, we stop the ubututu_container1 and start it again. After we do that, we can find that the file(logs.txt) which we had created earlier doesn’t exist anymore. This is because tmpfs doesn’t persist data.
4.4 Demonstrating the in-memory property.
While explaining Bind mounts and volumes, we created multiple containers to show how the data had persisted. But in the case of tmpfs we can’t do that as it is an in-memory property. It means that a file in the tmpfs folder of a container can’t be accessed by another container.

Tmpfs is different from saving files in a different location. In the case of tmpfs while we stop or exit the container, the information would be lost. But in any other location, if we stop and start the container back, we will be able to find the file.

4.5 Where can we use temporary file storage?
Tmpfs mounts are best used when we do not want the data to persist in both the container as well as the local system. They are used for storing security-related information, such as tokens that need to expire once the container is down. This also improves the performance of the container.
5. Conclusion
In this article, we have learned the different types of persistent storage options provided by Docker, their use cases, and their implementation. These options guarantee that the data is not lost once the container is removed. If you are not sure which to choose, go with volumes. In the case of Bind Mounts, we have to provide the location of the mount, but in the case of volumes, docker takes care of that for us. For sensitive data, we can go with temporary file storage, but we have to be careful as they are ephemeral.
References
- Manage data in Docker | Docker Documentation
- Docker Volumes Explained (PostgreSQL example) — YouTube
- (7384) Introduction to Persistent Storage Options in Docker — YouTube
Want to Connect?
If you have enjoyed this article, please follow me here on Medium for more stories about machine learning and computer science.
Linked In — Prithivee Ramalingam | LinkedIn
A guide to Persistent storage in Docker was originally published in Towards AI on Medium, where people are continuing the conversation by highlighting and responding to this story.
Join thousands of data leaders on the AI newsletter. It’s free, we don’t spam, and we never share your email address. Keep up to date with the latest work in AI. From research to projects and ideas. If you are building an AI startup, an AI-related product, or a service, we invite you to consider becoming a sponsor.
Published via Towards AI
Towards AI Academy
We Build Enterprise-Grade AI. We'll Teach You to Master It Too.
15 engineers. 100,000+ students. Towards AI Academy teaches what actually survives production.
Start free — no commitment:
→ 6-Day Agentic AI Engineering Email Guide — one practical lesson per day
→ Agents Architecture Cheatsheet — 3 years of architecture decisions in 6 pages
Our courses:
→ AI Engineering Certification — 90+ lessons from project selection to deployed product. The most comprehensive practical LLM course out there.
→ Agent Engineering Course — Hands on with production agent architectures, memory, routing, and eval frameworks — built from real enterprise engagements.
→ AI for Work — Understand, evaluate, and apply AI for complex work tasks.
Note: Article content contains the views of the contributing authors and not Towards AI.
Related posts
Recent Posts
")


")


