


YOLO V5 is Here! Custom Object Detection Tutorial with YOLO V5
Last Updated on June 15, 2020 by Editorial Team
Author(s): Mihir Rajput
Data Science
YOLO “You Only Look Once” is one of the most popular and most favorite algorithms for AI engineers. It always has been the first preference for real-time object detection.
YOLO has emerged so far since it’s the first release. Let’s briefly discuss earlier versions of YOLO then we will jump straight into the training part.
Previous YOLO Releases
YOLO v1 was introduced in May 2016 by Joseph Redmon with paper “You Only Look Once: Unified, Real-Time Object Detection.” This was one of the biggest evolution in real-time object detection.
In December 2017, Joseph introduced another version of YOLO with paper “YOLO9000: Better, Faster, Stronger.” it was also known as YOLO 9000.
After a year in April 2018, the most popular and stable version of YOLO was introduced. Joseph had a partner this time and they released YOLOv3 with paper “YOLOv3: An Incremental Improvement”.
Finally, in April 2020, Alexey Bochkovskiy introduced YOLOv4 with paper “YOLOv4: Optimal Speed and Accuracy of Object Detection” Alexey is not the official author of previous versions of YOLO but Joseph and Ali took a step back from YOLO someone has to handle the era.
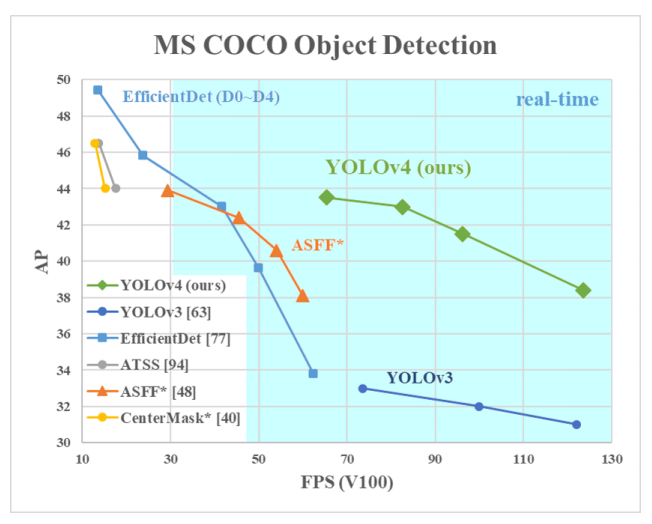
YOLOv4 was introduced with some astounding new things, It outperformed YOLOv3 with a high margin and also has a significant amount of average precision when compared to EfficientDet Family.
After a few days on 9 June 2020, just four days back another unofficial author Glenn Jocher released YOLOv5. There are lots of controversies about the selection of the name “YOLOv5” and other stuff. Glenn introduced PyTorch based version of YOLOv5 with exceptional improvements. Hence he has not released any official paper yet.
This version is pretty amazing and outperforms all the previous versions and got near to EfficientDet AP with higher FPS. You can notice that in the below graph.

For further comparisons please visit https://blog.roboflow.ai/yolov4-versus-yolov5/.
Train YOLOv5 on a Custom Dataset
This part consists of multiple steps as listed below,
- Preparing Dataset
- Environment Setup
- Configure/modify files and directory structure
- Training
- Inference
- Result
The code for this tutorial can be found on this GitHub repository.
Preparing Dataset
Once you get the labeled dataset in YOLO format you’re good to go.
In this tutorial, we will be using an elephant detection dataset from the open image dataset.
To get the labeled dataset you can search for an open-source dataset or you can scrap the images from the web and annotate them using tools like LabelImg.
NOTE: Your annotation format should be in the YOLO format.
Make sure you keep your annotations and images in the same directory.
Then generate train, test, and validation txt files, to do that just copy image files and paste the path into txt files. Best practice would be to keep 70% data in the training set, 20% in the validation set, and 10 % in the testing set.
For this tutorial, I will use this train, test, and validation txt files.
Also, I have added a labeled dataset here, the images directory contains all the images and the txt directory contains all the annotations.
Environment Setup
The important thing to notice is that you will require PyTorch version ≥ 1.5, Python version 3.7, and CUDA version 10.2.
The rest of the below dependencies can easily be installed using pip or the requirement.txt file.
numpy==1.17
scipy==1.4.1
cudatoolkit==10.2.89
opencv-python
torch==1.5
torchvision==0.6.0
matplotlib
pycocotools
tqdm
pillow
tensorboard
pyyaml
NOTE: For this tutorial, I have used ubuntu 16.04.
Once you successfully install all the dependencies you are ready to move further.
Configure/modify files and directory structure
To train the YOLOv5 model you will need to perform some steps.
First, start with the cloning repository for YOLOv5. You can clone from here if you are following this tutorial. You can clone from official repo as well form here.
Second, modify you need to add the YAML file to describe your dataset parameters. Please refer following YAML file and modify accordingly as per your need.
# here you need to specify the files train, test and validation txt # files created in step 1.
train: /self/elephant_dataset/train_elephant.txt
val: /self/elephant_dataset/val_elephant.txt
test: /self/elephant_dataset/test_elephant.txt
# number of classes in your dataset
nc: 1
# class names
names: ['Elephant']
We will use this file later to train the model.
Training
To train the YOLOv5 Glenn has proposed 4 versions.
- yolov5-s which is a small version
- yolov5-m which is a medium version
- yolov5-l which is a large version
- yolov5-x which is an extra-large version
You can see their comparison here.
While training you can pass the YAML file to select any of these models. All YAML files are present here.
Now everything is configured and we are ready to train our YOLOv5 model!
Move to the directory and use the following command to start training.
python train.py --img 640 --batch 8 --epochs 30 --data ./data/elephant.yaml --cfg ./models/yolov5s.yaml --weights '' --device 0
- — img: size of the input image
- — batch: batch size
- — epochs: number of epochs
- — data: YAML file which was created in step 3
- — cfg: model selection YAML file. I have chosen “s” for this tutorial.
- — weights: weights file to apply transfer learning, you can find them here.
- — device: to select the training device, “0” for GPU, and “cpu” for CPU.
This command will start the model training immediately. I have decided to train the model for 30 epochs.
Once the training is completed, the model will be saved in your “weights” directory and the resulting matrix graph will be generated as follows.
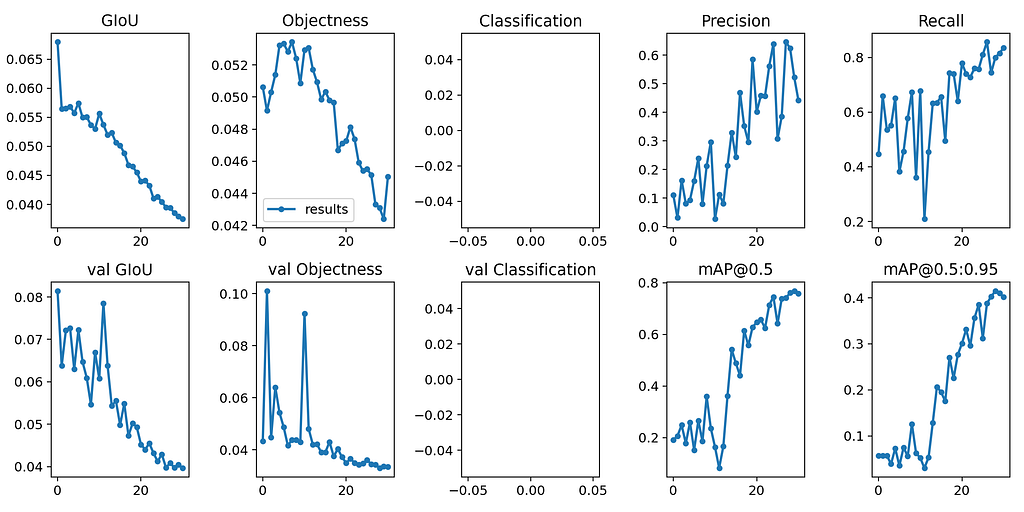
As we can see the model is trained pretty well the mAP@0.5 is almost 0.78 which is pretty good!
Inference
Now the model has been trained so let’s test its performance on some images.
To run the model inference use the following command.
python detect.py --source sample_img/ --weights weights/best.pt --conf 0.4
- — source: input images directory or single image path or video path
- — weights: trained model path
- — conf: confidence threshold
This will process the input and store the output in your inference directory.
Result
Here I am attaching some output images from trained model inference.
Pretty awesome right!
You can find a trained elephant detector here.
You can download and explore code for this tutorial from here.
If you have any doubts you can comment in the response section.
Special thanks to Mayur Patel for contributions and collaboration.
Any feedback or suggestions would be appreciated.
YOLO V5 is Here! Custom Object Detection Tutorial with YOLO V5 was originally published in Towards AI — Multidisciplinary Science Journal on Medium, where people are continuing the conversation by highlighting and responding to this story.
Published via Towards AI
Towards AI Academy
We Build Enterprise-Grade AI. We'll Teach You to Master It Too.
15 engineers. 100,000+ students. Towards AI Academy teaches what actually survives production.
Start free — no commitment:
→ 6-Day Agentic AI Engineering Email Guide — one practical lesson per day
→ Agents Architecture Cheatsheet — 3 years of architecture decisions in 6 pages
Our courses:
→ AI Engineering Certification — 90+ lessons from project selection to deployed product. The most comprehensive practical LLM course out there.
→ Agent Engineering Course — Hands on with production agent architectures, memory, routing, and eval frameworks — built from real enterprise engagements.
→ AI for Work — Understand, evaluate, and apply AI for complex work tasks.
Note: Article content contains the views of the contributing authors and not Towards AI.
Related posts


Recent Posts


")

