Name: Towards AI Legal Name: Towards AI, Inc. Description: Towards AI is the world's leading artificial intelligence (AI) and technology publication. Read by thought-leaders and decision-makers around the world. Phone Number: +1-650-246-9381 Email: pub@towardsai.net
228 Park Avenue South New York, NY 10003 United States
Website: Publisher: https://towardsai.net/#publisher Diversity Policy: https://towardsai.net/about Ethics Policy: https://towardsai.net/about Masthead: https://towardsai.net/about
Name: Towards AI Legal Name: Towards AI, Inc. Description: Towards AI is the world's leading artificial intelligence (AI) and technology publication. Founders: Roberto Iriondo, , Job Title: Co-founder and Advisor Works for: Towards AI, Inc. Follow Roberto: X, LinkedIn, GitHub, Google Scholar, Towards AI Profile, Medium, ML@CMU, FreeCodeCamp, Crunchbase, Bloomberg, Roberto Iriondo, Generative AI Lab, Generative AI Lab Denis Piffaretti, Job Title: Co-founder Works for: Towards AI, Inc. Louie Peters, Job Title: Co-founder Works for: Towards AI, Inc. Louis-François Bouchard, Job Title: Co-founder Works for: Towards AI, Inc. Cover:
Towards AI Cover
Logo:
Towards AI Logo
Areas Served: Worldwide Alternate Name: Towards AI, Inc. Alternate Name: Towards AI Co. Alternate Name: towards ai Alternate Name: towardsai Alternate Name: towards.ai Alternate Name: tai Alternate Name: toward ai Alternate Name: toward.ai Alternate Name: Towards AI, Inc. Alternate Name: towardsai.net Alternate Name: pub.towardsai.net
5 stars – based on 497 reviews

Frequently Used, Contextual References

TODO: Remember to copy unique IDs whenever it needs used. i.e., URL: 304b2e42315e

Resources

Take our 85+ lesson From Beginner to Advanced LLM Developer Certification: From choosing a project to deploying a working product this is the most comprehensive and practical LLM course out there!

Publication

Nuclei Detection and Fluorescence Quantification in Python: A Step-by-Step Guide (Part 2)
Data Analysis   Latest   Machine Learning

Nuclei Detection and Fluorescence Quantification in Python: A Step-by-Step Guide (Part 2)

Author(s): MicroBioscopicData (by Alexandros Athanasopoulos)

Originally published on Towards AI.

Welcome back to the second tutorial in our series, “Nuclei Detection and Fluorescence Quantification in Python.” In this tutorial, we will focus on measuring the fluorescence intensity from the GFP channel, extracting relevant data, and performing a detailed analysis to derive meaningful biological insights.

To fully benefit from this tutorial, it’s helpful to have a basic understanding of Python programming as well as some familiarity with fluorescence microscopy, including the principles behind using fluorescent proteins like GFP (Green Fluorescent Protein).

In the previous tutorial, we used images of fibroblast cells where the nuclei are labeled with DAPI, a fluorescent dye (blue channel) that binds to DNA, and a protein of interest that is present in both the cytoplasm and nucleus, detected in the green channel. We began by preprocessing the images to enhance data quality. We applied Gaussian smoothing with varying sigma values to reduce noise and used thresholding methods to effectively distinguish the nuclei from the background. Additionally, we discussed post-processing techniques, such as removing small artifacts, to further refine the segmentation results.

The code below (from our first tutorial) effectively segments and visualizes nuclei in fluorescence microscopy images, offering clear insights into the distribution and intensity of the detected features. The next step in fluorescence quantification is to label the segmented nuclei.

from skimage import io, filters, morphology, measure, segmentation, color
from skimage.measure import regionprops
import numpy as np
import matplotlib.pyplot as plt
import pandas as pd
import seaborn as sns
# Set option to display all columns and rows in Pandas DataFrames
pd.set_option('display.max_columns', None)
pd.set_option('display.max_rows', None)

# Load the multi-channel TIFF image
image = io.imread('fibro_nuclei.tif')

# Separate the GFP channel (assuming channel 0 is GFP)
channel1 = image[:, 0, :, :] # GFP channel
# Perform Maximum Intensity Projection (MIP) on GFP channel
channel1_max_projection = np.max(channel1, axis=0)

# Separate the DAPI channel (assuming channel 1 is DAPI)
channel2 = image[:, 1, :, :] # DAPI channel
# Perform Maximum Intensity Projection (MIP) on DAPI channel
channel2_max_projection = np.max(channel2, axis=0)

# Apply Gaussian smoothing to the DAPI MIP
smoothed_image = filters.gaussian(channel2_max_projection, sigma=5)

# Apply Otsu's method to find the optimal threshold and create a binary mask
threshold_value = filters.threshold_otsu(smoothed_image)
binary_mask = smoothed_image > threshold_value

# Create subplots with shared x-axis and y-axis
fig, (ax1, ax2) = plt.subplots(1, 2, sharex=True, sharey=True, figsize=(10, 10))

# Visualize the Maximum Intensity Projection (MIP) for the DAPI channel
ax1.imshow(channel2_max_projection, cmap='gray')
ax1.set_title('Maximum Intensity Projection (DAPI Channel)')

# Visualize the binary mask obtained after thresholding the smoothed DAPI MIP
ax2.imshow(binary_mask, cmap='gray')
ax2.set_title('Binary Mask (After Thresholding)')

# Adjust layout to prevent overlap
plt.tight_layout()

# Display the plots
plt.show()
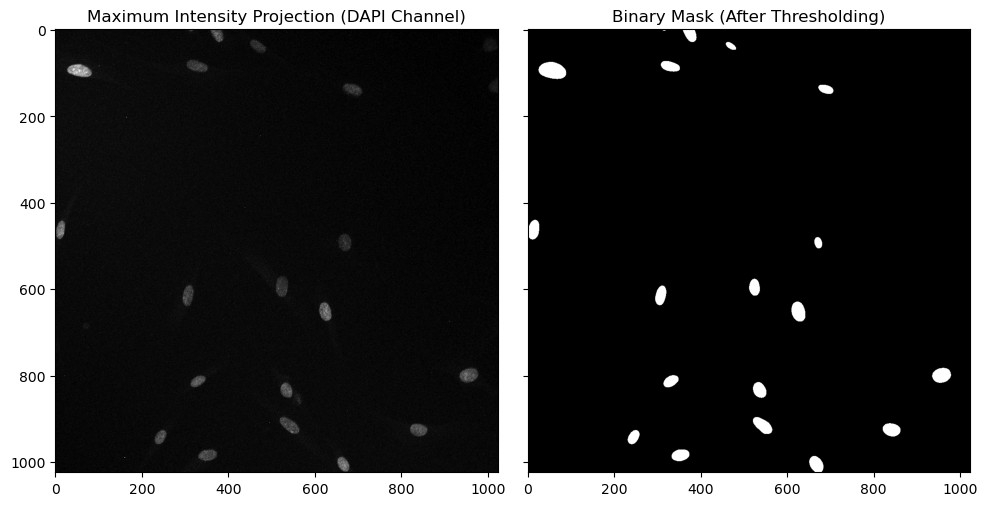
Left Panel: This image shows the Maximum Intensity Projection (MIP) of the DAPI channel, which highlights the nuclei stained with DAPI (a blue fluorescent dye). Right Panel: This panel displays the binary mask generated after applying Otsu’s thresholding to the DAPI channel.

Labeling the Segmented Nuclei

Labeling the binary mask is a crucial step in image analysis. When we perform thresholding on an image, the result is a binary mask (see also our previous tutorial) where pixels are classified as either foreground/True (e.g., nuclei) or background/False. However, this binary mask alone doesn’t distinguish between different individual nuclei — it simply shows which pixels belong to the foreground and to the background.

Labeling is the process of assigning a unique identifier (label) to each nucleus in the binary mask. In the context of connected components, labeling involves identifying and marking groups of connected pixels (components) that represent individual objects, such as nuclei, in the image. Once the binary mask is created, the connected components algorithm is applied. This algorithm scans the binary mask to detect groups of connected pixels using either 4-connectivity or 8-connectivity criteria (see below the image) and assigns a unique label to each connected component. Each label corresponds to a distinct nucleus in the image [1].

There are different types of connectivity, primarily 4-connectivity and 8-connectivity:

4-Connectivity:

  • Definition: In 4-connectivity, a pixel (of interest) is considered connected to another pixel if they share an edge. In a 2D grid, each pixel has four possible neighbors: left, right, above, and below.
  • Applications: 4-connectivity is often used in algorithms where diagonal connections are not considered, thus providing a more restrictive form of connectivity.

8-Connectivity:

  • Definition: In 8-connectivity, a pixel (of interest) is connected to all of its neighbors, including those that share a vertex. This means that, in addition to the four edge-connected neighbors (as in 4-connectivity), the pixel is also connected to the four diagonal neighbors.
  • Applications: 8-connectivity is used in applications where diagonal connections are significant, providing a more inclusive form of connectivity.
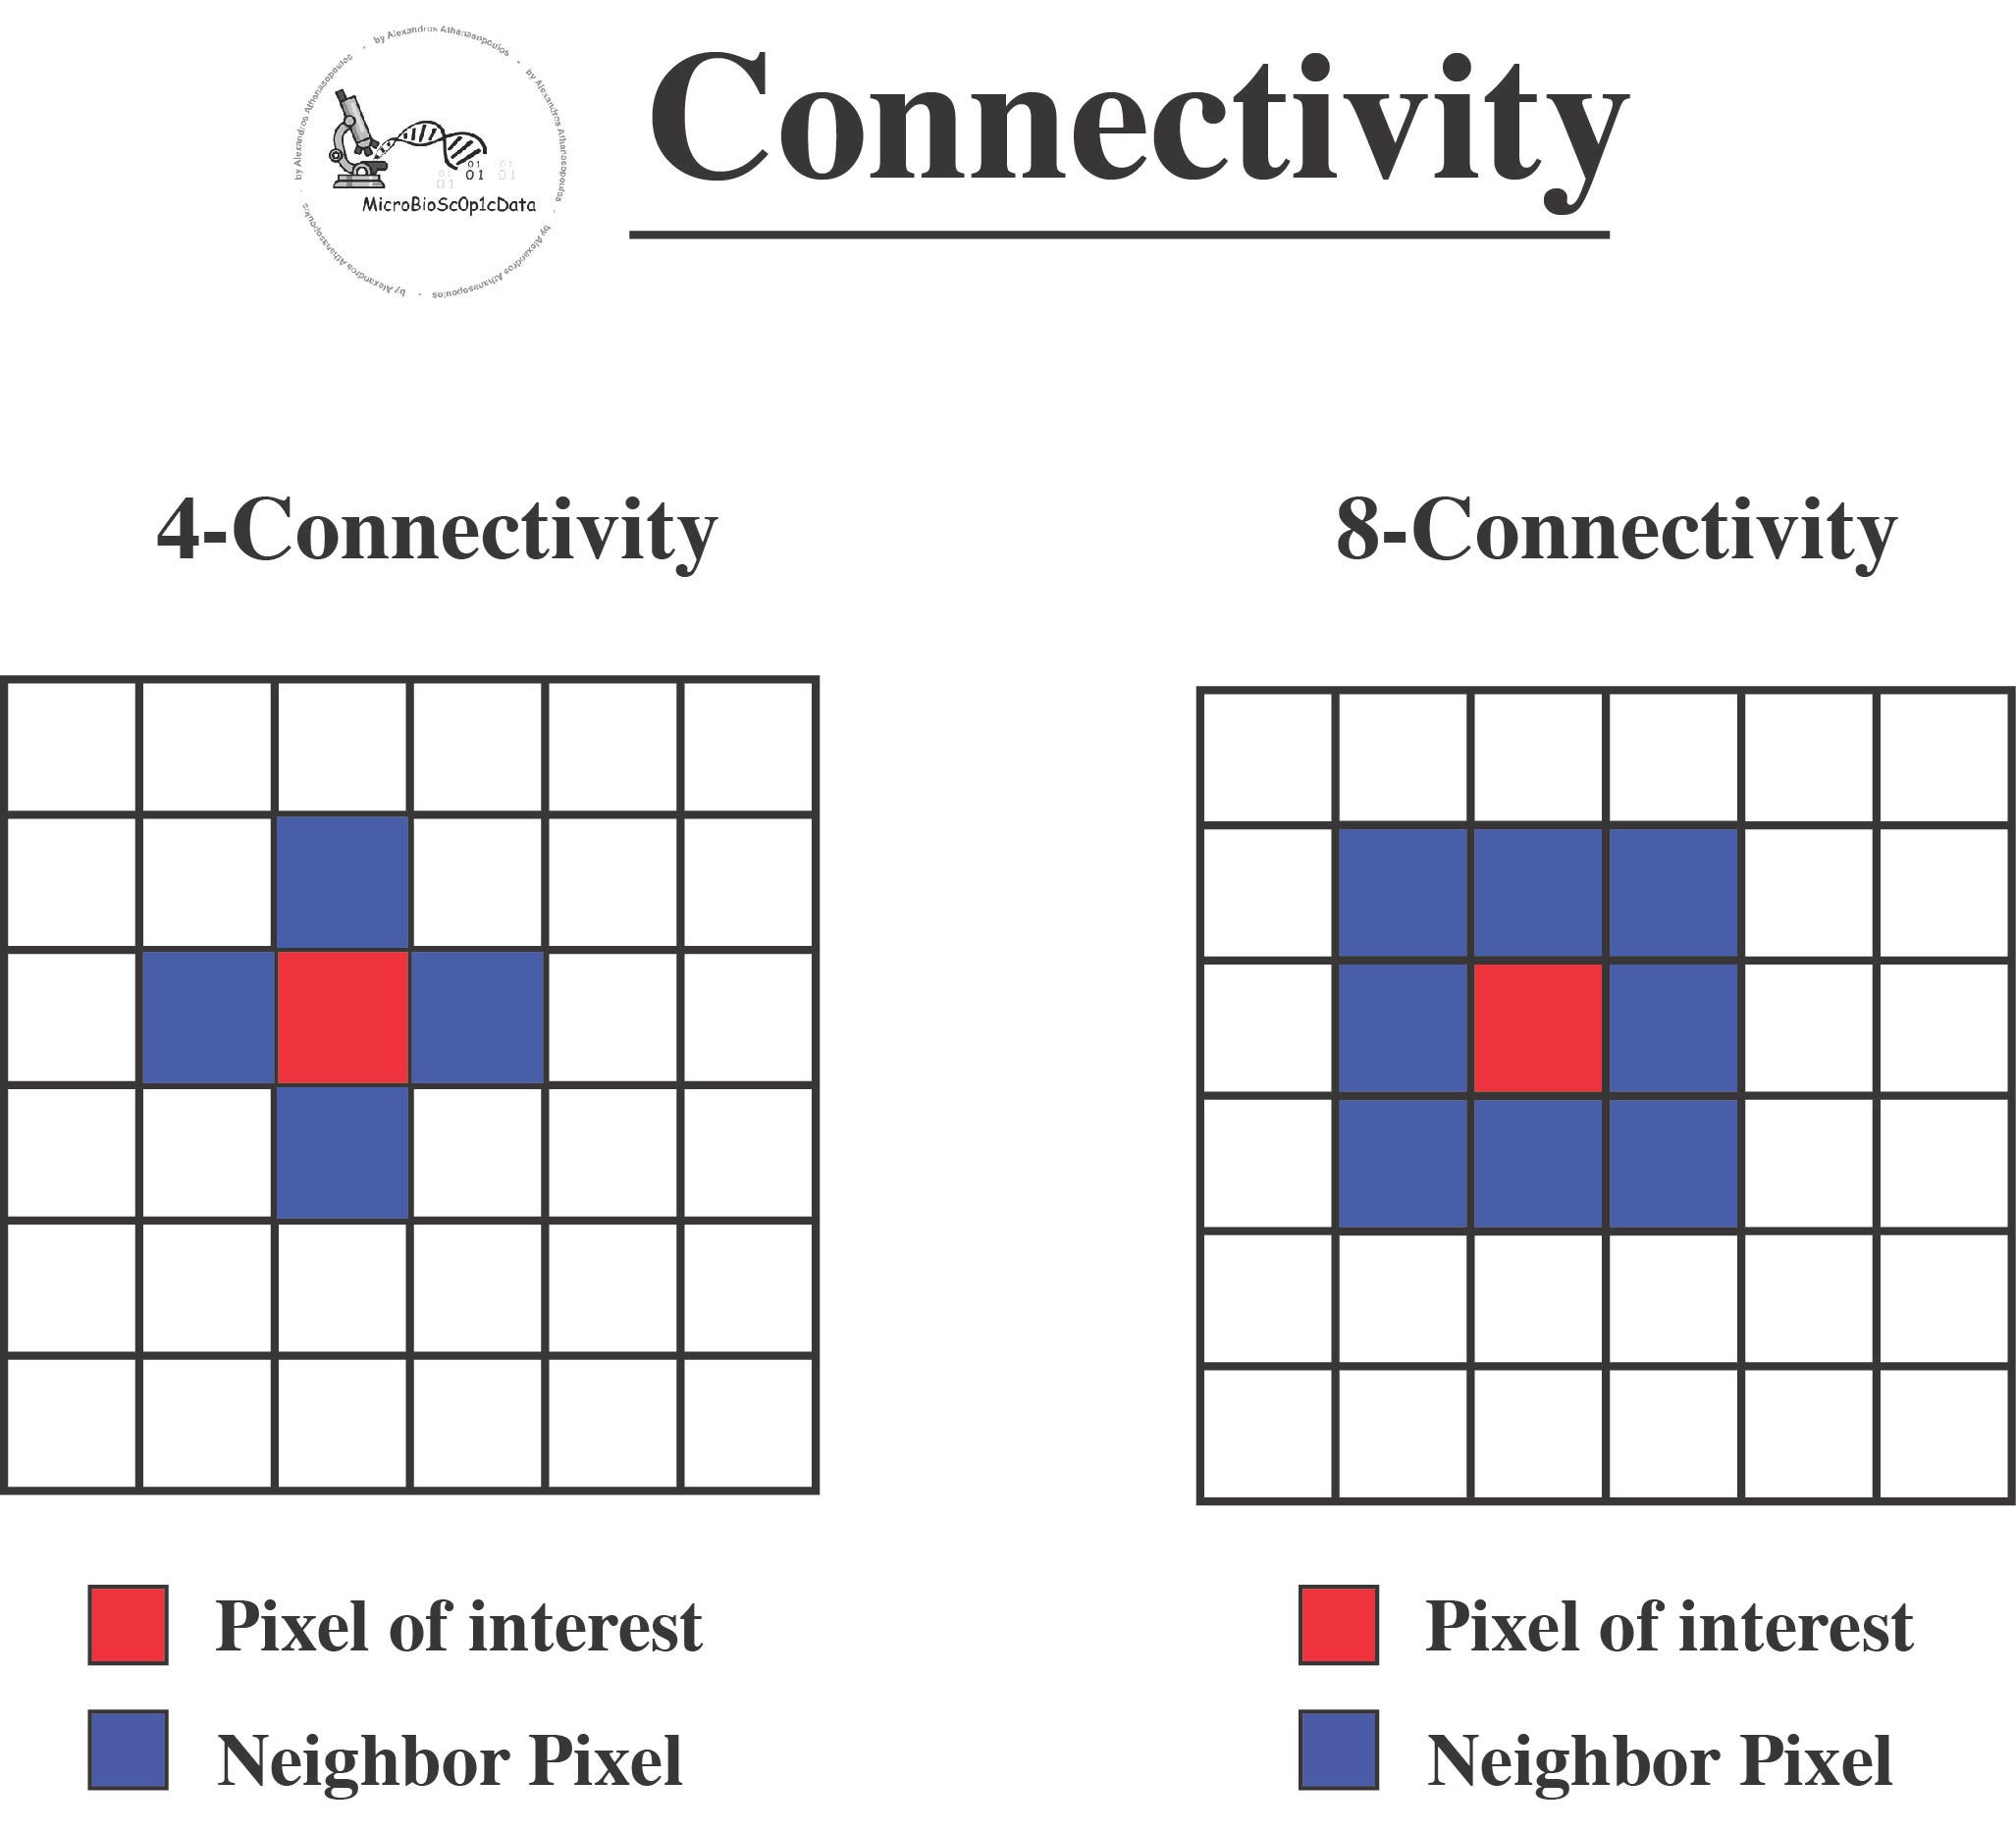
Left Panel: In 4-connectivity, the pixel of interest (highlighted in red) is connected to its four direct neighbors (up, down, left, and right), which are shown in blue. Right Panel: In 8-connectivity, the pixel of interest (highlighted in red) is connected to its eight surrounding neighbors (up, down, left, right, and diagonals), which are shown in blue.

Why Labeling is Important

  • Identification: Labeling allows us to identify and differentiate between individual nuclei within the binary mask. Each nucleus has a unique label, which makes it possible to treat and analyze each nucleus separately.
  • Analysis: Once the nuclei are labeled, we can measure various properties of each nucleus individually, such as area, perimeter, and fluorescence intensity… This is essential for quantitative analysis in biological research.
  • Visualization: Labeling also facilitates the visualization of segmented nuclei. By assigning different colors or intensities to each label, we can easily see and distinguish the segmented nuclei in a labeled image.

The code below is used to label connected regions (components) in our binary image. The function skimage.measure.label scans the binary mask and assigns a unique integer label to each connected component. The output is a labeled image (2D numpy array) where each connected component is assigned a unique integer label (e.g., 1, 2, 3, etc.). Pixels that belong to the same component (e.g., a single nucleus) will have the same label. By default, the function uses 8-connectivity.

The function color.label2rgb(labeled_nuclei, bg_label=0) from the skimage.color module converts a labeled image into an RGB (color) image.

  • labeled_nuclei: This is the labeled image
  • bg_label=0: This specifies that the background label is 0, so the background will not be colored, and only the labeled regions (nuclei) will be colored differently in the output RGB image.

The segmentation.clear_border() function is used next to remove any nuclei that touch the edges of the image, ensuring that only fully contained nuclei are considered. The image is then relabeled to reflect the removal of these border-touching nuclei, and the updated count is printed. Finally, the labeled nuclei are visualized in color, with each nucleus annotated at its centroid using its corresponding label number.

# Label the nuclei and return the number of labeled components
labeled_nuclei, num_nuclei = measure.label(binary_mask, return_num=True)

print(f"Initial number of labeled nuclei: {num_nuclei}")

# Remove nuclei that touch the borders
cleared_labels = segmentation.clear_border(labeled_nuclei)

# Recalculate the number of labeled nuclei after clearing the borders
# Note: We need to exclude the background (label 0)
final_labels, final_num_nuclei = measure.label(cleared_labels > 0, return_num=True)

print(f"Number of labeled nuclei after clearing borders: {final_num_nuclei}")

# Visualize the labeled nuclei
plt.figure(figsize=(10, 10))
plt.imshow(color.label2rgb(final_labels, bg_label=0), cmap='nipy_spectral')
plt.title('Labeled Nuclei')
plt.axis('off')


# Annotate each nucleus with its label
for region in measure.regionprops(final_labels):
# Take the centroid of the region and use it for placing the label
y, x = region.centroid
plt.text(x, y+30, f"Nucleus: {region.label}", color='white', fontsize=12, ha='center', va='center')

plt.show()
Initial number of labeled nuclei: 19
Number of labeled nuclei after clearing borders: 15
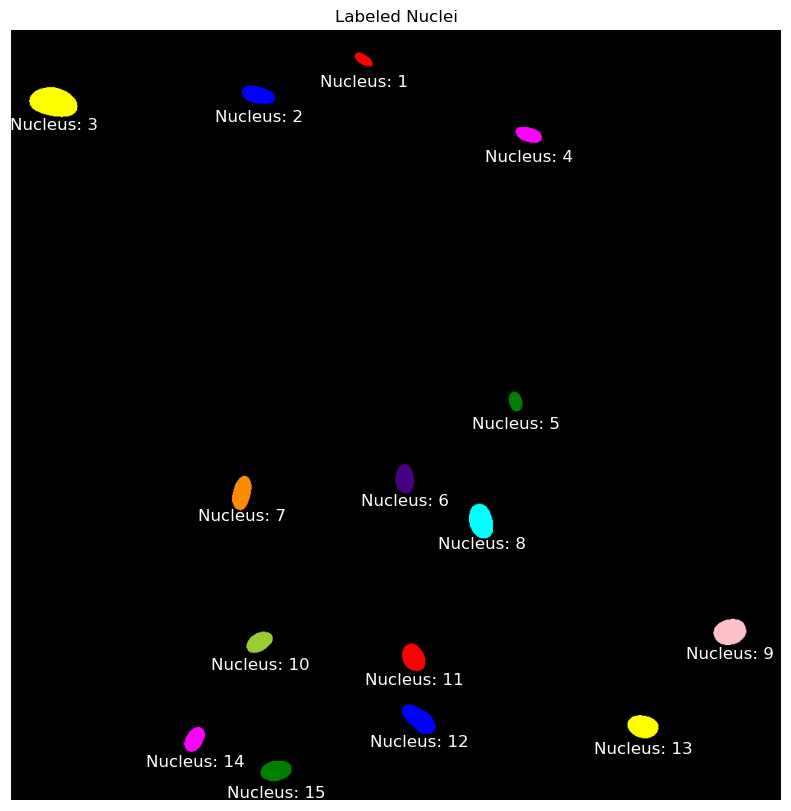
This image displays the labeled nuclei after segmentation. Each nucleus is assigned a unique label, represented by a different color and annotated with its corresponding label number (e.g., “Nucleus: 1”, “Nucleus: 2”). The labeled regions correspond to individual nuclei, allowing for further analysis, such as quantifying fluorescence intensity or calculating various morphological properties. The black background represents the area that does not contain any nuclei, while the colored regions are the segmented and labeled nuclei.
Left Panel: Maximum Intensity Projection (MIP) of the DAPI channel, highlighting the nuclei stained with a fluorescent dye that binds to DNA. The red contours indicate the boundaries of the segmented nuclei based on thresholding and image analysis. Right Panel: The summed intensity of the GFP channel, which detects the protein of interest in the sample. The red contours represent the same segmented nuclei from the DAPI channel, overlaid to show the corresponding locations of the nuclei within the GFP channel.

Measure fluorescence

To measure the fluorescence in the green channel (GFP) of our multi-channel Z-stack image, we sum the pixel values of the GFP channel within the regions defined by our binary mask, instead of relying solely on the maximum intensity projection.

This method (sum the pixel values) provides a better representation of the total fluorescence signal within each labeled region (nucleus) because it accounts for the entire intensity distribution rather than just the brightest pixels.

The code below calculates the total GFP fluorescence for each labeled nucleus in the image by summing the pixel intensities in the GFP channel. The resulting values are stored in a list for further analysis, such as comparing fluorescence across different nuclei or assessing the distribution of GFP within the sample. The operation channel1.sum(axis=0) sums the pixel intensities across all Z-slices for each (x, y) position in the image. This results in a 2D image where each pixel value represents the total fluorescence intensity at that (x, y) coordinate across the entire depth of the sample.

# Sum fluorescence in GFP channel within each labeled nucleus
gfp_fluorescence = []

for region in measure.regionprops(final_labels, intensity_image=channel1.sum(axis=0)): # channel1.sum(axis=0) has a data type of 64-bit unsigned integer
gfp_sum = region.intensity_image.sum()
gfp_fluorescence.append(gfp_sum)

# Print the total fluorescence for each nucleus
for i, fluorescence in enumerate(gfp_fluorescence, start=1):
print(f"Nucleus {i}: Total GFP Fluorescence = {fluorescence}")
Nucleus 1: Total GFP Fluorescence = 80250
Nucleus 2: Total GFP Fluorescence = 164085
Nucleus 3: Total GFP Fluorescence = 490688
Nucleus 4: Total GFP Fluorescence = 241095
Nucleus 5: Total GFP Fluorescence = 174400
Nucleus 6: Total GFP Fluorescence = 373265
Nucleus 7: Total GFP Fluorescence = 384270
Nucleus 8: Total GFP Fluorescence = 657477
Nucleus 9: Total GFP Fluorescence = 484203
Nucleus 10: Total GFP Fluorescence = 390793
Nucleus 11: Total GFP Fluorescence = 430493
Nucleus 12: Total GFP Fluorescence = 438093
Nucleus 13: Total GFP Fluorescence = 402420
Nucleus 14: Total GFP Fluorescence = 387462
Nucleus 15: Total GFP Fluorescence = 513172

Data Analysis

The code above practcially calculated the integrated density which is a measure used in image analysis to quantify the amount of signal (e.g., fluorescence) within a region of interest (such as a nucleus).

In fluorescence microscopy, integrated density can be used to estimate the total amount of fluorescence in a given nucleus or cellular compartment. This can be useful for comparing the expression levels of a fluorescently labeled protein between different cells or experimental conditions.

The code below converts the gfp_fluorescence list into a pandas DataFrame for further statistical analysis, such as comparing fluorescence across different nuclei or conditions, calculating mean and standard deviation, or performing more advanced analyses like clustering or correlation studies.

# Convert the fluorescence data into a DataFrame
df = pd.DataFrame({'Nucleus': range(1, len(gfp_fluorescence) + 1), 'GFP_Fluorescence': gfp_fluorescence})

# Display the DataFrame
df
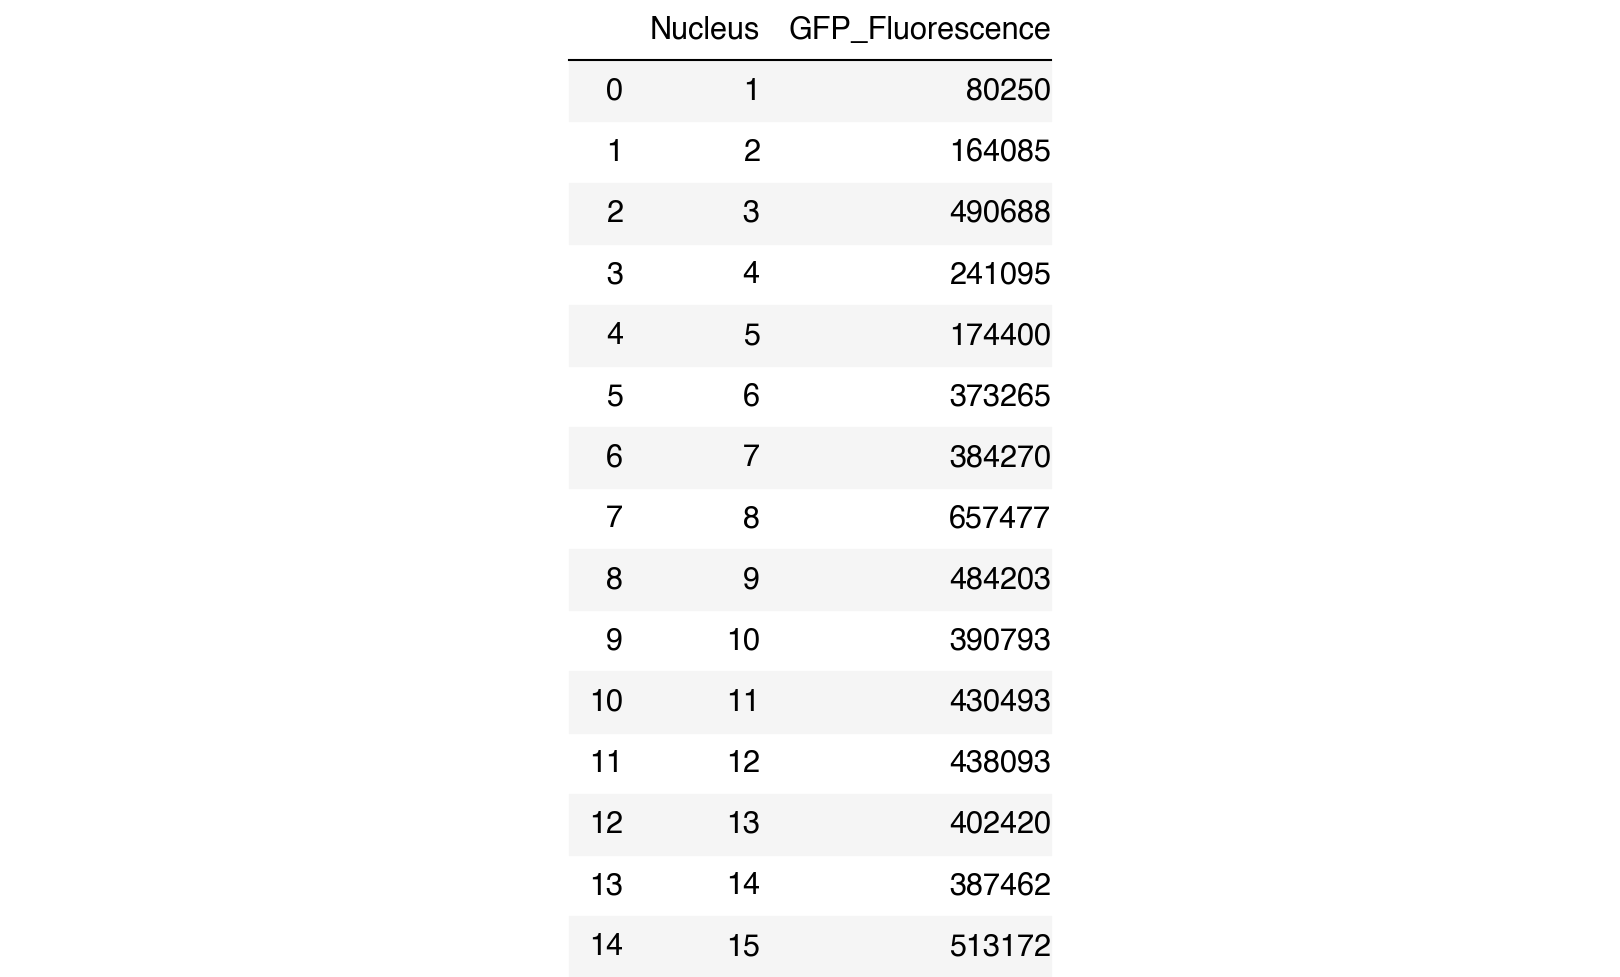
By analyzing the distribution of fluorescence intensity across the nuclei, we can potentially reveal the presence of different populations or subgroups within the sample. This analysis could provide valuable insights, such as identifying distinct expression patterns or responses to treatment. Techniques like clustering can help in categorizing the nuclei based on their fluorescence profiles, enabling deeper biological interpretations.

# Plot histogram
plt.figure(figsize=(10, 6))
sns.histplot(df['GFP_Fluorescence'], bins=20, kde=True)
plt.title('Histogram of GFP Fluorescence Intensity')
plt.xlabel('GFP Fluorescence Intensity')
plt.ylabel('Frequency')
plt.show()
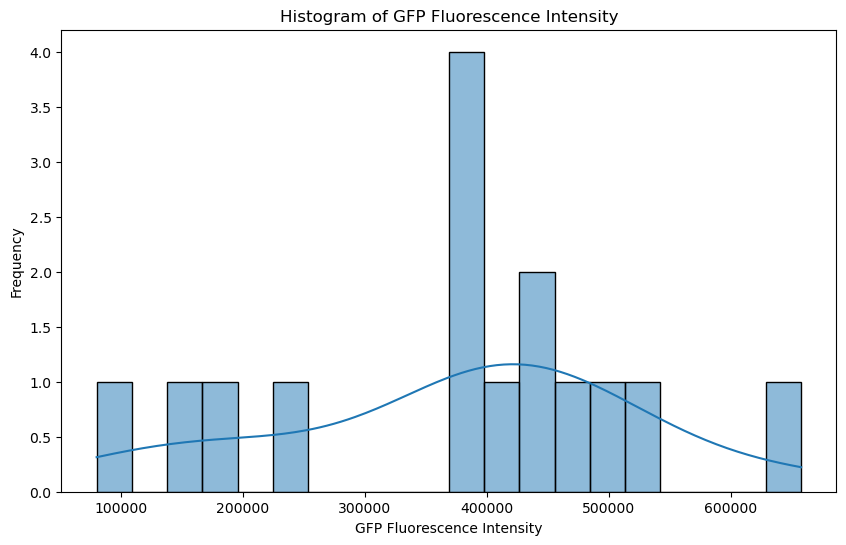
This figure shows the distribution of GFP fluorescence intensity across different nuclei in the sample. The x-axis represents the GFP fluorescence intensity, and the y-axis represents the frequency. The blue bars show the number of nuclei falling into each intensity range, and the blue line is a kernel density estimate (KDE) that provides a smoothed curve to represent the underlying distribution.

Clustering Analysis:

We can apply K-means clustering to group the nuclei based on their fluorescence intensity. This can help identify distinct populations that differ in their expression levels. In the scatter plot below each point represents a nucleus, with the x-axis showing the nucleus index and the y-axis showing the total GFP fluorescence intensity for that nucleus. The points are color-coded based on the cluster they belong to. Two clusters are represented: cluster 0 (in green) and cluster 1 (in orange). The clustering was performed using K-means with two clusters. This plot demonstrates how nuclei can be grouped into distinct clusters based on their GFP fluorescence intensity.

from sklearn.cluster import KMeans

# Reshape data for clustering
fluorescence_data = df['GFP_Fluorescence'].values.reshape(-1, 1)

# Apply K-means clustering (let's assume 2 clusters for simplicity)
kmeans = KMeans(n_clusters=2, random_state=0).fit(fluorescence_data)
df['Cluster'] = kmeans.labels_

# Visualize clusters
plt.figure(figsize=(10, 6))
sns.scatterplot(x=df.index, y=df['GFP_Fluorescence'], hue=df['Cluster'], palette='Set2')
plt.title('K-means Clustering of GFP Fluorescence Intensity')
plt.xlabel('Nucleus')
plt.ylabel('GFP Fluorescence Intensity')
plt.show()
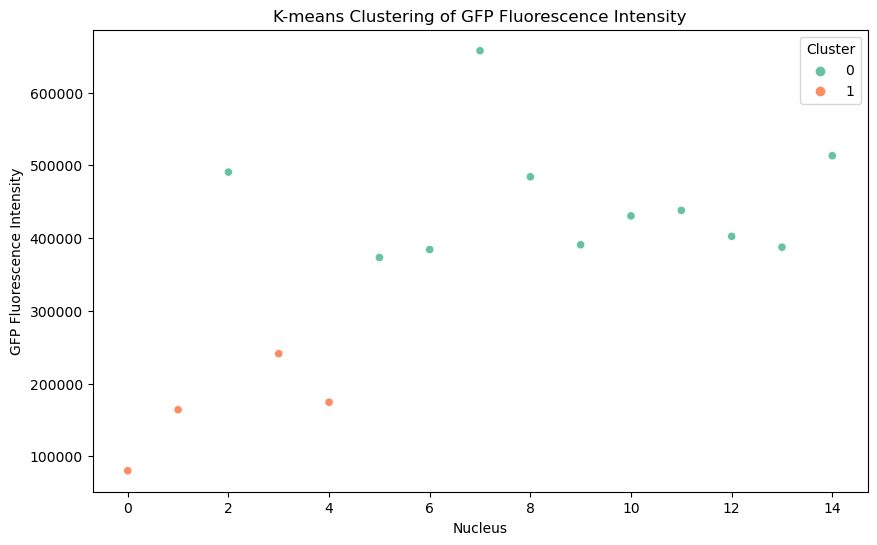
Together, these plots (histogram and scatter plot) indicate the presence of at least two subpopulations of nuclei based on their GFP fluorescence, potentially reflecting biological variability or different conditions affecting fluorescence expression.

Conclusion

In this tutorial, we explored advanced image processing techniques for segmenting nuclei and quantifying fluorescent signals using Python. By employing methods like Gaussian smoothing, thresholding, and connected component labeling, we were able to accurately identify and separate individual nuclei in the DAPI channel. We also demonstrated how to measure fluorescence intensity in the GFP channel by summing pixel values across Z-slices to capture the full distribution of fluorescence in each nucleus. Through data analysis, we were able to quantify and interpret the fluorescence signals, enabling deeper insights into biological variations.

References:

[1] P. Bankhead, “Introduction to Bioimage Analysis — Introduction to Bioimage Analysis.” https://bioimagebook.github.io/index.html (accessed Jun. 29, 2023).

Join thousands of data leaders on the AI newsletter. Join over 80,000 subscribers and keep up to date with the latest developments in AI. From research to projects and ideas. If you are building an AI startup, an AI-related product, or a service, we invite you to consider becoming a sponsor.

Published via Towards AI

Feedback ↓

Sign Up for the Course
`; } else { console.error('Element with id="subscribe" not found within the page with class "home".'); } } }); // Remove duplicate text from articles /* Backup: 09/11/24 function removeDuplicateText() { const elements = document.querySelectorAll('h1, h2, h3, h4, h5, strong'); // Select the desired elements const seenTexts = new Set(); // A set to keep track of seen texts const tagCounters = {}; // Object to track instances of each tag elements.forEach(el => { const tagName = el.tagName.toLowerCase(); // Get the tag name (e.g., 'h1', 'h2', etc.) // Initialize a counter for each tag if not already done if (!tagCounters[tagName]) { tagCounters[tagName] = 0; } // Only process the first 10 elements of each tag type if (tagCounters[tagName] >= 2) { return; // Skip if the number of elements exceeds 10 } const text = el.textContent.trim(); // Get the text content const words = text.split(/\s+/); // Split the text into words if (words.length >= 4) { // Ensure at least 4 words const significantPart = words.slice(0, 5).join(' '); // Get first 5 words for matching // Check if the text (not the tag) has been seen before if (seenTexts.has(significantPart)) { // console.log('Duplicate found, removing:', el); // Log duplicate el.remove(); // Remove duplicate element } else { seenTexts.add(significantPart); // Add the text to the set } } tagCounters[tagName]++; // Increment the counter for this tag }); } removeDuplicateText(); */ // Remove duplicate text from articles function removeDuplicateText() { const elements = document.querySelectorAll('h1, h2, h3, h4, h5, strong'); // Select the desired elements const seenTexts = new Set(); // A set to keep track of seen texts const tagCounters = {}; // Object to track instances of each tag // List of classes to be excluded const excludedClasses = ['medium-author', 'post-widget-title']; elements.forEach(el => { // Skip elements with any of the excluded classes if (excludedClasses.some(cls => el.classList.contains(cls))) { return; // Skip this element if it has any of the excluded classes } const tagName = el.tagName.toLowerCase(); // Get the tag name (e.g., 'h1', 'h2', etc.) // Initialize a counter for each tag if not already done if (!tagCounters[tagName]) { tagCounters[tagName] = 0; } // Only process the first 10 elements of each tag type if (tagCounters[tagName] >= 10) { return; // Skip if the number of elements exceeds 10 } const text = el.textContent.trim(); // Get the text content const words = text.split(/\s+/); // Split the text into words if (words.length >= 4) { // Ensure at least 4 words const significantPart = words.slice(0, 5).join(' '); // Get first 5 words for matching // Check if the text (not the tag) has been seen before if (seenTexts.has(significantPart)) { // console.log('Duplicate found, removing:', el); // Log duplicate el.remove(); // Remove duplicate element } else { seenTexts.add(significantPart); // Add the text to the set } } tagCounters[tagName]++; // Increment the counter for this tag }); } removeDuplicateText(); //Remove unnecessary text in blog excerpts document.querySelectorAll('.blog p').forEach(function(paragraph) { // Replace the unwanted text pattern for each paragraph paragraph.innerHTML = paragraph.innerHTML .replace(/Author\(s\): [\w\s]+ Originally published on Towards AI\.?/g, '') // Removes 'Author(s): XYZ Originally published on Towards AI' .replace(/This member-only story is on us\. Upgrade to access all of Medium\./g, ''); // Removes 'This member-only story...' }); //Load ionic icons and cache them if ('localStorage' in window && window['localStorage'] !== null) { const cssLink = 'https://code.ionicframework.com/ionicons/2.0.1/css/ionicons.min.css'; const storedCss = localStorage.getItem('ionicons'); if (storedCss) { loadCSS(storedCss); } else { fetch(cssLink).then(response => response.text()).then(css => { localStorage.setItem('ionicons', css); loadCSS(css); }); } } function loadCSS(css) { const style = document.createElement('style'); style.innerHTML = css; document.head.appendChild(style); } //Remove elements from imported content automatically function removeStrongFromHeadings() { const elements = document.querySelectorAll('h1, h2, h3, h4, h5, h6, span'); elements.forEach(el => { const strongTags = el.querySelectorAll('strong'); strongTags.forEach(strongTag => { while (strongTag.firstChild) { strongTag.parentNode.insertBefore(strongTag.firstChild, strongTag); } strongTag.remove(); }); }); } removeStrongFromHeadings(); "use strict"; window.onload = () => { /* //This is an object for each category of subjects and in that there are kewords and link to the keywods let keywordsAndLinks = { //you can add more categories and define their keywords and add a link ds: { keywords: [ //you can add more keywords here they are detected and replaced with achor tag automatically 'data science', 'Data science', 'Data Science', 'data Science', 'DATA SCIENCE', ], //we will replace the linktext with the keyword later on in the code //you can easily change links for each category here //(include class="ml-link" and linktext) link: 'linktext', }, ml: { keywords: [ //Add more keywords 'machine learning', 'Machine learning', 'Machine Learning', 'machine Learning', 'MACHINE LEARNING', ], //Change your article link (include class="ml-link" and linktext) link: 'linktext', }, ai: { keywords: [ 'artificial intelligence', 'Artificial intelligence', 'Artificial Intelligence', 'artificial Intelligence', 'ARTIFICIAL INTELLIGENCE', ], //Change your article link (include class="ml-link" and linktext) link: 'linktext', }, nl: { keywords: [ 'NLP', 'nlp', 'natural language processing', 'Natural Language Processing', 'NATURAL LANGUAGE PROCESSING', ], //Change your article link (include class="ml-link" and linktext) link: 'linktext', }, des: { keywords: [ 'data engineering services', 'Data Engineering Services', 'DATA ENGINEERING SERVICES', ], //Change your article link (include class="ml-link" and linktext) link: 'linktext', }, td: { keywords: [ 'training data', 'Training Data', 'training Data', 'TRAINING DATA', ], //Change your article link (include class="ml-link" and linktext) link: 'linktext', }, ias: { keywords: [ 'image annotation services', 'Image annotation services', 'image Annotation services', 'image annotation Services', 'Image Annotation Services', 'IMAGE ANNOTATION SERVICES', ], //Change your article link (include class="ml-link" and linktext) link: 'linktext', }, l: { keywords: [ 'labeling', 'labelling', ], //Change your article link (include class="ml-link" and linktext) link: 'linktext', }, pbp: { keywords: [ 'previous blog posts', 'previous blog post', 'latest', ], //Change your article link (include class="ml-link" and linktext) link: 'linktext', }, mlc: { keywords: [ 'machine learning course', 'machine learning class', ], //Change your article link (include class="ml-link" and linktext) link: 'linktext', }, }; //Articles to skip let articleIdsToSkip = ['post-2651', 'post-3414', 'post-3540']; //keyword with its related achortag is recieved here along with article id function searchAndReplace(keyword, anchorTag, articleId) { //selects the h3 h4 and p tags that are inside of the article let content = document.querySelector(`#${articleId} .entry-content`); //replaces the "linktext" in achor tag with the keyword that will be searched and replaced let newLink = anchorTag.replace('linktext', keyword); //regular expression to search keyword var re = new RegExp('(' + keyword + ')', 'g'); //this replaces the keywords in h3 h4 and p tags content with achor tag content.innerHTML = content.innerHTML.replace(re, newLink); } function articleFilter(keyword, anchorTag) { //gets all the articles var articles = document.querySelectorAll('article'); //if its zero or less then there are no articles if (articles.length > 0) { for (let x = 0; x < articles.length; x++) { //articles to skip is an array in which there are ids of articles which should not get effected //if the current article's id is also in that array then do not call search and replace with its data if (!articleIdsToSkip.includes(articles[x].id)) { //search and replace is called on articles which should get effected searchAndReplace(keyword, anchorTag, articles[x].id, key); } else { console.log( `Cannot replace the keywords in article with id ${articles[x].id}` ); } } } else { console.log('No articles found.'); } } let key; //not part of script, added for (key in keywordsAndLinks) { //key is the object in keywords and links object i.e ds, ml, ai for (let i = 0; i < keywordsAndLinks[key].keywords.length; i++) { //keywordsAndLinks[key].keywords is the array of keywords for key (ds, ml, ai) //keywordsAndLinks[key].keywords[i] is the keyword and keywordsAndLinks[key].link is the link //keyword and link is sent to searchreplace where it is then replaced using regular expression and replace function articleFilter( keywordsAndLinks[key].keywords[i], keywordsAndLinks[key].link ); } } function cleanLinks() { // (making smal functions is for DRY) this function gets the links and only keeps the first 2 and from the rest removes the anchor tag and replaces it with its text function removeLinks(links) { if (links.length > 1) { for (let i = 2; i < links.length; i++) { links[i].outerHTML = links[i].textContent; } } } //arrays which will contain all the achor tags found with the class (ds-link, ml-link, ailink) in each article inserted using search and replace let dslinks; let mllinks; let ailinks; let nllinks; let deslinks; let tdlinks; let iaslinks; let llinks; let pbplinks; let mlclinks; const content = document.querySelectorAll('article'); //all articles content.forEach((c) => { //to skip the articles with specific ids if (!articleIdsToSkip.includes(c.id)) { //getting all the anchor tags in each article one by one dslinks = document.querySelectorAll(`#${c.id} .entry-content a.ds-link`); mllinks = document.querySelectorAll(`#${c.id} .entry-content a.ml-link`); ailinks = document.querySelectorAll(`#${c.id} .entry-content a.ai-link`); nllinks = document.querySelectorAll(`#${c.id} .entry-content a.ntrl-link`); deslinks = document.querySelectorAll(`#${c.id} .entry-content a.des-link`); tdlinks = document.querySelectorAll(`#${c.id} .entry-content a.td-link`); iaslinks = document.querySelectorAll(`#${c.id} .entry-content a.ias-link`); mlclinks = document.querySelectorAll(`#${c.id} .entry-content a.mlc-link`); llinks = document.querySelectorAll(`#${c.id} .entry-content a.l-link`); pbplinks = document.querySelectorAll(`#${c.id} .entry-content a.pbp-link`); //sending the anchor tags list of each article one by one to remove extra anchor tags removeLinks(dslinks); removeLinks(mllinks); removeLinks(ailinks); removeLinks(nllinks); removeLinks(deslinks); removeLinks(tdlinks); removeLinks(iaslinks); removeLinks(mlclinks); removeLinks(llinks); removeLinks(pbplinks); } }); } //To remove extra achor tags of each category (ds, ml, ai) and only have 2 of each category per article cleanLinks(); */ //Recommended Articles var ctaLinks = [ /* ' ' + '

Subscribe to our AI newsletter!

' + */ '

Take our 85+ lesson From Beginner to Advanced LLM Developer Certification: From choosing a project to deploying a working product this is the most comprehensive and practical LLM course out there!

'+ '

Towards AI has published Building LLMs for Production—our 470+ page guide to mastering LLMs with practical projects and expert insights!

' + '
' + '' + '' + '

Note: Content contains the views of the contributing authors and not Towards AI.
Disclosure: This website may contain sponsored content and affiliate links.

' + 'Discover Your Dream AI Career at Towards AI Jobs' + '

Towards AI has built a jobs board tailored specifically to Machine Learning and Data Science Jobs and Skills. Our software searches for live AI jobs each hour, labels and categorises them and makes them easily searchable. Explore over 10,000 live jobs today with Towards AI Jobs!

' + '
' + '

🔥 Recommended Articles 🔥

' + 'Why Become an LLM Developer? Launching Towards AI’s New One-Stop Conversion Course'+ 'Testing Launchpad.sh: A Container-based GPU Cloud for Inference and Fine-tuning'+ 'The Top 13 AI-Powered CRM Platforms
' + 'Top 11 AI Call Center Software for 2024
' + 'Learn Prompting 101—Prompt Engineering Course
' + 'Explore Leading Cloud Providers for GPU-Powered LLM Training
' + 'Best AI Communities for Artificial Intelligence Enthusiasts
' + 'Best Workstations for Deep Learning
' + 'Best Laptops for Deep Learning
' + 'Best Machine Learning Books
' + 'Machine Learning Algorithms
' + 'Neural Networks Tutorial
' + 'Best Public Datasets for Machine Learning
' + 'Neural Network Types
' + 'NLP Tutorial
' + 'Best Data Science Books
' + 'Monte Carlo Simulation Tutorial
' + 'Recommender System Tutorial
' + 'Linear Algebra for Deep Learning Tutorial
' + 'Google Colab Introduction
' + 'Decision Trees in Machine Learning
' + 'Principal Component Analysis (PCA) Tutorial
' + 'Linear Regression from Zero to Hero
'+ '

', /* + '

Join thousands of data leaders on the AI newsletter. It’s free, we don’t spam, and we never share your email address. Keep up to date with the latest work in AI. From research to projects and ideas. If you are building an AI startup, an AI-related product, or a service, we invite you to consider becoming a sponsor.

',*/ ]; var replaceText = { '': '', '': '', '
': '
' + ctaLinks + '
', }; Object.keys(replaceText).forEach((txtorig) => { //txtorig is the key in replacetext object const txtnew = replaceText[txtorig]; //txtnew is the value of the key in replacetext object let entryFooter = document.querySelector('article .entry-footer'); if (document.querySelectorAll('.single-post').length > 0) { //console.log('Article found.'); const text = entryFooter.innerHTML; entryFooter.innerHTML = text.replace(txtorig, txtnew); } else { // console.log('Article not found.'); //removing comment 09/04/24 } }); var css = document.createElement('style'); css.type = 'text/css'; css.innerHTML = '.post-tags { display:none !important } .article-cta a { font-size: 18px; }'; document.body.appendChild(css); //Extra //This function adds some accessibility needs to the site. function addAlly() { // In this function JQuery is replaced with vanilla javascript functions const imgCont = document.querySelector('.uw-imgcont'); imgCont.setAttribute('aria-label', 'AI news, latest developments'); imgCont.title = 'AI news, latest developments'; imgCont.rel = 'noopener'; document.querySelector('.page-mobile-menu-logo a').title = 'Towards AI Home'; document.querySelector('a.social-link').rel = 'noopener'; document.querySelector('a.uw-text').rel = 'noopener'; document.querySelector('a.uw-w-branding').rel = 'noopener'; document.querySelector('.blog h2.heading').innerHTML = 'Publication'; const popupSearch = document.querySelector$('a.btn-open-popup-search'); popupSearch.setAttribute('role', 'button'); popupSearch.title = 'Search'; const searchClose = document.querySelector('a.popup-search-close'); searchClose.setAttribute('role', 'button'); searchClose.title = 'Close search page'; // document // .querySelector('a.btn-open-popup-search') // .setAttribute( // 'href', // 'https://medium.com/towards-artificial-intelligence/search' // ); } // Add external attributes to 302 sticky and editorial links function extLink() { // Sticky 302 links, this fuction opens the link we send to Medium on a new tab and adds a "noopener" rel to them var stickyLinks = document.querySelectorAll('.grid-item.sticky a'); for (var i = 0; i < stickyLinks.length; i++) { /* stickyLinks[i].setAttribute('target', '_blank'); stickyLinks[i].setAttribute('rel', 'noopener'); */ } // Editorial 302 links, same here var editLinks = document.querySelectorAll( '.grid-item.category-editorial a' ); for (var i = 0; i < editLinks.length; i++) { editLinks[i].setAttribute('target', '_blank'); editLinks[i].setAttribute('rel', 'noopener'); } } // Add current year to copyright notices document.getElementById( 'js-current-year' ).textContent = new Date().getFullYear(); // Call functions after page load extLink(); //addAlly(); setTimeout(function() { //addAlly(); //ideally we should only need to run it once ↑ }, 5000); }; function closeCookieDialog (){ document.getElementById("cookie-consent").style.display = "none"; return false; } setTimeout ( function () { closeCookieDialog(); }, 15000); console.log(`%c 🚀🚀🚀 ███ █████ ███████ █████████ ███████████ █████████████ ███████████████ ███████ ███████ ███████ ┌───────────────────────────────────────────────────────────────────┐ │ │ │ Towards AI is looking for contributors! │ │ Join us in creating awesome AI content. │ │ Let's build the future of AI together → │ │ https://towardsai.net/contribute │ │ │ └───────────────────────────────────────────────────────────────────┘ `, `background: ; color: #00adff; font-size: large`); //Remove latest category across site document.querySelectorAll('a[rel="category tag"]').forEach(function(el) { if (el.textContent.trim() === 'Latest') { // Remove the two consecutive spaces (  ) if (el.nextSibling && el.nextSibling.nodeValue.includes('\u00A0\u00A0')) { el.nextSibling.nodeValue = ''; // Remove the spaces } el.style.display = 'none'; // Hide the element } }); // Add cross-domain measurement, anonymize IPs 'use strict'; //var ga = gtag; ga('config', 'G-9D3HKKFV1Q', 'auto', { /*'allowLinker': true,*/ 'anonymize_ip': true/*, 'linker': { 'domains': [ 'medium.com/towards-artificial-intelligence', 'datasets.towardsai.net', 'rss.towardsai.net', 'feed.towardsai.net', 'contribute.towardsai.net', 'members.towardsai.net', 'pub.towardsai.net', 'news.towardsai.net' ] } */ }); ga('send', 'pageview'); -->