


Neural Style Transfer Using a Simple Python Library
Last Updated on November 9, 2021 by Editorial Team
Author(s): Divy Shah
A guide to neural style transfer using the neural-style-transfer python library
In this tutorial, we will learn how to use the neural-style-transfer library to compose images in the style of other images using just a few lines of code.
Neural Style Transfer is basically an optimization technique that takes 2 pictures as an input, one image reference style image, and the other image is input image which you want to style — model blends these two image together and produce a transformed image that looks like the given input (content) but painted in the given referenced style image.
looks interesting right.. but it’s required lots of stuff which includes image pre-processing code, model training code, optimization functions, and lots of other small functions, but to get rid of all these things we have an amazing library called neural-style-transfer which does all this stuff for us in just a few lines of code so in this blog will show you how someone can use this beautiful library.
First, install the library
pip install neural-style-transfer
Import the library and create a class object
from neuralstyletransfer.style_transfer import NeuralStyleTransfer
nst = NeuralStyleTransfer()
Now we need to load content and reference style images using the given command.
here I used an image from an external URL you can also load images directly from the local machine by providing an absolute path and pathType=’local’.
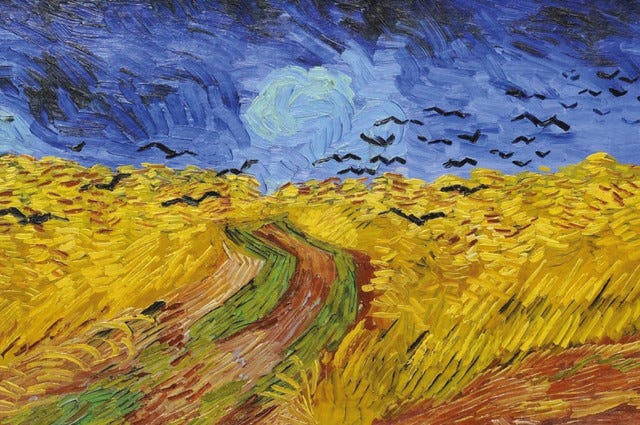
content_url = 'https://i.ibb.co/6mVpxGW/content.png'
style_url = 'https://i.ibb.co/30nz9Lc/style.jpg'
nst.LoadContentImage(content_url, pathType='url')
nst.LoadStyleImage(style_url, pathType='url')
Content image
Style image
Great! now we are all set to start model training..
No need to write any long code you just need to call apply function and model start optimization and give the final result as output.
output = nst.apply(contentWeight=1000, styleWeight=0.01, epochs=600)
output variable contains the final transformed image you can save the output using the Pillow library.
from PIL import Image
output.save('output.jpg')
this process takes some time based on your machine’s hardware I suggest using a GPU machine to make the process much faster.
here in the apply function, you can provide different hyperparameters based on your requirement.
- contentWeight →Using this parameter we can specify the weight of the content image if it is set to a low value than in the transformed (result) image it does not appear clearly, to make a content image sharper you can increase the value of the content weight.
- styleWeight →Using this parameter we can specify the weight of the style image usually it is set to 0.01 but if you want to make it lighter you can decrease the value based on your requirement.
- epochs →Using this parameter you can set the number of epoch for model training, as it is an optimization problem you can probably set this to a higher value like 500 or 600 or even more than that if you want your image more clear, basically higher the numbers of epoch image is more optimized, during the training time it prints the loss of content and style image so based on that you can decide your epoch for optimal result.
Transformed image (Output)
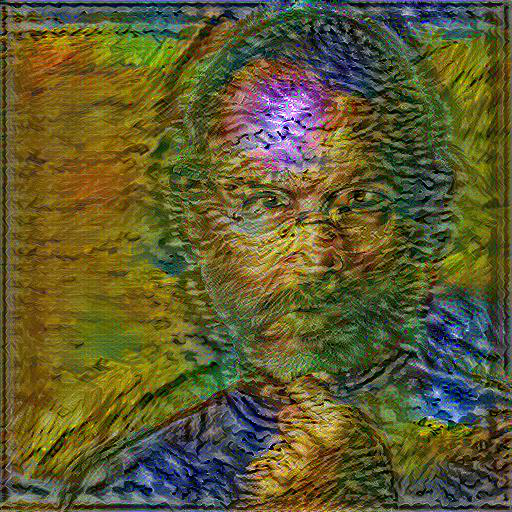
Wow.. we are done above is our transformed image looks like
checkout this colab-notebook for demo.
Neural Style Transfer using a python library was originally published in Towards AI on Medium, where people are continuing the conversation by highlighting and responding to this story.
Published via Towards AI
Towards AI Academy
We Build Enterprise-Grade AI. We'll Teach You to Master It Too.
15 engineers. 100,000+ students. Towards AI Academy teaches what actually survives production.
Start free — no commitment:
→ 6-Day Agentic AI Engineering Email Guide — one practical lesson per day
→ Agents Architecture Cheatsheet — 3 years of architecture decisions in 6 pages
Our courses:
→ AI Engineering Certification — 90+ lessons from project selection to deployed product. The most comprehensive practical LLM course out there.
→ Agent Engineering Course — Hands on with production agent architectures, memory, routing, and eval frameworks — built from real enterprise engagements.
→ AI for Work — Understand, evaluate, and apply AI for complex work tasks.
Note: Article content contains the views of the contributing authors and not Towards AI.
Related posts

![Top 15 Computer Vision Datasets [2026]](https://miro.medium.com/v2/resize:fit:700/1*e9tj4kRR7dH_IV8topwfdw.png "Top 15 Computer Vision Datasets [2026]")

")
Recent Posts


")

